2011 MERCEDES-BENZ S-Class window
[x] Cancel search: windowPage 127 of 524

Functions of the E and F button
You can use the remote control to execute the same functions as the COMAND control panel.
ModeFunctionAudio modeSelecting a station using the station search function (Y page 209)Selecting a track by skipping to a track (Y page 221)Fast forward/rewind (Y page 222)Video modeSelecting a scene or chapter (video DVD mode) (Y page 239)Fast forward/rewind (video DVD mode) (Y page 238)
Functions of the number pad
You can use the remote control to execute the same functions as the COMAND control panel.
ModeFunctionAudio modeSelecting channels via the channel presets (Y page 209)Setting stations by entering the frequency manually (Y page 209)Storing channels manually (Y page 210)Selecting a track (Y page 221)Selecting a data medium via the media list (Y page 221)Telephone modeTelephone number entry (Y page 197)Character entryEntering characters (direct entry) (Y page 128)Operating COMAND
Selecting a main function
Initial situation
You want to change from the telephone menu
to the vehicle settings, for example.
XSlide ZV the COMAND controller and
switch to the main function bar.
XSelect Vehicle in the main function bar by
turning cVd the COMAND controller and
press W to confirm.
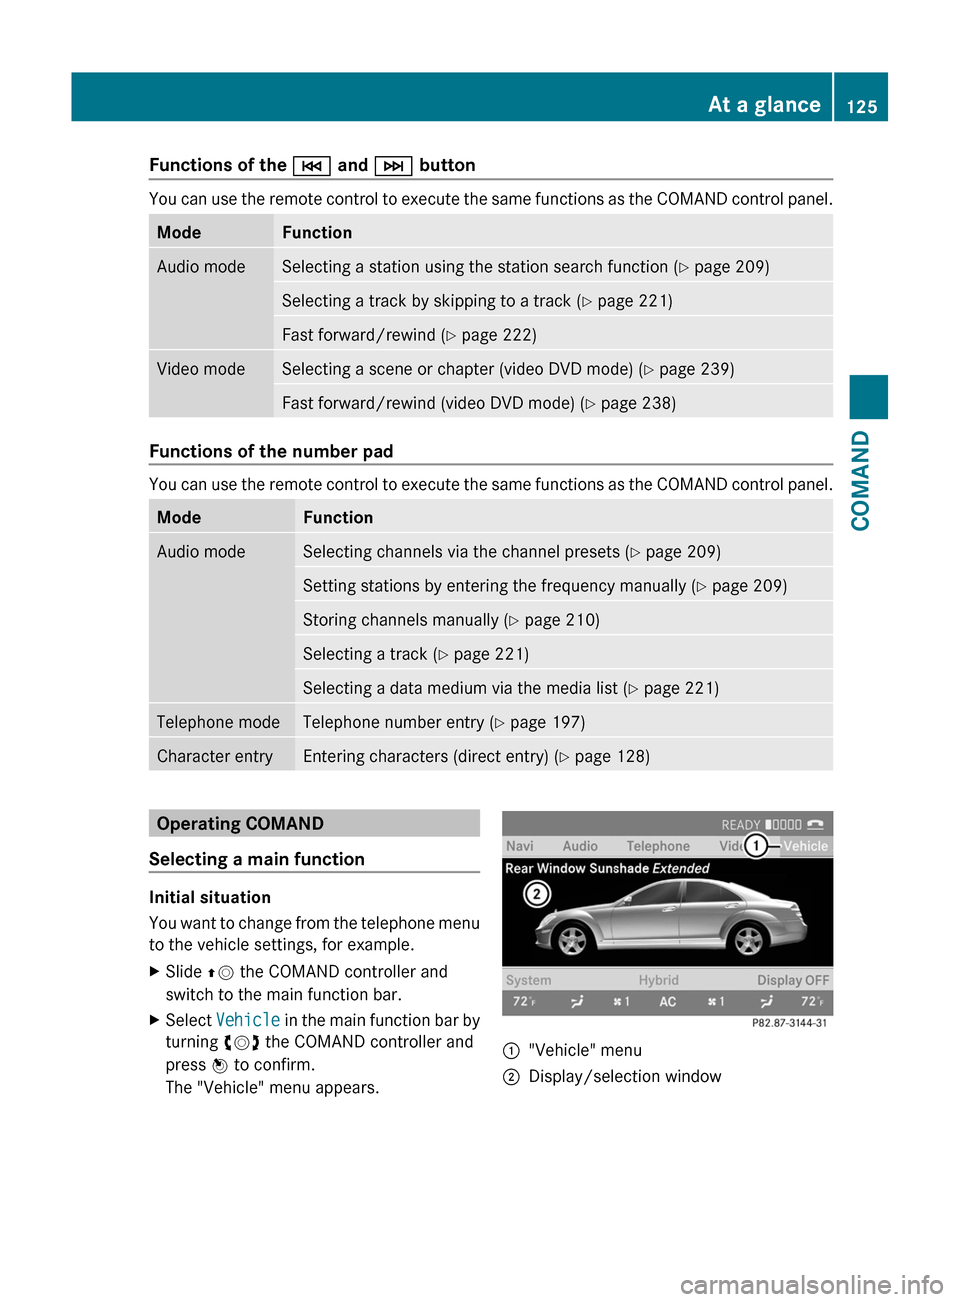
The "Vehicle" menu appears.
:"Vehicle" menu;Display/selection windowAt a glance125COMANDZ
Page 129 of 524

Calling up the audio function
XSelect Audio in the main function bar by
sliding ZV and turning cVd the COMAND
controller and press W to confirm.
The basic display of the current audio
operating mode, e.g. audio CD, appears.
Switching on radio mode
Option 1
XPress the R function button.
The radio display appears.
iRepeated pressing of this function button
switches between radio and the most
recently active audio source.
Option 2
XSelect Audio again by sliding ZV the
COMAND controller and press W to
confirm.
The Audio menu appears. Radio is
highlighted.
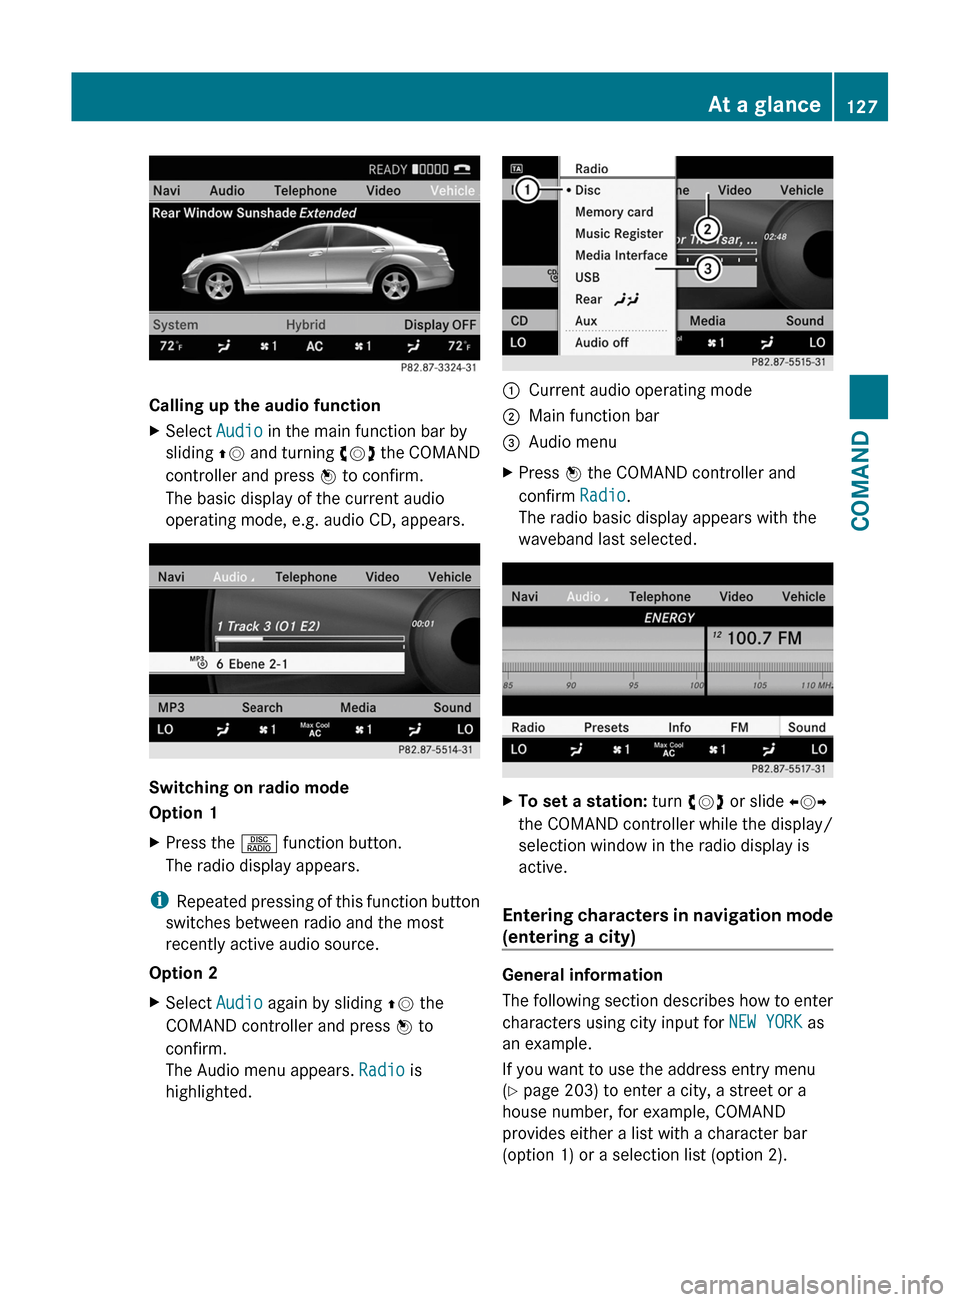
:Current audio operating mode;Main function bar=Audio menuXPress W the COMAND controller and
confirm Radio.
The radio basic display appears with the
waveband last selected.
XTo set a station: turn cVd or slide XVY
the COMAND controller while the display/
selection window in the radio display is
active.
Entering characters in navigation mode
(entering a city)
General information
The following section describes how to enter
characters using city input for NEW YORK as
an example.
If you want to use the address entry menu
(Y page 203) to enter a city, a street or a
house number, for example, COMAND
provides either a list with a character bar
(option 1) or a selection list (option 2).
At a glance127COMANDZ
Page 140 of 524

Remote control
Overview
:To switch the screen on/off;To switch button lighting on/off=To select the screen for remote control
operation (COMAND, SPLITVIEW, L
REAR and REAR R can be selected)
?To select a menu or menu itemATo confirm a selection or settingBTo switch sound on/off (for corded
headphones)
CTo adjust the volume (for corded
headphones)
DTo skip, fast-forward/fast-rewindETo select a track, to enter directlyFTo leave the menu (back)Selecting the screen for the remote
control
You can use the remote control to operate
one of the two rear screens at a time. To do
so, you must switch the remote control to the
desired screen.
XTo select the left-hand screen: turn
thumbwheel = until "L REAR" is
highlighted in the window.
XTo select the right-hand screen: turn
thumbwheel = until "REAR R" is
highlighted in the window.
Switching the screen on/off
If the key in the ignition lock is in position 0
or 1 or if the key is not in the ignition lock, the
rear screens will switch off after 30 minutes.
Before the screens switch off, they show a
message to this effect.
You can switch the screens back on,
However, this will discharge the starter
battery.
XPoint the remote control at the rear-
compartment screen which has been
selected for remote operation.
XPress button : on the remote control.
The respective rear screen switches on or
off.
iYou can only switch the screens on using
the remote control if the ignition is
switched on.
Switching button lighting on/off
XPress button ; on the remote control.
Depending on the previous status, the
button lighting is switched on or off.
iIf you do not use the remote control for
about 15 seconds, the button lighting
switches off automatically.
Switching the sound on/off (corded
headphones only)
XPress button B on the remote control.
The sound is switched on/off.
138At a glanceCOMAND
Page 145 of 524

XSelect Time zone and press W to confirm.
A list of time zones appears. The # dot
indicates the current setting.
XSelect the time zone and press W to
confirm.
XTo switch automatic changeover on/
off: select Automatic summer/winter
time changeover or Automatic summer/
winter time changeover by turning
cVd the COMAND controller and press
W to confirm.
The # dot indicates the current setting.
Read-aloud settings
Setting the text reader speed
XSelect Vehicle by turning cVd the
COMAND controller and press W to
confirm.
XSelect System and press W to confirm.XSelect Text reader and press W to
confirm.
XSelect Set text reader speed and press
W to confirm.
A list appears. The # dot indicates the
current setting.
XSelect a setting by turning cVd the
COMAND controller and press W to
confirm.
Voice Control System settings
Opening/closing the help window
The help window shows you additional
information during individualization and voice
control operation.
XSelect Vehicle in the main function bar by
turning cVd the COMAND controller and
press W to confirm.
XSelect System by turning cVd the
COMAND controller and press W to
confirm.
XSelect Voice Control by turning cVd the
COMAND controller and press W to
confirm.
XSelect Help window and press W to
confirm.
You have switched the help window on
O or off ª.
Individualization
Introduction
Using individualization, you can fine tune the
Voice Control System to your own voice and
thus improve voice recognition. This means
that other users' voices will not be recognized
as easily and, therefore, this function can be
switched off.
Individualization comprises two parts and
takes approximately five minutes. It consists
of training the system to recognize a certain
number of digit sequences and voice
commands.
Starting new individualization
Individualization can only be started when the
vehicle is stationary. Before starting, switch
off all devices or functions which could
interfere, such as the radio or the navigation
system. After starting the session, the system
System settings143COMANDZ
Page 176 of 524

Displaying real-time traffic reportsXIf necessary, switch to navigation mode
and show the menu (Y page 150).
XSelect Traffic in the navigation system
menu bar by turning cVd the COMAND
controller and press W to confirm.
If you see the No traffic messages.
message:
This means that:
Rno traffic reports have been received yet.
Rno traffic reports are available.
XTo cancel the search: select Cancel.XTo close the message window: select
OK.
If there are any traffic reports, a list is shown.
The content of the list varies depending on
whether route guidance is active or not.
List of traffic reports
XTo show the traffic report list: select
Display All Messages by turning cVd
the COMAND controller and press W to
confirm.
The list shows all the roads, areas or regions
for which traffic reports are available.
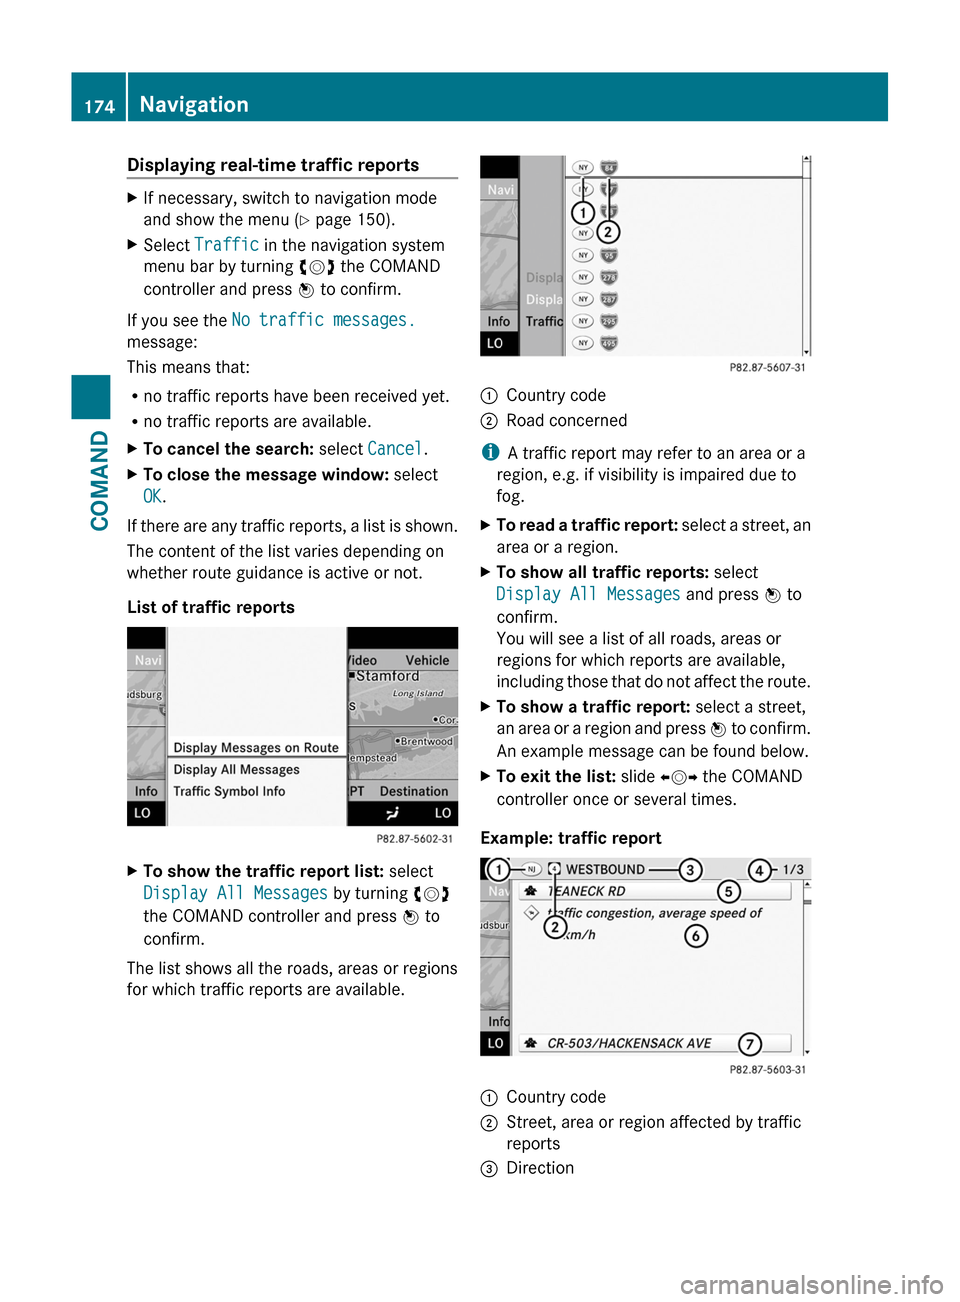
1Country code2Road concerned
iA traffic report may refer to an area or a
region, e.g. if visibility is impaired due to
fog.
XTo read a traffic report: select a street, an
area or a region.
XTo show all traffic reports: select
Display All Messages and press W to
confirm.
You will see a list of all roads, areas or
regions for which reports are available,
including those that do not affect the route.
XTo show a traffic report: select a street,
an area or a region and press W to confirm.
An example message can be found below.
XTo exit the list: slide XVY the COMAND
controller once or several times.
Example: traffic report
1Country code2Street, area or region affected by traffic
reports
3Direction174NavigationCOMAND
Page 199 of 524

Using the telephone
Incoming call
Rejecting or accepting a call
When there is an incoming call, you see a
corresponding window in the display.
XTo reject: select Reject by turning cVd
the COMAND controller and press W to
confirm.
or
XPress the ~ button on the telephone
keypad or on the multifunction steering
wheel.
XTo accept: confirm Accept by pressing
W.
or
XPress the 6 button on the telephone
keypad or on the multifunction steering
wheel.
Once you have accepted the call, you can use
hands-free mode. The call volume can be
adjusted (Y page 132). For more information,
see the "Functions during a single call
connection" section (Y page 198).
The display shows the phone number or the
name and phone number (if the entry is stored
in the address book) or shows the Unknown
(phone number withheld) message.
iYou can also accept a call as described
above when COMAND is showing the
display of a different main application. The
display switches to the telephone display
after you accept the call. After the call is
finished, you see the display of the previous
main application again.
Making a call
Entering a telephone number using the
telephone keypad
XCall up the telephone basic menu
(Y page 196).
XEnter the digits using the telephone
keypad.
XTo make a call: press the 6 button on
the telephone keypad or on the
multifunction steering wheel.
Entering a telephone number using the
telephone basic menu
XCall up the telephone basic menu
(Y page 196).
XSelect the digits one by one by turning
cVd and sliding ZVÆ the COMAND
controller and press W to confirm.
XTo connect a call: select ° in the
character bar and press W to confirm.
or
XPress the 6 button on the telephone
keypad or on the multifunction steering
wheel.
Redialing
XCall up the telephone basic menu
(Y page 196).
XPress the 6 button on the telephone
keypad.
or
XSelect SEND from the telephone basic menu
and press W to confirm.
In both cases, the calls dialed list appears.
The most recently dialed number is at the
top.
Telephone197COMANDZ
Page 210 of 524

Audio
Vehicle equipment
iThis manual describes all the standard
and optional equipment of your vehicle
which was available at the time of
purchase. Country-specific differences are
possible. Bear in mind that your vehicle
may not feature all functions described
here. This also refers to safety-related
systems and functions.
Radio mode
General information
iPortable electronic devices in the vehicle
may seriously impair radio reception.
Switching to radio mode
Option 1
XPress the R function button.
The radio display appears. You will hear the
last station selected on the last waveband
set.
Option 2
XSelect Audio in the main function bar by
sliding ZV and turning cVd the COMAND
controller and press W to confirm.
If radio mode was the last mode selected,
it will now be active.
If another audio mode is switched on, you
can now switch to radio mode in the audio
menu.
XSelect Audio by sliding ZV the COMAND
controller and press W to confirm.
The audio menu appears.
Example display: audio menu
:Current audio operating mode;Main function bar=Audio menuXSelect FM/AM radio by turning cVd the
COMAND controller and press W to
confirm.
Example display, FM radio
:Display window with station selection;Frequency of the selected station=Name of the selected station?Display bar for frequency settingASound settingsBWavebandCStation informationDMemory functionsERadio functions208AudioCOMAND
Page 211 of 524

Switching wavebandsXSelect FM, AM or WB in the radio display by
sliding VÆ and turning cVd the COMAND
controller and press W to confirm.
The waveband submenu opens.
1The waveband submenu (the # dot
shows the waveband currently set)
XSelect a waveband and press W to confirm.
You will hear the last station on the
selected waveband.
Selecting a station
Selecting stations using the station
search function
XTurn cVd or slide XVY the COMAND
controller while the display/selection
window in the radio display is active.
Station search scans up or down and stops
at the next station found.
Using the multifunction steering wheel
XUse = or ; to select the Audio
menu.
XPress 9 or : briefly.
Selecting stations via the station presets
XQuick setting: press a number key, e.g.
l.
XDirectly in the station presets: select
Presets by sliding VÆ and turning cVd
the COMAND controller and press W to
confirm.
or
XPress W the COMAND controller when the
display/selection window is active.
The station preset menu appears. The #
dot indicates under which preset the
currently selected station is stored.
XSelect a station by turning cVd and press
W to confirm or press a number key, e.g.
l.
Using the multifunction steering wheel
XUse = or ; to select the Audio
menu.
XPress 9 or : briefly.
Tuning in stations by entering the
frequency manually
XOption 1: press the Ä button.XOption 2: select Radio in the radio display
by sliding VÆ and turning cVd the
COMAND controller and press W to
confirm.
XSelect Enter Frequency and press W to
confirm.
Irrespective of the option chosen, an input
menu will appear.
XEnter a frequency using the number keys.
COMAND tunes in to the frequency
entered.
WavebandFrequencyAM (MF)530 – 1,700 kHzFM (VHF)87.7 – 107.9 MHzWB (Weather Band)Weather report
channels
iYou can only enter currently permitted
numbers.
iIf you enter a frequency in the FM or AM
wavebands which is outside the frequency
Audio209COMANDZ