2011 MERCEDES-BENZ S-Class Limit
[x] Cancel search: LimitPage 386 of 524
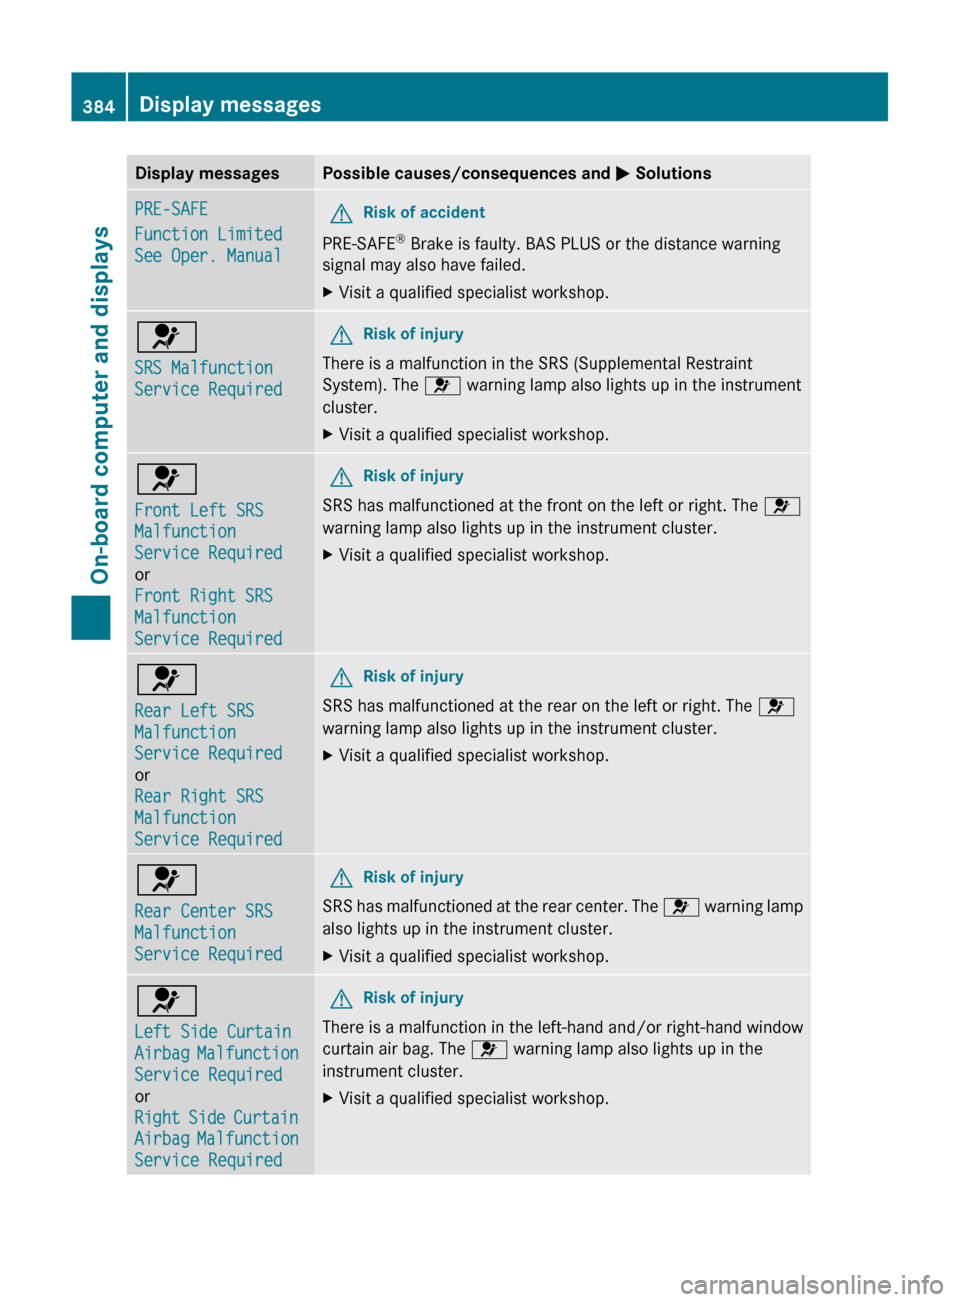
Display messagesPossible causes/consequences and M SolutionsPRE-SAFE
Function Limited
See Oper. ManualGRisk of accident
PRE-SAFE ®
Brake is faulty. BAS PLUS or the distance warning
signal may also have failed.
XVisit a qualified specialist workshop.6
SRS Malfunction
Service RequiredGRisk of injury
There is a malfunction in the SRS (Supplemental Restraint
System). The 6 warning lamp also lights up in the instrument
cluster.
XVisit a qualified specialist workshop.6
Front Left SRS
Malfunction
Service Required
or
Front Right SRS
Malfunction
Service RequiredGRisk of injury
SRS has malfunctioned at the front on the left or right. The 6
warning lamp also lights up in the instrument cluster.
XVisit a qualified specialist workshop.6
Rear Left SRS
Malfunction
Service Required
or
Rear Right SRS
Malfunction
Service RequiredGRisk of injury
SRS has malfunctioned at the rear on the left or right. The 6
warning lamp also lights up in the instrument cluster.
XVisit a qualified specialist workshop.6
Rear Center SRS
Malfunction
Service RequiredGRisk of injury
SRS has malfunctioned at the rear center. The 6 warning lamp
also lights up in the instrument cluster.
XVisit a qualified specialist workshop.6
Left Side Curtain
Airbag Malfunction
Service Required
or
Right Side Curtain
Airbag Malfunction
Service RequiredGRisk of injury
There is a malfunction in the left-hand and/or right-hand window
curtain air bag. The 6 warning lamp also lights up in the
instrument cluster.
XVisit a qualified specialist workshop.384Display messagesOn-board computer and displays
Page 391 of 524

Display messagesPossible causes/consequences and M Solutions!÷
Inoperative See
Oper. ManualGRisk of accident
ABS, ESP ®
, BAS, PRE-SAFE ®
, HOLD and hill start assist are
unavailable due to a malfunction. BAS PLUS and PRE-SAFE ®
Brake
may also have failed. In addition, the ÷, å and !
warning lamps light up in the instrument cluster.
The brake system continues to function normally, but without the
functions listed above. The wheels could therefore lock if you
brake hard, for example.
ATTENTION ASSIST 25
is deactivated.
XDrive on carefully.XVisit a qualified specialist workshop immediately.T !
÷
Inoperative See
Oper. Manual GRisk of accident
EBD (Electronic Brake force Distribution), ABS, ESP ®
, BAS, PRE-
SAFE ®
, HOLD and hill start assist are unavailable due to a
malfunction. BAS PLUS and PRE-SAFE ®
Brake may also have
failed. In addition, the ÷, å and ! warning lamps in the
instrument cluster light up and a warning tone sounds.
ATTENTION ASSIST is deactivated.
The brake system continues to function normally, but without the
functions listed above. The wheels could therefore lock if you
brake hard, for example.
XDrive on carefully.XVisit a qualified specialist workshop immediately.#
Brake wearThe brake pads/linings have reached their wear limit.XVisit a qualified specialist workshop.F
(USA only)
!
(Canada only)
Release parking
brakeThe red F (USA only)/ ! (Canada only) indicator lamp
flashes and a warning tone sounds.
You are driving with the electric parking brake applied.XRelease the electric parking brake.
or
XPull away carefully ( Y page 317).25
Not available on HYBRID vehicles.Display messages389On-board computer and displaysZ
Page 420 of 524
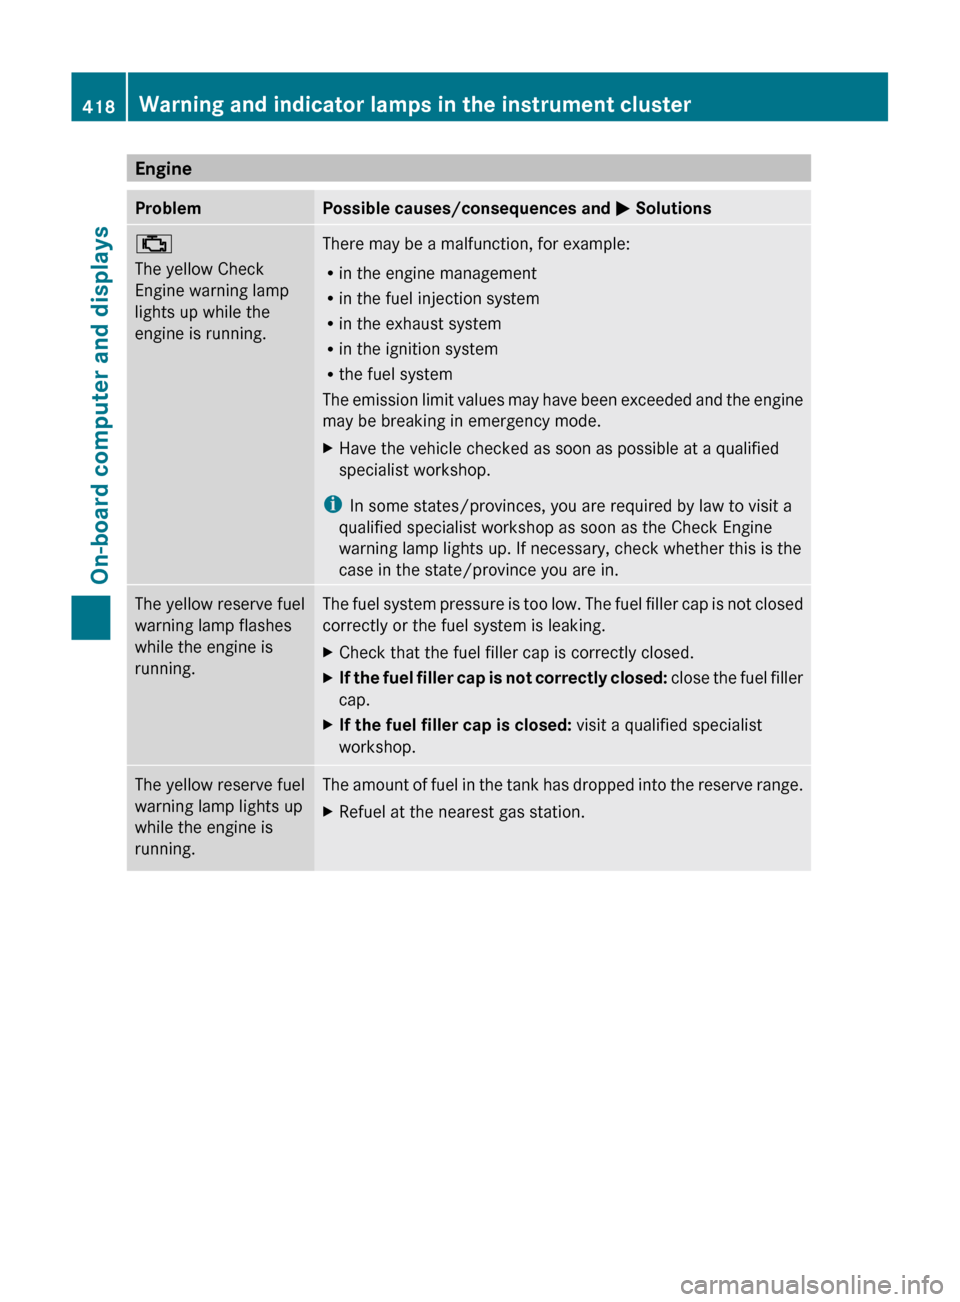
EngineProblemPossible causes/consequences and M Solutions;
The yellow Check
Engine warning lamp
lights up while the
engine is running.There may be a malfunction, for example:
R in the engine management
R in the fuel injection system
R in the exhaust system
R in the ignition system
R the fuel system
The emission limit values may have been exceeded and the engine
may be breaking in emergency mode.XHave the vehicle checked as soon as possible at a qualified
specialist workshop.
i In some states/provinces, you are required by law to visit a
qualified specialist workshop as soon as the Check Engine
warning lamp lights up. If necessary, check whether this is the
case in the state/province you are in.
The yellow reserve fuel
warning lamp flashes
while the engine is
running.The fuel system pressure is too low. The fuel filler cap is not closed
correctly or the fuel system is leaking.XCheck that the fuel filler cap is correctly closed.XIf the fuel filler cap is not correctly closed: close the fuel filler
cap.XIf the fuel filler cap is closed: visit a qualified specialist
workshop.The yellow reserve fuel
warning lamp lights up
while the engine is
running.The amount of fuel in the tank has dropped into the reserve range.XRefuel at the nearest gas station.418Warning and indicator lamps in the instrument clusterOn-board computer and displays
Page 429 of 524
Take into consideration that when the roof
rack is loaded, the handling characteristics
are different from those when operating the
vehicle without the roof rack loaded.
! Mercedes-Benz recommends that you
only use roof carriers that have been tested
and approved for Mercedes-Benz vehicles.
This helps to prevent damage to the
vehicle.
Position the load on the roof carrier in such
a way that the vehicle will not sustain
damage even when it is in motion.
Depending on the vehicle equipment,
ensure that when the roof carrier is
installed you can:
Rraise the sliding sunroof fully
Ropen the panorama roof with power tilt/
sliding panel fully
Ropen the trunk lid fully
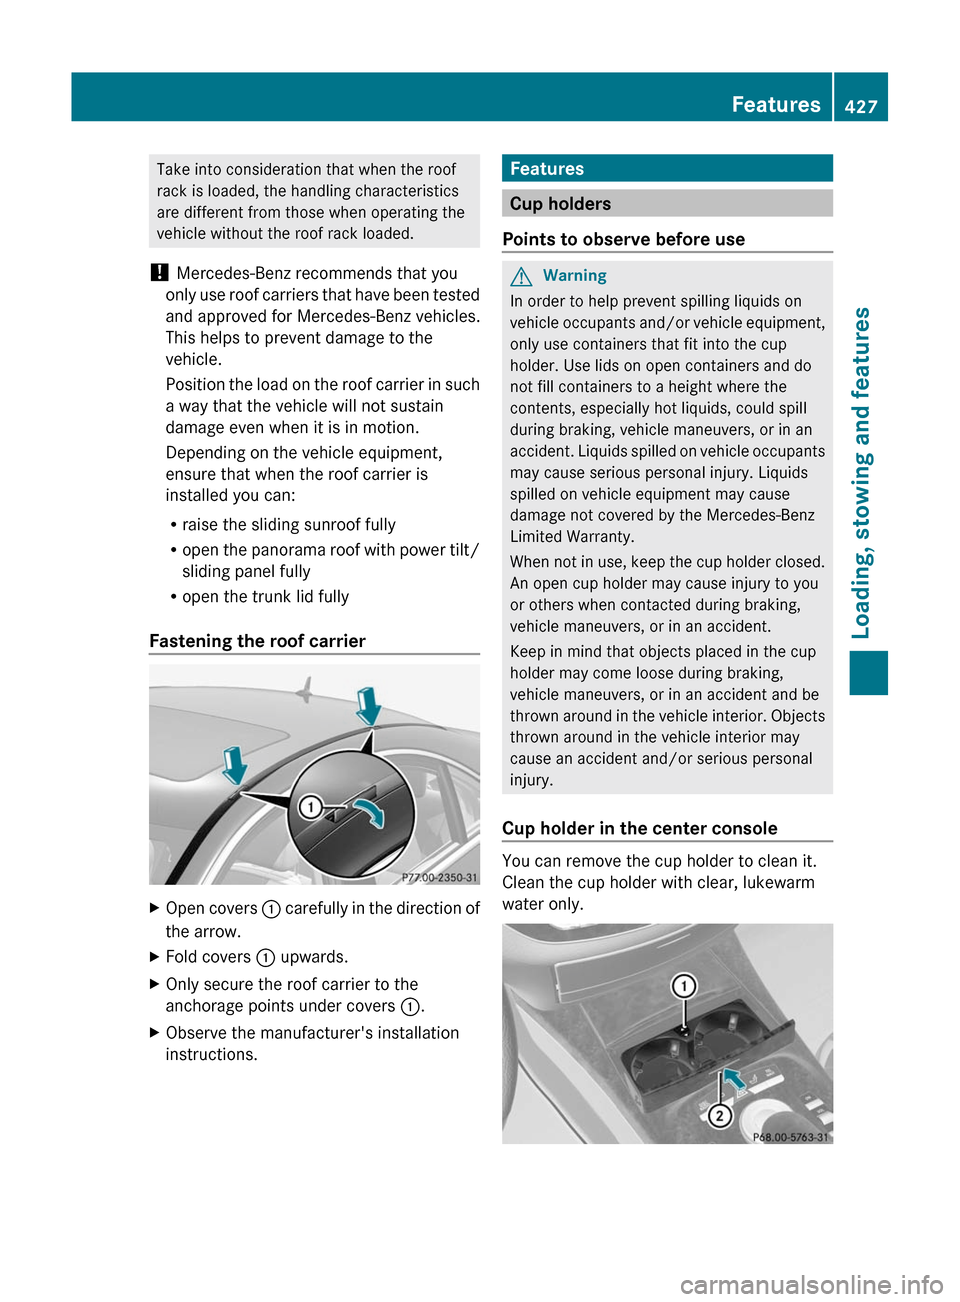
Fastening the roof carrier
XOpen covers : carefully in the direction of
the arrow.
XFold covers : upwards.XOnly secure the roof carrier to the
anchorage points under covers :.
XObserve the manufacturer's installation
instructions.Features
Cup holders
Points to observe before use
GWarning
In order to help prevent spilling liquids on
vehicle occupants and/or vehicle equipment,
only use containers that fit into the cup
holder. Use lids on open containers and do
not fill containers to a height where the
contents, especially hot liquids, could spill
during braking, vehicle maneuvers, or in an
accident. Liquids spilled on vehicle occupants
may cause serious personal injury. Liquids
spilled on vehicle equipment may cause
damage not covered by the Mercedes-Benz
Limited Warranty.
When not in use, keep the cup holder closed.
An open cup holder may cause injury to you
or others when contacted during braking,
vehicle maneuvers, or in an accident.
Keep in mind that objects placed in the cup
holder may come loose during braking,
vehicle maneuvers, or in an accident and be
thrown around in the vehicle interior. Objects
thrown around in the vehicle interior may
cause an accident and/or serious personal
injury.
Cup holder in the center console
You can remove the cup holder to clean it.
Clean the cup holder with clear, lukewarm
water only.
Features427Loading, stowing and featuresZ
Page 485 of 524

"Technical Data" section to avoid damage
to the vehicle or the wheels.
R Only use snow chains when driving on an
area completely covered by snow. Do not
exceed the maximum permissible speed of
30 mph (50 km/h). Remove the snow
chains as soon as possible when you are no
longer driving on snow-covered roads.
R Local regulations may restrict the use of
snow chains. Applicable regulations must
be observed if you wish to mount snow
chains.
R Snow chains must not be mounted on
emergency spare wheels.
If you intend to mount snow chains, please
bear the following points in mind:
R you may not attach snow chains to all
wheel-tire combinations; see the "Tires and
wheels" section in the "Technical data"
chapter.
R mount snow chains only in pairs and only
on the rear wheels. Observe the
manufacturer's installation instructions.
! If snow chains are mounted on the front
wheels, the snow chains could grind
against the bodywork or components of the
chassis. This could result in damage to the
vehicle or the tires.
! Vehicles with steel wheels
If you wish to mount snow chains to steel
wheels, make sure that you remove the
respective wheels' hubcaps first. The
hubcaps may otherwise be damaged.
i You may wish to deactivate
ESP ®
(Y page 69) when pulling away with
snow chains installed. This way you can
allow the wheels to spin in a controlled
manner, achieving an increased driving
force (cutting action).Tire pressure
Tire pressure specifications
GWarning
Follow recommended tire inflation pressures.
Do not underinflate tires. Underinflated tires
wear excessively and/or unevenly, adversely
affect handling and fuel economy, and are
more likely to fail from being overheated.
Do not overinflate tires. Overinflated tires can
adversely affect handling and ride comfort,
wear unevenly, increase stopping distance,
and result in sudden deflation (blowout)
because they are more likely to become
punctured or damaged by road debris,
potholes etc.
Do not overload the tires by exceeding the
specified load limit as indicated on the Tire
and Loading Information placard on the
driver's door B-pillar. Overloading the tires
can overheat them, possibly causing a
blowout. Overloading the tires can also result
in handling or steering problems, or brake
failure.
You will find a table of recommended tire
pressures on the Tire and Loading
Information placard on the B-pillar on the
driver's side ( Y page 490). You will find a
table of tire pressures for various operating
conditions on the inside of your vehicle's fuel
filler flap.
Use a suitable pressure gauge. The outer
appearance of a tire does not permit any
reliable conclusion about the tire pressure.
On vehicles equipped with the electronic tire
pressure monitor, the tire pressure can be
checked using the on-board computer.
GWarning
Should the tire pressure drop repeatedly:
Tire pressure483Tires and wheelsZ
Page 488 of 524
Rfail from being overheated
R adversely affect handling
Overinflated tiresGWarning
Follow recommended tire inflation pressures.
Do not overinflate tires. Overinflated tires can
adversely affect handling and ride comfort,
wear unevenly, increase stopping distance,
and result in sudden deflation (blowout)
because they are more likely to become
punctured or damaged by road debris,
potholes etc.
Overinflated tires can:
R adversely affect handling
R wear excessively and/or unevenly
R be more likely to become damaged
R adversely affect ride comfort
R increase stopping distance
Maximum tire pressure
GWarning
Never exceed the maximum tire inflation
pressure. Follow recommended tire inflation
pressures.
Do not underinflate tires. Underinflated tires
wear excessively and/or unevenly, adversely
affect handling and fuel economy, and are
more likely to fail from being overheated.
Do not overinflate tires. Overinflated tires can
adversely affect handling and ride comfort,
wear unevenly, increase stopping distance,
and result in sudden deflation (blowout)
because they are more likely to become
punctured or damaged by road debris,
potholes etc.
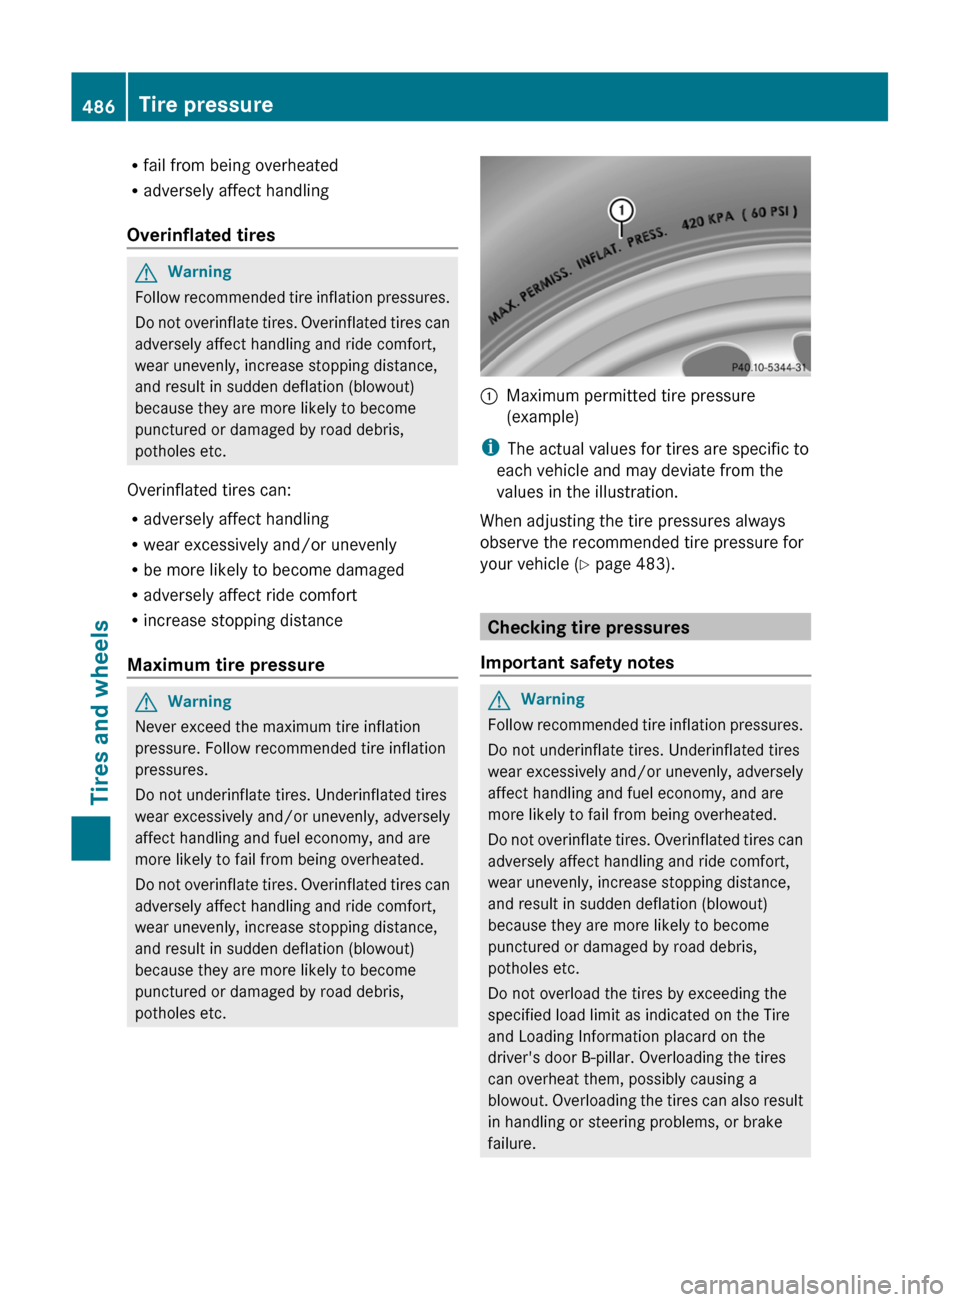
:Maximum permitted tire pressure
(example)
i The actual values for tires are specific to
each vehicle and may deviate from the
values in the illustration.
When adjusting the tire pressures always
observe the recommended tire pressure for
your vehicle ( Y page 483).
Checking tire pressures
Important safety notes
GWarning
Follow recommended tire inflation pressures.
Do not underinflate tires. Underinflated tires
wear excessively and/or unevenly, adversely
affect handling and fuel economy, and are
more likely to fail from being overheated.
Do not overinflate tires. Overinflated tires can
adversely affect handling and ride comfort,
wear unevenly, increase stopping distance,
and result in sudden deflation (blowout)
because they are more likely to become
punctured or damaged by road debris,
potholes etc.
Do not overload the tires by exceeding the
specified load limit as indicated on the Tire
and Loading Information placard on the
driver's door B-pillar. Overloading the tires
can overheat them, possibly causing a
blowout. Overloading the tires can also result
in handling or steering problems, or brake
failure.
486Tire pressureTires and wheels
Page 492 of 524

XPress the 9 or : button to select
Tire Pressure .XPress the a button.
The current tire pressure of each wheel or
the Tire Pressures Displayed After
Driving A Few Minutes message is
shown in the multifunction display.XPress the : button.
The Use Current Pressures as New
Reference Values message appears in
the multifunction display.
If you wish to confirm the restart:
XPress the a button.
The Tire Pressure Monitor
Restarted message appears in the
multifunction display.
After driving for a few minutes, the system
checks whether the current tire pressures
are within the specified range. The new tire
pressures are then accepted as reference
values and monitored.
If you wish to cancel the restart:
XPress the % button.
The tire pressure values stored at the last
restart will continue to be monitored.
Loading the vehicle
Instruction labels for tires and loads
GWarning
Do not overload the tires by exceeding the
specified load limit as indicated on the Tire
and Loading Information placard on the
driver's door B-pillar. Overloading the tires
can overheat them, possibly causing a
blowout. Overloading the tires can also result
in handling or steering problems, or brake
failure.
Two instruction labels on your vehicle show
the maximum possible load.
(1)The Tire and Loading Information placard
is on the B-pillar on the driver's side. TheTire and Loading Information placard
shows the maximum possible number of
occupants and the maximum possible
vehicle load. It also contains details of the
tire sizes and corresponding pressures
for tires mounted at the factory.(2)The vehicle identification plate is on the
B-pillar on the driver's side. The vehicle
identification plate informs you of the
gross vehicle weight rating. It is made up
of the vehicle weight, all vehicle
occupants, the fuel and the cargo. You
can also find information about the
maximum gross axle weight rating of the
front and rear axle.
The maximum gross axle weight rating is
the maximum weight that can be carried
by one axle (front or rear axle). Never
exceed the maximum load or the
maximum gross axle weight rating for the
front or rear axle.:B-pillar, driver's side
Maximum permissible gross vehicle
weight rating
i The details on the Tire and Loading
Information placard illustration are only an
example. The maximum permissible gross
vehicle weight rating is vehicle-specific and
may differ from that which is illustrated.
You can find the valid maximum
permissible gross vehicle weight rating for
your vehicle on the Tire and Loading
Information placard.
490Loading the vehicleTires and wheels
Page 494 of 524
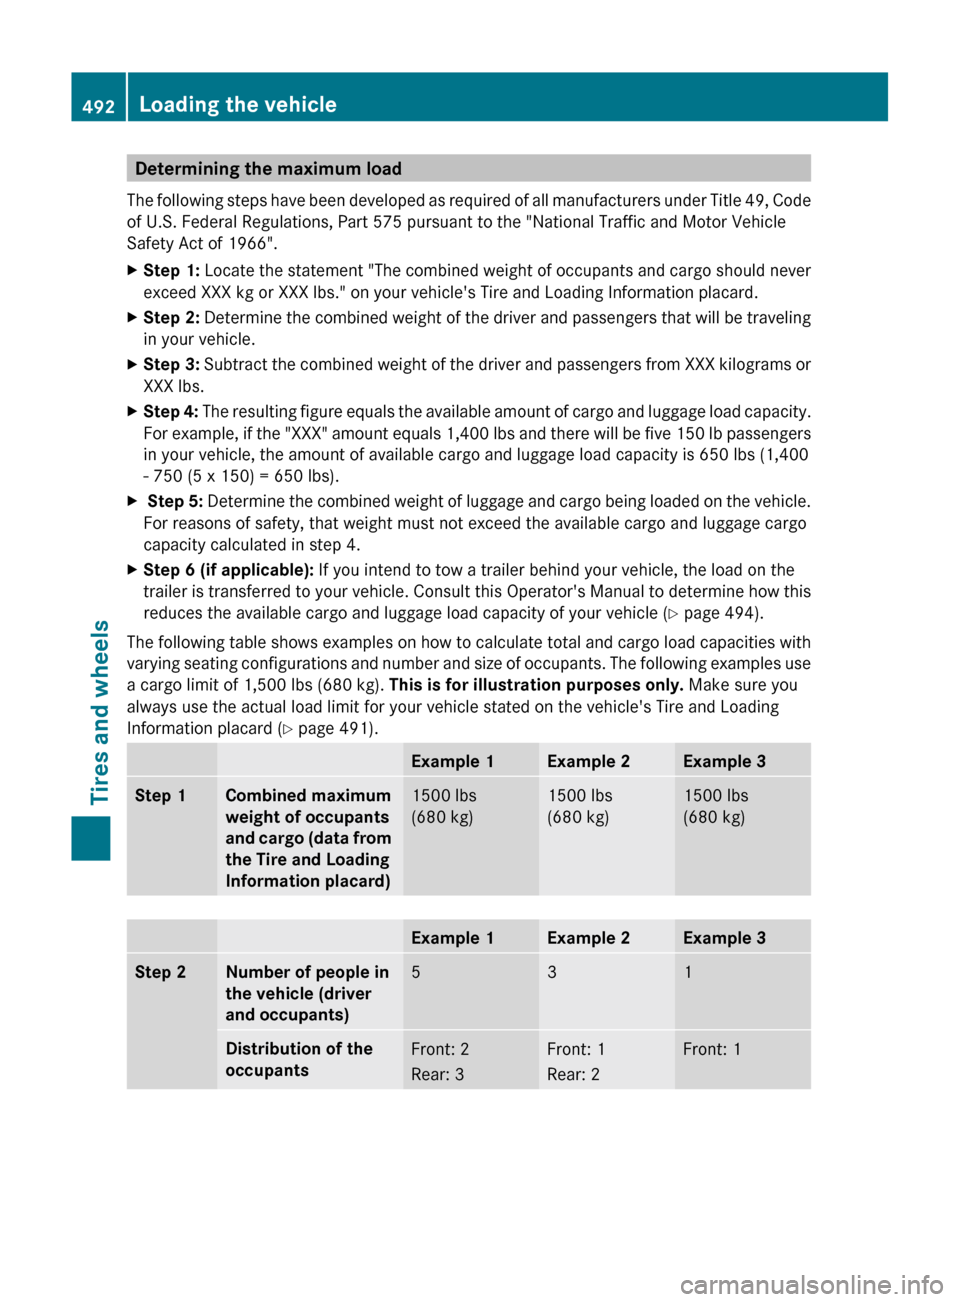
Determining the maximum load
The following steps have been developed as required of all manufacturers under Title 49, Code
of U.S. Federal Regulations, Part 575 pursuant to the "National Traffic and Motor Vehicle
Safety Act of 1966".XStep 1: Locate the statement "The combined weight of occupants and cargo should never
exceed XXX kg or XXX lbs." on your vehicle's Tire and Loading Information placard.XStep 2: Determine the combined weight of the driver and passengers that will be traveling
in your vehicle.XStep 3: Subtract the combined weight of the driver and passengers from XXX kilograms or
XXX lbs.XStep 4: The resulting figure equals the available amount of cargo and luggage load capacity.
For example, if the "XXX" amount equals 1,400 lbs and there will be five 150 lb passengers
in your vehicle, the amount of available cargo and luggage load capacity is 650 lbs (1,400
- 750 (5 x 150) = 650 lbs).X Step 5: Determine the combined weight of luggage and cargo being loaded on the vehicle.
For reasons of safety, that weight must not exceed the available cargo and luggage cargo
capacity calculated in step 4.XStep 6 (if applicable): If you intend to tow a trailer behind your vehicle, the load on the
trailer is transferred to your vehicle. Consult this Operator's Manual to determine how this
reduces the available cargo and luggage load capacity of your vehicle ( Y page 494).
The following table shows examples on how to calculate total and cargo load capacities with
varying seating configurations and number and size of occupants. The following examples use
a cargo limit of 1,500 lbs (680 kg). This is for illustration purposes only. Make sure you
always use the actual load limit for your vehicle stated on the vehicle's Tire and Loading
Information placard ( Y page 491).
Example 1Example 2Example 3Step 1Combined maximum
weight of occupants
and cargo (data from
the Tire and Loading
Information placard)1500 lbs
(680 kg)1500 lbs
(680 kg)1500 lbs
(680 kg)Example 1Example 2Example 3Step 2Number of people in
the vehicle (driver
and occupants)531Distribution of the
occupantsFront: 2
Rear: 3Front: 1
Rear: 2Front: 1492Loading the vehicleTires and wheels