2011 MERCEDES-BENZ S-Class Windows
[x] Cancel search: WindowsPage 289 of 524

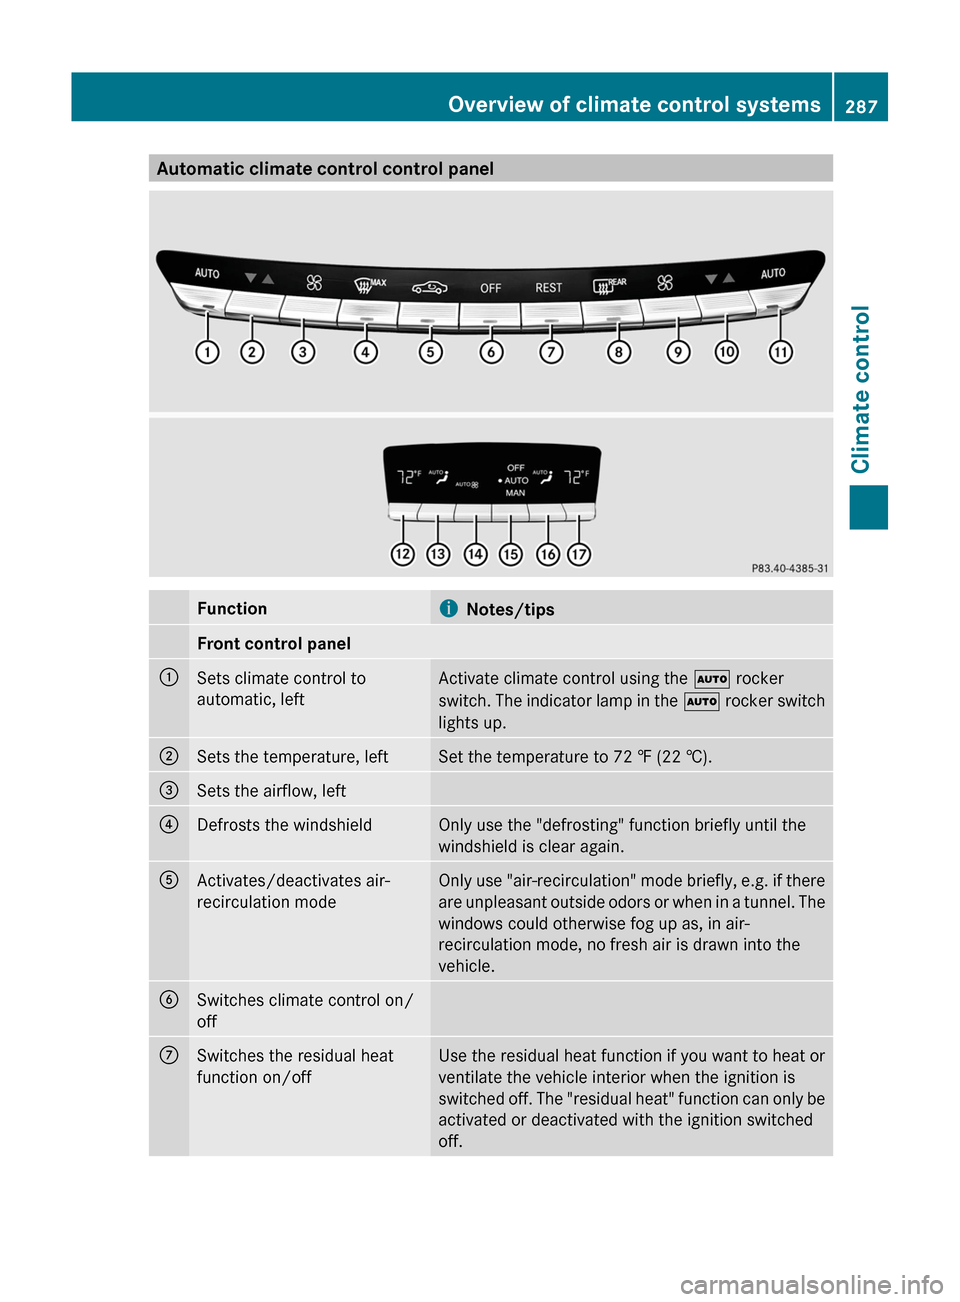
Automatic climate control control panelFunctioniNotes/tipsFront control panel:Sets climate control to
automatic, left
Activate climate control using the à rocker
switch. The indicator lamp in the à rocker switch
lights up.
;Sets the temperature, leftSet the temperature to 72 ‡ (22 †).=Sets the airflow, left?Defrosts the windshieldOnly use the "defrosting" function briefly until the
windshield is clear again.
AActivates/deactivates air-
recirculation mode
Only use "air-recirculation" mode briefly, e.g. if there
are unpleasant outside odors or when in a tunnel. The
windows could otherwise fog up as, in air-
recirculation mode, no fresh air is drawn into the
vehicle.
BSwitches climate control on/
off
CSwitches the residual heat
function on/off
Use the residual heat function if you want to heat or
ventilate the vehicle interior when the ignition is
switched off. The "residual heat" function can only be
activated or deactivated with the ignition switched
off.
Overview of climate control systems287Climate controlZ
Page 290 of 524

FunctioniNotes/tipsDSwitches the rear window
defroster on/offESets the airflow, rightFSets the temperature, rightSet the temperature to 72 ‡ (22 †).GSets climate control to
automatic, rightActivate climate control using the à rocker
switch. The indicator lamp in the à rocker switch
lights up.Rear control panelHSets the temperature, leftSet the temperature to 72 ‡ (22 †).ISets the air distribution, leftJSets the airflowKOFF Deactivates the rear-
compartment climate control
AUTO Sets the rear-
compartment climate control
to automatic
MAN Sets the rear-
compartment climate control
to manualLSets the air distribution, rightMSets the temperature, rightSet the temperature to 72 ‡ (22 †).Operating the climate control
systems
Switching climate control on/off
Important information
GWarning!
When the climate control system is
deactivated, the outside air supply and
circulation are also deactivated. Only choose
this setting for a short time. Otherwise the
windows could fog up, impairing visibility and
endangering you and others.
i Activate climate control primarily using
the à rocker switch ( Y page 289).
Activating/deactivating the front
climate control using the front control
panelXTurn the key to position 2 in the ignition
lock.XTo switch on: press the ^ rocker
switch up or down.
The indicator lamp in the rocker switch
goes out. The previously selected settings
come into effect again.XTo switch off: press the ^ rocker
switch up or down.
The indicator lamp in the rocker switch
lights up.288Operating the climate control systemsClimate control
Page 291 of 524

Activating/deactivating the rear-
compartment climate control using the
front control panelXTurn the key to position 2 in the ignition
lock.XActivate the Y rear compartment
function via COMAND ( Y page 265).
The rear-compartment climate control can
be controlled via the front control panel
using the Y rear compartment function.XTo switch on: press the ^ rocker
switch up or down.
The indicator lamp in the rocker switch
goes out. The previously selected settings
come into effect again.XTo switch off: press the ^ rocker
switch up or down.
The indicator lamp in the rocker switch
lights up.
Activating/deactivating the rear-
compartment climate control using the
rear control panel
XTurn the key to position 2 in the ignition
lock.XTo activate: press rocker switch
K (Y page 287) up or down and select
AUTO .
or
XPress rocker switch K (Y page 287) up or
down and select MAN.XTo deactivate: press rocker switch
K (Y page 287) up or down and select
OFF .
Activating/deactivating cooling with
air dehumidification
Important information
The cooling with air dehumidification function
is only available when the engine is running.
The air inside the vehicle is cooled and
dehumidified according to the temperature
selected.GWarning
If you switch off the cooling function, the
vehicle will not be cooled when weather
conditions are warm. The windows can fog up
more quickly. Window fogging may impair
visibility and endanger you and others.
Condensation may drip from the underside of
the vehicle when the automatic climate
control is in cooling mode. This is normal and
not a sign that there is a malfunction.
You can activate or deactivate the "cooling
with air dehumidification" function via
COMAND ( Y page 263).
i The cooling with air dehumidification
function uses refrigerant R134a. This
coolant does not contain
chlorofluorocarbons, and therefore does
not damage the ozone layer.
Problems with the "cooling with air
dehumidification" function
If you can no longer switch on the cooling with
air dehumidification function via COMAND,
the cooling with air dehumidification function
is switched off due to a malfunction.
XConsult a qualified specialist workshop.
Setting climate control to automatic
GWarning
If you switch off the cooling function, the
vehicle will not be cooled when weather
conditions are warm. The windows can fog up
more quickly. Window fogging may impair
visibility and endanger you and others.
In automatic mode, the set temperature is
maintained automatically at a constant level.
The system automatically regulates the
temperature of the dispensed air, the airflow
and the air distribution.
Operating the climate control systems289Climate controlZ
Page 294 of 524

air distribution symbol is shown in the
display.
Setting the airflow
Setting the front-compartment airflow
using the front control panel
You can select different airflow settings for
the driver's and front-passenger sides as well
as for the rear compartment.
You can also use COMAND to set the airflow
( Y page 263).
XTurn the key to position 2 in the ignition
lock.XTo increase/reduce: press the K
rocker switch up or down.
Setting the rear-compartment airflow
using the front control panel
XTurn the key to position 2 in the ignition
lock.XActivate the Y rear compartment
function via COMAND ( Y page 265).
The rear-compartment climate control can
be controlled via the front control panel
using the Y rear compartment function.XTo increase/reduce: press the K
rocker switch up or down.
Setting the rear-compartment airflow
using the rear control panel
XTurn the key to position 2 in the ignition
lock.XTo increase/reduce: press rocker switch
J up or down ( Y page 287).
Defrosting the windshield
You can use this function to defrost the
windshield or to defrost the inside of the
windshield and the side windows.
i You should only select the defrosting
function until the windshield is clear again.XTurn the SmartKey to position 2 in the
ignition lock.XTo switch on: press the ¬ rocker
switch up or down.
The indicator lamp in the ¬ rocker
switch lights up.
The climate control system switches to the
following functions:
R cooling with air dehumidification on
R high airflow 20
R high temperature 20
R air distribution to the windshield and
front side windows
R air-recirculation mode offXTo switch off: press the ¬ rocker
switch up or down.
The indicator lamp in the ¬ rocker
switch goes out. The previously selected
settings come into effect again. The cooling
with air dehumidification function remains
on. Air-recirculation mode remains
deactivated.
or
XPress the w rocker switch up or down.
or
XPress the K rocker switch up or down.
Maximum cooling MAX COOL
The MAX COOL function is only available in
vehicles for the USA.
MAX COOL is only operational when the
engine is running.
The MAX COOL function is activated
automatically:
R if climate control is set to automatic
( Ã ) on both sides
R if additional cooling is used
The display shows MAX COOL.
20
Depending on the outside temperature.292Operating the climate control systemsClimate control
Page 295 of 524

This is the quickest way to cool the vehicle
interior when the sliding sunroof and the side
windows are closed.
Defrosting the windows
Windows fogged up on the inside
XActivate the "cooling with air
dehumidification" function via COMAND
( Y page 263).XActivate automatic mode Ã.XIf the windows continue to fog up, activate
the defrosting function ( Y page 292).
i
You should only select this setting until
the windshield is clear again.
Windows fogged up on the outside
XActivate the windshield wipers.XActivate automatic climate control.
i You should only select this setting until
the windshield is clear again.
Rear window defroster
Activating/deactivating
GWarning
Any accumulation of snow and ice should be
removed from the rear window before driving.
Visibility could otherwise be impaired,
endangering you and others.
The rear window heating has a high current
draw. You should therefore switch it off as
soon as the window is clear as it only switches
off automatically after several minutes.
If the battery voltage is too low, the rear
window heating may switch off.
XTurn the SmartKey to position 2 in the
ignition lock.XPress the ¤ rocker switch up or down.
The indicator lamp in the ¤ rocker
switch lights up or goes out.Problems with the rear window heating
The rear window heating has deactivated
itself prematurely or cannot be activated.
XSwitch off any consumers that are not
required, e.g. reading lamps or interior
lighting.
When the battery is sufficiently charged,
the rear window heating is activated again
automatically.
Activating/deactivating air-
recirculation mode
You can deactivate the flow of fresh air if
unpleasant odors are entering the vehicle
from outside. The air already inside the
vehicle will then be recirculated.
GWarning
Fogged windows impair visibility,
endangering you and others. If the windows
begin to fog on the inside, switching off the
air recirculation mode immediately should
clear interior window fogging. If interior
window fogging persists, make sure the air
conditioning is activated, or press the ¬
button.
XTurn the SmartKey to position 2 in the
ignition lock.XTo activate: press the g rocker switch
up or down.
The indicator lamp in the g rocker
switch lights up.
i Air-recirculation mode is activated
automatically at high outside
temperatures. The indicator lamp in the
g rocker switch is not lit when
automatic air-recirculation mode is
activated.
Outside air is added after about 30
minutes.
Operating the climate control systems293Climate controlZ
Page 454 of 524

Further information can be obtained at an
authorized Mercedes-Benz Center or at
http://www.mbusa.com (USA only).
The service interval display informs you of the
next service due date.
If a service due date has been exceeded, you
also hear an acoustic signal.
The multifunction display shows a service
message for a few seconds, e.g.
Next Service A Due in .. days
Service A Due
Service A Exceeded By .. days
The letter indicates how much time the
workshop will require to carry out the service
work. The letters displayed range from A for
a short service duration to H for a long service
duration.
The service interval display does not take into
account any periods of time during which the
battery is disconnected.
Maintaining the time-dependent service
schedule:XNote down the service due date displayed
in the multifunction display before
disconnecting the battery.
or
XSubtract the battery disconnection periods
from the service date shown on the display
after reconnecting the battery.
Hiding a service message
XPress % or a on the steering wheel.
Displaying service messages
XSwitch on the ignition.XPress = or ; to select the Service
menu on the steering wheel.XPress 9 or : to select the ASSYST
PLUS submenu and press a to confirm.
The service due date appears in the
multifunction display.Points to remember
A qualified specialist workshop, e.g. a
Mercedes-Benz Service Center, will reset the
service interval display after the necessary
service work has been carried out.
You can obtain further information, e.g.
regarding service work, at an authorized
Mercedes-Benz Center or directly from
Mercedes-Benz.
! If the service interval indicator has been
inadvertently reset, this setting can be
corrected at an authorized Mercedes-Benz
Center.
Have the service work carried out as
described in the Service Booklet. There
may otherwise be increased wear, resulting
in damage to the vehicle or to the major
assemblies.
Care
Notes on care
Regular care of your vehicle is a condition for
retaining the quality in the long term.
Use care products and cleaning agents
recommended and approved by Mercedes-
Benz.
GWarning
Many cleaning products can be hazardous.
Some are poisonous, others are flammable.
Always follow the instructions on the
particular container. Always open your
vehicle's doors or windows when cleaning the
inside.
Never use fluids or solvents that are not
designed for cleaning your vehicle.
Always lock away cleaning products and keep
them out of reach of children.
! For cleaning your vehicle, do not use any
of the following:
R dry, rough or hard cloths
R abrasive cleaning agents
452CareMaintenance and care
Page 455 of 524

Rsolvents
R cleaning agents containing solvents
Do not scrub.
Do not touch the surfaces or protective
films with hard objects, e.g. a ring or ice
scraper. You could otherwise scratch or
damage the surfaces and protective film.HEnvironmental note
Dispose of empty packaging and cleaning
cloths in an environmentally responsible
manner.
! Do not park the vehicle for an extended
period right after cleaning it, particularly
after having cleaned the wheels with wheel
cleaner. Wheel cleaners could cause
increased corrosion of the brake discs and
brake pads/linings. For this reason, you
should drive for a few minutes after
cleaning. Braking heats the brake discs and
brake pads, thus drying them. The vehicle
can then be parked up.
Exterior care
Automatic car wash
GWarning
Braking efficiency is reduced after washing
the vehicle. This could cause an accident. For
this reason, you must drive particularly
carefully after washing the vehicle until the
brakes have dried.
GWarning
The vehicle is braked when the HOLD function
or DISTRONIC PLUS is activated. Therefore,
deactivate the HOLD function and DISTRONIC
PLUS before the vehicle is washed in an
automatic car wash.
You can wash the vehicle in an automatic car
wash from the very start.
! Never clean your vehicle in a Touchless
Automatic Car Wash as these use special
cleaning agents. These cleaning agents can
damage the paintwork or plastic parts.
If the vehicle is very dirty, pre-wash it before
cleaning it in an automatic car wash.
! In car washes with a towing mechanism,
make sure that AUTOTRONIC is in
transmission position N, otherwise the
vehicle could be damaged.
R Vehicles with a SmartKey:
Do not remove the SmartKey from the
ignition lock. Do not open the driver's
door or front-passenger door when the
engine is switched off. Otherwise,
AUTOTRONIC selects park position P
automatically and locks the wheels. You
can prevent this by shifting AUTOTRONIC
to N beforehand.
R Vehicles with KEYLESS-GO:
Do not open the driver's door or front-
passenger door when the engine is
switched off. Otherwise, AUTOTRONIC
selects park position P automatically and
locks the wheels.
Observe the following to make sure that the
automatic transmission stays in position N:XMake sure the vehicle is stationary and the
ignition is switched off.XTurn the key to position 2 (Y page 299) in
the ignition lock.
Use the key instead of the Start/Stop
button on vehicles with KEYLESS-GO.XDepress and hold the brake pedal.XShift the automatic transmission to
position N.XRelease the brake pedal.XRelease the parking brake.XSwitch off the ignition and leave the key in
the ignition lock.
! Make sure that the side windows are
completely closed, that the ventilation/
heating is switched off and that the
windshield wiper switch is set to 0.
Otherwise, the rain/light sensor could be
activated, triggering unintended wiper
Care453Maintenance and careZ
Page 457 of 524

with a cloth soaked in petroleum ether or
lighter fluid.XUse tar remover to remove tar stains.XUse silicone remover to remove wax.
! Do not affix:
R stickers
R films
R magnetic plates or similar items
to painted surfaces. You could otherwise
damage the paintwork.
If water no longer forms "beads" on the
painted surface, paint care products should
be used that have been approved and
recommended by Mercedes-Benz. This is the
case approximately every three to five
months, depending on climatic conditions
and the care product used.
If dirt has entered the paint surface or the
paintwork has become dull, a paint cleaner
should be used that has been approved and
recommended by Mercedes-Benz.
Never use such care products in direct
sunlight or on a hot hood.
XUse a suitable touch-up stick, e.g. MB
Touch Up stick, for quick, temporary repair
of damaged paintwork.
Matte finish care
If your vehicle has a clear matte finish,
observe the following instructions in order to
avoid damage to the paintwork due to
incorrect care.
! Never polish the vehicle. Polishing causes
the finish to shine.
! Do not use paintwork cleaner, grinding or
polishing products or gloss preservers such
as wax. These products are only suitable for
high-gloss surfaces. Using them on
vehicles with matte paintwork can cause
severe damage to the surface (shiny,
mottled patches).
Always have paintwork repairs performed
at a qualified specialist workshop, e.g. an
authorized Mercedes-Benz Center.
! Do not use wash programs with a hot wax
treatment under any circumstances.
i Use only insect remover and car shampoo
from the range of recommended and
approved Mercedes-Benz care products.
Cleaning the windowsGWarning
Switch off the windshield wipers and remove
the SmartKey from the ignition lock before
cleaning the windshield or the wiper blades.
On vehicles with KEYLESS-GO, press the
Start/Stop button repeatedly until all
indicator lamps in the instrument cluster have
gone off. The windshield wipers could
otherwise move and injure you.
! Only fold the windshield wipers away from
the windshield when vertical. Otherwise,
you will damage the hood.
XClean the inside and outside of the
windows with a damp cloth and a cleaning
agent that is recommended and approved
by Mercedes-Benz.
! Do not use dry cloths, abrasive products,
solvents or cleaning agents containing
solvents to clean the inside of the windows.
Do not use hard objects to clean the insides
of the windows, e.g. an ice scraper or ring.
There is otherwise a risk of damaging the
windows.
! Clean the water drainage channels of the
windshield and the rear window at regular
intervals. Deposits such as leaves, petals
and pollen may under certain
circumstances prevent water from draining
away. This can lead to corrosion damage
and damage to electronic components.
Care455Maintenance and careZ