2011 MERCEDES-BENZ S-Class Radio
[x] Cancel search: RadioPage 145 of 524

XSelect Time zone and press W to confirm.
A list of time zones appears. The # dot
indicates the current setting.
XSelect the time zone and press W to
confirm.
XTo switch automatic changeover on/
off: select Automatic summer/winter
time changeover or Automatic summer/
winter time changeover by turning
cVd the COMAND controller and press
W to confirm.
The # dot indicates the current setting.
Read-aloud settings
Setting the text reader speed
XSelect Vehicle by turning cVd the
COMAND controller and press W to
confirm.
XSelect System and press W to confirm.XSelect Text reader and press W to
confirm.
XSelect Set text reader speed and press
W to confirm.
A list appears. The # dot indicates the
current setting.
XSelect a setting by turning cVd the
COMAND controller and press W to
confirm.
Voice Control System settings
Opening/closing the help window
The help window shows you additional
information during individualization and voice
control operation.
XSelect Vehicle in the main function bar by
turning cVd the COMAND controller and
press W to confirm.
XSelect System by turning cVd the
COMAND controller and press W to
confirm.
XSelect Voice Control by turning cVd the
COMAND controller and press W to
confirm.
XSelect Help window and press W to
confirm.
You have switched the help window on
O or off ª.
Individualization
Introduction
Using individualization, you can fine tune the
Voice Control System to your own voice and
thus improve voice recognition. This means
that other users' voices will not be recognized
as easily and, therefore, this function can be
switched off.
Individualization comprises two parts and
takes approximately five minutes. It consists
of training the system to recognize a certain
number of digit sequences and voice
commands.
Starting new individualization
Individualization can only be started when the
vehicle is stationary. Before starting, switch
off all devices or functions which could
interfere, such as the radio or the navigation
system. After starting the session, the system
System settings143COMANDZ
Page 170 of 524

XSelect Continue Route Guidance and
press W to confirm.
COMAND calculates the route.
Destination or area of destination
reached
When you reach your destination, COMAND
displays a checkered flag and route guidance
is automatically ended.
For certain points of interest (e.g. airports),
you will see the Area of destination
reached message in addition to the
checkered flag.
Navigation announcements
Repeating navigation announcements
GWarning
Navigation announcements are intended to
direct you while driving without diverting your
attention from the road and driving.
Please always use this feature instead of
consulting the map display for directions.
Looking at the icons or map display can
distract you from traffic conditions and
driving, and increase the risk of an accident.
i Audible navigation announcements are
muted during a telephone call.
If you have missed an announcement, you can
call up the current announcement at any
time.
XTo show the menu: press W the COMAND
controller.XConfirm RPT in the navigation menu by
pressing W.
Switching navigation announcements
on/off
XTo switch off: press the 8 button
during an announcement.
You will briefly see the message: The
driving instructions have been
muted .XTo switch on: press W the COMAND
controller.XConfirm + in the navigation menu by
pressing W.
i COMAND automatically switches the
navigation announcements back on when:
R you have a new route calculated.
R you start the engine again after having
left the vehicle.
Reducing volume during a navigation
announcement
The volume of an active radio or video source
can be automatically reduced during a
navigation announcement.
XSelect Navi in the main function bar by
sliding ZV and turning cVd the COMAND
controller and press W to confirm.XSelect Audio Fadeout and press W to
confirm.
The function is switched on O or off ª,
depending on the previous status.
Setting the volume manually
XAdjust the volume during a navigation
announcement.
or
XSelect + in the map view with the menu
shown and adjust the volume.
Avoiding a section of the route blocked
by a traffic jam
This function blocks a section of the route
ahead of you. The length of the section of
route to be blocked can be adjusted. If
possible, COMAND calculates a detour
around the blocked section of the route.
XTo switch on navigation mode: press the
S function button once or twice.XTo show the menu: press the COMAND
controller W.168NavigationCOMAND
Page 174 of 524

The continuous blue route on the map starts
from the nearest road known to the system.
As soon as the vehicle is back on a road
known to the system, route guidance
continues in the usual way.
Route guidance from an off-map location
to a destination
If the vehicle position is outside the area
covered by the digital map, then the vehicle
is in an off-map location. COMAND is also
able to guide you to a destination even from
an off-map location.
At the start of the route guidance, you will see
the Street unknown message, an arrow and
the distance to the destination. The arrow
shows the compass heading to the road left
last.
The route is highlighted in blue from the
nearest road known to the system.
As soon as the vehicle is back on a road
known to the system, route guidance
continues in the usual way.
Off-road during route guidance
Due to road construction work, for example,
there may be differences between the data
on the digital map and the actual course of
the road.
In such cases, the system will temporarily be
unable to locate the vehicle position on the
digital map and thus considers the vehicle to
be in an off-road position.
In the display, you will see the Street
unknown message, an arrow and the distance
to the destination. The arrow shows the
compass heading to the actual destination.
As soon as the system can assign the vehicle
position to the map again, route guidance
continues in the usual way.Traffic reports
Conditions
i The SatRadio reception described below
requires optionally available SatRadio
equipment as well as a subscription to
SIRIUS XM SatRadio Traffic Message
Service. Further details on SatRadio are
available in the "SatRadio" chapter
( Y page 213).
COMAND can receive traffic reports via
SatRadio and incorporate them in the
navigation system. Traffic reports and map
icons can then be shown in the COMAND
display.
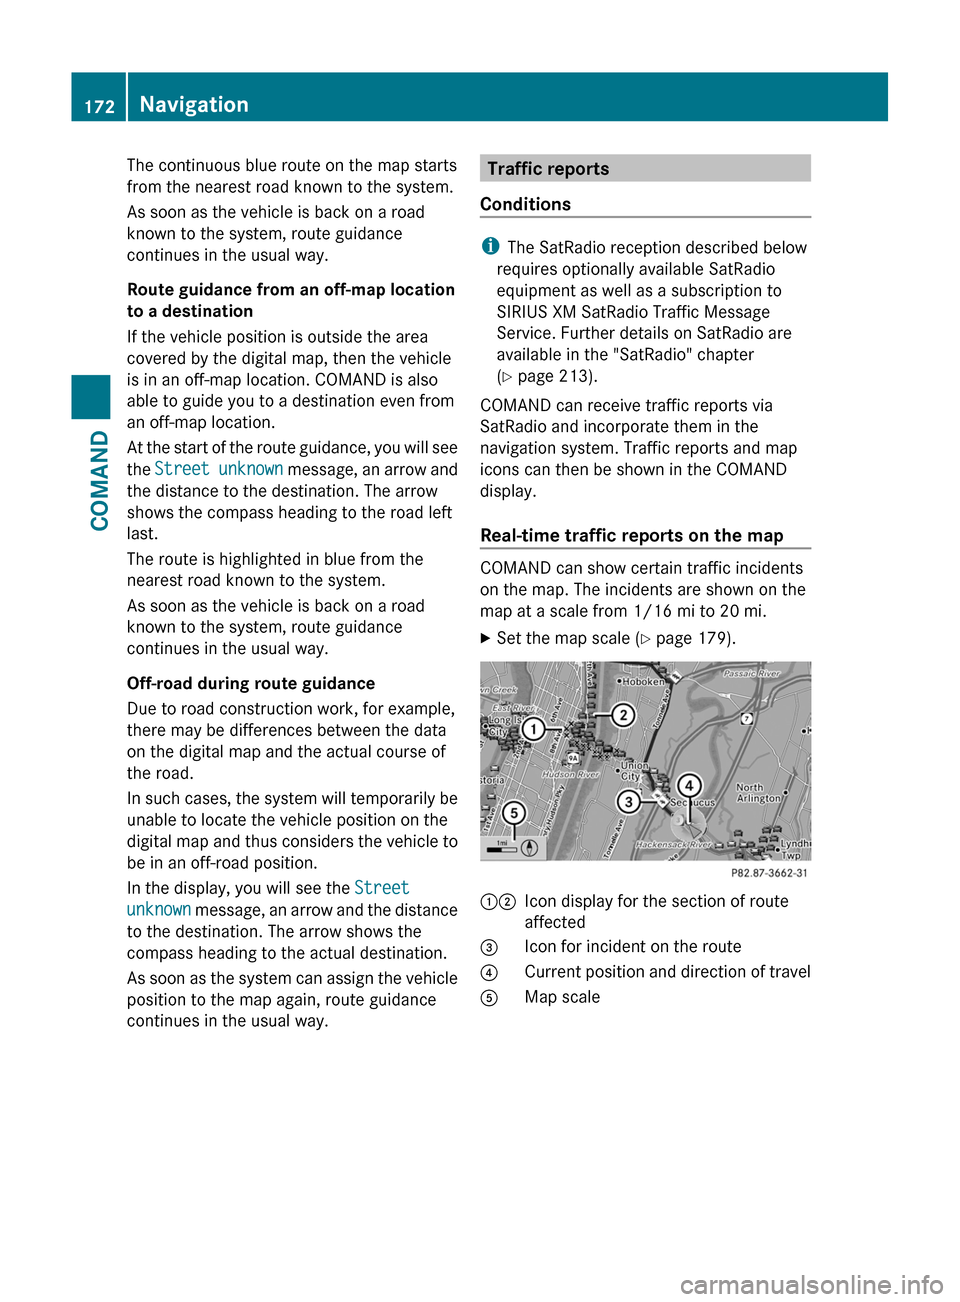
Real-time traffic reports on the map
COMAND can show certain traffic incidents
on the map. The incidents are shown on the
map at a scale from 1/16 mi to 20 mi.
XSet the map scale ( Y page 179).12Icon display for the section of route
affected3Icon for incident on the route4Current position and direction of travel5Map scale172NavigationCOMAND
Page 186 of 524

Data for the representation of buildings is
not available for all cities.
XTo show the menu: press the COMAND
controller W.
XSelect Navi in the main function bar by
sliding ZV and turning cVd the COMAND
controller and press W to confirm.
XSelect City (3D) and press W to confirm.
Depending on the previous state, switch
the option on O or off ª.
:Hills;Buildings=Important buildings
Displaying the map data version
XTo show the menu: press the COMAND
controller W.
XSelect Navi in the main function bar by
sliding ZV and turning cVd the COMAND
controller and press W to confirm.
XSelect Map Version and press W to
confirm.
The number of the map data version is
shown. Information about new versions of
the digital map can be obtained from an
authorized Mercedes-Benz Center.
Traffic information on the map
Traffic information can be shown on the map
if you have a subscription to the SIRIUS XM
Satellite Radio Traffic Message Service. You
can select three categories for the display.
XTo switch the display on/off: press W
the COMAND controller to show the menu.
XSelect Navi in the main function bar by
sliding ZV and turning cVd the COMAND
controller and press W to confirm.
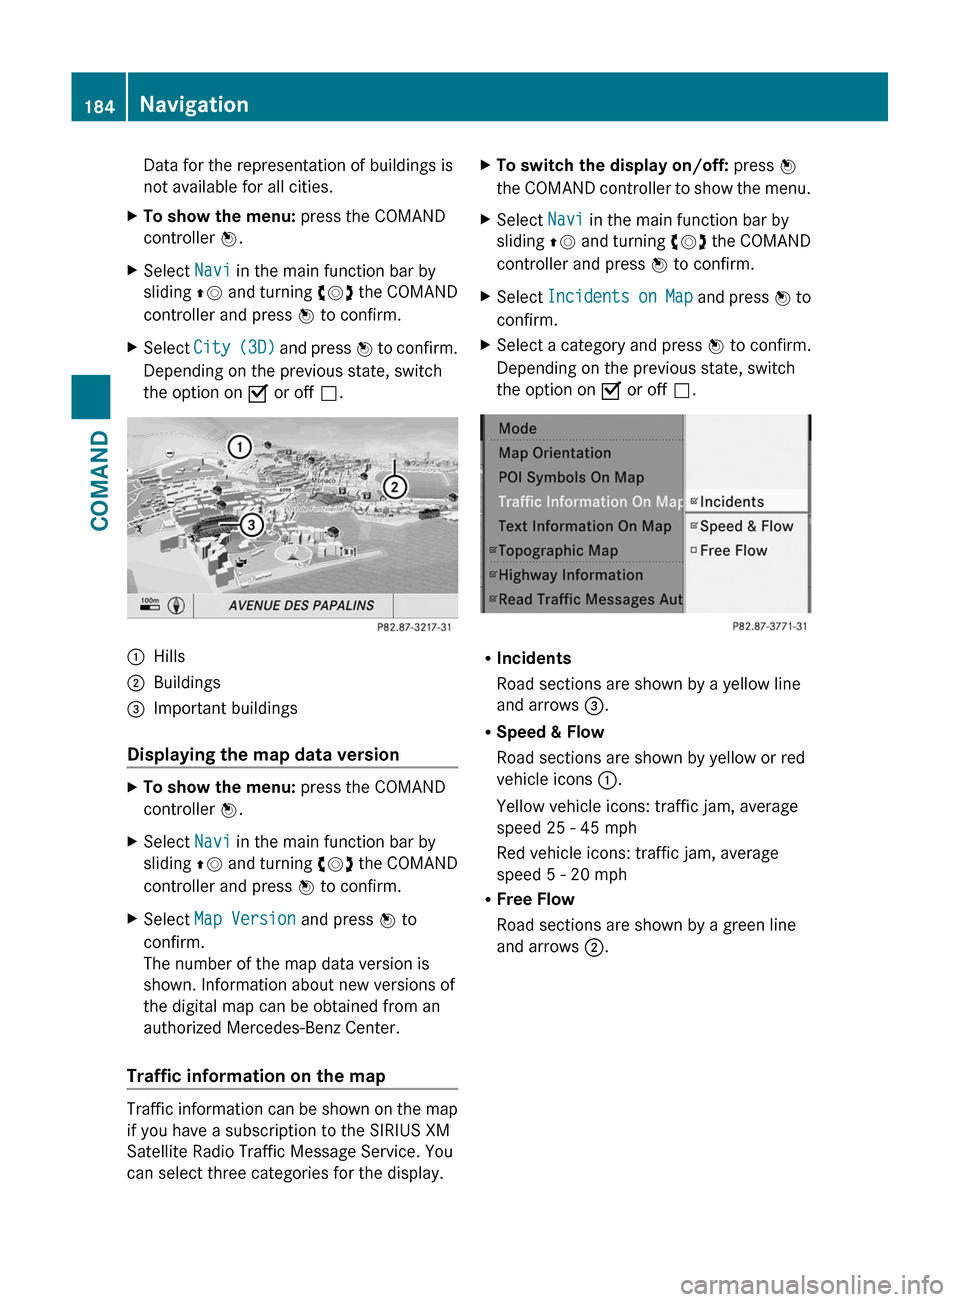
XSelect Incidents on Map and press W to
confirm.
XSelect a category and press W to confirm.
Depending on the previous state, switch
the option on O or off ª.
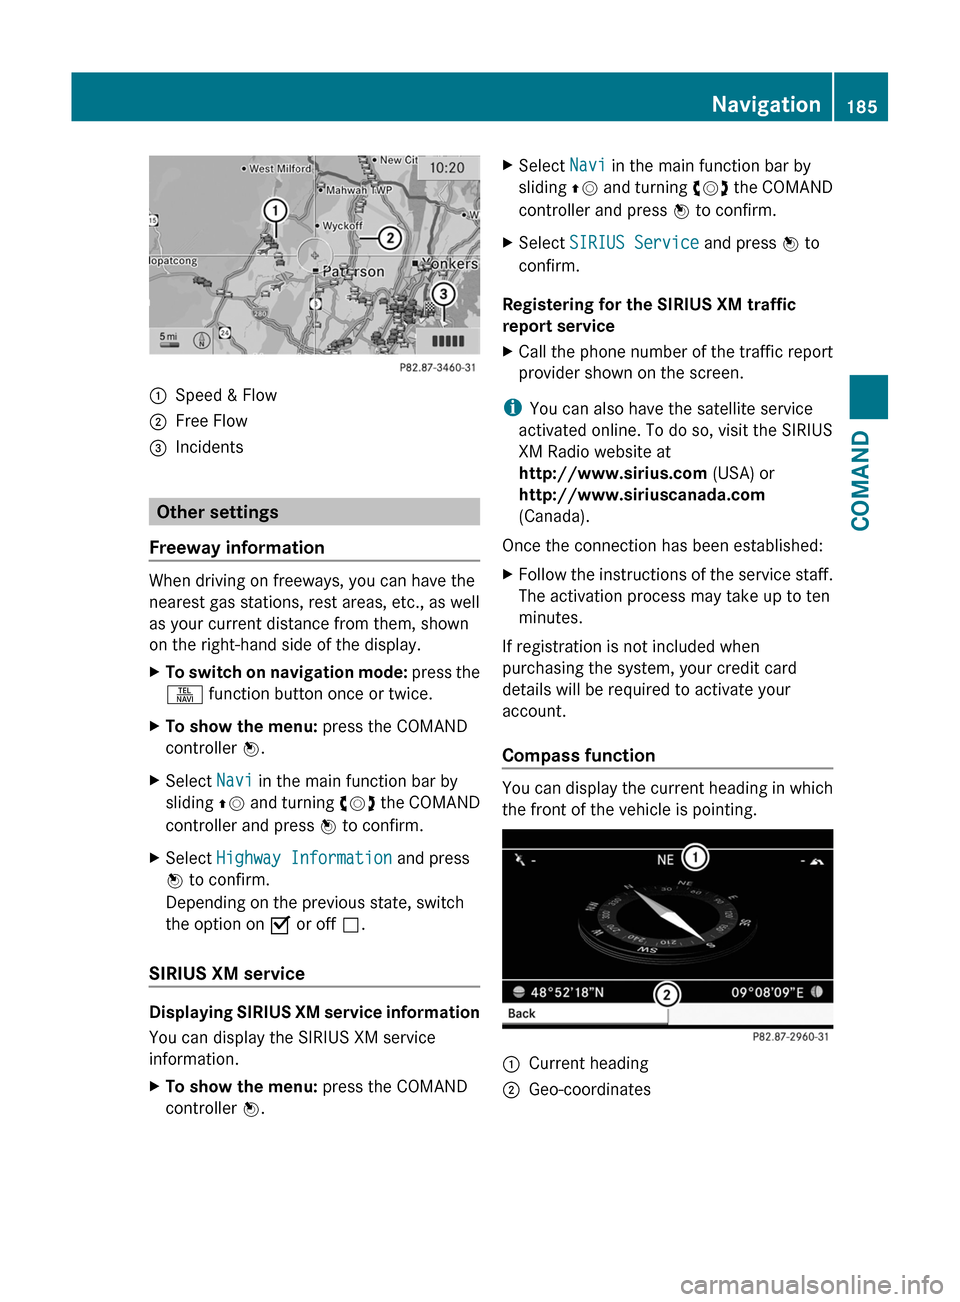
RIncidents
Road sections are shown by a yellow line
and arrows =.
RSpeed & Flow
Road sections are shown by yellow or red
vehicle icons :.
Yellow vehicle icons: traffic jam, average
speed 25 - 45 mph
Red vehicle icons: traffic jam, average
speed 5 - 20 mph
RFree Flow
Road sections are shown by a green line
and arrows ;.
184NavigationCOMAND
Page 187 of 524

:Speed & Flow;Free Flow=Incidents
Other settings
Freeway information
When driving on freeways, you can have the
nearest gas stations, rest areas, etc., as well
as your current distance from them, shown
on the right-hand side of the display.
XTo switch on navigation mode: press the
S function button once or twice.
XTo show the menu: press the COMAND
controller W.
XSelect Navi in the main function bar by
sliding ZV and turning cVd the COMAND
controller and press W to confirm.
XSelect Highway Information and press
W to confirm.
Depending on the previous state, switch
the option on O or off ª.
SIRIUS XM service
Displaying SIRIUS XM service information
You can display the SIRIUS XM service
information.
XTo show the menu: press the COMAND
controller W.
XSelect Navi in the main function bar by
sliding ZV and turning cVd the COMAND
controller and press W to confirm.
XSelect SIRIUS Service and press W to
confirm.
Registering for the SIRIUS XM traffic
report service
XCall the phone number of the traffic report
provider shown on the screen.
iYou can also have the satellite service
activated online. To do so, visit the SIRIUS
XM Radio website at
http://www.sirius.com (USA) or
http://www.siriuscanada.com
(Canada).
Once the connection has been established:
XFollow the instructions of the service staff.
The activation process may take up to ten
minutes.
If registration is not included when
purchasing the system, your credit card
details will be required to activate your
account.
Compass function
You can display the current heading in which
the front of the vehicle is pointing.
:Current heading;Geo-coordinatesNavigation185COMANDZ
Page 188 of 524

You can view the current direction of travel,
the current height and the coordinates of the
current vehicle position in the compass view.XTo switch on navigation mode: press the
S function button once or twice.XTo show the menu: press the COMAND
controller W.XSelect Position in the navigation menu by
sliding VÆ and turning cVd the COMAND
controller and press W to confirm.XSelect Compass and press W to confirm.XTo exit the display: confirm Back by
pressing W or press the % button.
Installing new map software
The digital data generated by the map
software becomes outdated in the same way
as conventional road maps. Optimal route
guidance can only be provided by the
navigation system in conjunction with the
most up-to-date map software. Information
about new map software versions can be
obtained from an authorized Mercedes-Benz
Center.
You can install new map software yourself
using one or more DVDs, depending on the
size.
The installation process can take between 10
and 120 minutes depending on the size of the
map software. If radio mode is selected
before you start the installation process, you
can still adjust the volume. It is also still
possible to operate the automatic climate
control and cancel the process on COMAND.
Other functions are not operational. If
possible, carry out the installation process
when the vehicle is stationary. This takes less
time, since the DVD read speed is higher
when the vehicle is stationary than when it is
in motion. If the starter battery is not
sufficiently charged, COMAND may end the
process automatically in order to preserve
the battery. Therefore, keep the engine
running during the installation process.
GWarning
Never leave the engine running in enclosed
spaces. The exhaust gases contain toxic
carbon monoxide. Breathing in exhaust fumes
is a health hazard and can lead to
unconsciousness or death.
Displaying information about the
currently used map version
XTo switch on navigation mode: press the
S function button once or twice.XTo show the menu: press the COMAND
controller W.XSelect Navi in the main function bar by
sliding VÆ and turning cVd the COMAND
controller and press W to confirm.XSelect Map Version and press W to
confirm.
Notes on handling DVDs
R Only touch the edges of DVDs.
R Handle DVDs carefully to avoid read errors.
R Avoid scratching DVDs or getting
fingerprints or dust on them.
R Use a conventional cleaning cloth to clean
DVDs. Never wipe in a circle, but instead in
straight lines from the inside to the outside.
R Place DVDs back in their cases after use.
R Do not expose DVDs to heat or direct
sunlight.
Map software copy protection
Map software for COMAND is subject to a fee.
Map software can only be used on one vehicle
with an activation code and is not
transferable. The six-digit activation code is
available at your authorized Mercedes-Benz
Center. Contact your authorized Mercedes-
Benz Center if you lose the activation code or
if COMAND does not accept the code that you
received.
Your vehicle is delivered from the factory with
map software. Depending on the country,
map software for your region is either pre-
installed (Europe/USA) or the map software
186NavigationCOMAND
Page 210 of 524

Audio
Vehicle equipment
iThis manual describes all the standard
and optional equipment of your vehicle
which was available at the time of
purchase. Country-specific differences are
possible. Bear in mind that your vehicle
may not feature all functions described
here. This also refers to safety-related
systems and functions.
Radio mode
General information
iPortable electronic devices in the vehicle
may seriously impair radio reception.
Switching to radio mode
Option 1
XPress the R function button.
The radio display appears. You will hear the
last station selected on the last waveband
set.
Option 2
XSelect Audio in the main function bar by
sliding ZV and turning cVd the COMAND
controller and press W to confirm.
If radio mode was the last mode selected,
it will now be active.
If another audio mode is switched on, you
can now switch to radio mode in the audio
menu.
XSelect Audio by sliding ZV the COMAND
controller and press W to confirm.
The audio menu appears.
Example display: audio menu
:Current audio operating mode;Main function bar=Audio menuXSelect FM/AM radio by turning cVd the
COMAND controller and press W to
confirm.
Example display, FM radio
:Display window with station selection;Frequency of the selected station=Name of the selected station?Display bar for frequency settingASound settingsBWavebandCStation informationDMemory functionsERadio functions208AudioCOMAND
Page 211 of 524

Switching wavebandsXSelect FM, AM or WB in the radio display by
sliding VÆ and turning cVd the COMAND
controller and press W to confirm.
The waveband submenu opens.
1The waveband submenu (the # dot
shows the waveband currently set)
XSelect a waveband and press W to confirm.
You will hear the last station on the
selected waveband.
Selecting a station
Selecting stations using the station
search function
XTurn cVd or slide XVY the COMAND
controller while the display/selection
window in the radio display is active.
Station search scans up or down and stops
at the next station found.
Using the multifunction steering wheel
XUse = or ; to select the Audio
menu.
XPress 9 or : briefly.
Selecting stations via the station presets
XQuick setting: press a number key, e.g.
l.
XDirectly in the station presets: select
Presets by sliding VÆ and turning cVd
the COMAND controller and press W to
confirm.
or
XPress W the COMAND controller when the
display/selection window is active.
The station preset menu appears. The #
dot indicates under which preset the
currently selected station is stored.
XSelect a station by turning cVd and press
W to confirm or press a number key, e.g.
l.
Using the multifunction steering wheel
XUse = or ; to select the Audio
menu.
XPress 9 or : briefly.
Tuning in stations by entering the
frequency manually
XOption 1: press the Ä button.XOption 2: select Radio in the radio display
by sliding VÆ and turning cVd the
COMAND controller and press W to
confirm.
XSelect Enter Frequency and press W to
confirm.
Irrespective of the option chosen, an input
menu will appear.
XEnter a frequency using the number keys.
COMAND tunes in to the frequency
entered.
WavebandFrequencyAM (MF)530 – 1,700 kHzFM (VHF)87.7 – 107.9 MHzWB (Weather Band)Weather report
channels
iYou can only enter currently permitted
numbers.
iIf you enter a frequency in the FM or AM
wavebands which is outside the frequency
Audio209COMANDZ