2011 MERCEDES-BENZ S-Class Maintenance
[x] Cancel search: MaintenancePage 457 of 524
with a cloth soaked in petroleum ether or
lighter fluid.XUse tar remover to remove tar stains.XUse silicone remover to remove wax.
! Do not affix:
R stickers
R films
R magnetic plates or similar items
to painted surfaces. You could otherwise
damage the paintwork.
If water no longer forms "beads" on the
painted surface, paint care products should
be used that have been approved and
recommended by Mercedes-Benz. This is the
case approximately every three to five
months, depending on climatic conditions
and the care product used.
If dirt has entered the paint surface or the
paintwork has become dull, a paint cleaner
should be used that has been approved and
recommended by Mercedes-Benz.
Never use such care products in direct
sunlight or on a hot hood.
XUse a suitable touch-up stick, e.g. MB
Touch Up stick, for quick, temporary repair
of damaged paintwork.
Matte finish care
If your vehicle has a clear matte finish,
observe the following instructions in order to
avoid damage to the paintwork due to
incorrect care.
! Never polish the vehicle. Polishing causes
the finish to shine.
! Do not use paintwork cleaner, grinding or
polishing products or gloss preservers such
as wax. These products are only suitable for
high-gloss surfaces. Using them on
vehicles with matte paintwork can cause
severe damage to the surface (shiny,
mottled patches).
Always have paintwork repairs performed
at a qualified specialist workshop, e.g. an
authorized Mercedes-Benz Center.
! Do not use wash programs with a hot wax
treatment under any circumstances.
i Use only insect remover and car shampoo
from the range of recommended and
approved Mercedes-Benz care products.
Cleaning the windowsGWarning
Switch off the windshield wipers and remove
the SmartKey from the ignition lock before
cleaning the windshield or the wiper blades.
On vehicles with KEYLESS-GO, press the
Start/Stop button repeatedly until all
indicator lamps in the instrument cluster have
gone off. The windshield wipers could
otherwise move and injure you.
! Only fold the windshield wipers away from
the windshield when vertical. Otherwise,
you will damage the hood.
XClean the inside and outside of the
windows with a damp cloth and a cleaning
agent that is recommended and approved
by Mercedes-Benz.
! Do not use dry cloths, abrasive products,
solvents or cleaning agents containing
solvents to clean the inside of the windows.
Do not use hard objects to clean the insides
of the windows, e.g. an ice scraper or ring.
There is otherwise a risk of damaging the
windows.
! Clean the water drainage channels of the
windshield and the rear window at regular
intervals. Deposits such as leaves, petals
and pollen may under certain
circumstances prevent water from draining
away. This can lead to corrosion damage
and damage to electronic components.
Care455Maintenance and careZ
Page 458 of 524

Cleaning the wiper bladesGWarning
Switch off the windshield wipers and remove
the SmartKey from the ignition lock before
cleaning the windshield or the wiper blades.
On vehicles with KEYLESS-GO, press the
Start/Stop button repeatedly until all
indicator lamps in the instrument cluster have
gone off. The windshield wipers could
otherwise move and injure you.
! Only fold the windshield wipers away from
the windshield when vertical. Otherwise,
you will damage the hood.
! Do not pull the wiper blade. Otherwise,
the wiper blade could be damaged.
! Do not clean wiper blades too often and
do not rub them too hard. Otherwise, the
graphite coating could be damaged. This
could cause wiper noise.
XFold the wiper arms away from the
windshield.
XCarefully clean the wiper blades with a
damp cloth.
XFold the windshield wipers back again
before switching on the ignition.
! Hold the wiper arm securely when folding
back. The windshield could be damaged if
the wiper arm smacks against it suddenly.
Cleaning the headlamps
XClean the plastic lamp lenses on the
headlamps using a wet sponge and a mild
cleaning agent, e.g. Mercedes-Benz car
shampoo or cleaning cloths.
! Only use cleaning agents or cleaning
cloths which are suitable for plastic
headlamp lenses. Unsuitable cleaning
agents or cleaning cloths could scratch or
damage the plastic headlamp lenses.
Cleaning the sensorsXClean sensors : of the driving systems
with water, car shampoo and a soft cloth.
! When cleaning the sensors with a power
washer, maintain a distance between the
vehicle and the nozzle of the power washer
of at least 11.8 in (30 cm). Information
about the correct distance is available from
the equipment manufacturer.
Cleaning the rear view camera
XUse clear water and a soft cloth to clean
camera lens :.
! Do not clean the camera lens and the area
around the rear view camera with a power
washer.
456CareMaintenance and care
Page 459 of 524
Cleaning the exhaust tail pipes
Impurities combined with the effects of road
grit and corrosive environmental factors may
cause flash rust to form on the surface. You
can restore the original shine of the exhaust
tail pipe by cleaning it regularly, especially in
winter and after washing.
! Do not clean the exhaust tail pipes with
alkaline-based cleaning agents, such as
wheel cleaner.
XClean the exhaust tail pipes with a chrome
care product tested and approved by
Mercedes-Benz.
Interior care
Cleaning the display
XBefore cleaning the display, make sure that
it is switched off and has cooled down.XClean the display surface using a
commercially-available microfiber cloth
and TFT/LCD display cleaner.XDry the display surface using a dry
microfiber cloth.
! For cleaning, do not use any of the
following:
R alcohol-based thinner or gasoline
R abrasive cleaning agents
R commercially-available household
cleaning agents
These may damage the display surface. Do
not put pressure on the display surface
when cleaning. This could lead to
irreparable damage to the display.
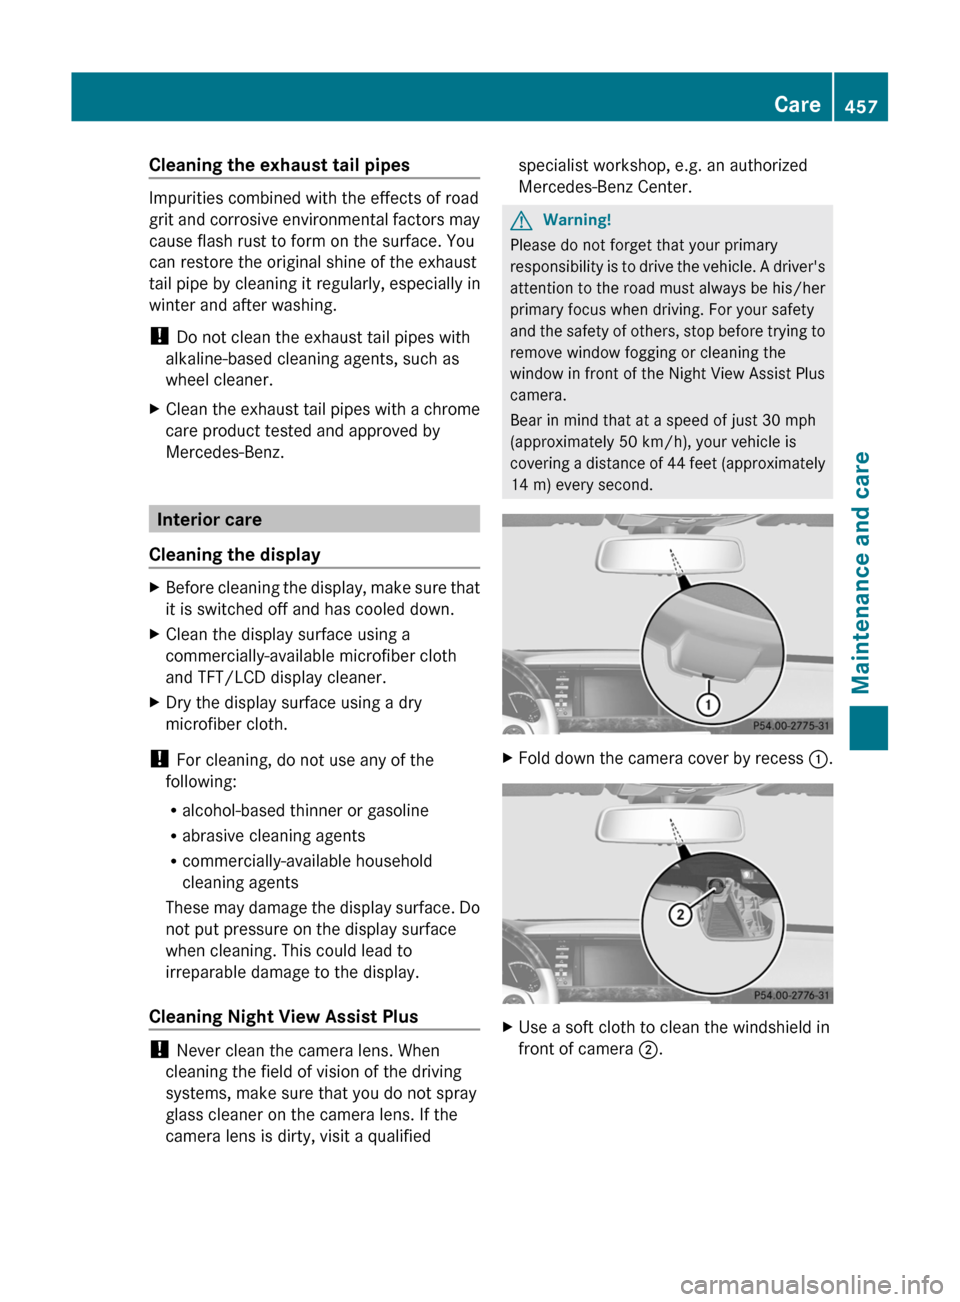
Cleaning Night View Assist Plus
! Never clean the camera lens. When
cleaning the field of vision of the driving
systems, make sure that you do not spray
glass cleaner on the camera lens. If the
camera lens is dirty, visit a qualified
specialist workshop, e.g. an authorized
Mercedes-Benz Center.GWarning!
Please do not forget that your primary
responsibility is to drive the vehicle. A driver's
attention to the road must always be his/her
primary focus when driving. For your safety
and the safety of others, stop before trying to
remove window fogging or cleaning the
window in front of the Night View Assist Plus
camera.
Bear in mind that at a speed of just 30 mph
(approximately 50 km/h), your vehicle is
covering a distance of 44 feet (approximately
14 m) every second.
XFold down the camera cover by recess :.XUse a soft cloth to clean the windshield in
front of camera ;.Care457Maintenance and careZ
Page 460 of 524
Cleaning the plastic trimGWarning
When cleaning the steering wheel boss and
dashboard, do not use cockpit sprays or
cleaning agents containing solvents. Cleaning
agents containing solvents cause the surface
to become porous, and as a result, plastic
parts may break away and be thrown around
the interior when an air bag is deployed, which
may result in severe injuries.
! Do not affix the following to plastic
surfaces:
R stickers
R films
R scented oil bottles or similar items
You can otherwise damage the plastic.
! Do not allow cosmetics, insect repellent
or sunscreen to come into contact with the
plastic trim. This maintains the high-quality
look of the surfaces.
XWipe the plastic trim with a damp, lint-free
cloth, e.g. a microfiber cloth.XHeavy soiling: use car care and cleaning
products recommended and approved by
Mercedes-Benz.
The surface may change color temporarily.
Wait until the surface is dry again.
Cleaning the steering wheel and gear or
selector lever
XWash thoroughly with a damp cloth or use
a leather care agent that has been
recommended and approved by Mercedes-
Benz.
Cleaning real wood and trim strips
XWipe the wooden trim and trim strips with
a damp, lint-free cloth, e.g. a microfiber
cloth.XHeavy soiling: use car care and cleaning
products recommended and approved by
Mercedes-Benz.! Do not use solvent-based cleaning agents
such as tar remover, wheel cleaners,
polishes or waxes. There is otherwise a risk
of damaging the surface.
! Do not use chrome polish for trim strips.
The trim strips have a chrome look but are
mostly made of anodized aluminum and
can lose their shine if chrome polish is
used. Use a damp, lint-free cloth instead
when cleaning the trim strips.
Chrome polish can be used to remove very
heavy soiling from trim strips which you are
sure are made of chrome. If you are unsure
as to whether a trim strip is chrome-plated
or not, consult an authorized Mercedes-
Benz Center.
Cleaning the seat covers
! Do not use microfiber cloths to clean
genuine leather, artificial leather or
Alcantara® covers. If used often, these can
damage the cover.
! Observe the following when cleaning:
R clean genuine leather covers carefully
with a damp cloth and then wipe the
covers down with a dry cloth. Make sure
that the leather does not become
soaked. It may otherwise become rough
and cracked. Only use leather care
agents that have been tested and
approved by Mercedes-Benz. You can
obtain these from a qualified specialist
workshop, e.g. an authorized Mercedes-
Benz Center.
R clean artificial leather covers with a cloth
moistened with a solution containing 1%
detergent (e.g. dish washing liquid).
R clean cloth covers with a microfiber cloth
moistened with a solution containing 1%
detergent (e.g. dish washing liquid). Rub
carefully and always wipe entire seat
sections to avoid leaving visible lines.
Leave the seat to dry afterwards.
458CareMaintenance and care
Page 461 of 524
Cleaning results depend on the type of
dirt and how long it has been there.
R clean Alcantara® covers with a damp
cloth. Make sure you wipe entire seat
sections to avoid leaving visible lines.
i Note that regular care is essential to
ensure that the appearance and comfort of
the covers is retained over time.
Cleaning the seat beltsXUse clean, luke-warm water and soap
solution.
! Do not clean the seat belts using chemical
cleaning agents. Do not dry the seat belts
by warming them above 176 ‡ (80 †) or
placing them in direct sunlight.
GWarning
Do not bleach or dye seat belts as this may
severely weaken them. In a crash, they may
not be able to provide adequate protection.
Cleaning the roof lining and carpets
XRoof lining: use soft brushes or dry
shampoo if it is particularly dirty.XCarpets: use carpet and textile cleaners
that have been approved and
recommended by Mercedes-Benz.Care459Maintenance and careZ
Page 467 of 524

performing maintenance work under the
vehicle. To help avoid personal injury, use the
jack only to lift the vehicle during a wheel
change.
Never get beneath the vehicle while it is
supported by the jack. Keep hands and feet
away from the area under the lifted vehicle.
Always lower the vehicle onto sufficient
capacity jackstands before working under the
vehicle.
Always firmly engage the parking brake and
block the wheels with wheel chocks or other
sizable objects before raising the vehicle with
the jack. Do not disengage the parking brake
while the vehicle is raised.
Make sure that the ground on which the
vehicle is standing and where you place the
jack is solid, level and not slippery. If
necessary, use a large underlay. On slippery
surfaces, such as tiled floors, you should use
a non-slip underlay, for example a rubber mat.
Do not use wooden blocks or similar objects
as a jack underlay. Otherwise, the jack may
not be able to achieve its load-bearing
capacity if it is not at its full height.
Never start the engine when the vehicle is
raised.
Also observe the notes on the jack.
XUsing lug wrench :, loosen the bolts on
the wheel you wish to change by about one
full turn. Do not unscrew the bolts
completely.
The jacking points for the jack are located
behind the wheel housings of the front wheels
and in front of the wheel housings of the rear
wheels (arrows).
GWarning
The jack is designed exclusively for jacking up
the vehicle at the jacking points. The jack
saddle must be placed centrally under the
jacking point.
If you do not position the jack correctly in the
jacking point, the vehicle can fall off the jack
and seriously or fatally injure you or others.
! The jack is designed exclusively for
jacking up the vehicle at the jacking points.
Otherwise, your vehicle could be damaged.
XPosition jack = at jacking point ;.Flat tire465Roadside assistanceZ
Page 489 of 524

Check the tire pressure at least once a month.
Only check and correct tire pressures when
the tires are cold ( Y page 483).
Checking the tire pressures manually
In order to determine and adjust the tire
pressures, proceed as follows:
XRemove the valve cap of the tire you wish
to check.XPress the tire pressure gauge securely onto
the valve.XRead the tire pressure and compare it with
the recommended value on the Tire and
Loading Information placard on the
B-pillar on the driver's side of your vehicle.XIf necessary, increase the tire pressure to
the recommended value ( Y page 483).XIf the tire pressure is too high, release air
by pressing down the metal pin in the valve
using the tip of a pen, for example. Then,
check the tire pressure again using the tire
pressure gauge.XScrew the valve cap onto the valve.XRepeat the steps for the other tires.
Tire pressure monitor
Important safety notes
If a tire pressure monitor is installed, the
vehicle's wheels have sensors installed that
monitor the tire pressures in all four tires. The
tire pressure monitor warns you when the
pressure drops in one or more of the tires. The
tire pressure monitor only functions if the
correct wheel electronics units are installed
in all wheels.
The tire pressure monitor has a yellow
warning lamp in the instrument cluster for
indicating pressure loss/malfunctions (USA)
or pressure loss (Canada). Depending on how
the warning lamp flashes or lights up, a tire
pressure that is too low or a malfunction in
the tire pressure monitor is displayed:
R if the warning lamp is lit continuously, the
tire pressure on one or more tires is
significantly too low. The tire pressure
monitor is not malfunctioning.
R USA only: if the warning lamp flashes for
60 seconds and then remains lit constantly,
the tire pressure monitor is malfunctioning.GWarning
Each tire, including the spare (if provided),
should be checked at least once a month
when cold and inflated to the inflation
pressure recommended by the vehicle
manufacturer on the Tire and Loading
Information placard on the driver’s door B-
pillar or the tire inflation pressure label on the
inside of the fuel filler flap. If your vehicle has
tires of a different size than the size indicated
on the Tire and Loading Information placard
or the tire inflation pressure label, you should
determine the proper tire inflation pressure
for those tires.
As an added safety feature, your vehicle has
been equipped with a tire pressure monitoring
system (TPMS) that illuminates a low tire
pressure telltale when one or more of your
tires are significantly underinflated.
Accordingly, when the low tire pressure
telltale illuminates, you should stop and check
your tires as soon as possible, and inflate
them to the proper pressure. Driving on a
significantly underinflated tire causes the tire
to overheat and can lead to tire failure.
Underinflation also reduces fuel efficiency
and tire tread life, and may affect the vehicle's
handling and stopping ability. Please note that
the TPMS is not a substitute for proper tire
maintenance, and it is the driver's
responsibility to maintain correct tire
pressure, even if underinflation has not
Tire pressure487Tires and wheelsZ
Page 506 of 524
load, tire dimension variations could cause
the tires to come into contact with the
bodywork and axle components. This could
result in damage to the tires or the vehicle.
Mercedes-Benz accepts no liability for
damage resulting from the use of tires,
wheels or accessories other than those
tested and approved.
Further information about tires, wheels and
approved combinations can be obtained
from any authorized Mercedes-Benz
Center.
i The Tire and Loading Information placard
with the recommended tire pressures is
attached to the B-pillar on the driver's side.
Further information about driving at high
speeds or driving with vehicle loads that are
lighter than the maximum vehicle load can
be found in the tire pressure table on the
inside of the fuel filler flap. Check tire
pressures regularly, and only when the tires
are cold. Follow the tire manufacturer's
maintenance recommendations in the
vehicle document wallet.
Further information on recommended tire
pressures including tire pressures for specific
driving situations, see ( Y page 483).
i Notes on the vehicle equipment – always
equip the vehicle:
R with tires of the same size on a given axle
(left/right)
R with the same type of tires at a given time
(summer tires, winter tires, MOExtended
tires)
i The following pages contain information
on approved wheel rims and tire sizes for
equipping your vehicle with winter tires.
Winter tires are not available at the factory
as standard equipment or optional extras.
If you wish to fit approved winter tires to
your vehicle, rims of appropriate size are
also required, as the sizes of the approved
winter tires can differ from those of theoriginal tires. This is dependent on the
model and the equipment installed at the
factory.
Tires and wheel rims as well as additional
information are available from a qualified
specialist workshop, e.g. an authorized
Mercedes-Benz Center.
i Overview of abbreviations used in the
following tire tables:
R BA: both axles
R FA: front axle
R RA: rear axle
The tire and wheel combinations listed in the
tables below apply to the following models:V1S 550 36V2S 550 4MATIC 36V3S 600V4AMG vehicles36
BlueEFFICIENCY.504Wheel/tire combinationsTires and wheels