2011 MERCEDES-BENZ S-Class trunk lock
[x] Cancel search: trunk lockPage 349 of 524

Do not use the rear view camera in these
situations. Otherwise you could injure
yourself or others and/or damage property
including your vehicle while parking/
maneuvering.
Activating the rear view camera
XMake sure that the SmartKey is in
position 2 in the ignition lock.
XEngage reverse gear.
The area behind the vehicle is shown in the
COMAND display with guide lines.
Guide lines in the COMAND display
GWarning!
Use of rear view camera can be dangerous if
you are color-blind or have impaired color
vision.
Only use rear view camera if you can see and
distinguish all colored guidelines shown by
rear view camera on the COMAND system
display.
GWarning
Please note that objects that do not touch the
ground may appear to be further away than
they actually are, for example:
Rthe bumper of a vehicle parked behind you
Rthe trailer drawbar
Rthe ball coupling of a trailer tow hitch
Rthe rear end of a truck
Ra slanted post
In such cases, you should not use the guide
lines to judge the distance. You may misjudge
the distance, which increases the risk of
impacting the objects.
Even if the object you approach is directly on
the ground, do not approach the object any
closer than the red guide line.
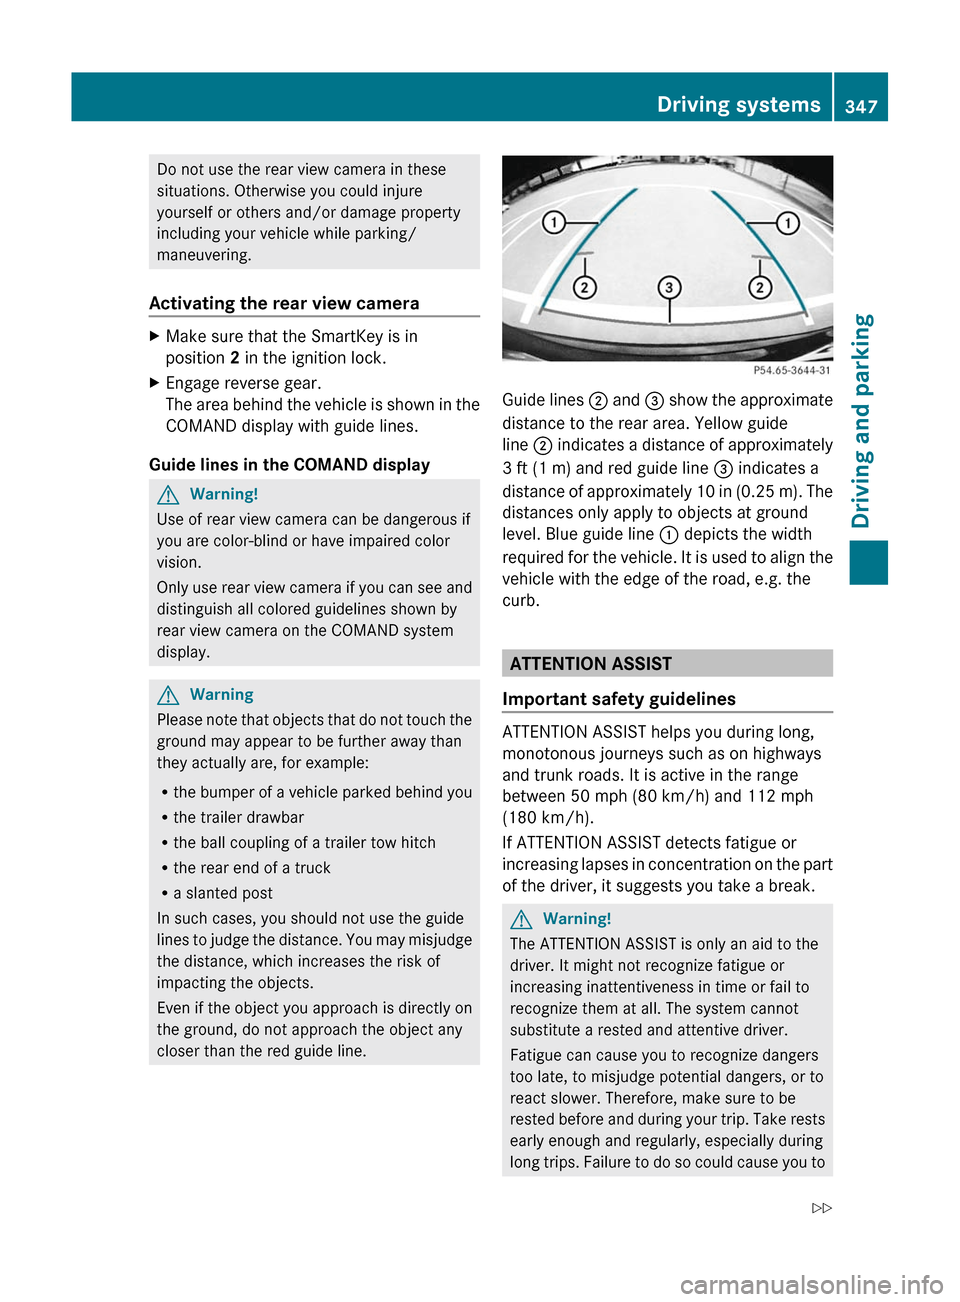
Guide lines ; and = show the approximate
distance to the rear area. Yellow guide
line ; indicates a distance of approximately
3 ft (1 m) and red guide line = indicates a
distance of approximately 10 in (0.25 m). The
distances only apply to objects at ground
level. Blue guide line : depicts the width
required for the vehicle. It is used to align the
vehicle with the edge of the road, e.g. the
curb.
ATTENTION ASSIST
Important safety guidelines
ATTENTION ASSIST helps you during long,
monotonous journeys such as on highways
and trunk roads. It is active in the range
between 50 mph (80 km/h) and 112 mph
(180 km/h).
If ATTENTION ASSIST detects fatigue or
increasing lapses in concentration on the part
of the driver, it suggests you take a break.
GWarning!
The ATTENTION ASSIST is only an aid to the
driver. It might not recognize fatigue or
increasing inattentiveness in time or fail to
recognize them at all. The system cannot
substitute a rested and attentive driver.
Fatigue can cause you to recognize dangers
too late, to misjudge potential dangers, or to
react slower. Therefore, make sure to be
rested before and during your trip. Take rests
early enough and regularly, especially during
long trips. Failure to do so could cause you to
Driving systems347Driving and parkingZ
Page 440 of 524

Vehicle remote opening
If you have unintentionally locked your
vehicle (e.g. the SmartKey is inside the
vehicle) and a replacement key is not
available:
XContact the following service hotlines:
R USA: Response Center under the
number 1-888-990-9007
R Canada: Customer Service under
1-888-923-8367
You will be asked for your password.XReturn to your vehicle at the time arranged
with the Response Center.XPull the trunk handle for at least 20
seconds until the indicator lamp in the SOS
button ( Y page 433) flashes.
The Connecting Call message appears in
the multifunction display.
Alternatively, the vehicle can also be opened
via the Internet in the "Owners Online"
section using your ID number and
password 32
.
i Vehicle remote unlocking is only possible
if the corresponding cellular phone
network is accessible.
The SOS button flashes and the
Connecting Call message appears in the
multifunction display to confirm that the
command for vehicle remote unlocking has
been received.
If you pull the trunk handle for more than
20 seconds before receiving authorization
for remote unlocking, you must wait 15
minutes before you can pull on the handle
of the trunk lid again.
Remote vehicle locking in an
emergency
If you forget to lock your vehicle but are no
longer in the vicinity of the vehicle, it can be
locked for you by the Response Center.
The vehicle can be locked remotely up to four
days after the ignition was last switched off.
XContact the following service hotlines:
R USA: Response Center under
866-990-9007
R Canada: Customer Service under
1-888-923-8367
You will be asked for your PIN.
The next time you are in your vehicle and
switch on the ignition, the Tele Aid Doors
Locked Remotely message appears in the
multifunction display.
i The vehicle remote locking feature is
available when the relevant mobile phone
network is available and data connection is
possible.
Automatic retrieval of vehicle data for
the service due date
Your vehicle comes with a function which
improves the servicing of the vehicle
considerably. Shortly before the service due
date, mbrace sends important vehicle
maintenance information to your authorized
Mercedes-Benz Center. In this way, the
Mercedes-Benz Center is informed of the
work required. This happens automatically
and does not require any action from the
driver. This function allows the Mercedes-
Benz Center to improve appointment
planning significantly and ensures that your
vehicle receives the best service possible.
i The "Automatic retrieval of vehicle data
for the service due date" function is only
available if the relevant mobile phone
network is available and a data connection
is possible.
32 USA only.438FeaturesLoading, stowing and features
Page 464 of 524

Vehicle equipment
i This manual describes all the standard
and optional equipment of your vehicle
which was available at the time of
purchase. Country-specific differences are
possible. Bear in mind that your vehicle
may not feature all functions described
here. This also refers to safety-related
systems and functions.
Where will I find...?
First-aid kit
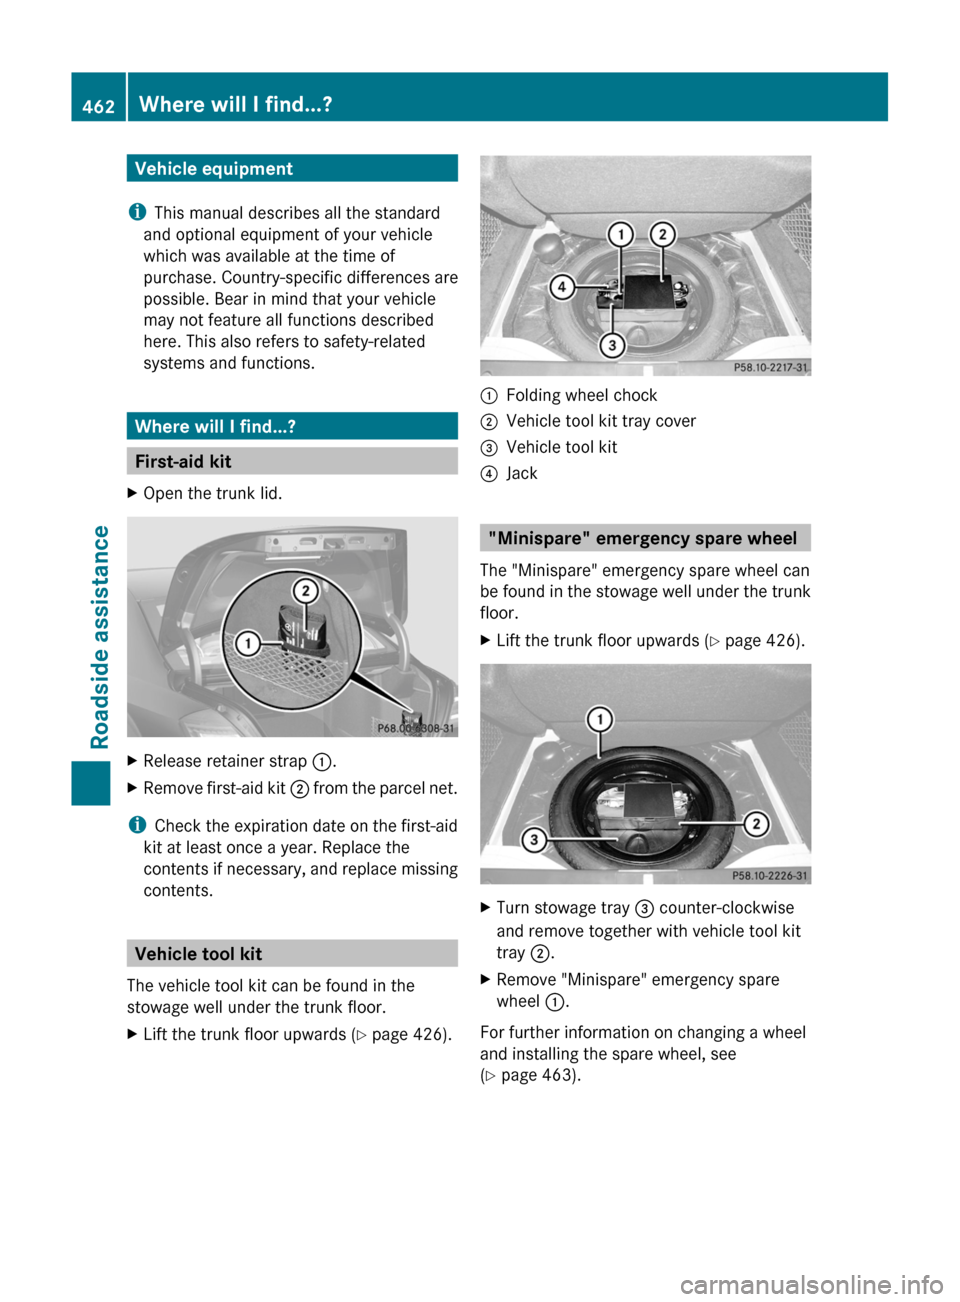
XOpen the trunk lid.XRelease retainer strap :.XRemove first-aid kit ; from the parcel net.
i
Check the expiration date on the first-aid
kit at least once a year. Replace the
contents if necessary, and replace missing
contents.
Vehicle tool kit
The vehicle tool kit can be found in the
stowage well under the trunk floor.
XLift the trunk floor upwards ( Y page 426).:Folding wheel chock;Vehicle tool kit tray cover=Vehicle tool kit?Jack
"Minispare" emergency spare wheel
The "Minispare" emergency spare wheel can
be found in the stowage well under the trunk
floor.
XLift the trunk floor upwards ( Y page 426).XTurn stowage tray = counter-clockwise
and remove together with vehicle tool kit
tray ;.XRemove "Minispare" emergency spare
wheel :.
For further information on changing a wheel
and installing the spare wheel, see
( Y page 463).
462Where will I find...?Roadside assistance
Page 469 of 524

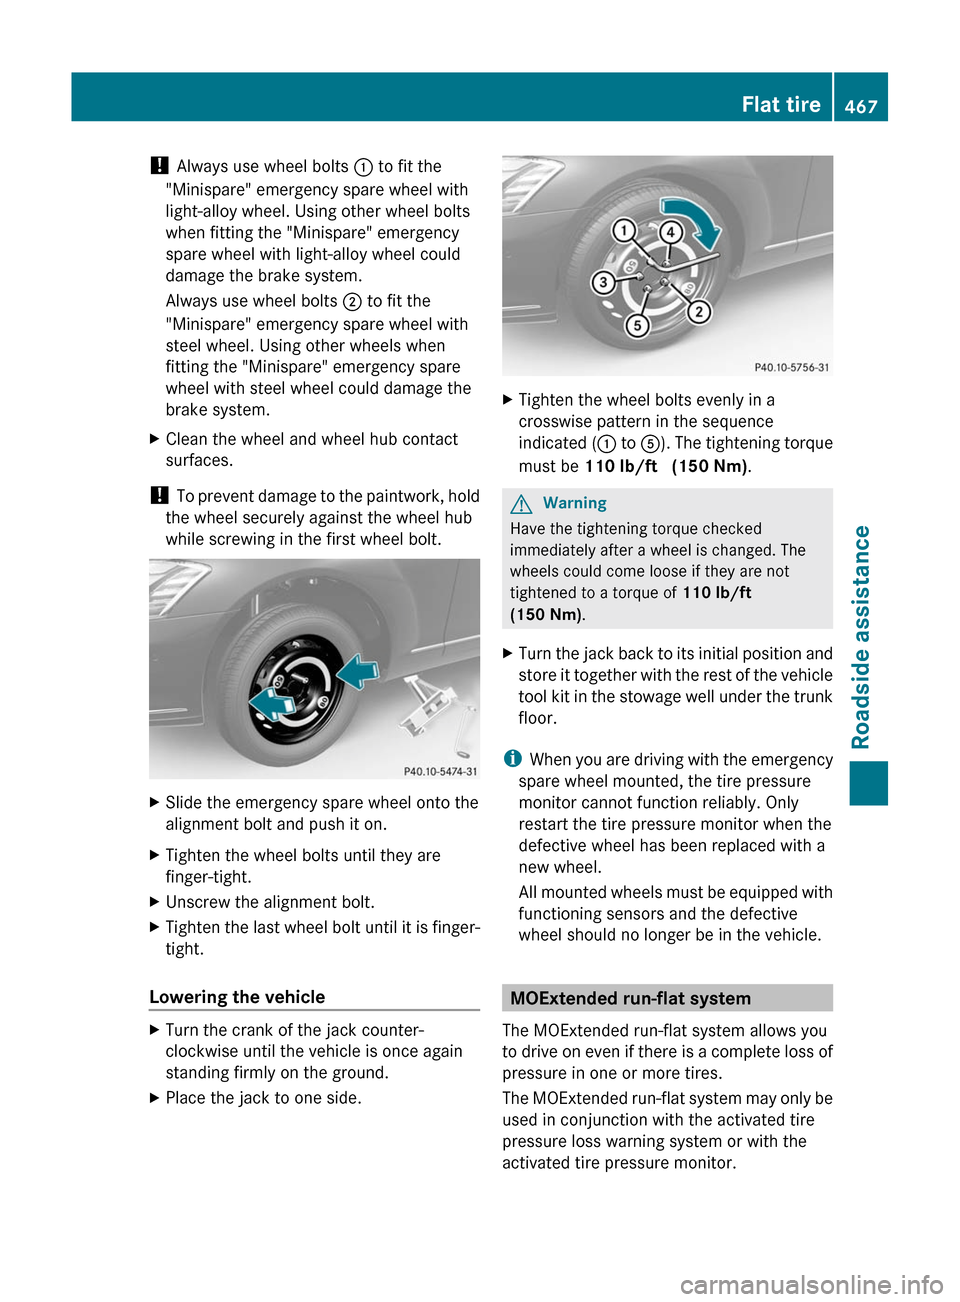
! Always use wheel bolts : to fit the
"Minispare" emergency spare wheel with
light-alloy wheel. Using other wheel bolts
when fitting the "Minispare" emergency
spare wheel with light-alloy wheel could
damage the brake system.
Always use wheel bolts ; to fit the
"Minispare" emergency spare wheel with
steel wheel. Using other wheels when
fitting the "Minispare" emergency spare
wheel with steel wheel could damage the
brake system.
XClean the wheel and wheel hub contact
surfaces.
! To prevent damage to the paintwork, hold
the wheel securely against the wheel hub
while screwing in the first wheel bolt.
XSlide the emergency spare wheel onto the
alignment bolt and push it on.
XTighten the wheel bolts until they are
finger-tight.
XUnscrew the alignment bolt.XTighten the last wheel bolt until it is finger-
tight.
Lowering the vehicle
XTurn the crank of the jack counter-
clockwise until the vehicle is once again
standing firmly on the ground.
XPlace the jack to one side.XTighten the wheel bolts evenly in a
crosswise pattern in the sequence
indicated (: to A). The tightening torque
must be 110 lb/ft (150 Nm).
GWarning
Have the tightening torque checked
immediately after a wheel is changed. The
wheels could come loose if they are not
tightened to a torque of 110 lb/ft
(150 Nm).
XTurn the jack back to its initial position and
store it together with the rest of the vehicle
tool kit in the stowage well under the trunk
floor.
iWhen you are driving with the emergency
spare wheel mounted, the tire pressure
monitor cannot function reliably. Only
restart the tire pressure monitor when the
defective wheel has been replaced with a
new wheel.
All mounted wheels must be equipped with
functioning sensors and the defective
wheel should no longer be in the vehicle.
MOExtended run-flat system
The MOExtended run-flat system allows you
to drive on even if there is a complete loss of
pressure in one or more tires.
The MOExtended run-flat system may only be
used in conjunction with the activated tire
pressure loss warning system or with the
activated tire pressure monitor.
Flat tire467Roadside assistanceZ