2011 MERCEDES-BENZ S-Class electrical
[x] Cancel search: electricalPage 109 of 524

iIf the battery voltage is too low, the seat
heating may switch off.
The system automatically switches down
from level 3 to level 2 after approximately
eight minutes.
The system automatically switches down
from level 2 to level 1 after approximately ten
minutes.
The system automatically switches off
approximately 20 minutes after it is set to
level 1.
XMake sure that the SmartKey is in position
2 in the ignition lock.
XTo switch on: press button : repeatedly
until the desired heating level is set.
XTo switch off: press button : repeatedly
until all the indicator lamps go out.
Problems with the seat heating
The seat heating has switched itself off
prematurely. The vehicle's electrical system
voltage is too low because too many electrical
consumers are switched on.
XSwitch off electrical consumers which you
do not need, such as the rear window
heating or interior lighting.
Switching the seat ventilation on/off
Switching on/off
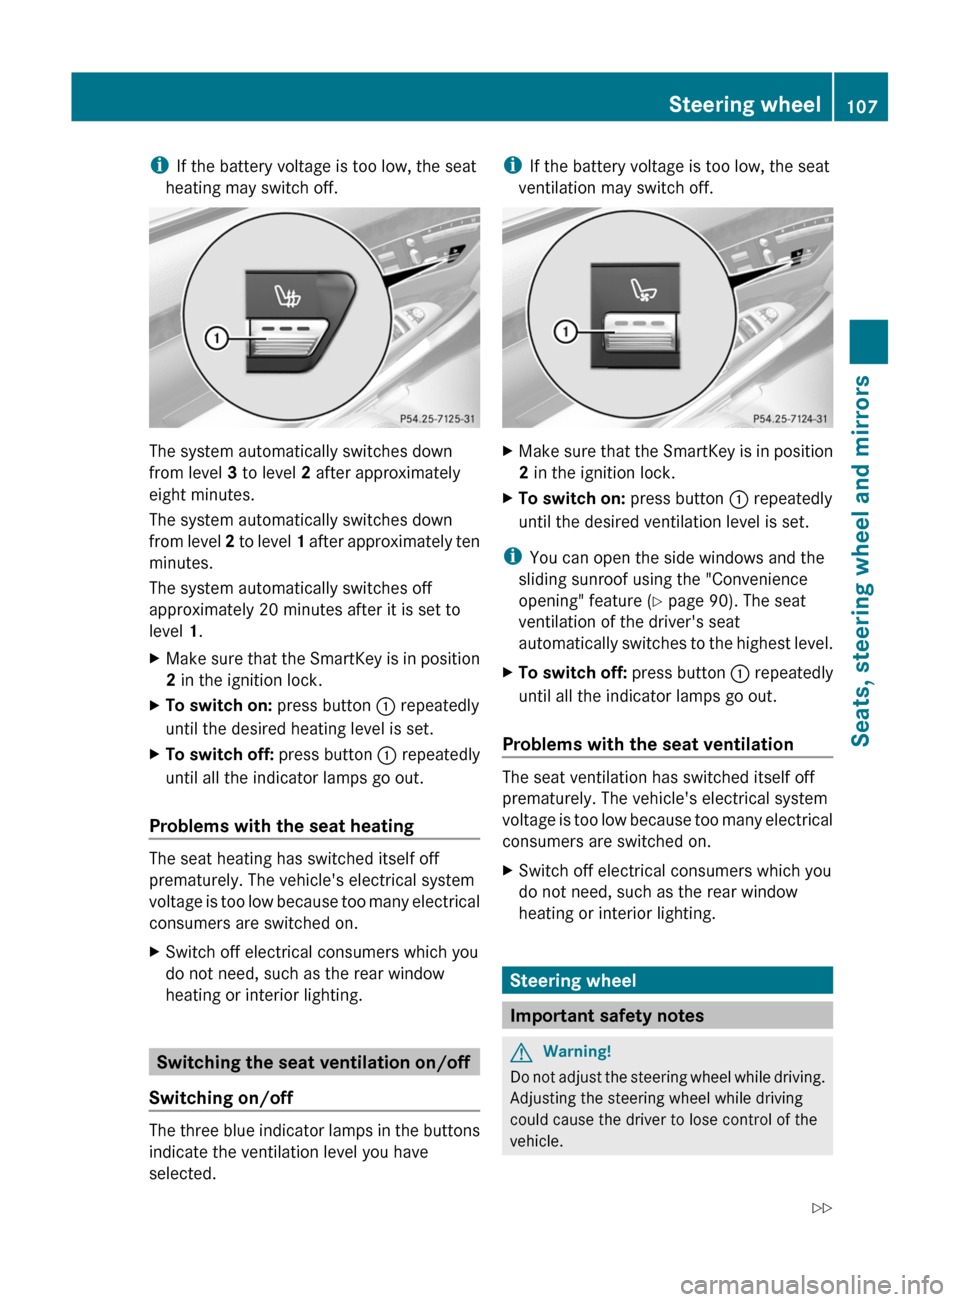
The three blue indicator lamps in the buttons
indicate the ventilation level you have
selected.
iIf the battery voltage is too low, the seat
ventilation may switch off.
XMake sure that the SmartKey is in position
2 in the ignition lock.
XTo switch on: press button : repeatedly
until the desired ventilation level is set.
iYou can open the side windows and the
sliding sunroof using the "Convenience
opening" feature (Y page 90). The seat
ventilation of the driver's seat
automatically switches to the highest level.
XTo switch off: press button : repeatedly
until all the indicator lamps go out.
Problems with the seat ventilation
The seat ventilation has switched itself off
prematurely. The vehicle's electrical system
voltage is too low because too many electrical
consumers are switched on.
XSwitch off electrical consumers which you
do not need, such as the rear window
heating or interior lighting.
Steering wheel
Important safety notes
GWarning!
Do not adjust the steering wheel while driving.
Adjusting the steering wheel while driving
could cause the driver to lose control of the
vehicle.
Steering wheel107Seats, steering wheel and mirrorsZ
Page 110 of 524

The electrical steering wheel adjustment
feature can be operated at any time.
Therefore, do not leave children unattended
in the vehicle, or with access to an unlocked
vehicle. A child's unsupervised access to a
vehicle could result in an accident and/or
serious personal injury.
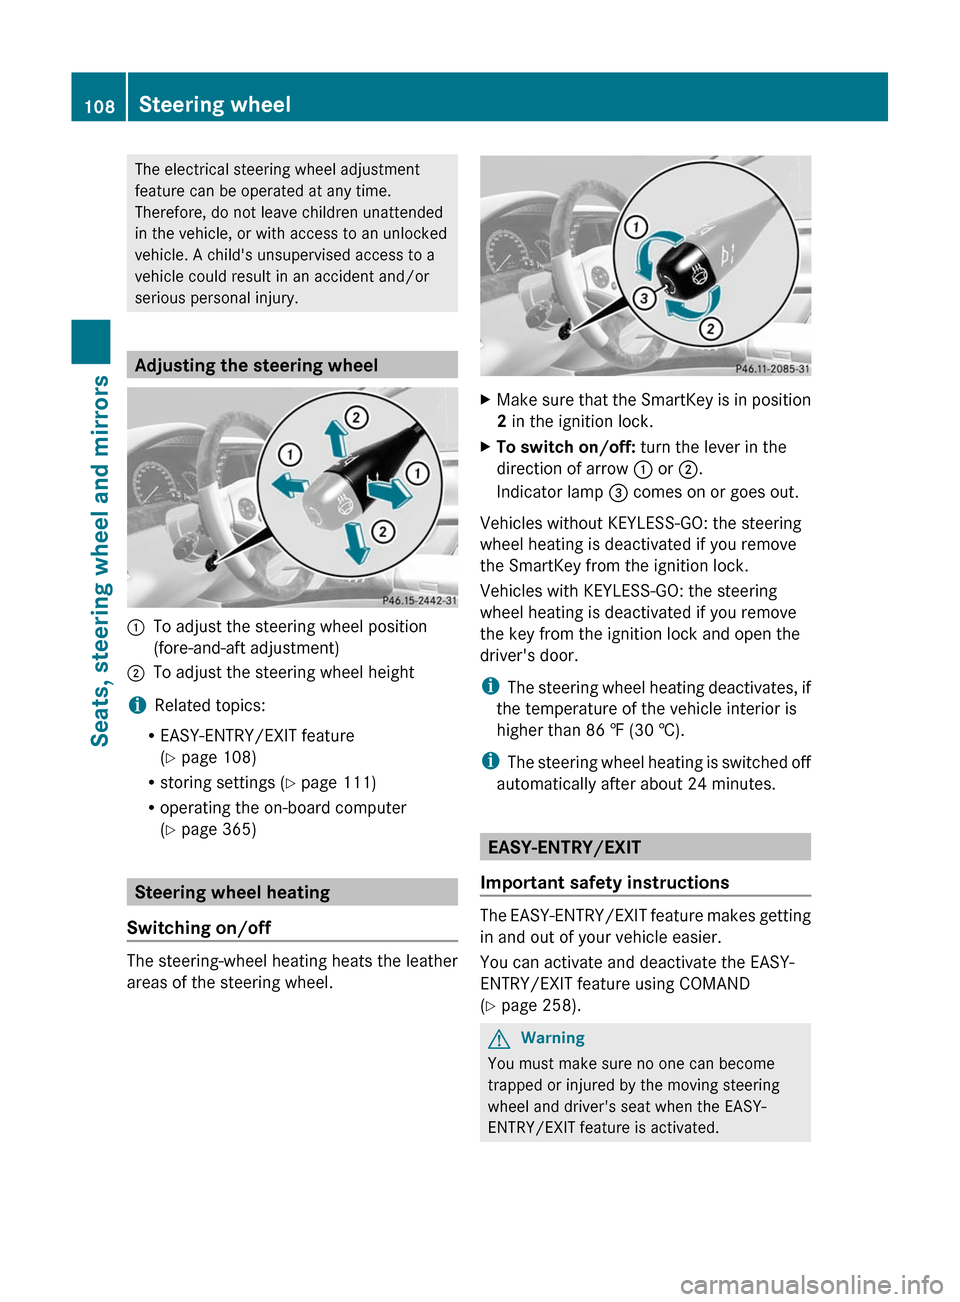
Adjusting the steering wheel
:To adjust the steering wheel position
(fore-and-aft adjustment)
;To adjust the steering wheel height
iRelated topics:
REASY-ENTRY/EXIT feature
(Y page 108)
Rstoring settings (Y page 111)
Roperating the on-board computer
(Y page 365)
Steering wheel heating
Switching on/off
The steering-wheel heating heats the leather
areas of the steering wheel.
XMake sure that the SmartKey is in position
2 in the ignition lock.
XTo switch on/off: turn the lever in the
direction of arrow : or ;.
Indicator lamp = comes on or goes out.
Vehicles without KEYLESS-GO: the steering
wheel heating is deactivated if you remove
the SmartKey from the ignition lock.
Vehicles with KEYLESS-GO: the steering
wheel heating is deactivated if you remove
the key from the ignition lock and open the
driver's door.
iThe steering wheel heating deactivates, if
the temperature of the vehicle interior is
higher than 86 ‡ (30 †).
iThe steering wheel heating is switched off
automatically after about 24 minutes.
EASY-ENTRY/EXIT
Important safety instructions
The EASY-ENTRY/EXIT feature makes getting
in and out of your vehicle easier.
You can activate and deactivate the EASY-
ENTRY/EXIT feature using COMAND
(Y page 258).
GWarning
You must make sure no one can become
trapped or injured by the moving steering
wheel and driver's seat when the EASY-
ENTRY/EXIT feature is activated.
108Steering wheelSeats, steering wheel and mirrors
Page 112 of 524

XMake sure that the SmartKey is in position
1 or 2 in the ignition lock.XPress button ; for the right-hand exterior
mirror or button = for the left-hand
exterior mirror.
The indicator lamp lights up in the button
that has been pressed.XPress adjustment button : up, down, to
the right or to the left until the exterior
mirror is set in a way which provides you
with a good overview of traffic conditions.
Folding the exterior mirrors in or out
electrically
XMake sure that the SmartKey is in position
1 or 2 in the ignition lock.XBriefly press button :.
Both exterior mirrors fold in or out.
i Make sure that the exterior mirrors are
always folded out fully while the vehicle is
in motion, as they may otherwise vibrate.
Folding the exterior mirrors in or out
automatically
When the "Automatic mirror folding" function
is activated in COMAND ( Y page 258):
R the exterior mirrors fold in automatically as
soon as you lock the vehicle from the
outside.
R the exterior mirrors fold out again
automatically as soon as you unlock the
vehicle and then open the driver's or front-
passenger door.
i The mirrors do not fold out if they have
been folded in manually.
Exterior mirror out of position
If an exterior mirror has been pushed out of
position, proceed as follows:
XPress the mirror-folding button
( Y page 110) repeatedly until you hear the
mirrors engage in position.
The mirror housing is engaged again and
you can adjust the exterior mirrors as usual
( Y page 109).
Automatic anti-glare mirrors
GWarning!
The auto dimming function does not react if
incoming light is not aimed directly at sensors
in the interior rear view mirror.
The interior rear view mirror and the exterior
rear view mirror on the driver's side do not
react, for example, if the rear window
sunshade is in raised position.
Light hitting the mirror(s) at certain angles
(incident light) could blind you. As a result,
you may not be able to observe traffic
conditions and could cause an accident.
The rear-view mirror and the exterior mirror
on the driver's side automatically go into anti-
glare mode if the ignition is switched on and
incident light from headlamps strikes the
sensor in the rear-view mirror.
110MirrorsSeats, steering wheel and mirrors
Page 236 of 524

Selecting an active partition (USB mass
storage devices only)
You can select this function for USB mass
storage devices when the storage device is
partitioned. Up to four partitions (primary or
logical; FAT format) are supported.
i The Windows formatting program
supports FAT partitions of up to 32 GB as
standard.
XSelect Media Interface in the basic
display by sliding VÆ and turning cVd the
COMAND controller and press W to
confirm.XSelect Select active partition and
press W to confirm.
Playback options
The following options are available:
R Normal track sequence
Normal track sequence: You hear the
tracks in their normal order (numerical or
alphabetical).
R Random tracks:
All the tracks on the medium are played in
random order.
R Category mix or Random folder (for USB
devices if Folder has been selected)
The tracks in the currently active category
or folder, including any subfolders, are
played in random order.
i For USB devices, the random playlists
offer a maximum of 300 tracks chosen at
random.
XTo select a playback option: select
Media Interface in the basic display by
sliding VÆ and turning cVd the COMAND
controller and press W to confirm.
The options list appears. The # dot
indicates the option selected.XSelect an option and press W to confirm.Separate USB connection
In addition to the USB connection on the
Media Interface, there is another USB
connection in the glove box. This connection
can also be used to play audio files.
Electrical consumption at this connection
must not exceed a continuous current of
500 mA. If the electrical consumption is
higher, use a separate source to provide
power for the USB device (e.g.
12 V power supply).
Notes on USB devices
Data formats
The following data formats are supported:
R MP3: CBR, VBR (up to 320 kbit/s)
R wma: CBR, VBR (up to 320 kbit/s)
Notes on USB devices
R In order to keep the initialization time to a
minimum, store only music data on a USB
device.
R Approximately 10,000 tracks are
supported. Multiple folders should be used
for larger numbers of tracks.
R Do not use USB extension leads or
adapters. They can impair functionality.
R A background search of the USB device is
performed and any playlists found are
shown in a separate category in addition to
the folders. Initialization of larger USB mass
storage devices containing a high number
of files may take several minutes.
i DRM (Digital Rights Management)
protected files are not supported by the
Media Interface.
Audio AUX mode
Notes on audio AUX mode
You can connect an external audio source
(AUX) to COMAND. The socket for this is
located in the glove box.
234AudioCOMAND
Page 302 of 524

the case if you are not depressing the brake
pedal.
If you depress the brake pedal and press the
Start/Stop button, the engine starts
immediately.
The Start/Stop button can be removed from
the ignition lock. Then you can insert the
SmartKey in the ignition lock.
i You do not have to remove the Start/Stop
button from the ignition lock when you
leave the vehicle. However, you should
always take the SmartKey with you when
leaving the vehicle. The vehicle can be
started with the Start/Stop button and the
electrical equipment can be operated while
the SmartKey is in the vehicle.:Start/Stop button;Ignition lockXInsert Start/Stop button : into ignition
lock ;.
i
When you insert Start/Stop button :
into ignition lock ;, the system requires a
detection time of two seconds before you
can use Start/Stop button :.
XShift the transmission to position P.XDo not press the brake pedal.
Start/Stop button
=USA only?Canada onlyXPosition 0: if Start/Stop button : has not
yet been pressed, this corresponds to the
SmartKey being removed from the ignition.XPosition 1: press Start/Stop button :.
You can now activate the windshield
wipers, for example.
i If you then open the driver's door when in
this position, the power supply is
deactivated.
XPosition 2 (ignition): press Start/Stop
button : twice.
i
If you press Start/Stop button : once
when in this position and the driver's door
is open, the power supply is deactivated
again.
As soon as the ignition is switched on, all the
indicator lamps in the instrument cluster light
up. The indicator lamps of the high-beam
headlamps or the turn signal lamps only light
up if the high-beam headlamps or the turn
signal lamps are switched on. If an indicator
lamp does not light up when the ignition is
switched on, check it and replace it if
necessary. If an indicator lamp does not go
out after the engine is started or if it lights up
while the vehicle is in motion, see
( Y page 413).
300DrivingDriving and parking
Page 332 of 524

Changing lanes
If you wish to change to the passing lane (in
left-hand-drive vehicles, the passing lane is
the left-hand lane), DISTRONIC PLUS
supports you if:
R you are driving above 40 mph (60 km/h)
R DISTRONIC PLUS is maintaining the
distance to a vehicle in front
R you switch on the appropriate turn signals
R DISTRONIC PLUS does not detect a danger
of collision
If these conditions are met, your vehicle is
accelerated. Acceleration will be interrupted
if changing lanes takes too long or if the
distance between your vehicle and the
vehicle in front becomes too small.GWarning
DISTRONIC PLUS and Active Blind Spot Assist
are only aids designed to assist driving.
They do not relieve you of the responsibility
of paying attention. The driver remains fully
responsible for the vehicle's distance from
other vehicles, the vehicle's speed and for
braking in good time. Always pay attention to
traffic conditions and your surroundings.
Otherwise, you may fail to recognize dangers
in time, cause an accident and injure yourself
and others.
Stopping
GWarning
Never get out of the vehicle when DISTRONIC
PLUS is activated.
DISTRONIC PLUS must also never be
operated, activated or deactivated by a
passenger or from outside the vehicle.
DISTRONIC PLUS does not replace the
electric parking brake and must not be used
for parking.
The DISTRONIC PLUS braking effect is
canceled and the vehicle can start moving if:
R DISTRONIC PLUS is deactivated using the
cruise control lever.
R you accelerate.
R
there is a malfunction in the system or an
interruption in the power supply, e.g.
battery failure.
R the electrical system in the engine
compartment, the battery or the fuses are
tampered with.
R the battery is disconnected.
If you wish to leave the vehicle or park it,
deactivate DISTRONIC PLUS and secure the
vehicle against rolling away.
If DISTRONIC PLUS detects that the vehicle
in front is stopping, it brakes your vehicle until
it is stationary.
Once your vehicle is stationary, it remains
stationary and you do not need to depress the
brake.
i After a time, the electric parking brake
secures the vehicle and relieves the service
brake.
i Depending on the specified minimum
distance, your vehicle will come to a
standstill at a sufficient distance behind the
vehicle in front. The specified minimum
distance is set using the control on the
cruise control lever.
Setting a speedGWarning
Keep in mind that it may take a brief moment
until the vehicle has made the necessary
adjustments.
Increase or decrease the set vehicle speed to
a value that the prevailing road conditions and
legal speed limits permit. Otherwise, sudden
and unexpected acceleration or deceleration
of the vehicle could cause an accident and/
or serious injury to you and others.
330Driving systemsDriving and parking
Page 338 of 524

Deactivating the HOLD function
The HOLD function is deactivated
automatically if:
R you accelerate and the transmission is in
position D or R.
R the transmission is in position P.
R you apply the brakes again with a certain
amount of pressure until HOLD disappears
from the instrument cluster.
R you secure the vehicle using the electric
parking brake.
R you activate DISTRONIC PLUS.
i After a time, the electric parking brake
secures the vehicle and relieves the service
brake.
GWarning
Never get out of the vehicle when the HOLD
function is activated.
The HOLD function must never be operated
or deactivated by a passenger or from outside
the vehicle.
The HOLD function does not replace the
electric parking brake and must not be used
for parking.
The braking effect of the HOLD function is
canceled and the vehicle could roll away if:
R the HOLD function is deactivated by
depressing the accelerator pedal or the
brake pedal.
R there is a malfunction in the system or an
interruption in the power supply, e.g.
battery failure.
R the electrical system in the engine
compartment, the battery or the fuses are
tampered with.
R the battery is disconnected.
AIRMATIC
Vehicle level
Your vehicle regulates its height
automatically. All-round self-leveling ensures
the best possible suspension and constant
ground clearance, even with a laden vehicle.
When you drive fast, the vehicle is lowered
automatically to improve driving safety and to
reduce fuel consumption.
The following vehicle levels are possible on
vehicles without 4MATIC:
R normal.
R raised: the vehicle is raised above the
normal level by 1.00 in (25 mm).
R lowered: the vehicle is lowered beyond the
normal level by 0.60 in (15 mm).
The following vehicle levels are possible on
vehicles with 4MATIC:
R normal: in comfort mode, the vehicle is
raised above Sport mode by 0.40 in
(10 mm).
R raised: in comfort mode, the vehicle is
raised by about 0.60 in (15 mm) and in
Sport mode by about 1.00 in (25 mm) over
the normal level.
R lowered: the vehicle is lowered beyond the
normal level by 0.40 in (10 mm).
The "Normal" and "Raised" vehicle levels can
be set manually.
The "Lowered” vehicle level is set
automatically:
R in vehicles without 4MATIC at speeds
above 60 mph (100 km/h)
R in vehicles with 4MATIC at speeds above
50 mph (80 km/h)
Setting the vehicle level
Select the "Normal" setting for normal road
surfaces and "Raised" for driving with snow
chains or on particularly poor road surfaces.
Your selection remains stored even if you
remove the SmartKey from the ignition lock.
336Driving systemsDriving and parking
Page 411 of 524

Display messagesPossible causes/consequences and M Solutionsh
Check Tire PressureGRisk of accident
The tire pressure in one or more tires has dropped significantly.
XStop the vehicle without making any sudden steering or braking
maneuvers. Pay attention to the traffic conditions as you do so.XIf necessary, change a wheel ( Y page 502).XCheck the tire pressure. If necessary, correct the tire pressure
( Y page 487).h
Correct Tire
PressureThe tire pressure is insufficient in at least one of the tires or the
tire pressure difference between the wheels is too great.XCheck the tire pressures at the next opportunity. If necessary,
correct the tire pressure ( Y page 487).
Vehicle
Display messagesPossible causes/consequences and M SolutionsShift to P or N
to startto Start
Engine to Start
EngineYou have attempted to start the engine with the transmission in
position R or D.XShift the transmission to position P or N.Auxiliary Battery
Malfunction
(white display
message)The auxiliary battery for the automatic transmission is no longer
being charged.XVisit a qualified specialist workshop.Auxiliary Battery
Malfunction
(red display message)The auxiliary battery for the automatic transmission is discharged.
If there is a malfunction in the vehicle's electrical system, you may
not be able to change the transmission position.XPull over and stop the vehicle safely as soon as possible, paying
attention to road and traffic conditions. Do not continue driving
under any circumstances.XConsult a qualified specialist workshop.Apply brake to
Shift from 'P'You have attempted to move the transmission selector lever to
position D, R or N without depressing the brake pedal.XDepress the brake pedal.Door Open
Vehicle Not in ParkThe driver's door is open and the transmission is in position R, N
or D.XShift the transmission to position P.XEngage the parking brake.Display messages409On-board computer and displaysZ