2011 MERCEDES-BENZ S-Class cluster
[x] Cancel search: clusterPage 124 of 524

removed, the settings on the front-passenger
side are saved for approximately 30 minutes
longer. After this period, reactivation on the
front-passenger side means that the settings
from the driver's side will be used.
Cordless headphones for the front
passenger
There are different cordless headphones for
the front passenger and the rear
compartment.
The cordless headphones for the front
passenger can be identified by SPLITVIEW
symbol : on the headband.
The cordless headphones for the front
passenger cannot be used in the rear
compartment. Equally, the headphones for
the rear compartment cannot be used by the
front passenger.
Swiveling the COMAND display and
setting the brightness
! Do not place any objects in front of or
behind the COMAND display and/or do not
secure any objects to the COMAND
display. Movement could otherwise be
prevented when folding the display in/out.
You can swivel the COMAND display7. The
buttons are located beside the COMAND
display.
Swiveling:To swivel the display to the left;To swivel the display to the right
Setting the brightness
:Brightness of the instrument cluster
lighting
;Brightness of the COMAND display
Brighter or dimmer:
XTurn control : or ; clockwise or counter-
clockwise.
iIf Night View Assist Plus is activated, only
the brightness of the multifunction display
is adjusted with control :.
Display design
When the default settings are selected, the
display automatically switches between day
design and night design.
You can change these settings using
COMAND (Y page 141).
7Not with SPLITVIEW.122At a glanceCOMAND
Page 182 of 524

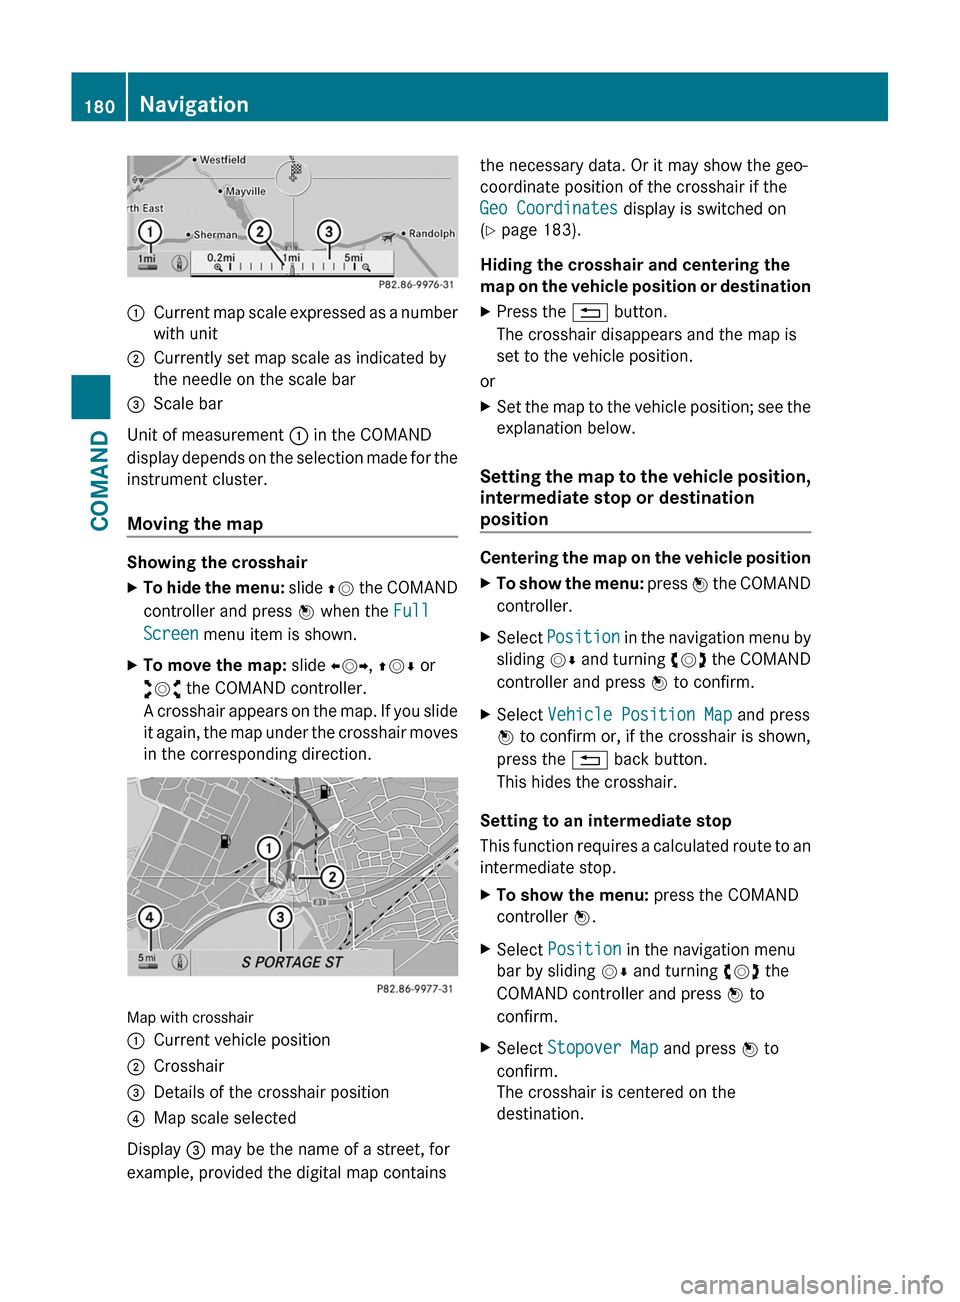
:Current map scale expressed as a number
with unit
;Currently set map scale as indicated by
the needle on the scale bar
=Scale bar
Unit of measurement : in the COMAND
display depends on the selection made for the
instrument cluster.
Moving the map
Showing the crosshair
XTo hide the menu: slide ZV the COMAND
controller and press W when the Full
Screen menu item is shown.
XTo move the map: slide XVY, ZVÆ or
aVb the COMAND controller.
A crosshair appears on the map. If you slide
it again, the map under the crosshair moves
in the corresponding direction.
Map with crosshair
:Current vehicle position;Crosshair=Details of the crosshair position?Map scale selected
Display = may be the name of a street, for
example, provided the digital map contains
the necessary data. Or it may show the geo-
coordinate position of the crosshair if the
Geo Coordinates display is switched on
(Y page 183).
Hiding the crosshair and centering the
map on the vehicle position or destination
XPress the % button.
The crosshair disappears and the map is
set to the vehicle position.
or
XSet the map to the vehicle position; see the
explanation below.
Setting the map to the vehicle position,
intermediate stop or destination
position
Centering the map on the vehicle position
XTo show the menu: press W the COMAND
controller.
XSelect Position in the navigation menu by
sliding VÆ and turning cVd the COMAND
controller and press W to confirm.
XSelect Vehicle Position Map and press
W to confirm or, if the crosshair is shown,
press the % back button.
This hides the crosshair.
Setting to an intermediate stop
This function requires a calculated route to an
intermediate stop.
XTo show the menu: press the COMAND
controller W.
XSelect Position in the navigation menu
bar by sliding VÆ and turning cVd the
COMAND controller and press W to
confirm.
XSelect Stopover Map and press W to
confirm.
The crosshair is centered on the
destination.
180NavigationCOMAND
Page 248 of 524

XSelect Brightness, Contrast, color or
Auto using the 9: buttons and
press 9 to confirm.
An adjustment scale appears.
XSelect a setting using the 9:
buttons and press the 9 button to confirm.
Changing the picture format
XTo show the menu: press the 9 button
on the remote control.
or
XSelect Menu while the navigation menu
(Y page 237) is shown and press the 9
button to confirm.
XSelect DVD-V using the :=;
buttons and press the 9 button to confirm.
The ä icon in front of the 16:9
optimized, 4:3 or Widescreen menu item
indicates the format currently set.
XSelect a format using the 9:
buttons and press the 9 button to confirm.
System settings
Notes
You can adjust all system settings individually
for each screen without affecting the other
screen. You make these settings using the
remote control.
Selecting the display language
XSelect System using the 9=;
button on the remote control and press
9 to confirm.
You see the system menu on the selected
rear screen.
XSelect Settings using the : button
and press the 9 button to confirm.
XSelect Language using the 9:
buttons and press the 9 button to confirm.
You see the language list. The # dot
indicates the current setting.
XSelect a language using the 9:
buttons and press the 9 button to confirm.
The Rear Seat Entertainment System
activates the selected language.
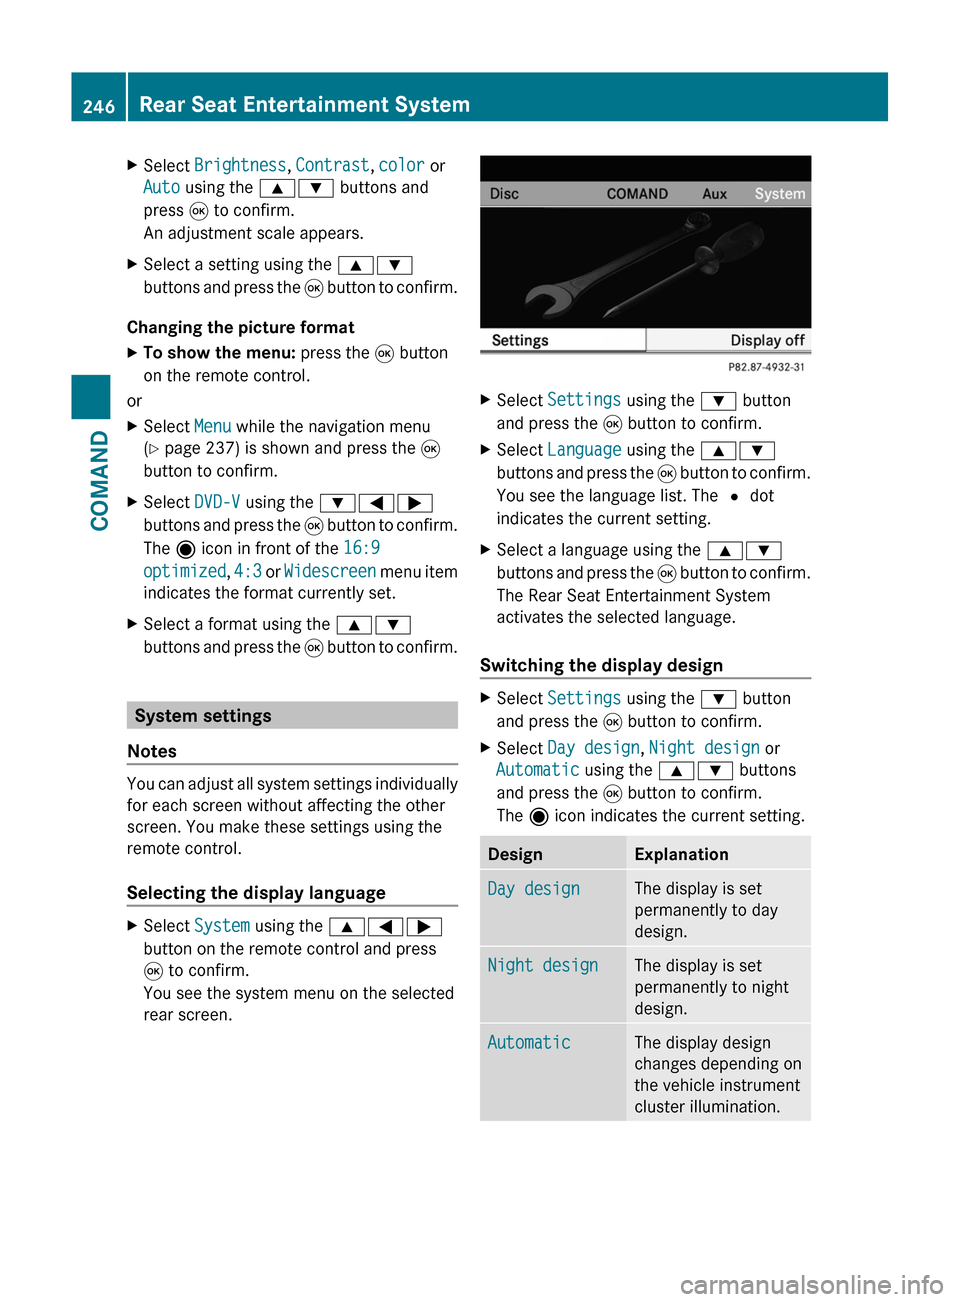
Switching the display design
XSelect Settings using the : button
and press the 9 button to confirm.
XSelect Day design, Night design or
Automatic using the 9: buttons
and press the 9 button to confirm.
The ä icon indicates the current setting.
DesignExplanationDay designThe display is set
permanently to day
design.
Night designThe display is set
permanently to night
design.
AutomaticThe display design
changes depending on
the vehicle instrument
cluster illumination.
246Rear Seat Entertainment SystemCOMAND
Page 277 of 524

High-beam headlampsXTo switch on the high-beam headlamps:
turn the key in the ignition lock to position
2 or start the engine.
XTurn the light switch to L.XPress the combination switch beyond the
pressure point in the direction of
arrow :.
The K indicator lamp in the instrument
cluster lights up.
XTo switch off the high-beam
headlamps: move the combination switch
back to its normal position.
The K indicator lamp in the instrument
cluster goes out.
Adaptive Highbeam Assist
GWarning!
The Adaptive Highbeam Assist is only an aid
intended to support you while driving. The
driver is and remains responsible for proper
vehicle lighting in accordance with the
prevailing light, sight and traffic conditions.
The system may be impaired or unavailable
when
Rvisibility is poor, e.g. due to snow, rain, fog,
or heavy spray
Rthe optical sensor area of the windshield is
dirty, fogged up, or covered by a sticker for
example
The system cannot recognize the following
road users:
RRoad users without a lighting system of
their own, e.g. pedestrians
RRoad users with dim lighting of their own,
e.g. cyclists
RRoad users whose lighting is obstructed,
e.g. road users behind a guardrail
RIn some seldom cases, even road users with
a lighting system of their own may be
recognized too late or not at all.
The automatic high-beam headlamps will then
not be deactivated or it will be activated in
spite of preceding or oncoming road users.
This could endanger you and/or others and
cause an accident. Always pay close attention
to the traffic situation and switch off the high
beam manually if necessary.
You can use this function to set the
headlamps to change between low beam and
high beam automatically. The system
recognizes vehicles with their lights on, either
approaching from the opposite direction or
traveling in front of your vehicle, and
consequently switches the headlamps from
high beam to low beam.
The system automatically adapts the low-
beam headlamp range depending on the
distance to the other vehicle. Once the
system no longer detects any other vehicles,
it reactivates the high-beam headlamps.
The system's optical sensor is located behind
the windshield near the overhead control
panel.
XTo activate: activate the Adaptive
Highbeam Assist function using the on-
board computer (Y page 377).
XTurn the light switch to c.Exterior lighting275Lights and windshield wipersZ
Page 278 of 524

XPress the combination switch beyond the
pressure point in the direction of arrow :
(Y page 274).
When the low-beam headlamps are
switched on, the _ indicator lamp in the
instrument cluster lights up.
If you are driving at speeds above
approximately 28 mph (45 km/h):
the headlamp range is set automatically
depending on the distance between the
vehicle and other road users.
If you are driving at speeds above
approximately 35 mph (55 km/h) and no
other road users are detected:
the high-beam headlamps are switched on
automatically. The K indicator lamp in
the instrument cluster also lights up.
If you are driving at speeds below
approximately 30 mph (45 km/h) or other
road users are detected or the roads are
illuminated sufficiently:
the high-beam headlamps are switched off
automatically. The K indicator lamp in
the instrument cluster goes out. The _
indicator lamp in the instrument cluster
stays on.
XTo deactivate: move the combination
switch back to its normal position.
The _ indicator lamp in the instrument
cluster goes out.
High-beam flasher
XTo switch on: turn the key in the ignition
lock to position 1 or 2 or start the engine.
XPull the combination switch briefly in the
direction of arrow =.Hazard warning lamps
The hazard warning lamps automatically
switch on if:
Ran air bag is deployed.
Rthe vehicle decelerates rapidly from a
speed of more than 45 mph (70 km/h) and
comes to a standstill.
XTo switch on the hazard warning lamps:
press button :.
All turn signals flash. If you now switch on
a turn signal using the combination switch,
only the turn signal lamp on the
corresponding side of the vehicle will flash.
XTo switch off the hazard warning
lamps: press button :.
The hazard warning lamp switches off
automatically after full brake application if the
vehicle then reaches a speed of above 6 mph
(10 km/h).
iThe hazard warning lamps still operate if
the ignition is switched off.
Headlamp cleaning system
The headlamps are cleaned automatically if
the "Wipe with washer fluid" function is
operated ten times while the lights are on and
the engine is running (Y page 281). When you
switch off the ignition, the automatic
headlamp cleaning system is reset and
counting is resumed from 0.
276Exterior lightingLights and windshield wipers
Page 301 of 524

gear when the engine is idling normally and
when your right foot is firmly on the brake
pedal.GWarning!
HYBRID vehicles: It is imperative that you read
the HYBRID Supplemental Operating
Instructions included in your vehicle literature
portfolio. You may otherwise not receive all
necessary safety information and warning for
the operation of your vehicle.
! Warm up the engine quickly. Do not use
the engine's full performance until it has
reached operating temperature.
Only shift the automatic transmission to
the desired drive position when the vehicle
is stationary.
Where possible, avoid spinning the drive
wheels when pulling away on slippery
roads. You could otherwise damage the
drive train.
! S 63 AMG: at low engine oil temperatures
below 68 ‡ (+20 † ), the maximum engine
speed is restricted in order to protect the
engine. To protect the engine and maintain
smooth engine operation, avoid driving at
full throttle when the engine is cold.
SmartKey positions
SmartKey
gTo remove the SmartKey1Power supply for some consumers, such
as the windshield wipers2Ignition (power supply for all consumers)
and drive position3To start the engine
As soon as the ignition is switched on, all the
indicator lamps in the instrument cluster light
up. The indicator lamps of the high-beam
headlamps or the turn signal lamps only light
up if the high-beam headlamps or the turn
signal lamps are switched on. If an indicator
lamp does not light up when the ignition is
switched on, check it and replace it if
necessary. If an indicator lamp does not go
out after the engine is started or if it lights up
while the vehicle is in motion, see
( Y page 413).
XRemove the SmartKey when the engine is
switched off.
The battery may otherwise discharge.
If you cannot turn the SmartKey in the ignition
lock, the vehicle battery may not be charged
sufficiently.
XCheck the vehicle battery and charge if
necessary ( Y page 470).
or
XJump-start the vehicle ( Y page 471).
i
The SmartKey can be turned in the
ignition lock even if it is not the correct
SmartKey for the vehicle. The ignition is not
switched on. The engine cannot be started.
KEYLESS-GO
Vehicles with KEYLESS-GO are equipped with
a SmartKey with an integrated KEYLESS-GO
function and a detachable Start/Stop button.
The Start/Stop button must be inserted in the
ignition lock and the SmartKey must be in the
vehicle.
Pressing the Start/Stop button several times
in succession corresponds to the different
key positions in the ignition lock. This is only
Driving299Driving and parkingZ
Page 302 of 524

the case if you are not depressing the brake
pedal.
If you depress the brake pedal and press the
Start/Stop button, the engine starts
immediately.
The Start/Stop button can be removed from
the ignition lock. Then you can insert the
SmartKey in the ignition lock.
i You do not have to remove the Start/Stop
button from the ignition lock when you
leave the vehicle. However, you should
always take the SmartKey with you when
leaving the vehicle. The vehicle can be
started with the Start/Stop button and the
electrical equipment can be operated while
the SmartKey is in the vehicle.:Start/Stop button;Ignition lockXInsert Start/Stop button : into ignition
lock ;.
i
When you insert Start/Stop button :
into ignition lock ;, the system requires a
detection time of two seconds before you
can use Start/Stop button :.
XShift the transmission to position P.XDo not press the brake pedal.
Start/Stop button
=USA only?Canada onlyXPosition 0: if Start/Stop button : has not
yet been pressed, this corresponds to the
SmartKey being removed from the ignition.XPosition 1: press Start/Stop button :.
You can now activate the windshield
wipers, for example.
i If you then open the driver's door when in
this position, the power supply is
deactivated.
XPosition 2 (ignition): press Start/Stop
button : twice.
i
If you press Start/Stop button : once
when in this position and the driver's door
is open, the power supply is deactivated
again.
As soon as the ignition is switched on, all the
indicator lamps in the instrument cluster light
up. The indicator lamps of the high-beam
headlamps or the turn signal lamps only light
up if the high-beam headlamps or the turn
signal lamps are switched on. If an indicator
lamp does not light up when the ignition is
switched on, check it and replace it if
necessary. If an indicator lamp does not go
out after the engine is started or if it lights up
while the vehicle is in motion, see
( Y page 413).
300DrivingDriving and parking
Page 304 of 524

XRelease the brake pedal.XCarefully depress the accelerator pedal.
The electric parking brake (Y page 317) is
automatically released.
The red F indicator lamp (USA only) or
the red ! indicator lamp (Canada only)
in the instrument cluster goes out.
iThe vehicle locks centrally once you have
pulled away. The locking knobs in the doors
drop down.
You can open the doors from the inside at
any time.
You can also deactivate the automatic
locking feature .
iUpshifts take place at higher engine
speeds after a cold start. This helps the
catalytic converter to reach its operating
temperature more quickly.
Hill start assist
Hill start assist helps you when pulling away
forwards or in reverse on an uphill gradient.
It holds the vehicle for a short time after you
have removed your foot from the brake pedal.
This gives you enough time to move your foot
from the brake pedal to the accelerator pedal
and depress it before the vehicle begins to
roll.
GWarning
Never leave the vehicle when it is held by hill
start assist. After approximately one second,
hill start assist will no longer brake your
vehicle and it could roll away.
XTake your foot off the brake pedal.
iOnce you have taken your foot off the
brake pedal, the vehicle is held for around
one second.
XPull away.
Hill start assist will not function if:
Ryou are pulling away on a level road or a
downhill gradient.
Rthe transmission is in position N.
Rthe electric parking brake is applied.
RESP® is malfunctioning.
ECO start/stop function
General notes
The ECO start/stop function is only available
for the S 63 AMG.
The ECO start/stop function is only available
in drive program C.
The ECO start/stop function switches the
engine off automatically when the vehicle
stops moving.
The engine starts automatically when you pull
away again. The ECO start/stop function
thereby helps you to reduce the fuel
consumption and emissions of your vehicle.
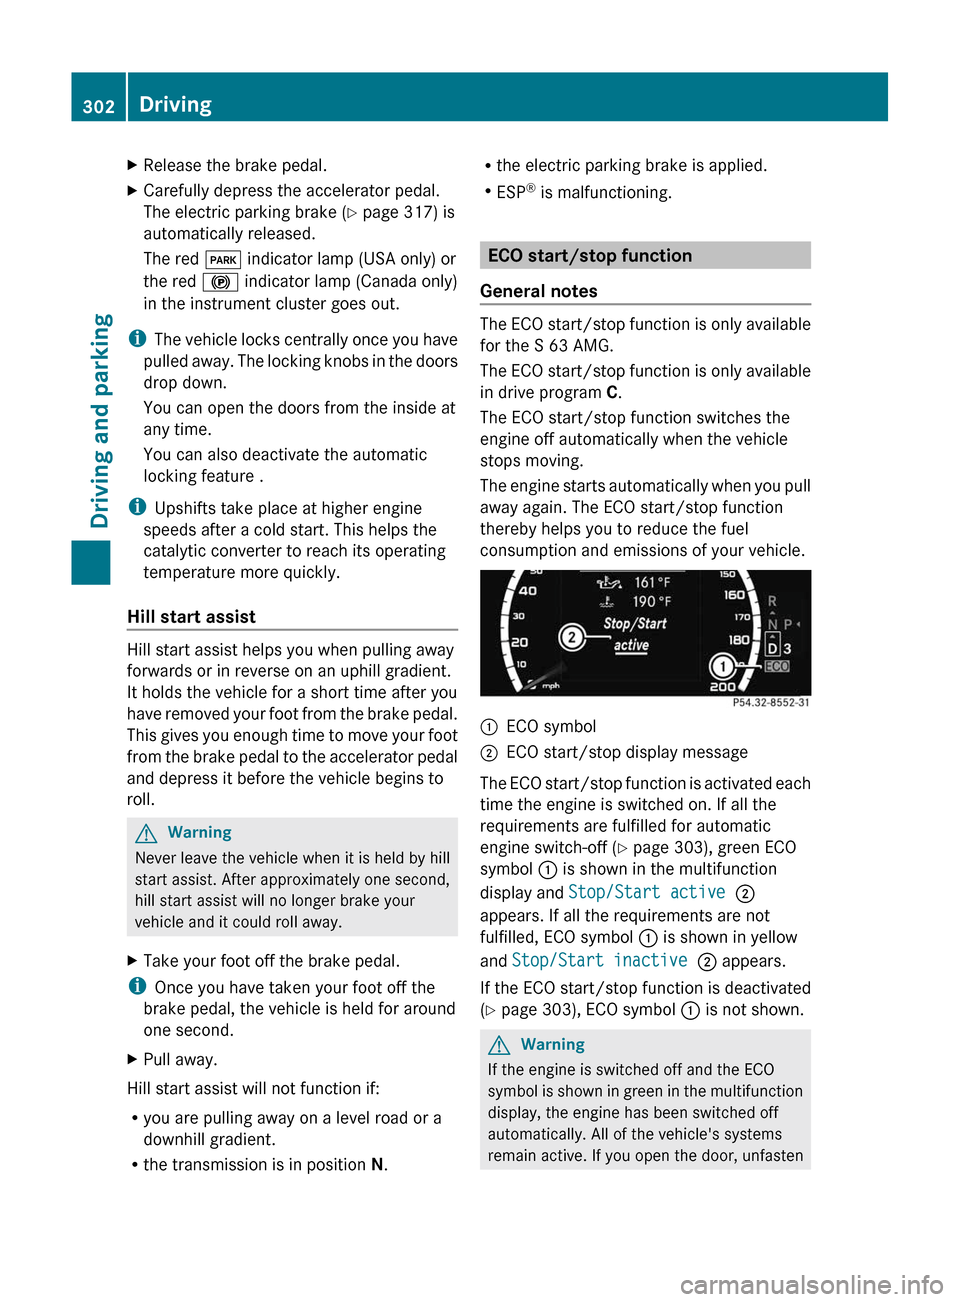
:ECO symbol;ECO start/stop display message
The ECO start/stop function is activated each
time the engine is switched on. If all the
requirements are fulfilled for automatic
engine switch-off (Y page 303), green ECO
symbol : is shown in the multifunction
display and Stop/Start active ;
appears. If all the requirements are not
fulfilled, ECO symbol : is shown in yellow
and Stop/Start inactive ; appears.
If the ECO start/stop function is deactivated
(Y page 303), ECO symbol : is not shown.
GWarning
If the engine is switched off and the ECO
symbol is shown in green in the multifunction
display, the engine has been switched off
automatically. All of the vehicle's systems
remain active. If you open the door, unfasten
302DrivingDriving and parking