2011 MERCEDES-BENZ S-Class Sd card
[x] Cancel search: Sd cardPage 207 of 524

stores the destination in the address book
with the complete navigable address data.
In this case, navigation can be started
without any further data input.
If the contact entry contains a postal
address, e.g. as a result of importing a
vCard, the system can also navigate to this
address. If the data is incomplete or
unclear, COMAND asks the user to enter
the relevant address data. After the entry
has been completed and navigation has
been started, COMAND replaces the
existing address with the navigable
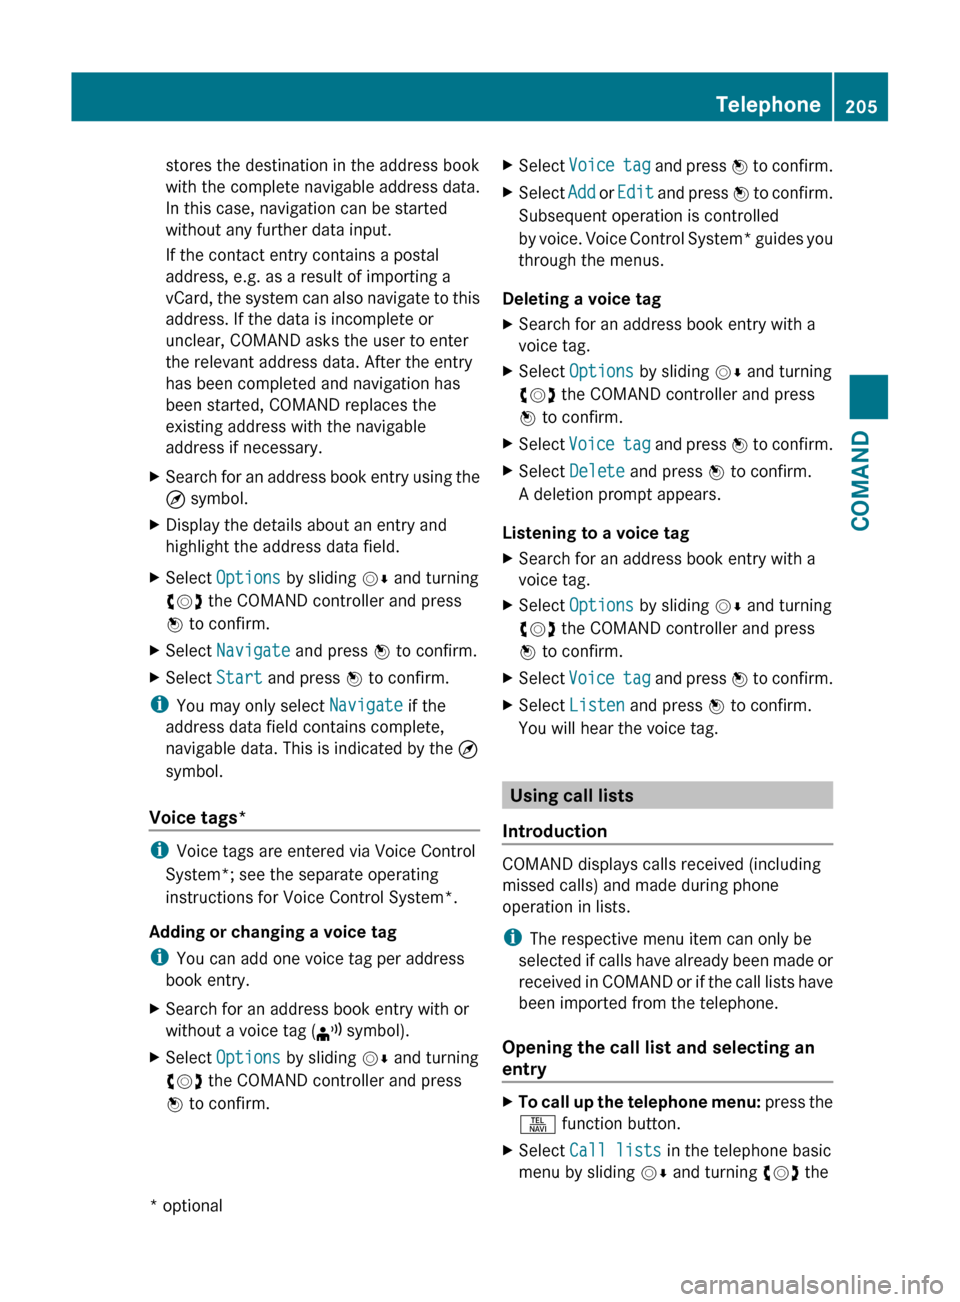
address if necessary.XSearch for an address book entry using the
¤ symbol.XDisplay the details about an entry and
highlight the address data field.XSelect Options by sliding VÆ and turning
cVd the COMAND controller and press
W to confirm.XSelect Navigate and press W to confirm.XSelect Start and press W to confirm.
i
You may only select Navigate if the
address data field contains complete,
navigable data. This is indicated by the ¤
symbol.
Voice tags*
i Voice tags are entered via Voice Control
System*; see the separate operating
instructions for Voice Control System*.
Adding or changing a voice tag
i You can add one voice tag per address
book entry.
XSearch for an address book entry with or
without a voice tag ( ¦ symbol).XSelect Options by sliding VÆ and turning
cVd the COMAND controller and press
W to confirm.XSelect Voice tag and press W to confirm.XSelect Add or Edit and press W to confirm.
Subsequent operation is controlled
by voice. Voice Control System* guides you
through the menus.
Deleting a voice tag
XSearch for an address book entry with a
voice tag.XSelect Options by sliding VÆ and turning
cVd the COMAND controller and press
W to confirm.XSelect Voice tag and press W to confirm.XSelect Delete and press W to confirm.
A deletion prompt appears.
Listening to a voice tag
XSearch for an address book entry with a
voice tag.XSelect Options by sliding VÆ and turning
cVd the COMAND controller and press
W to confirm.XSelect Voice tag and press W to confirm.XSelect Listen and press W to confirm.
You will hear the voice tag.
Using call lists
Introduction
COMAND displays calls received (including
missed calls) and made during phone
operation in lists.
i The respective menu item can only be
selected if calls have already been made or
received in COMAND or if the call lists have
been imported from the telephone.
Opening the call list and selecting an
entry
XTo call up the telephone menu: press the
S function button.XSelect Call lists in the telephone basic
menu by sliding VÆ and turning cVd theTelephone205COMAND* optionalZ
Page 216 of 524

of Mercedes-Benz USA, LLC. Operation
may also be impaired in certain locations
(e.g. tunnels, parking garages or inside or
next to buildings) or near certain
constructions.
iSIRIUS XM Radio offers more than 130
digital-quality radio channels providing
100% commercial-free music, sport, news
and entertainment.
SIRIUS XM Radio employs a fleet of high-
performance satellites to broadcast around
the clock in the contiguous USA and
Canada.
Satellite radio is available for a monthly fee.
Details are available from the SIRIUS XM
Service Center and at
http://www.sirius.com (USA) or
http://www.siriuscanada.com
(Canada).
Registering satellite radio
XSelect Audio in the main function bar by
sliding ZV and turning cVd the COMAND
controller and press W to confirm.
XSelect Satellite radio and press W to
confirm.
Service information screen
1Provider's phone number (SIRIUS XM)2SIRIUS XM ID of your satellite receiverXCall the phone number of your satellite
radio provider shown on the screen.
iYou can also have the satellite service
activated online. To do so, visit the SIRIUS
XM Radio website at
http://www.sirius.com (USA) or
http://www.siriuscanada.com
(Canada).
Once the connection has been established:
XFollow the instructions of the service staff.
The activation process may take up to ten
minutes. If the activation is completed
successfully, the No Service message
appears in the display, followed by the
satellite radio main menu.
iIf registration is not included when
purchasing the system, your credit card
details will be required to activate your
account.
If the satellite receiver is not installed or is
not installed correctly, the Device not
available. message will appear.
Switching to satellite radio mode
Notes
Important notes on registration, see
"Registering satellite radio" (Y page 214).
Switching to satellite radio mode
XSelect Audio in the main function bar by
sliding ZV and turning cVd the COMAND
controller and press W to confirm.
If satellite radio mode was the last mode
selected, it will now be active.
If another audio mode is switched on, you
can now switch to satellite radio mode in
the audio menu.
XSelect Audio by sliding ZV the COMAND
controller and press W to confirm.
The audio menu appears.
XSelect Sat. Radio and press W to
confirm.
The No Service message appears when
starting up or if no signal is being received.
If the satellite receiver is not installed or is
not installed correctly, the Device not
available. message will appear.
214AudioCOMAND
Page 220 of 524

XTo load a single magazine tray: press
respective button =.
XRemove any CD/DVD which may be in
slot :.
XWait until the indicator lamp for button =
which has been pressed flashes quickly.
XInsert the CD/DVD to be loaded into
slot :.
If the CD/DVD has been inserted properly
and if it is a permissible type, the last CD/
DVD loaded will be played.
XTo load all six magazine trays: press
button ;.
The DVD changer checks the load status of
all magazine trays and switches to the first
empty tray.
XWait until the indicator lamp for the
respective button flashes quickly.
XInsert a disc into slot :.
The DVD changer switches to the next
empty magazine tray.
XRepeat the last two steps until all trays are
loaded.
If the CD/DVD has been inserted properly
and if it is a permissible type, the last CD/
DVD loaded will be played.
iIf you remove one disc while playing
another disc, the DVD changer interrupts
playback. Playback continues once the disc
has been removed.
XTo remove a disc: press respective button
=.
XRemove the CD/DVD from slot :.
If the CD/DVD is not removed from
slot :, it will be automatically drawn in
again after a short while.
XTo remove all discs: press button ?.
The DVD changer ejects the CD/DVD from
the tray currently in use.
XRemove the CD/DVD from slot :.
The DVD changer switches to the next
loaded magazine tray and ejects the CD/
DVD.
XRepeat the last step until the magazine is
empty.
Loading and removing SD cards
iNot all SD memory cards are designed for
the temperatures which may be reached in
the vehicle.
Due to the wide range of SD cards available
on the market, Mercedes-Benz cannot
guarantee playback for all brands of SD
memory card.
XTo load an SD card: press the SD card into
slot :. The tapered side must point
towards the right.
If the SD card contains MP3 tracks,
COMAND will play them back.
XTo remove the SD card: press the SD card
into slot : as far as it will go and then
release it again.
XPull out the card.
Activating audio CD/DVD or MP3 mode
Option 1
XInsert a CD/DVD (Y page 217) or an SD
card (Y page 218).
COMAND loads the medium inserted and
starts to play it.
218AudioCOMAND
Page 221 of 524

Option 2XPress the R function button once or
twice.XSelect an audio medium from the media list
( Y page 221).
Option 3
XSelect Audio in the main function bar by
sliding ZV and turning cVd the COMAND
controller and press W to confirm.
If disc mode was the last mode selected, it
will now be active.
If another audio source is switched on, you
can now switch to disc mode in the audio
menu.XSelect Audio by sliding ZV and turning
cVd the COMAND controller and press
W to confirm.
The audio menu appears.XSelect Disc or Memory card and press
W to confirm.
The desired disc mode is activated.XSelect an audio medium from the media list
( Y page 221).
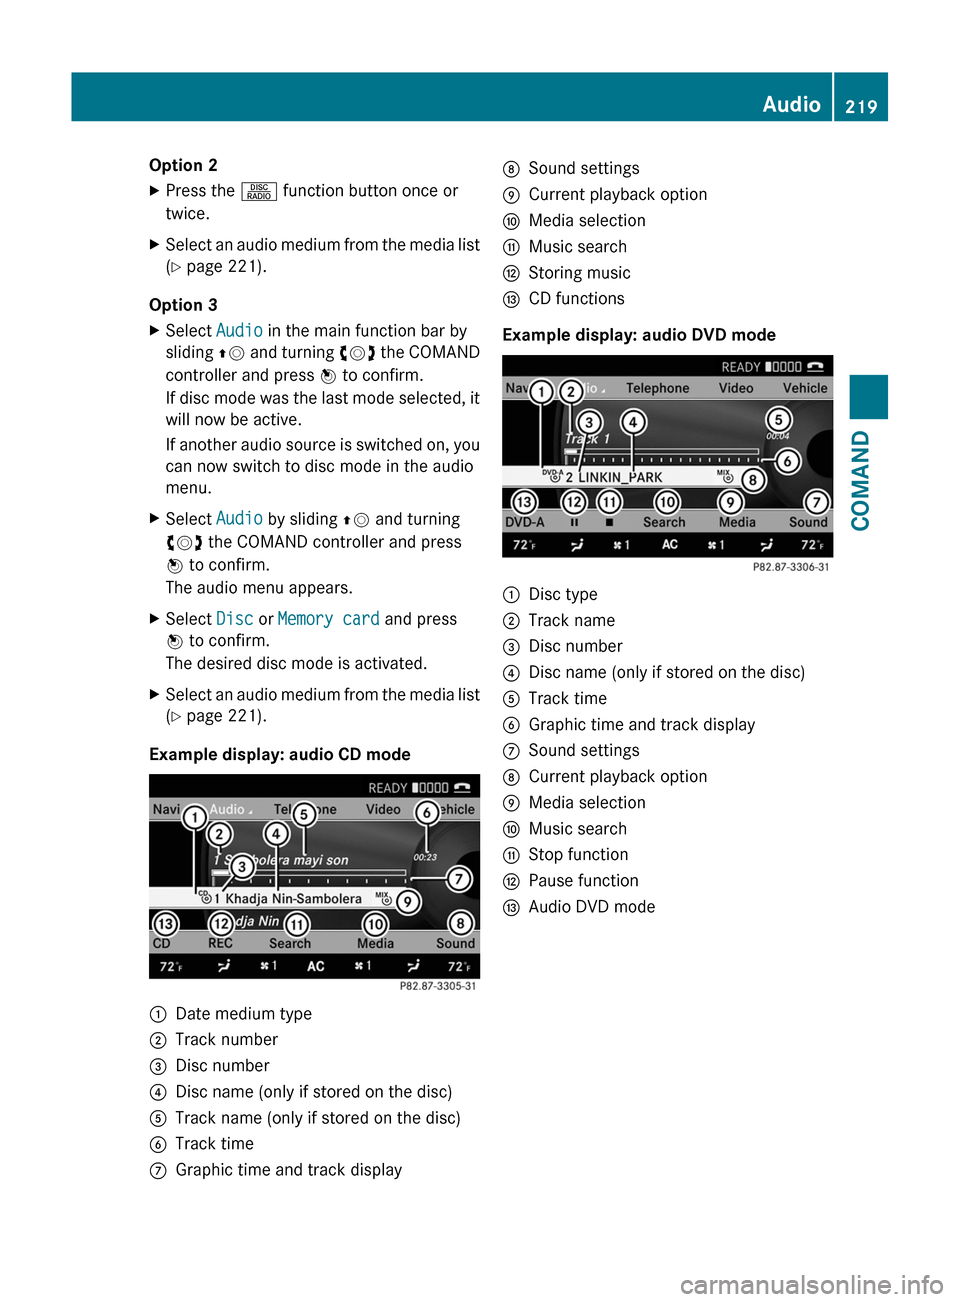
Example display: audio CD mode
:Date medium type;Track number=Disc number?Disc name (only if stored on the disc)ATrack name (only if stored on the disc)BTrack timeCGraphic time and track displayDSound settingsECurrent playback optionFMedia selectionGMusic searchHStoring musicICD functions
Example display: audio DVD mode
:Disc type;Track name=Disc number?Disc name (only if stored on the disc)ATrack timeBGraphic time and track displayCSound settingsDCurrent playback optionEMedia selectionFMusic searchGStop functionHPause functionIAudio DVD modeAudio219COMANDZ
Page 223 of 524

Selecting CD/audio DVD/MP3 discs
Selecting via the media list
XIn CD/audio DVD and MP3 mode: select
Media by sliding VÆ or turning cVd the
COMAND controller and press W to
confirm.
The media list appears. The # dot
indicates the currently selected medium.
Media list
The media list shows the discs currently
available.
Media list (when equipped with a DVD
changer)
Magazine trays, positions 1 to 6: readable
data media are audio CDs, MP3 CDs or MP3
DVDs, audio DVDs and video DVDs.
Memory card, position 7MUSIC REGISTER, position 8Media Interface, position 9USB, position 10
iIf a disc cannot be read, an entry appears
after the display in the magazine tray.
Equipped with a single DVD driveDVD drive, position 1: readable data media
are audio CDs, MP3 CDs or MP3 DVDs,
audio DVDs and video DVDs.
Memory card, position 2MUSIC REGISTER, position 3Media Interface, position 4USB, position 5XSelect the data medium by turning cVd
the COMAND controller and press W to
confirm.
iIf you select a video DVD, the system
switches to video DVD mode
(Y page 236).
Selecting a track using the number
keypad
XPress a number button, e.g. n, when the
display/selection window is active.
The medium at the corresponding position
in the media list is loaded and then played.
Selecting a track
Selecting by skipping to a track
XTo skip forwards or back to a track: slide
XVY or turn cVd the COMAND controller
when the display/selection window is
active.
The skip forward function skips to the next
track.
Skipping backwards restarts the current
track (if it has been playing for more than
eight seconds) or starts the previous track
(if the current track has only been playing
for a shorter time).
If you activate the Medium mix or Random
tracks playback option (MP3 mode only),
the track order is random.
XOn the multifunction steering wheel:
switch COMAND to audio CD, audio DVD or
MP3 mode (Y page 218).
XUse = or ; to select the Audio
menu.
XPress the 9 or : button on the
multifunction steering wheel.
Audio221COMANDZ
Page 226 of 524

XSelect Group by turning cVd and press
W to confirm.
The list of available audio formats appears.
The # dot indicates the format currently
selected.XSelect the audio format by turning cVd
and press W to confirm.XTo exit the menu: slide XVY the COMAND
controller or press the % button.
Playback options
The following options are available to you:
R Normal track sequence
The tracks are played in the normal order
(e.g. track 1, 2, 3, etc.).
In MP3 mode, the track order is determined
by the order in which the tracks are written
to the MP3 data carrier when it is created.
Alphabetical order is the most common.
Once all the tracks in a folder have been
played, the tracks in the next folder are
played.
R Medium mix
All the tracks on the medium are played in
random order (e.g. track 3, 8, 5 etc.).
R Random tracks (MP3 mode only)
You hear the tracks in the current active
folder and any subfolders in random order.
XTo select options: switch on audio CD/
DVD or MP3 mode ( Y page 218).XSelect CD, DVD-A or MP3 by sliding VÆ and
turning cVd the COMAND controller and
press W to confirm.
The options list appears. The # dot
indicates the option selected.XSelect an option by turning cVd and press
W to confirm.
The option is switched on. For all options
except "Normal track sequence", you will
see a corresponding display in the display/
selection window. See the example of the
display in audio CD mode ( Y page 219).i
The "Normal track sequence" option is
automatically selected when you change
the medium you are currently listening to
or when you select a different medium. If
an option is selected, it remains selected
after COMAND is switched on or off.
Notes on MP3 mode
Permissible discs
R CD-R and CD-RW
R DVD-R and DVD-RW
R DVD+R and DVD+RW
R SD memory card:
Permissible file systems
R ISO 9660/Joliet standard for CDs
R UDF for audio and video DVDs
R FAT16 or FAT32 for PCMCIA memory cards
with storage medium
Multisession CDs
For multisession CDs, the content of the first
session determines how COMAND will
process the CD. COMAND plays only one
session and gives priority to the audio CD
session.
If possible, use COMAND to play only CDs
which have been written in one session.
File structure of a data carrier
When you create a disc with compressed
music files, the tracks can be organized in
folders. A folder can also contain subfolders.
A disc can contain a maximum of 255 folders.
Each folder can contain a maximum of
255 tracks and 255 subfolders.
The disc may contain no more than eight
directory levels. Files beyond the eighth level
will not be recognized by the system.
Track and file names
When you create a disc with compressed
music files, you can assign names to the
tracks and folders.
COMAND uses these names accordingly for
the display. Folders which contain data other
224AudioCOMAND
Page 228 of 524

If you insert thicker discs, e.g. those that
contain data on both sides (DVD on one
side and audio data on the other), they
cannot be ejected and can damage the
drive.
Do not use discs with a diameter of 8 cm,
even with an adapter. Only use round discs
with a diameter of 12 cm.
iCOMAND is able to play back audio CDs
in multichannel audio format.
MUSIC REGISTER
General notes
You can store music files in MP3 or WMA
format in the MUSIC REGISTER. The memory
has a capacity of approximately 7 GB.
! Retain the original music files in a secure
location. An error in COMAND might result
in the loss of the music files stored in the
MUSIC REGISTER. Mercedes-Benz is not
liable for any loss of data.
Switching on the MUSIC REGISTER
XSelect Audio in the main function bar by
sliding ZV and turning cVd the COMAND
controller and press W to confirm.
If MUSIC REGISTER was the last mode
selected, it is now switched on.
If another audio source is switched on, you
can now switch on the MUSIC REGISTER in
the audio menu.
XSelect Music Register and press W to
confirm.
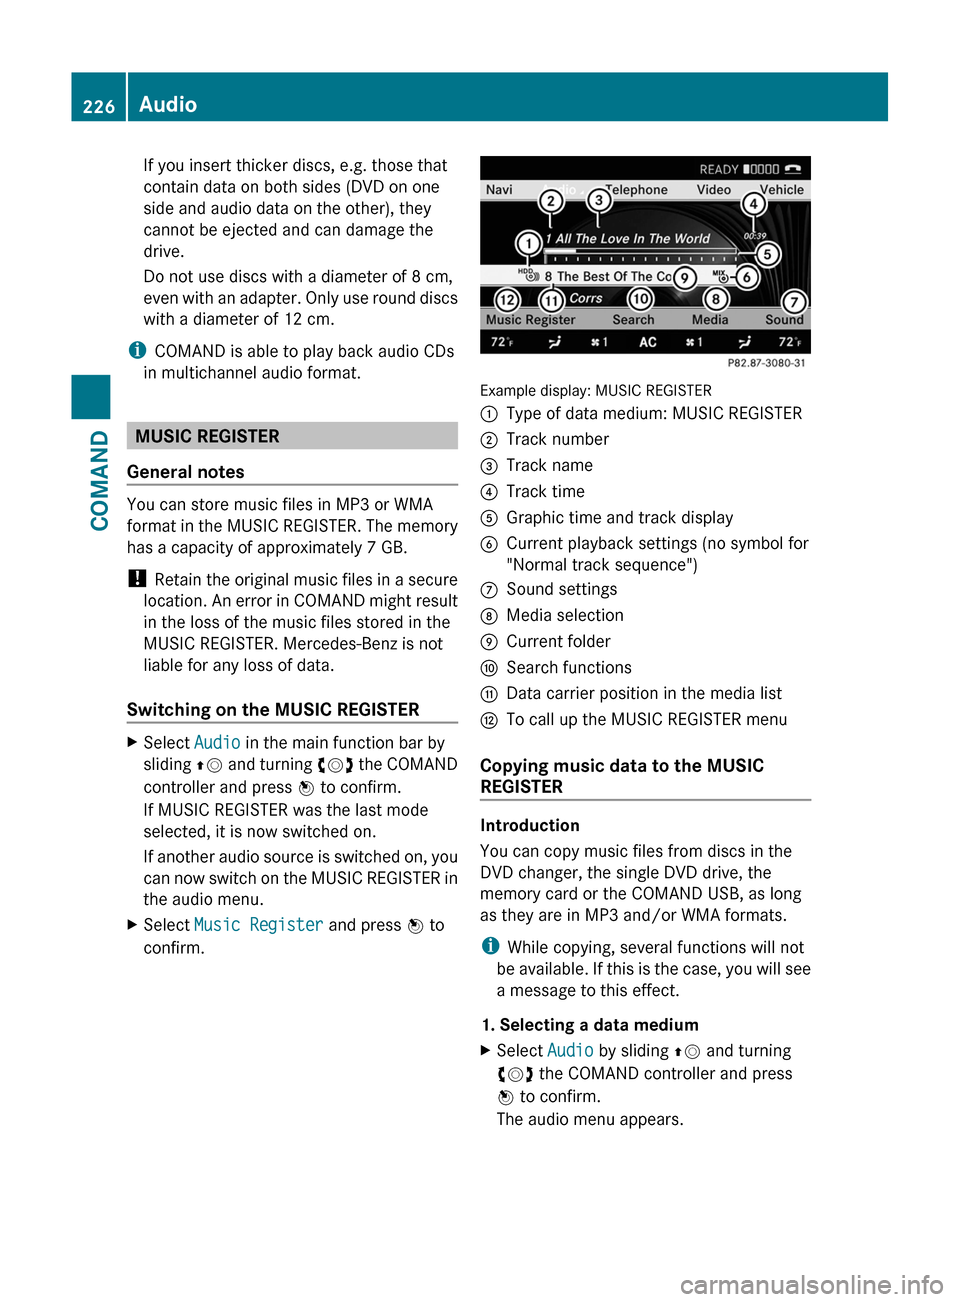
Example display: MUSIC REGISTER
:Type of data medium: MUSIC REGISTER;Track number=Track name?Track timeAGraphic time and track displayBCurrent playback settings (no symbol for
"Normal track sequence")
CSound settingsDMedia selectionECurrent folderFSearch functionsGData carrier position in the media listHTo call up the MUSIC REGISTER menu
Copying music data to the MUSIC
REGISTER
Introduction
You can copy music files from discs in the
DVD changer, the single DVD drive, the
memory card or the COMAND USB, as long
as they are in MP3 and/or WMA formats.
iWhile copying, several functions will not
be available. If this is the case, you will see
a message to this effect.
1. Selecting a data medium
XSelect Audio by sliding ZV and turning
cVd the COMAND controller and press
W to confirm.
The audio menu appears.
226AudioCOMAND
Page 229 of 524

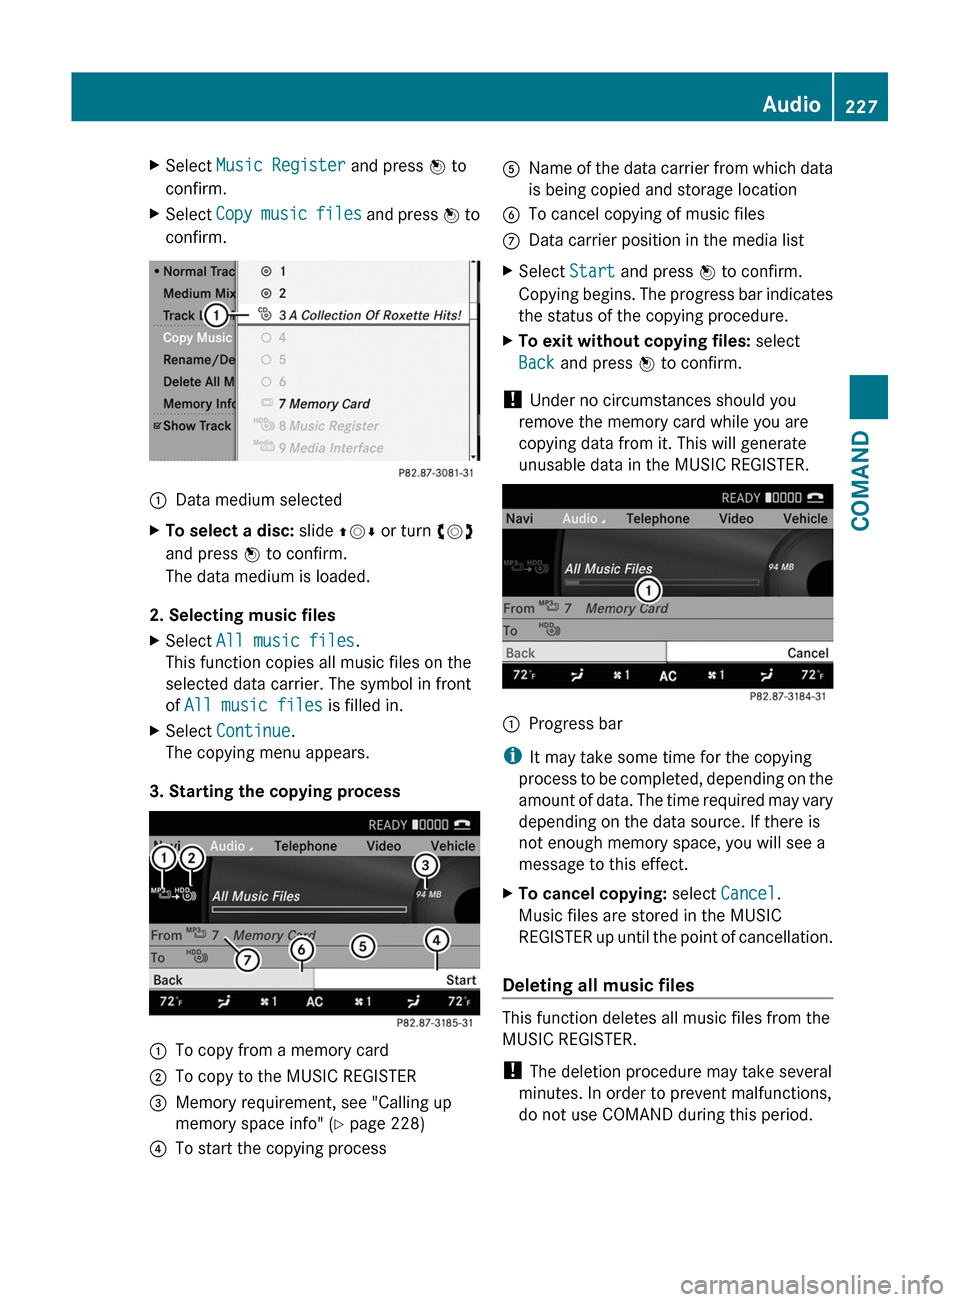
XSelect Music Register and press W to
confirm.
XSelect Copy music files and press W to
confirm.
:Data medium selectedXTo select a disc: slide ZVÆ or turn cVd
and press W to confirm.
The data medium is loaded.
2. Selecting music files
XSelect All music files.
This function copies all music files on the
selected data carrier. The symbol in front
of All music files is filled in.
XSelect Continue.
The copying menu appears.
3. Starting the copying process
:To copy from a memory card;To copy to the MUSIC REGISTER=Memory requirement, see "Calling up
memory space info" (Y page 228)
?To start the copying processAName of the data carrier from which data
is being copied and storage location
BTo cancel copying of music filesCData carrier position in the media listXSelect Start and press W to confirm.
Copying begins. The progress bar indicates
the status of the copying procedure.
XTo exit without copying files: select
Back and press W to confirm.
! Under no circumstances should you
remove the memory card while you are
copying data from it. This will generate
unusable data in the MUSIC REGISTER.
:Progress bar
iIt may take some time for the copying
process to be completed, depending on the
amount of data. The time required may vary
depending on the data source. If there is
not enough memory space, you will see a
message to this effect.
XTo cancel copying: select Cancel.
Music files are stored in the MUSIC
REGISTER up until the point of cancellation.
Deleting all music files
This function deletes all music files from the
MUSIC REGISTER.
! The deletion procedure may take several
minutes. In order to prevent malfunctions,
do not use COMAND during this period.
Audio227COMANDZ