2011 MERCEDES-BENZ S-Class Lights
[x] Cancel search: LightsPage 108 of 524

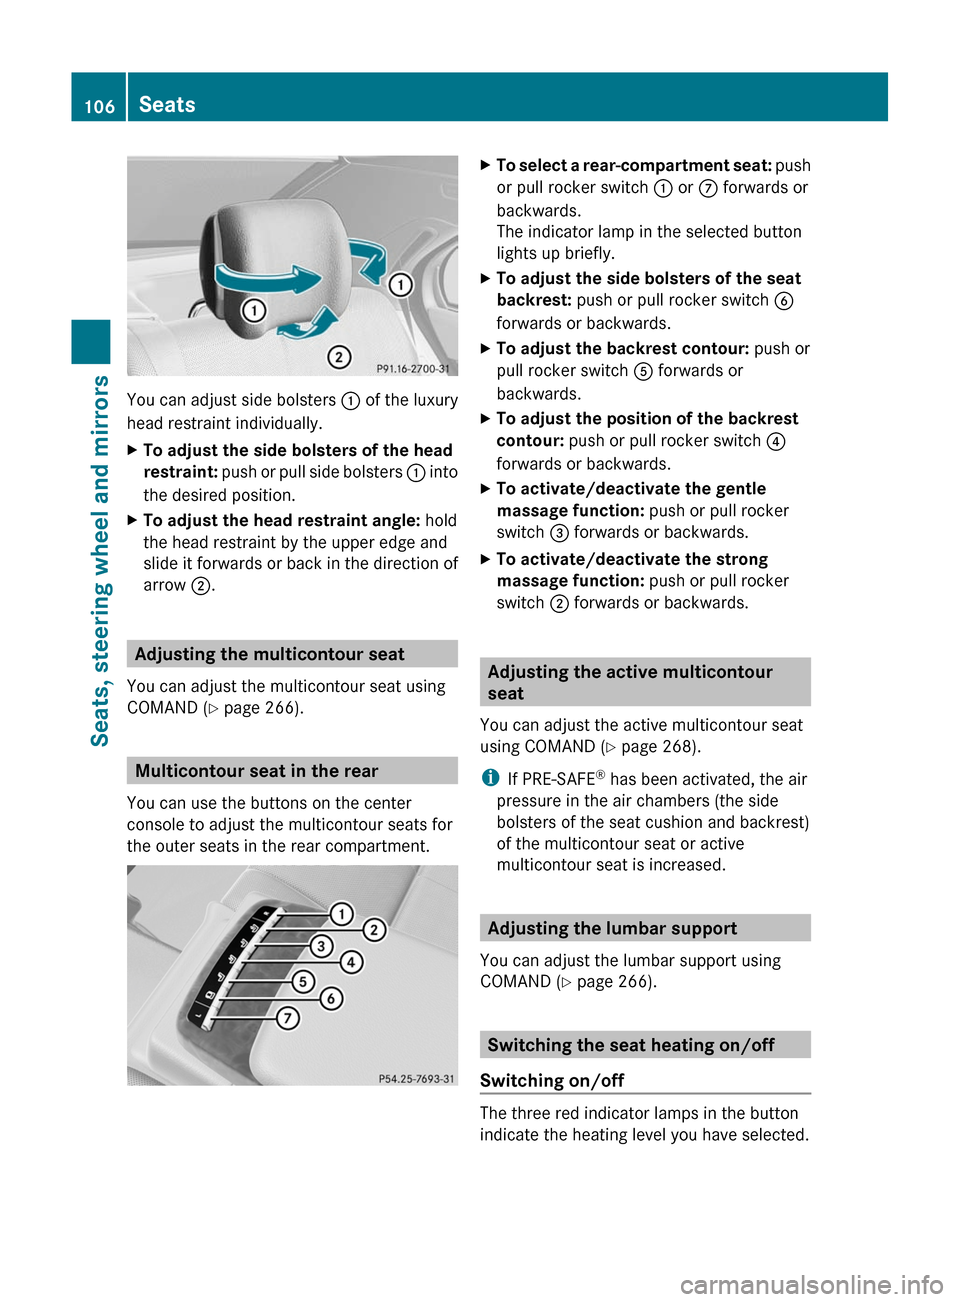
You can adjust side bolsters : of the luxury
head restraint individually.
XTo adjust the side bolsters of the head
restraint: push or pull side bolsters : into
the desired position.
XTo adjust the head restraint angle: hold
the head restraint by the upper edge and
slide it forwards or back in the direction of
arrow ;.
Adjusting the multicontour seat
You can adjust the multicontour seat using
COMAND (Y page 266).
Multicontour seat in the rear
You can use the buttons on the center
console to adjust the multicontour seats for
the outer seats in the rear compartment.
XTo select a rear-compartment seat: push
or pull rocker switch : or C forwards or
backwards.
The indicator lamp in the selected button
lights up briefly.
XTo adjust the side bolsters of the seat
backrest: push or pull rocker switch B
forwards or backwards.
XTo adjust the backrest contour: push or
pull rocker switch A forwards or
backwards.
XTo adjust the position of the backrest
contour: push or pull rocker switch ?
forwards or backwards.
XTo activate/deactivate the gentle
massage function: push or pull rocker
switch = forwards or backwards.
XTo activate/deactivate the strong
massage function: push or pull rocker
switch ; forwards or backwards.
Adjusting the active multicontour
seat
You can adjust the active multicontour seat
using COMAND (Y page 268).
iIf PRE-SAFE® has been activated, the air
pressure in the air chambers (the side
bolsters of the seat cushion and backrest)
of the multicontour seat or active
multicontour seat is increased.
Adjusting the lumbar support
You can adjust the lumbar support using
COMAND (Y page 266).
Switching the seat heating on/off
Switching on/off
The three red indicator lamps in the button
indicate the heating level you have selected.
106SeatsSeats, steering wheel and mirrors
Page 112 of 524

XMake sure that the SmartKey is in position
1 or 2 in the ignition lock.XPress button ; for the right-hand exterior
mirror or button = for the left-hand
exterior mirror.
The indicator lamp lights up in the button
that has been pressed.XPress adjustment button : up, down, to
the right or to the left until the exterior
mirror is set in a way which provides you
with a good overview of traffic conditions.
Folding the exterior mirrors in or out
electrically
XMake sure that the SmartKey is in position
1 or 2 in the ignition lock.XBriefly press button :.
Both exterior mirrors fold in or out.
i Make sure that the exterior mirrors are
always folded out fully while the vehicle is
in motion, as they may otherwise vibrate.
Folding the exterior mirrors in or out
automatically
When the "Automatic mirror folding" function
is activated in COMAND ( Y page 258):
R the exterior mirrors fold in automatically as
soon as you lock the vehicle from the
outside.
R the exterior mirrors fold out again
automatically as soon as you unlock the
vehicle and then open the driver's or front-
passenger door.
i The mirrors do not fold out if they have
been folded in manually.
Exterior mirror out of position
If an exterior mirror has been pushed out of
position, proceed as follows:
XPress the mirror-folding button
( Y page 110) repeatedly until you hear the
mirrors engage in position.
The mirror housing is engaged again and
you can adjust the exterior mirrors as usual
( Y page 109).
Automatic anti-glare mirrors
GWarning!
The auto dimming function does not react if
incoming light is not aimed directly at sensors
in the interior rear view mirror.
The interior rear view mirror and the exterior
rear view mirror on the driver's side do not
react, for example, if the rear window
sunshade is in raised position.
Light hitting the mirror(s) at certain angles
(incident light) could blind you. As a result,
you may not be able to observe traffic
conditions and could cause an accident.
The rear-view mirror and the exterior mirror
on the driver's side automatically go into anti-
glare mode if the ignition is switched on and
incident light from headlamps strikes the
sensor in the rear-view mirror.
110MirrorsSeats, steering wheel and mirrors
Page 151 of 524

COMAND calculates the route to the
destination without taking account of the
following:
R Traffic lights
R Stop and right-of-way-signs
R Lane merging
R Parking or stopping prohibited areas
R Other road and traffic rules and regulations
R Narrow bridgesGWarning
COMAND may give incorrect navigation
commands if the data in the digital map does
not correspond with the actual road/traffic
situation. Digital maps do not cover all areas
nor all routes within an area. For example, if
the traffic routing has been changed or the
direction of a one-way road has been
reversed.
For this reason, you must always observe
applicable road and traffic rules and
regulations during your journey. Road and
traffic rules and regulations always have
priority over the navigation commands
generated by the system.
GWarning
Navigation announcements are intended to
direct you while driving without diverting your
attention from the road and driving.
Please always use this feature instead of
consulting the map display for directions.
Looking at the icons or map display can
distract you from traffic conditions and
driving, and increase the risk of an accident.
General information
Operational readiness of the navigation
system
The navigation system must determine the
position of the vehicle before first use or
whenever operational status is restored.
Therefore, you may have to drive for a while
before precise route guidance is possible.
GPS reception
Among other things, correct functioning of
the navigation system depends on GPS
reception. In certain situations, GPS
reception may be impaired, there may be
interference or there may be no reception at
all, e.g. in tunnels or parking garages.
Input restriction
On vehicles for certain countries, there is a
restriction on entering data.
The restriction is active at vehicle speeds
above approximately 3 mph (5 km/h). The
restriction is deactivated as soon as the
speed falls below 2 mph (3 km/h).
When the restriction is active, certain entries
cannot be made. This will be indicated by the
fact that certain menu items are grayed out
and cannot be selected.
The following entries are not possible, for
example:
R entering the destination city and street
R entering a destination via the map
R entering in the vicinity of a city or via a
name search
R editing entries
R direct entry using the number keypad
Other entries are still possible, such as
entering points of interest in the vicinity of the
destination or current position.
Switching on navigation modeXPress the S function button once or
twice.
or
XSelect Navi in the main function bar by
sliding ZV and turning cVd the COMAND
controller and press W to confirm.
In both cases, you will see the map either
with or without the menu shown.Navigation149COMANDZ
Page 166 of 524

Route guidance
General information
GWarning
COMAND calculates the route to the
destination without taking into account the
following, for example:
RTraffic lights
RStop and right-of-way signs
RLane merging
RParking or stopping prohibited areas
ROther road and traffic rules and regulations
RNarrow bridges
COMAND may give incorrect navigation
commands if the data in the digital map does
not correspond with the actual road/ traffic
situation. For example, if the traffic routing
has been changed or the direction of a one-
way road has been reversed.
For this reason, you must always observe
applicable road and traffic rules and
regulations during your journey. Road and
traffic rules and regulations always have
priority over the navigation commands
generated by the system.
Route guidance begins once a route has been
calculated (Y page 154).
COMAND guides you to your destination by
means of navigation commands in the form
of audible navigation announcements and
route guidance displays.
The route guidance displays can only be seen
if the display is switched to navigation mode.
If you do not follow the navigation
announcements or if you leave the calculated
route, COMAND automatically calculates a
new route to the destination.
If the digital map contains the corresponding
information, the following applies:
Rwhen selecting a route, COMAND tries to
avoid roads that only have limited access,
e.g. roads closed to through traffic and non-
residents.
Rroads that have time restrictions (e.g.
closed on Sundays and public holidays) are
avoided for route guidance.
Changing direction
Introduction
Changes of direction have three phases:
RPreparation phase
RAnnouncement phase
RChange-of-direction phase
Preparation phase
COMAND prepares you for the upcoming
change of direction. Based on the example
display below, there is an audible
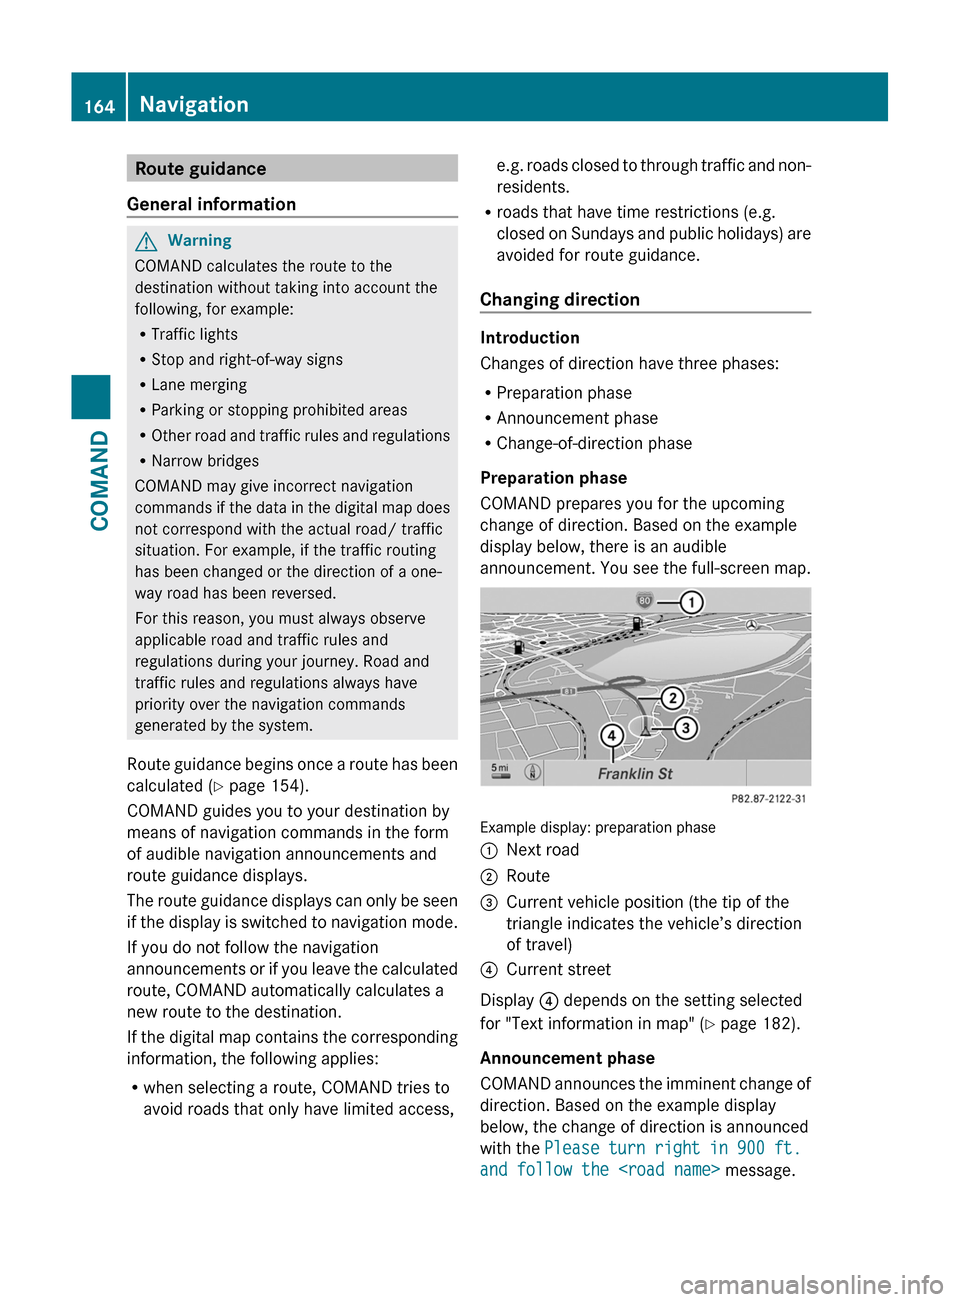
announcement. You see the full-screen map.
Example display: preparation phase
:Next road;Route=Current vehicle position (the tip of the
triangle indicates the vehicle’s direction
of travel)
?Current street
Display ? depends on the setting selected
for "Text information in map" (Y page 182).
Announcement phase
COMAND announces the imminent change of
direction. Based on the example display
below, the change of direction is announced
with the Please turn right in 900 ft.
and follow the
164NavigationCOMAND
Page 261 of 524

If there is a risk of entrapment by the seat, you
can also cancel the adjustment procedure by
moving the seat adjustment switch. The
steering column and driver’s seat* stop
moving immediately.
Never leave children unsupervised in the
vehicle. They could open the driver’s door and
thereby unintentionally activate the EASY-
ENTRY feature and become trapped as a
result.
You can make a setting in COMAND so that
the steering wheel swings upwards and/or
the driver's seat moves backwards before you
get into the vehicle. You can make the
following settings:
ROff: the function is switched off.
RSteering column: the steering wheel
swings upwards.
RSteering column and seat: the steering
wheel swings upwards and the driver’s seat
moves backwards.
XTo set the EASY-ENTRY/EXIT feature:
select Vehicle in the main function bar by
sliding XVY and turning cVd the
COMAND controller and press W to
confirm.
The main area is active.
XSelect the Easy-entry/exit feature
menu by sliding XVY or turning cVd the
COMAND controller.
The EASY-ENTRY/EXIT feature menu
appears. The current setting is indicated by
a # dot.
XSelect Setting by sliding ZVÆ or turning
cVd the COMAND controller.
The selected setting is indicated by a #
dot.
Setting the interior/exterior lighting
delayed switch-off time
Interior lighting: you can set whether and for
how long you wish the interior lighting to
remain on in the dark after you have removed
the key from the ignition lock.
Exterior light: you can set whether and for
how long you want the exterior lighting to
remain on in the dark after the doors have
been closed. The exterior lighting
automatically switches off after the switch-off
delay has elapsed.
You may select from the following settings:
R0 seconds: delayed switch-off is
deactivated.
R15, 30, 45, 60 seconds: delayed switch-off
is activated.
iYou can reactivate this function by
opening a door within one minute. If none
of the doors are opened after the key is
removed from the ignition lock or if a door
is not closed after it has been opened, the
exterior lights switch off after 60 seconds.
Vehicle259COMANDZ
Page 273 of 524

Vehicle equipment ............................272
Exterior lighting ................................ 272
Interior lighting ................................. 277
Changing bulbs ................................. 278
Windshield wipers ............................281271Lights and windshield wipers
Page 274 of 524

Vehicle equipment
iThis manual describes all the standard
and optional equipment of your vehicle
which was available at the time of
purchase. Country-specific differences are
possible. Bear in mind that your vehicle
may not feature all functions described
here. This also refers to safety-related
systems and functions.
Exterior lighting
Important safety notes
For reasons of safety, Mercedes-Benz
recommends that you drive with the lights
switched on even during the daytime. In some
countries, operation of the headlamps varies
due to legal requirements and self-imposed
obligations.
Notes on driving abroad
Convert to symmetrical low beam when
driving abroad: switch the headlamps to
symmetrical low beam in countries in which
traffic drives on the opposite side of the road
from the country where the vehicle is
registered. This prevents oncoming traffic
from being dazzled. Symmetrical lights do not
illuminate as large an area of the edge of the
road.
Have the headlamps converted at a qualified
specialist workshop, e.g. an authorized
Mercedes-Benz Center, as close to the border
as possible before driving in these countries.
Convert to asymmetrical low beam after
returning: have the headlamps converted
back to asymmetrical low beam at a qualified
specialist workshop, e.g. an authorized
Mercedes-Benz Center, as soon as possible
after crossing the border when returning.
Light switch
Operation
1WLeft-hand standing lamps2XRight-hand standing lamps3$Lights off/daytime running lamps4cAutomatic headlamp mode/daytime
running lamps
5TSide lamps, license plate and
instrument lighting
6LLow-beam/high-beam headlamps7NFog lamps148RRear fog lamps
The turn signals, high-beam headlamps and
the high-beam flasher are operated using the
combination switch (Y page 274).
! Switch off the parking lamps and standing
lamps when you leave the vehicle. This
prevents the battery from discharging.
The exterior lighting (except the side lamps/
standing lamps) switches off automatically if
you:
Rremove the key from the ignition lock
Ropen the driver's door with the key in
position 0
If you hear a warning tone when you leave the
vehicle, the lights may still be switched on.
XTurn the light switch to $ or c.
or
XIf the rear fog lamp is switched on: press
the light switch in to the stop.14Only vehicles with Bi-Xenon headlamps without Intelligent Light System* are equipped with front fog lamps.272Exterior lightingLights and windshield wipers* optional
Page 275 of 524

Low-beam headlampsXTo switch on the low-beam headlamps:
turn the key in the ignition lock to position
2 or start the engine.XTurn the light switch to L.
The T indicator lamp on the light switch
lights up.
Daytime running lamps
Daytime running lamps in Canada
The "daytime running lamps" function is
required by law in Canada. It cannot therefore
be deactivated.
XTurn the light switch to $ or c .
When the engine is on: depending on the
ambient light, the daytime running lamps or
the low-beam headlamps are switched on.
When the low-beam headlamps are
activated, the T indicator lamp on the
light switch lights up.
When the engine is running and the vehicle is
stationary or if the electronic parking brake is
applied: if you move the selector lever from a
driving position to P, the daytime running
lamps/low-beam headlamps go out after
three minutes.
When the engine is running, the vehicle is
stationary and in high ambient light
brightness: if you turn the light switch
to T , you turn on the daytime running
lamps and low-beam headlamps.
If the engine is running and you turn the light
switch to L, the manual settings take
precedence over the daytime running lamps.
Daytime running lamps in the USA
In the USA, the daytime running lamps are
deactivated upon delivery from the factory.
XTo activate: activate the daytime running
lamps function in the on-board computer
( Y page 377).XTurn the light switch to $ or c .
When the engine is on: depending on the
ambient light, the daytime running lamps or
the low-beam headlamps are switched on.
When the low-beam headlamps are
activated, the T indicator lamp on the
light switch lights up.
If the engine is running and you turn the light
switch to T or L , the manual settings
take precedence over the daytime running
lamps.
Automatic headlamps
GRisk of accident
If the light switch is set to c, the low-beam
headlamps will not come on automatically if
it is foggy. This could endanger you and
others. Therefore, turn the light switch to
L in fog.
The automatic headlamp feature is only an
aid. The driver is responsible for the vehicle's
lighting at all times.
GRisk of accident
When it is dark or foggy, turn the light switch
quickly from c to L . Otherwise, the
headlamps could switch off temporarily and
you could cause an accident.
XTo switch on automatic headlamp
mode: turn the light switch to c.
Key in position 1 in the ignition lock: the
side lamps are switched on or off
automatically depending on the brightness
of the ambient light.
With the engine running: depending on the
brightness of the ambient light, the daytime
running lamps 15
or the side lamps and low-
beam headlamps are switched on or off
automatically.15 Only if daytime running lamps have been activated via the on-board computer.Exterior lighting273Lights and windshield wipersZ