2011 MERCEDES-BENZ S-Class rear disc
[x] Cancel search: rear discPage 249 of 524

Setting the picture brightnessXSelect Settings using the : button
and press the 9 button to confirm.
XSelect Brightness using the 9:
buttons and press the 9 button to confirm.
A scale appears.
XAdjust the brightness using the 9:
buttons and press the 9 button to confirm.
The brightness bar moves up or down. The
picture becomes lighter or darker in
accordance with the scale.
Showing/hiding the picture
XTo hide the picture: select Display off
in the system menu using the :;
buttons on the remote control and press
the 9 button to confirm.
The picture is hidden.
XTo display the picture: press the 9
button.
Audio CD/DVD and MP3 mode
Safety note
GWarning
The RSE CD/DVD player is a Class 1 laser
product. There is a danger of invisible laser
radiation when you open or damage the cover.
Do not remove the cover. The RSE CD/DVD
player does not contain any parts which can
be serviced by the user. For safety reasons,
have any necessary service work performed
by qualified personnel.
General notes
You will find information on the following
topics in the Audio section:
Rnotes on CDs/DVDs (Y page 225)
Rnotes on MP3 mode (Y page 224)
Rnotes on copyright (Y page 225)
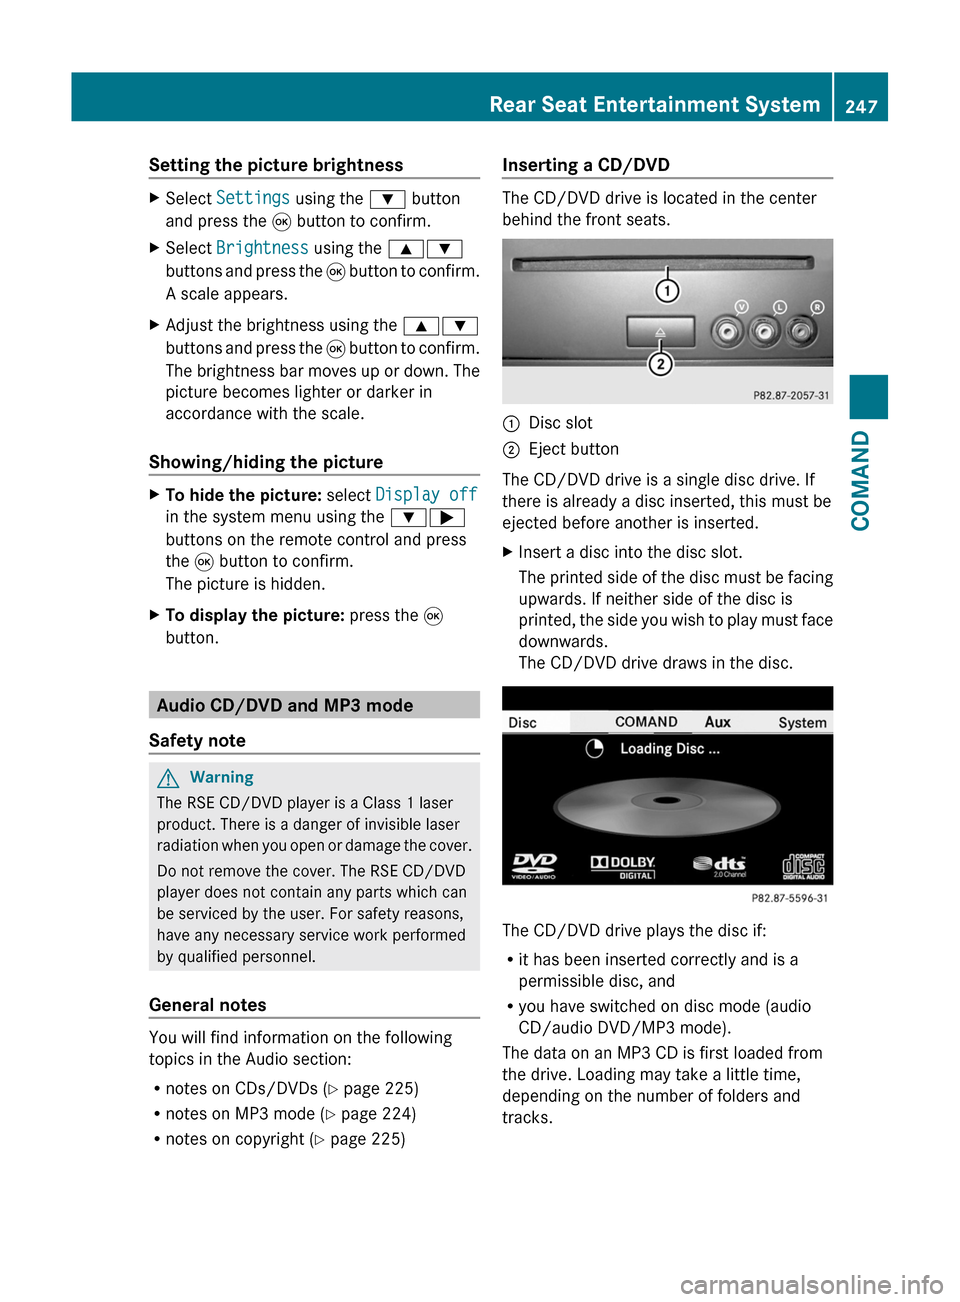
Inserting a CD/DVD
The CD/DVD drive is located in the center
behind the front seats.
:Disc slot;Eject button
The CD/DVD drive is a single disc drive. If
there is already a disc inserted, this must be
ejected before another is inserted.
XInsert a disc into the disc slot.
The printed side of the disc must be facing
upwards. If neither side of the disc is
printed, the side you wish to play must face
downwards.
The CD/DVD drive draws in the disc.
The CD/DVD drive plays the disc if:
Rit has been inserted correctly and is a
permissible disc, and
Ryou have switched on disc mode (audio
CD/audio DVD/MP3 mode).
The data on an MP3 CD is first loaded from
the drive. Loading may take a little time,
depending on the number of folders and
tracks.
Rear Seat Entertainment System247COMANDZ
Page 250 of 524

Removing the CD/DVDXPress the þ eject button.
The drive ejects the disc.XTake the disc out of the slot.
If you do not take the disc out of the slot,
the drive will draw it in again automatically
after a short while.
Switching on audio CD, audio DVD or
MP3 mode
XInsert a CD/DVD ( Y page 247).
The Rear Seat Entertainment System loads
the inserted disc.XSelect Disc in the menu using the
9=; buttons on the remote
control and press the 9 button to confirm.
The corresponding mode is switched on.
The Rear Seat Entertainment System plays
the disc.
i Variable bit rates in MP3 tracks can result
in the elapsed time shown being different
to the actual elapsed time.
Selecting a track
Selecting by skipping to a track
XTo skip forwards or backwards to a
track: press the = or ; button on
the remote control.
or
XPress the E or F button.
The skip forward function skips to the next
track.
Skipping backwards restarts the current
track (if it has been playing for more than
eight seconds) or starts the previous track
(if the current track has only been playing
for a shorter time).
If you have selected the playback options
Random tracks or Random folder , the
track order is random.Selecting by track list
In audio CD mode, the track list contains all
tracks on the disc currently playing.
In audio DVD mode, the track list contains all
tracks in the currently active group; see
"Setting the audio format" ( Y page 223).
In MP3 mode, the track list shows all tracks
in the currently active folder as well as the
folder structure, allowing you to select any
track on the MP3 CD.XSelect Track list (audio CD/DVD mode)
or Folder (MP3 mode) using
the :=; buttons on the remote
control and press the 9 button to confirm.
or
XPress the 9 button when the display/
selection window is active.
The track list appears. The # dot indicates
the current track.XSelect a track using the 9: buttons
and press the 9 button to confirm.
Making a selection by entering the track
number directly
XPress h on the remote control.
The track entry display appears.
Example: track 2
XPress the · number button.
Example: track 12
XPress the corresponding number keys in
rapid succession.
i You cannot enter numbers which are
higher than the number of tracks on the CD
or in the currently active folder.
XWait for approximately three seconds after
making the entry.
You will hear the track entered. The
respective basic menu is shown again.
Fast forward/rewind
XWith the display/selection window active,
press the = or ; button on the248Rear Seat Entertainment SystemCOMAND
Page 252 of 524

XTo interrupt playback: select ± using
the :=; buttons on the remote
control and press the 9 button to confirm.
The « display changes to M.XTo continue playback: select M and press
the 9 button to confirm.
Playback continues from the point where it
was interrupted.XTo stop playback: while playback is
interrupted, select ± again and press the
9 button to confirm.
Playback stops and returns to the
beginning of the DVD. M is highlighted.XTo restart playback: select M and press
the 9 button to confirm.
Playback starts from the beginning of the
DVD.
Setting the audio format
Further information on audio formats is
available in the Audio section ( Y page 223).
XSelect DVD-A using the :=;
buttons on the remote control and press
the 9 button to confirm.XSelect Group using the 9: buttons
and press the 9 button to confirm.
The list of available audio formats appears.
The # dot indicates the format currently
selected.XSelect an audio format using the
9: buttons and press the 9 button
to confirm.XTo exit the menu: press the =
or ; button.
Playback options
Further information on playback options is
available in the Audio section ( Y page 224).
XSelect CD, DVD-A or MP3 using
the :=; buttons on the remote
control and press the 9 button to confirm.
The options list appears. The # dot
indicates the option selected.XSelect Normal track sequence , Random
tracks or Random folder using the
9: buttons and press the 9 button
to confirm.
The option is switched on. All options
except Normal track sequence will be
indicated in the display/selection window.
i If you change the disc, the Normal
track sequence option is activated
automatically. If an option is selected, it
remains selected after the Rear Seat
Entertainment System is switched on or
off.
Switching track information on/off
(MP3 mode only)
If the function is switched on, folder and track
names are displayed.
If the function is switched off, disc and file
names are displayed.
XSelect MP3 using the :=;
buttons on the remote control and press
the 9 button to confirm.XSelect Show track information using
the 9: buttons and press the 9
button to confirm.
The function is switched on O or off ª,
depending on the previous status.
DVD video mode
General notes
Here you will find further information on the
following topics:
R safety notes ( Y page 217)
R notes on DVDs ( Y page 236)
250Rear Seat Entertainment SystemCOMAND
Page 253 of 524

DVD playback conditions
There may be playback problems when
playing copied discs. There are a large variety
of discs, DVD authoring software, disc writing
software and writers available. This variety
means that there is no guarantee that the
Rear Seat Entertainment System will be able
to play video DVDs that you have copied
yourself.
You will find further information in the Video
section (Y page 237). Information regarding
COMAND also applies to the Rear Seat
Entertainment System.
Function restrictions
Depending on the DVD, it is possible that
certain functions or actions described in this
section will be temporarily blocked or may not
function at all. As soon as you try to activate
these functions or actions, you will see the
K symbol in the display.
Inserting and removing a CD/DVD
XProceed as described in the "Audio CD/
DVD and MP3 mode" section
(Y page 247).
Activating video DVD mode
XInsert a video DVD.
The Rear Seat Entertainment System loads
the disc.
If disc mode was the last mode selected, it
will now be active.
If it was not, switch on video DVD mode as
described in the following instruction.
XSelect Disc in the menu using the
9=; buttons on the remote
control and press the 9 button to confirm.
If the video DVD fulfills the playback
criteria, the film either starts automatically
or the menu saved on the DVD appears. If
the DVD menu appears, you must start the
film manually.
XSelect the corresponding menu item in the
DVD menu.
Hiding/showing the control menu
XTo show: press the 9 or : button
on the remote control.
XTo hide: press the 9 or : button.
or
XWait about eight seconds.
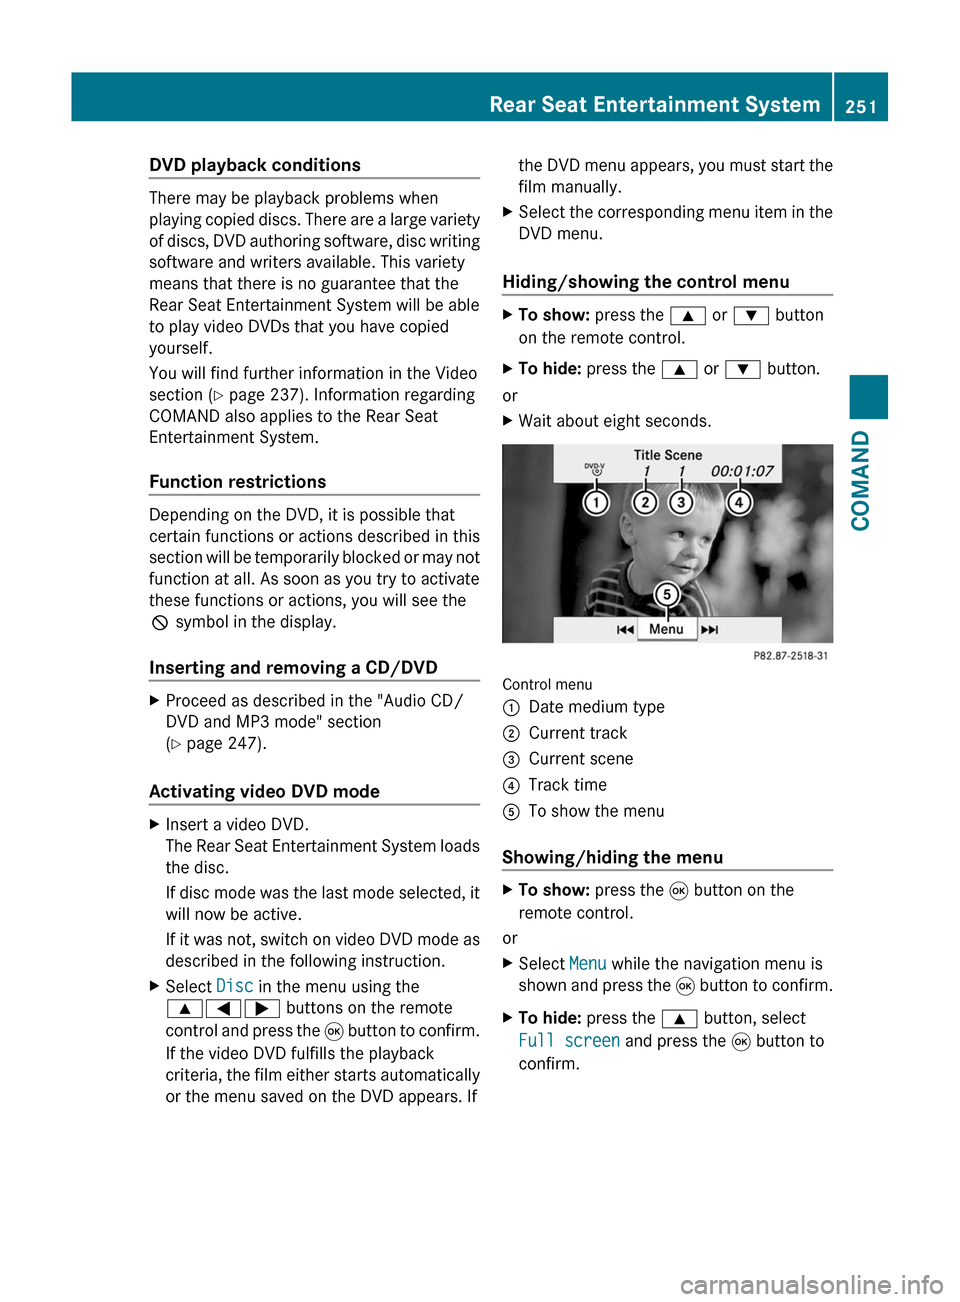
Control menu
:Date medium type;Current track=Current scene?Track timeATo show the menu
Showing/hiding the menu
XTo show: press the 9 button on the
remote control.
or
XSelect Menu while the navigation menu is
shown and press the 9 button to confirm.
XTo hide: press the 9 button, select
Full screen and press the 9 button to
confirm.
Rear Seat Entertainment System251COMANDZ
Page 274 of 524

Vehicle equipment
iThis manual describes all the standard
and optional equipment of your vehicle
which was available at the time of
purchase. Country-specific differences are
possible. Bear in mind that your vehicle
may not feature all functions described
here. This also refers to safety-related
systems and functions.
Exterior lighting
Important safety notes
For reasons of safety, Mercedes-Benz
recommends that you drive with the lights
switched on even during the daytime. In some
countries, operation of the headlamps varies
due to legal requirements and self-imposed
obligations.
Notes on driving abroad
Convert to symmetrical low beam when
driving abroad: switch the headlamps to
symmetrical low beam in countries in which
traffic drives on the opposite side of the road
from the country where the vehicle is
registered. This prevents oncoming traffic
from being dazzled. Symmetrical lights do not
illuminate as large an area of the edge of the
road.
Have the headlamps converted at a qualified
specialist workshop, e.g. an authorized
Mercedes-Benz Center, as close to the border
as possible before driving in these countries.
Convert to asymmetrical low beam after
returning: have the headlamps converted
back to asymmetrical low beam at a qualified
specialist workshop, e.g. an authorized
Mercedes-Benz Center, as soon as possible
after crossing the border when returning.
Light switch
Operation
1WLeft-hand standing lamps2XRight-hand standing lamps3$Lights off/daytime running lamps4cAutomatic headlamp mode/daytime
running lamps
5TSide lamps, license plate and
instrument lighting
6LLow-beam/high-beam headlamps7NFog lamps148RRear fog lamps
The turn signals, high-beam headlamps and
the high-beam flasher are operated using the
combination switch (Y page 274).
! Switch off the parking lamps and standing
lamps when you leave the vehicle. This
prevents the battery from discharging.
The exterior lighting (except the side lamps/
standing lamps) switches off automatically if
you:
Rremove the key from the ignition lock
Ropen the driver's door with the key in
position 0
If you hear a warning tone when you leave the
vehicle, the lights may still be switched on.
XTurn the light switch to $ or c.
or
XIf the rear fog lamp is switched on: press
the light switch in to the stop.14Only vehicles with Bi-Xenon headlamps without Intelligent Light System* are equipped with front fog lamps.272Exterior lightingLights and windshield wipers* optional
Page 280 of 524

Switch the reading lamp off=Interior lighting
Interior lighting control
Important notes
In order to prevent the vehicle's battery from
discharging, the interior lighting functions are
automatically deactivated after some time
except for when the key is in position 2 in the
ignition lock.
Automatic interior lighting control
XTo switch on/off: press the | button.
The OFF indicator lamp shows whether the
automatic interior lighting control is
deactivated (indicator lamp on) or
activated (indicator lamp off).
The interior lighting automatically switches
on if you:
R unlock the vehicle
R open a door
R remove the key from the ignition lock
The interior light is activated for a short while
when the key is removed from the ignition
lock. You can activate this delayed switch-off
using COMAND ( Y page 259).
Manual interior lighting control
XTo switch the front interior lighting on/
off: press the c button.XTo switch the rear interior lighting on/
off: press the u button.XTo switch the reading lamps on/off:
press the p button.Changing bulbs
Important safety notes
Xenon bulbs
If your vehicle is equipped with Xenon bulbs,
you can recognize this by the following: the
cone of light from the Xenon bulbs moves
from the top to the bottom and back again
when you start the engine. For this to be
observed, the lights must be switched on
before starting the engine.
GWarning
Xenon bulbs carry a high voltage. You could
get an electric shock and be seriously or even
fatally injured if you touch the electric
contacts on Xenon bulbs. Therefore, never
remove the cover from Xenon bulbs.
Do not change Xenon bulbs yourself, but have
them replaced at a qualified specialist
workshop which has the necessary specialist
knowledge and tools to carry out the work
required.
Mercedes-Benz recommends that you use an
authorized Mercedes-Benz Center for this
purpose. In particular, work relevant to safety
or on safety-related systems must be carried
out at a qualified specialist workshop.
Bulbs and lamps are an important aspect of
vehicle safety. You must therefore make sure
that these function correctly at all times.
Have the headlamp setting checked regularly.
Other bulbs
GWarning!
Bulbs and lamps can be very hot. You should
therefore allow them to cool down before you
change them. Otherwise, you could be burned
if you touch them.
Keep bulbs out of the reach of children.
Otherwise, they could damage the bulbs, for
example, and injure themselves.
278Changing bulbsLights and windshield wipers
Page 433 of 524

Cigarette lighterGWarning
When leaving the vehicle, always remove the
SmartKey from the ignition lock. Always take
the SmartKey with you and lock the vehicle.
Do not leave children unattended in the
vehicle, even if they are secured in a child
restraint system, or with access to an
unlocked vehicle. A child's unsupervised
access to a vehicle could result in an accident
and/or serious personal injury. The children
could:
Rinjure themselves on parts of the vehicle
Rbe seriously or fatally injured through
excessive exposure to extreme heat or cold
Rinjure themselves or cause an accident with
vehicle equipment that can be operated
even if the SmartKey is removed from the
ignition lock or removed from the vehicle,
such as seat adjustment, steering wheel
adjustment, or the memory function
If children open a door, they could injure other
persons or get out of the vehicle and injure
themselves or be injured by following traffic.
Do not expose the child restraint system to
direct sunlight. The child restraint system's
metal parts, for example, could become very
hot, and the child could be burned on these
parts.
GWarning
Never touch the heating element or sides of
the lighter; they are extremely hot. Hold the
knob only.
Make sure any children traveling with you do
not injure themselves or start a fire with the
hot cigarette lighter.
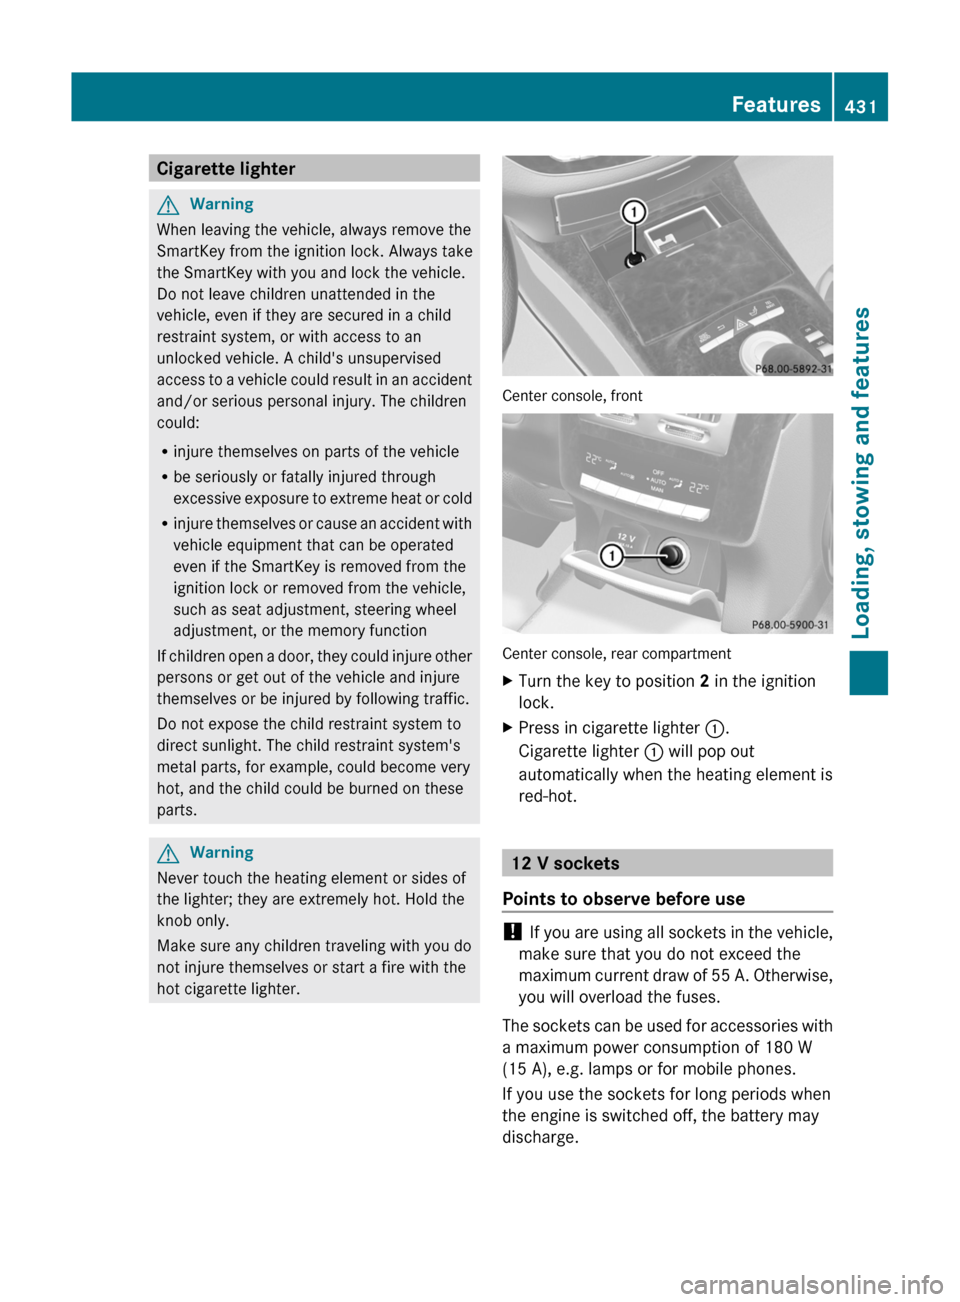
Center console, front
Center console, rear compartment
XTurn the key to position 2 in the ignition
lock.
XPress in cigarette lighter :.
Cigarette lighter : will pop out
automatically when the heating element is
red-hot.
12 V sockets
Points to observe before use
! If you are using all sockets in the vehicle,
make sure that you do not exceed the
maximum current draw of 55 A. Otherwise,
you will overload the fuses.
The sockets can be used for accessories with
a maximum power consumption of 180 W
(15 A), e.g. lamps or for mobile phones.
If you use the sockets for long periods when
the engine is switched off, the battery may
discharge.
Features431Loading, stowing and featuresZ
Page 505 of 524

The wear patterns on the front and rear tires
differ, depending on the operating conditions.
Rotate the wheels before a clear wear pattern
has formed on the tires. Front tires typically
wear more on the shoulders and the rear tires
in the center.
If your vehicle's tire configuration allows, you
can rotate the wheels according to the
intervals in the tire manufacturer's warranty
book in your vehicle documents. If no
warranty book is available, the tires should be
rotated every 3000 to 6000 miles
(5000 to 10000 km), or earlier if tire wear
requires. Do not change the direction of
wheel rotation.
Clean the contact surfaces of the wheel and
the brake disc thoroughly every time a wheel
is interchanged. Check the tire pressures.
Information on changing a wheel and fitting
the spare wheel ( Y page 463).
! On vehicles installed with a tire pressure
monitor, electronic components are
located in the wheel.
Tire-mounting tools should not be applied
in the area of the valve, as this could
damage the electronic components.
Always have the tires changed at a qualified
specialist workshop, e.g. an authorized
Mercedes-Benz Center.
Direction of rotation
Tires with a specified direction of rotation
have additional benefits, e.g. if there is a risk
of hydroplaning. You will only gain these
benefits if the correct direction of rotation is
observed.
An arrow on the sidewall of the tire indicates
its correct direction of rotation.
You may install an emergency spare wheel/
spare wheel against the direction of rotation.
Observe the time restriction on use as well as
the speed limitation specified on the
emergency spare wheel/spare wheel.
Storing wheels
Store wheels that are not being used in a cool,
dry and preferably dark place. Protect the
tires from contact with oil, grease and fuel.
Cleaning the wheels
GWarning
Do not use power washers with circular jet
nozzles (concentrated-power jets) to clean
your vehicle, especially for cleaning tires. You
could otherwise damage the tires and cause
an accident.
Wheel/tire combinations
Points to remember
GWarning
Observe the "Important safety notes"
( Y page 480).
! For safety reasons, Mercedes-Benz
recommends that you only use tires,
wheels and accessories which have been
approved by Mercedes-Benz specifically
for your vehicle.
These tires have been specially adapted for
use with the control systems, such as ABS
or ESP ®
, and are marked as follows:
R MO = Mercedes-Benz Original
R MOE = Mercedes-Benz Original Extended
(tires with run-flat characteristics)
R MO1 = Mercedes-Benz Original (only
certain AMG tires)
Mercedes-Benz Original Extended tires
may only be used on wheels that have been
specifically approved by Mercedes-Benz.
Only use tires, wheels or accessories
tested and approved by Mercedes-Benz.
Certain characteristics, e.g. handling,
vehicle noise emissions or fuel
consumption, may otherwise be adversely
affected. In addition, when driving with a
Wheel/tire combinations503Tires and wheelsZ