2011 MERCEDES-BENZ S-Class height
[x] Cancel search: heightPage 104 of 524

Do not drive the vehicle without the seat head
restraints. Head restraints are intended to
help reduce injuries during an accident.
! To avoid damage to the seats and the seat
heating, observe the following information:
Rdo not spill any liquids on the seats. If
liquid is spilled on the seats, dry them as
soon as possible.
Rif the seat covers are damp or wet, do not
switch on the seat heating. The seat
heating should also not to be used to dry
the seats.
Rclean the seat covers as recommended;
see the "Interior care" section.
Rdo not transport heavy loads on the
seats. Do not place sharp objects on the
seat cushions, e.g. knives, nails or tools.
The seats should only be occupied by
passengers, if possible.
Rwhen the seat heating is in operation, do
not cover the seats with insulating
materials, e.g. blankets, coats, bags,
seat covers, child seats or booster seats.
! When you move the seats, make sure that
there are no objects in the footwell or
behind the seats. Otherwise, you could
damage the seats and the objects.
iThe head restraints in the front seats are
installed with the NECK-PRO system. For
this reason, it is not possible to remove the
head restraints from the front seats.
For design reasons, the rear-compartment
head restraints cannot be removed.
Please contact an authorized Mercedes-
Benz Center for more information.
Adjusting the seats:Head restraint height;Seat height=Seat cushion angle?Seat cushion lengthASeat fore-and-aft adjustmentBBackrest angle
iIf PRE-SAFE® has been activated, the
front-passenger seat and the electrically
adjustable rear seats are moved into a
more favorable position.
iYou can store the seat settings using the
memory function (Y page 111).
iTo ensure the largest possible range of
seat settings, certain seat adjustment
functions will automatically activate other
seat adjustment functions.
iDepending on the seat fore-and-aft
setting, the head restraint height is
adjusted automatically.
Adjusting the rear seats electrically
You can only adjust the outer seats in the rear
electrically.
102SeatsSeats, steering wheel and mirrors
Page 106 of 524

You can use the override button to disable
this function (Y page 65).
The button is located in the rear door on the
front-passenger side.
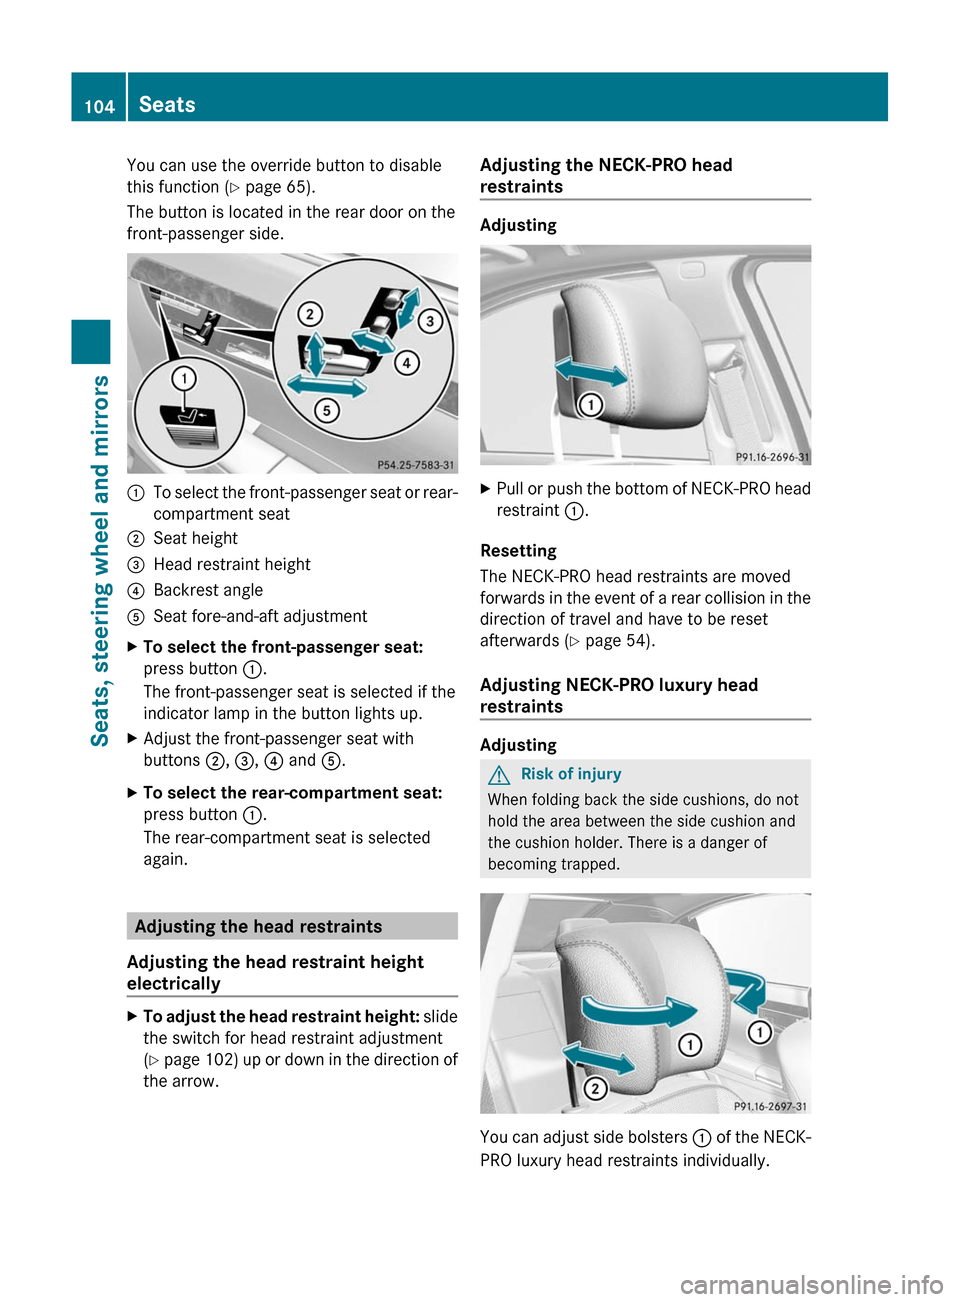
:To select the front-passenger seat or rear-
compartment seat
;Seat height=Head restraint height?Backrest angleASeat fore-and-aft adjustmentXTo select the front-passenger seat:
press button :.
The front-passenger seat is selected if the
indicator lamp in the button lights up.
XAdjust the front-passenger seat with
buttons ;, =, ? and A.
XTo select the rear-compartment seat:
press button :.
The rear-compartment seat is selected
again.
Adjusting the head restraints
Adjusting the head restraint height
electrically
XTo adjust the head restraint height: slide
the switch for head restraint adjustment
(Y page 102) up or down in the direction of
the arrow.
Adjusting the NECK-PRO head
restraints
Adjusting
XPull or push the bottom of NECK-PRO head
restraint :.
Resetting
The NECK-PRO head restraints are moved
forwards in the event of a rear collision in the
direction of travel and have to be reset
afterwards (Y page 54).
Adjusting NECK-PRO luxury head
restraints
Adjusting
GRisk of injury
When folding back the side cushions, do not
hold the area between the side cushion and
the cushion holder. There is a danger of
becoming trapped.
You can adjust side bolsters : of the NECK-
PRO luxury head restraints individually.
104SeatsSeats, steering wheel and mirrors
Page 110 of 524

The electrical steering wheel adjustment
feature can be operated at any time.
Therefore, do not leave children unattended
in the vehicle, or with access to an unlocked
vehicle. A child's unsupervised access to a
vehicle could result in an accident and/or
serious personal injury.
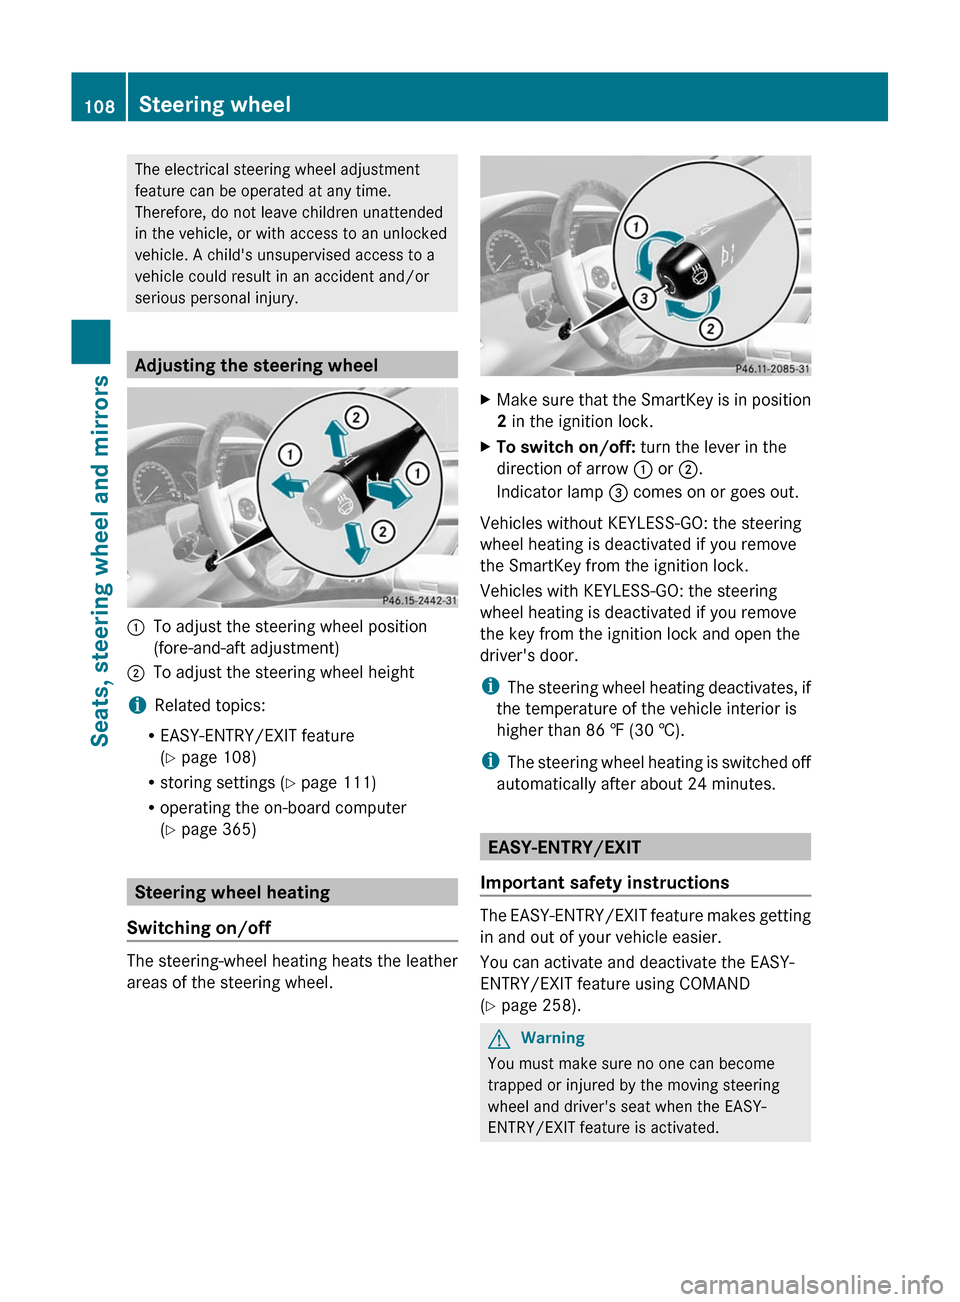
Adjusting the steering wheel
:To adjust the steering wheel position
(fore-and-aft adjustment)
;To adjust the steering wheel height
iRelated topics:
REASY-ENTRY/EXIT feature
(Y page 108)
Rstoring settings (Y page 111)
Roperating the on-board computer
(Y page 365)
Steering wheel heating
Switching on/off
The steering-wheel heating heats the leather
areas of the steering wheel.
XMake sure that the SmartKey is in position
2 in the ignition lock.
XTo switch on/off: turn the lever in the
direction of arrow : or ;.
Indicator lamp = comes on or goes out.
Vehicles without KEYLESS-GO: the steering
wheel heating is deactivated if you remove
the SmartKey from the ignition lock.
Vehicles with KEYLESS-GO: the steering
wheel heating is deactivated if you remove
the key from the ignition lock and open the
driver's door.
iThe steering wheel heating deactivates, if
the temperature of the vehicle interior is
higher than 86 ‡ (30 †).
iThe steering wheel heating is switched off
automatically after about 24 minutes.
EASY-ENTRY/EXIT
Important safety instructions
The EASY-ENTRY/EXIT feature makes getting
in and out of your vehicle easier.
You can activate and deactivate the EASY-
ENTRY/EXIT feature using COMAND
(Y page 258).
GWarning
You must make sure no one can become
trapped or injured by the moving steering
wheel and driver's seat when the EASY-
ENTRY/EXIT feature is activated.
108Steering wheelSeats, steering wheel and mirrors
Page 122 of 524

NaviAudioTelephoneVideoVehicleModeFM/AM radioVideo DVDECOMap orientationSatRadioAUXMulticontour
seat/lumbar
settingsPoint of interest
symbols on the mapDiscVideo offRear window
blindRoad signs on the
mapMemory cardEASY-ENTRY/
EXIT systemText information on
mapMUSIC
REGISTERExterior
lighting
delayed
switch-off timeO Speed Limit AssistMedia
InterfaceInterior
lighting
delayed
switch-offO Topographical
mapUSBAmbient
lightingO City viewRearO Automatic
mirror fold-in
functionO Freeway
informationAUXO Locator
lightingO Audio fadeoutAudio offO Automatic
lockingSIRIUS serviceO Interior
motion sensorMap versionO Tow-away
protectionO Trunk lid
opening height
restrictionSPLITVIEW
SPLITVIEW allows the driver and front
passenger to use separate COMAND
functions at the same time. Depending on the
viewing angle of the display (from the driver's
seat or from the front passenger seat), you
will see two different displays.
For example, the "Navi" function can be
viewed from the driver's side while the video120At a glanceCOMAND
Page 185 of 524

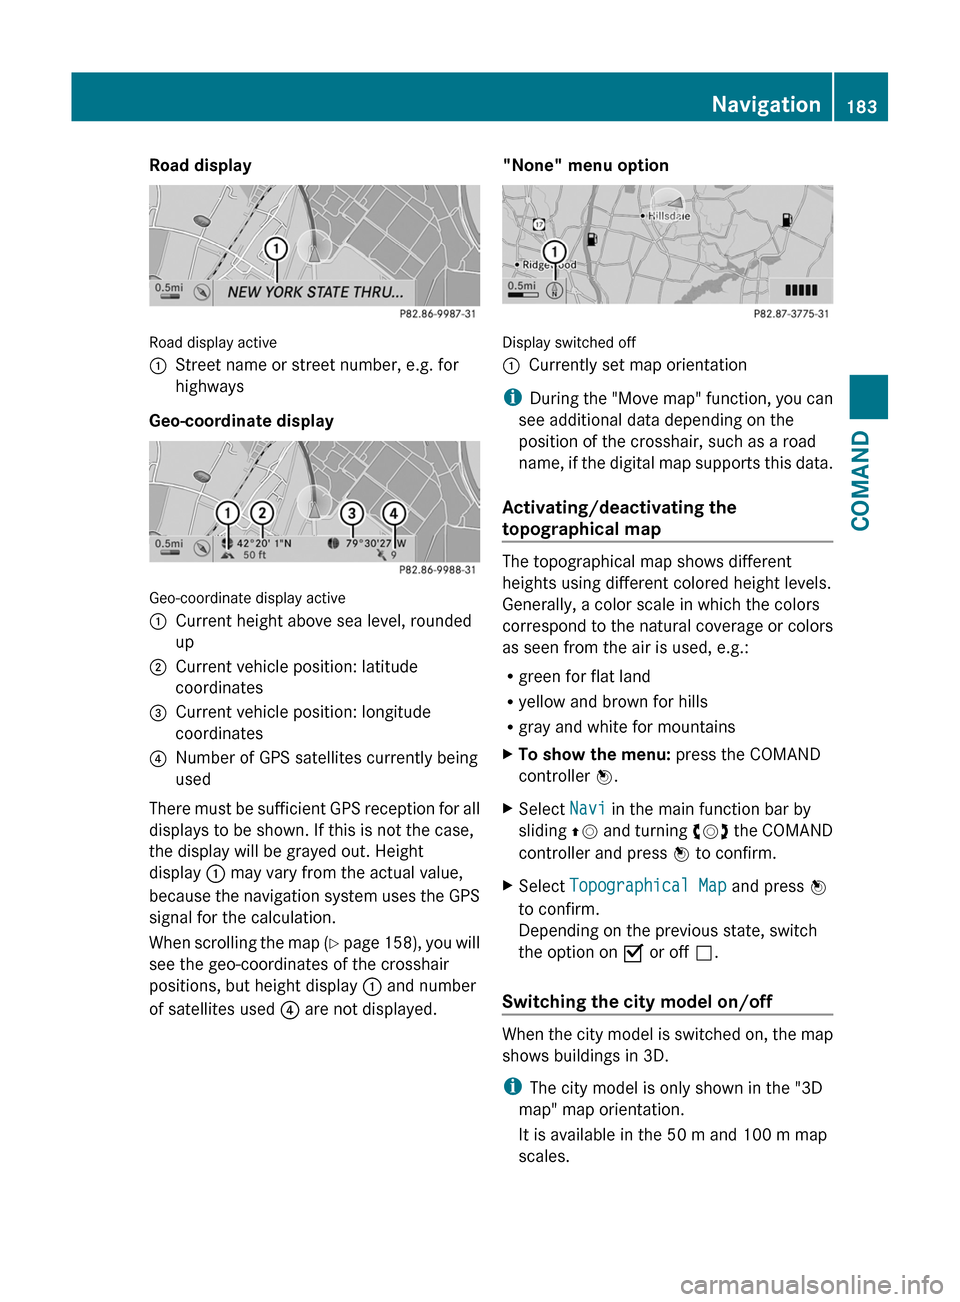
Road display
Road display active
:Street name or street number, e.g. for
highways
Geo-coordinate display
Geo-coordinate display active
:Current height above sea level, rounded
up
;Current vehicle position: latitude
coordinates
=Current vehicle position: longitude
coordinates
?Number of GPS satellites currently being
used
There must be sufficient GPS reception for all
displays to be shown. If this is not the case,
the display will be grayed out. Height
display : may vary from the actual value,
because the navigation system uses the GPS
signal for the calculation.
When scrolling the map (Y page 158), you will
see the geo-coordinates of the crosshair
positions, but height display : and number
of satellites used ? are not displayed.
"None" menu option
Display switched off
:Currently set map orientation
iDuring the "Move map" function, you can
see additional data depending on the
position of the crosshair, such as a road
name, if the digital map supports this data.
Activating/deactivating the
topographical map
The topographical map shows different
heights using different colored height levels.
Generally, a color scale in which the colors
correspond to the natural coverage or colors
as seen from the air is used, e.g.:
Rgreen for flat land
Ryellow and brown for hills
Rgray and white for mountains
XTo show the menu: press the COMAND
controller W.
XSelect Navi in the main function bar by
sliding ZV and turning cVd the COMAND
controller and press W to confirm.
XSelect Topographical Map and press W
to confirm.
Depending on the previous state, switch
the option on O or off ª.
Switching the city model on/off
When the city model is switched on, the map
shows buildings in 3D.
iThe city model is only shown in the "3D
map" map orientation.
It is available in the 50 m and 100 m map
scales.
Navigation183COMANDZ
Page 188 of 524

You can view the current direction of travel,
the current height and the coordinates of the
current vehicle position in the compass view.XTo switch on navigation mode: press the
S function button once or twice.XTo show the menu: press the COMAND
controller W.XSelect Position in the navigation menu by
sliding VÆ and turning cVd the COMAND
controller and press W to confirm.XSelect Compass and press W to confirm.XTo exit the display: confirm Back by
pressing W or press the % button.
Installing new map software
The digital data generated by the map
software becomes outdated in the same way
as conventional road maps. Optimal route
guidance can only be provided by the
navigation system in conjunction with the
most up-to-date map software. Information
about new map software versions can be
obtained from an authorized Mercedes-Benz
Center.
You can install new map software yourself
using one or more DVDs, depending on the
size.
The installation process can take between 10
and 120 minutes depending on the size of the
map software. If radio mode is selected
before you start the installation process, you
can still adjust the volume. It is also still
possible to operate the automatic climate
control and cancel the process on COMAND.
Other functions are not operational. If
possible, carry out the installation process
when the vehicle is stationary. This takes less
time, since the DVD read speed is higher
when the vehicle is stationary than when it is
in motion. If the starter battery is not
sufficiently charged, COMAND may end the
process automatically in order to preserve
the battery. Therefore, keep the engine
running during the installation process.
GWarning
Never leave the engine running in enclosed
spaces. The exhaust gases contain toxic
carbon monoxide. Breathing in exhaust fumes
is a health hazard and can lead to
unconsciousness or death.
Displaying information about the
currently used map version
XTo switch on navigation mode: press the
S function button once or twice.XTo show the menu: press the COMAND
controller W.XSelect Navi in the main function bar by
sliding VÆ and turning cVd the COMAND
controller and press W to confirm.XSelect Map Version and press W to
confirm.
Notes on handling DVDs
R Only touch the edges of DVDs.
R Handle DVDs carefully to avoid read errors.
R Avoid scratching DVDs or getting
fingerprints or dust on them.
R Use a conventional cleaning cloth to clean
DVDs. Never wipe in a circle, but instead in
straight lines from the inside to the outside.
R Place DVDs back in their cases after use.
R Do not expose DVDs to heat or direct
sunlight.
Map software copy protection
Map software for COMAND is subject to a fee.
Map software can only be used on one vehicle
with an activation code and is not
transferable. The six-digit activation code is
available at your authorized Mercedes-Benz
Center. Contact your authorized Mercedes-
Benz Center if you lose the activation code or
if COMAND does not accept the code that you
received.
Your vehicle is delivered from the factory with
map software. Depending on the country,
map software for your region is either pre-
installed (Europe/USA) or the map software
186NavigationCOMAND
Page 259 of 524

Vehicle
Vehicle
General notes
In this menu, you can set the following vehicle
functions:
RECO
RMulticontour seat settings
RRear window blind
REASY-ENTRY/EXIT feature
RExterior lighting delayed switch-off time
RInterior lighting delayed switch-off
RAmbient lighting
RAutomatic folding mirror
RLocator lighting
RAutomatic locking feature
RTrunk lid opening height restriction
You can open the "Vehicle" menu in one of
two ways.
Opening the "Vehicle" menu from the
main area in the center of the display
:"Vehicle" menu item;Main areaXSelect Vehicle in the main function bar by
sliding XVY and turning cVd the
COMAND controller and press W to
confirm.
Main area ; is active.
XSelect the individual vehicle functions by
sliding XVY or turning cVd the COMAND
controller and press W to confirm.
Opening from the "Vehicle" menuXSelect Vehicle in the main function bar by
sliding XVY and turning cVd the
COMAND controller and press W to
confirm.
The "Vehicle" submenu opens.
XSelect the individual vehicle functions in
the menu by sliding XVY or turning cVd
the COMAND controller and press W to
confirm.
In the next section, it is the first procedure
that is always described.
Switching the ECO function on/off
The ECO start/stop function switches the
engine off automatically when the vehicle is
stopped under certain conditions. When
pulling away again, the engine starts
automatically (Y page 302). You can switch
the ECO start/stop function on and off using
COMAND.
If you switch the ECO start/stop function off
using COMAND, the function is switched on
again automatically when you switch the
ignition off and on again.
Vehicle257COMANDZ
Page 263 of 524

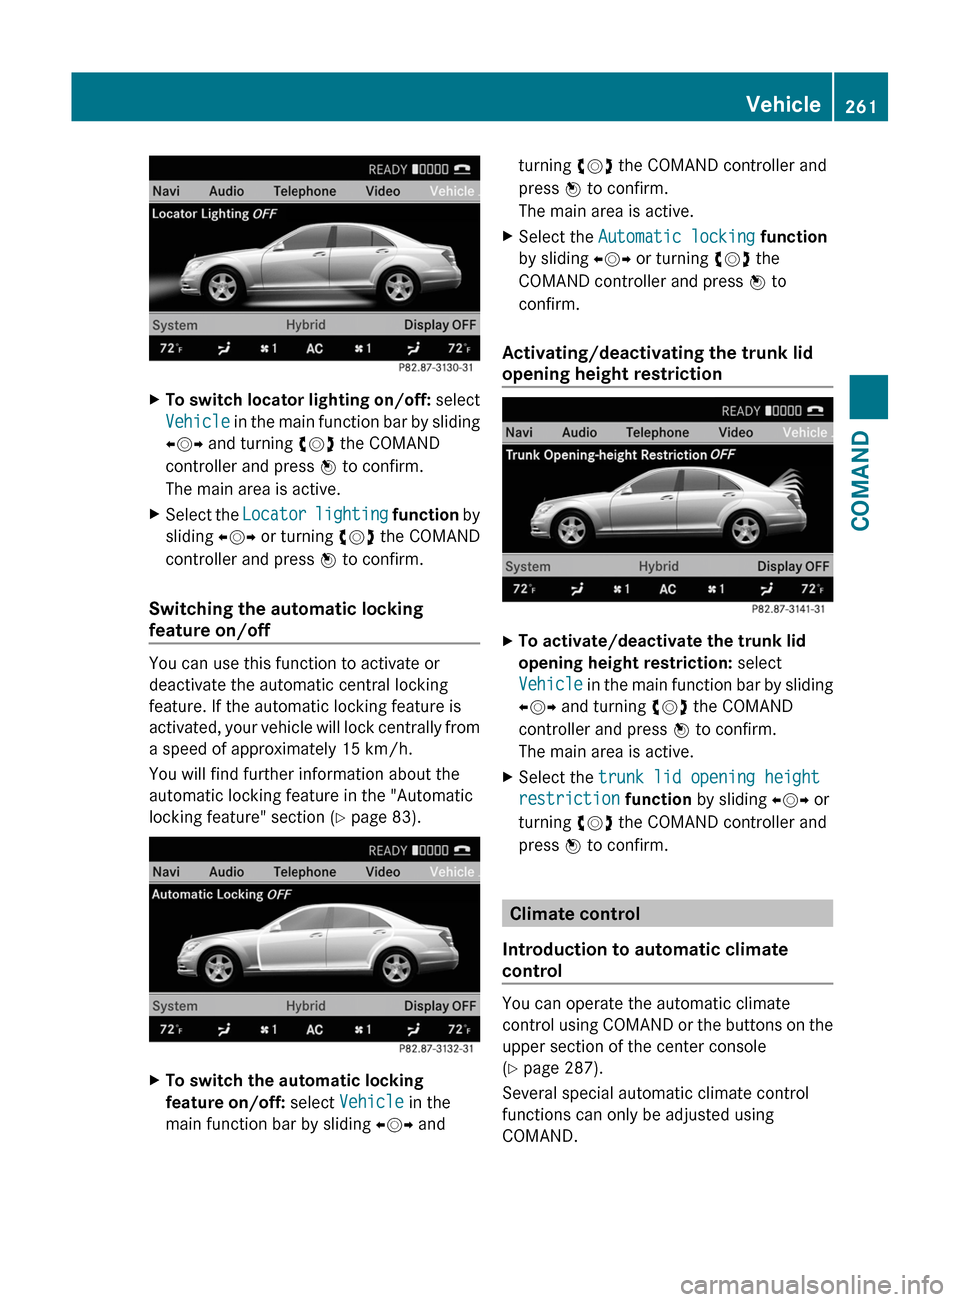
XTo switch locator lighting on/off: select
Vehicle in the main function bar by sliding
XVY and turning cVd the COMAND
controller and press W to confirm.
The main area is active.
XSelect the Locator lighting function by
sliding XVY or turning cVd the COMAND
controller and press W to confirm.
Switching the automatic locking
feature on/off
You can use this function to activate or
deactivate the automatic central locking
feature. If the automatic locking feature is
activated, your vehicle will lock centrally from
a speed of approximately 15 km/h.
You will find further information about the
automatic locking feature in the "Automatic
locking feature" section (Y page 83).
XTo switch the automatic locking
feature on/off: select Vehicle in the
main function bar by sliding XVY and
turning cVd the COMAND controller and
press W to confirm.
The main area is active.
XSelect the Automatic locking function
by sliding XVY or turning cVd the
COMAND controller and press W to
confirm.
Activating/deactivating the trunk lid
opening height restriction
XTo activate/deactivate the trunk lid
opening height restriction: select
Vehicle in the main function bar by sliding
XVY and turning cVd the COMAND
controller and press W to confirm.
The main area is active.
XSelect the trunk lid opening height
restriction function by sliding XVY or
turning cVd the COMAND controller and
press W to confirm.
Climate control
Introduction to automatic climate
control
You can operate the automatic climate
control using COMAND or the buttons on the
upper section of the center console
(Y page 287).
Several special automatic climate control
functions can only be adjusted using
COMAND.
Vehicle261COMANDZ