2011 MERCEDES-BENZ S-Class change time
[x] Cancel search: change timePage 117 of 524

is operated in a commercial environment.
This equipment generates, uses and can
radiate radio frequency energy and, if not
installed and used in accordance with the
instruction manual, may cause harmful
interference to radio communications.GWarning
This equipment complies with FCC radiation
exposure limits set forth for uncontrolled
equipment and meets the FCC radio
frequency (RF) Exposure Guidelines in
Supplement C to OET65.
This equipment has very low levels of RF
energy that is deemed to comply without
maximum permissive exposure evaluation
(MPE). But it is desirable that it should be
installed and operated with at least 8 inches
(20 cm) and more between the radiator and a
person's body (excluding extremities: hands,
wrists, feet and legs.)
Correct use
Observe the following information when using
COMAND:
R the safety notes in this manual
R all road traffic regulations
i Improper work on electronic components
or other systems (such as radio, DVD
changer) and their software may result in
malfunction or failure. Even systems that
have not been modified could be affected
because the electronic systems are
connected. Electronic malfunctions can
seriously jeopardize the operational safety
of your vehicle.
i Only have work or changes to electronic
components carried out at a qualified
specialist workshop which has the
necessary specialist knowledge and tools
to carry out the work required. Daimler
recommends that you use an authorized
Mercedes-Benz Center for this purpose. In
particular, work relevant to safety or on
safety-related systems must be carried out
at a qualified specialist workshop.
i Protection against theft: this device is
equipped with technical provisions to
protect it against theft. Further information
on protection against theft can be obtained
from an authorized Mercedes-Benz Center.
Vehicle equipment
These operating instructions describe all
standard and optional equipment available
for your vehicle at the time of going to print.
Country-specific deviations are possible.
Please note that your vehicle may not be
equipped with all features described. This
includes safety-related systems and
functions. The equipment in your vehicle may
therefore differ from some of the descriptions
or illustrations. The original purchase
agreement lists all systems installed in your
vehicle. Contact an authorized Mercedes-
Benz Center if you have any questions about
equipment or operation.
Function restrictions
For safety reasons, some COMAND functions
are restricted or unavailable while the vehicle
is in motion. You will notice this, for example,
because you will either not be able to select
certain menu items or because COMAND will
display a message to this effect.
To protect the integrated hard drive against
damage, COMAND deactivates the drive at
very high temperatures. The following
functions will be temporarily unavailable:
R navigation system
R Voice Control System
R address book
R MUSIC REGISTER
Introduction115COMANDZ
Page 123 of 524

DVD function can be viewed from the front
passenger side.
Use the SPLITVIEW remote control to operate
COMAND from the front passenger side.
Points to remember:
RYour vehicle may be equipped with
SPLITVIEW. The use of SPLITVIEW is
currently not permitted in the following
states: AL, CO, IL, LA, MA, MD, NH, PA, VA,
VT, WA, WI, and WV as well as in the
Canadian provinces Manitoba,
Newfoundland, New Brunswick, and Prince
Edward Island. The driver is responsible for
complying with ALL regional laws. If your
vehicle is registered in a state or province
where SPLITVIEW is not permitted, this
function must be deactivated. Please
consult an authorized Mercedes-Benz
center to verify if the use of SPLITVIEW is
permitted in your state/province.
RThe SPLITVIEW remote control can be used
to adjust the volume of the front-passenger
side headphones. Before putting on the
headphones, make certain that the volume
has not been set too high.
RYou can only use media from the driver's
and front-passenger sides separately if the
media are from different sources. Example:
on the driver's side, an audio CD is being
played on the DVD changer. This means
that on the front-passenger side, the DVD
changer cannot be used to play a different
medium, for instance a video DVD.
However, other media can be used at the
same time on the front-passenger side,
including radio, memory card, MUSIC
REGISTER, Media Interface, USB or AUX.
RIf you use the same medium on both sides,
you can both carry out the respective
settings.
RThere must be clear line of sight between
the headphones and the display so that
COMAND can optimally transmit music and
speech via the infrared signal on the front-
passenger's headphones. For this reason,
please also observe that the headphones
have left and right sides, and use them
correctly.
RUsing SPLITVIEW you can only use
entertainment functions separately, such
as audio and video functions.
RThe multifunction steering wheel can only
used for functions which relate to the
driver's side.
Switching SPLITVIEW on/off
XTo switch on SPLITVIEW: select
Vehicle from the main function bar by
turning cVd the COMAND controller and
press W to confirm.
The "Vehicle" menu appears.
XSelect SPLITVIEW on.
SPLITVIEW symbol : appears in the
display, and display ; switches to
SPLITVIEW off.
XTo switch off SPLITVIEW: select
Vehicle from the main function bar by
turning cVd the COMAND controller and
press W to confirm.
The "Vehicle" menu appears.
XSelect SPLITVIEW off.
Display ; switches to SPLITVIEW on.
iIf COMAND has already been switched
on, you can also use the remote control to
switch SPLITVIEW on and off
(Y page 123).
The SPLITVIEW screen remains on for
approximately 30 minutes after the key has
been turned to position 0 in the ignition lock.
After this time or after the key has been
At a glance121COMANDZ
Page 143 of 524

DisplayStatusGreenThe headphones are switched
on and the batteries are fully
charged.RedThe headphones are switched
on and the batteries are
almost discharged.No display
(dark)The headphones are switched
off, or the batteries are
empty, incorrectly inserted or
not inserted.
Connecting additional headphones
You can connect an additional set of corded
headphones to each rear-compartment
screen ( Y page 137).
Changing batteries
Batteries are required for the remote control
and for the two sets of cordless headphones.
For changing batteries: ( Y page 243)
System settings
Vehicle equipment
i These Operating Instructions describe all
standard and optional equipment available
for your vehicle at the time of purchase.
Please note that your vehicle may not be
equipped with all features described.
Display settings
Switching the display on/off
XSelect Vehicle by turning cVd the
COMAND controller and press W to
confirm.XSelect Display off by turning cVd the
COMAND controller and press W to
confirm.XTo switch on the display: press W or
cVd turn the COMAND controller.
Display design
Your COMAND display features optimized
designs for operation during daytime and
night-time hours. You can customize the
design to suit your personal preferences by
manually selecting day or night design or opt
for an automatic setting.
XSelect Vehicle by turning cVd the
COMAND controller and press W to
confirm.XSelect System by turning cVd the
COMAND controller and press W to
confirm.XSelect Display and press W to confirm.XSelect Day design , Night design or
Automatic by turning cVd the COMAND
controller and press W to confirm.
The # icon indicates the current setting.DesignExplanationDay designThe display is set
permanently to day
design.Night designThe display is set
permanently to night
design.AutomaticThe display design
changes depending on
the brightness around
the vehicle.
i In the Automatic setting, COMAND
evaluates the readings from the automatic
vehicle light sensor and switches between
the display designs automatically.
System settings141COMANDZ
Page 144 of 524

Time settings
General information
If COMAND is equipped with a navigation
system and has GPS reception, COMAND
automatically sets the time and date. You can
also adjust the time yourself in 30-minute
increments, but the date cannot be changed.
iIf you set the time in 30-minute
increments, any time zone settings and
settings for changing between summer and
standard time are lost (Y page 142).
iThe following navigation system functions
require the time, time zone and summer/
standard time to be set correctly in order
to work properly:
Rroute guidance on routes with time-
dependent traffic guidance
Rcalculation of expected time of arrival
Setting the time
XSelect Vehicle in the main function bar by
turning cVd the COMAND controller and
press W to confirm.
XSelect System by turning cVd the
COMAND controller and press W to
confirm.
XSelect Time by turning cVd the COMAND
controller and press W to confirm.
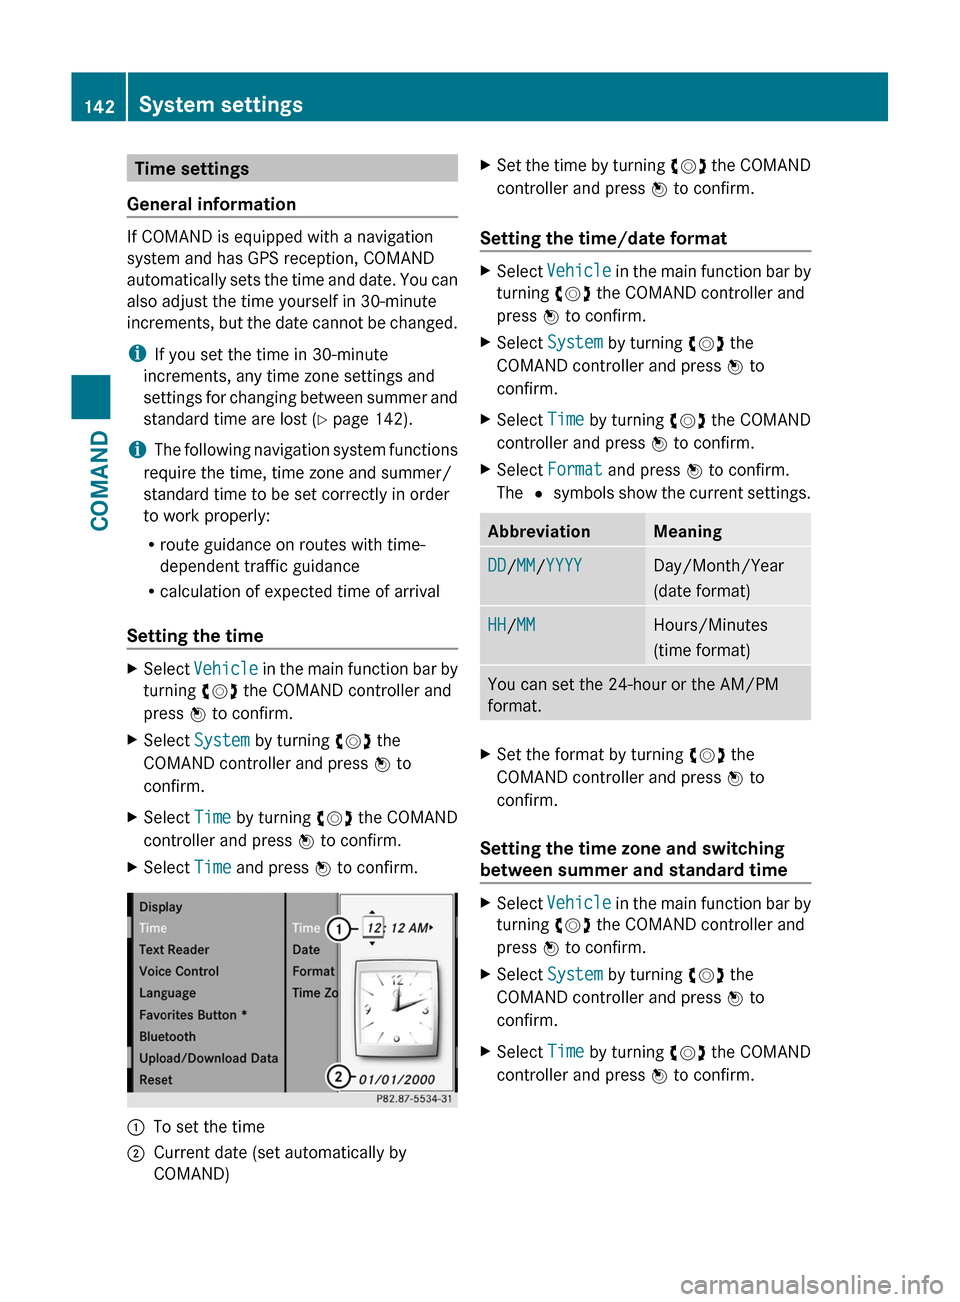
XSelect Time and press W to confirm.:To set the time;Current date (set automatically by
COMAND)
XSet the time by turning cVd the COMAND
controller and press W to confirm.
Setting the time/date format
XSelect Vehicle in the main function bar by
turning cVd the COMAND controller and
press W to confirm.
XSelect System by turning cVd the
COMAND controller and press W to
confirm.
XSelect Time by turning cVd the COMAND
controller and press W to confirm.
XSelect Format and press W to confirm.
The # symbols show the current settings.
AbbreviationMeaningDD/MM/YYYYDay/Month/Year
(date format)
HH/MMHours/Minutes
(time format)
You can set the 24-hour or the AM/PM
format.
XSet the format by turning cVd the
COMAND controller and press W to
confirm.
Setting the time zone and switching
between summer and standard time
XSelect Vehicle in the main function bar by
turning cVd the COMAND controller and
press W to confirm.
XSelect System by turning cVd the
COMAND controller and press W to
confirm.
XSelect Time by turning cVd the COMAND
controller and press W to confirm.
142System settingsCOMAND
Page 145 of 524

XSelect Time zone and press W to confirm.
A list of time zones appears. The # dot
indicates the current setting.
XSelect the time zone and press W to
confirm.
XTo switch automatic changeover on/
off: select Automatic summer/winter
time changeover or Automatic summer/
winter time changeover by turning
cVd the COMAND controller and press
W to confirm.
The # dot indicates the current setting.
Read-aloud settings
Setting the text reader speed
XSelect Vehicle by turning cVd the
COMAND controller and press W to
confirm.
XSelect System and press W to confirm.XSelect Text reader and press W to
confirm.
XSelect Set text reader speed and press
W to confirm.
A list appears. The # dot indicates the
current setting.
XSelect a setting by turning cVd the
COMAND controller and press W to
confirm.
Voice Control System settings
Opening/closing the help window
The help window shows you additional
information during individualization and voice
control operation.
XSelect Vehicle in the main function bar by
turning cVd the COMAND controller and
press W to confirm.
XSelect System by turning cVd the
COMAND controller and press W to
confirm.
XSelect Voice Control by turning cVd the
COMAND controller and press W to
confirm.
XSelect Help window and press W to
confirm.
You have switched the help window on
O or off ª.
Individualization
Introduction
Using individualization, you can fine tune the
Voice Control System to your own voice and
thus improve voice recognition. This means
that other users' voices will not be recognized
as easily and, therefore, this function can be
switched off.
Individualization comprises two parts and
takes approximately five minutes. It consists
of training the system to recognize a certain
number of digit sequences and voice
commands.
Starting new individualization
Individualization can only be started when the
vehicle is stationary. Before starting, switch
off all devices or functions which could
interfere, such as the radio or the navigation
system. After starting the session, the system
System settings143COMANDZ
Page 147 of 524

XSelect Yes or No and press W to confirm.
If you select No, the process will be aborted.
If you select Yes, the individualization is
deleted. You will see a message to this
effect.
Bluetooth® settings
General information about Bluetooth®
Bluetooth® technology is the standard for
short-range wireless data transmission of up
to approximately 10 meters. Bluetooth®
allows, for example, the exchange of vCards.
Bluetooth® is a registered trademark of
Bluetooth Special Interest Group (SIG) Inc.
Requirements for a Bluetooth®
connection
You can connect mobile phones and
notebooks with COMAND.
To do so, the following conditions need to be
met:
RBluetooth®-capable devices, e.g. mobile
phones, must comply with a certain profile
in order to be connected to COMAND.
Every Bluetooth® device has its own
specific Bluetooth® name.
RBluetooth® must be activated in COMAND
and on the respective Bluetooth® device;
see the separate operating instructions.
Rthe Bluetooth® device must be "visible" to
COMAND in order for COMAND to find and
display it. For the setting procedures,
please see the operating instructions for
the Bluetooth® device.
iOnce a mobile phone has been
connected, reception and transmission
volume may change.
Activating/deactivating Bluetooth®
XSelect Vehicle in the main function bar by
turning cVd the COMAND controller and
press W to confirm.
XSelect System by turning cVd the
COMAND controller and press W to
confirm.
XSelect Bluetooth by turning cVd the
COMAND controller and press W to
confirm.
XSelect Bluetooth activated and press
W to confirm.
This switches Bluetooth® on O or off ª.
Connecting Bluetooth® devices
General information
Before using your Bluetooth® device with
COMAND for the first time, you will need to
connect it.
Connecting is comprised of:
Rsearching for a Bluetooth® device and
Rsubsequently authorizing it
iYou can connect up to ten devices to
COMAND.
For more information on suitable mobile
phones and on connecting a Bluetooth®-
capable mobile phone to COMAND, visit
http://www.mbusa-mobile.com or call
the Mercedes-Benz Customer Assistance
Center at
1-800-FOR-MERCedes(1-800-367-6372)
(US) or Customer Service at
1-800-387-0100 (Canada).
System settings145COMANDZ
Page 150 of 524

System language settings
This function allows you to determine the
language for the menu displays and the
navigation announcements. The selected
language affects the characters available for
entry.
If you change the system language, the
language for Voice Control System will be
also be changed. If the selected language is
not supported by Voice Control System,
"English" will be selected.XSelect Vehicle by turning cVd the
COMAND controller and press W to
confirm.XSelect System and press W to confirm.XSelect Language and press W to confirm.
You see the language list. The # dot
indicates the current setting.XSelect the language by turning cVd the
COMAND controller and press W to
confirm.
COMAND loads the selected language and
sets it.
i In Arabic as well as some other countries,
the selection option English (Arabic
map) is available when setting the system
language. This language setting shows the
menus and input data in COMAND in
English and the map in Arabic for certain
countries. The destination is entered in
English.
Reset function
You can reset COMAND to the factory
settings. Amongst other things, this will
delete all personal data (e.g. station presets,
address book entries, entries in the
destination memory and in the list of previous
destinations in the navigation system).
Resetting is recommended before selling or
transferring ownership of your vehicle, for
example.
XSelect Vehicle in the main function bar by
turning cVd the COMAND controller and
press W to confirm.XSelect System by turning cVd the
COMAND controller and press W to
confirm.XSelect Reset and press W to confirm.
A prompt appears asking whether you wish
to reset.XSelect Yes or No and press W to confirm.
If you select No, the process will be aborted.
If you select Yes, another prompt appears
asking whether you really wish to reset.XSelect Yes or No and press W to confirm.
If you select Yes, a message will be shown.
COMAND is reset and restarted.
If you select No, the process will be aborted.
Navigation
Vehicle equipment
i These Operating Instructions describe all
standard and optional equipment available
for your vehicle at the time of purchase.
Please note that your vehicle may not be
equipped with all features described.
Introduction
Important safety notes
GWarning
For safety reasons, only enter a destination
when the vehicle is stationary. When the
vehicle is in motion, a passenger should enter
the destination. Study manual and select
route before driving.
Bear in mind that at a speed of just 30 mph
(approximately 50 km/h), your vehicle is
covering a distance of 44 feet (approximately
14 m) every second.
148NavigationCOMAND
Page 152 of 524

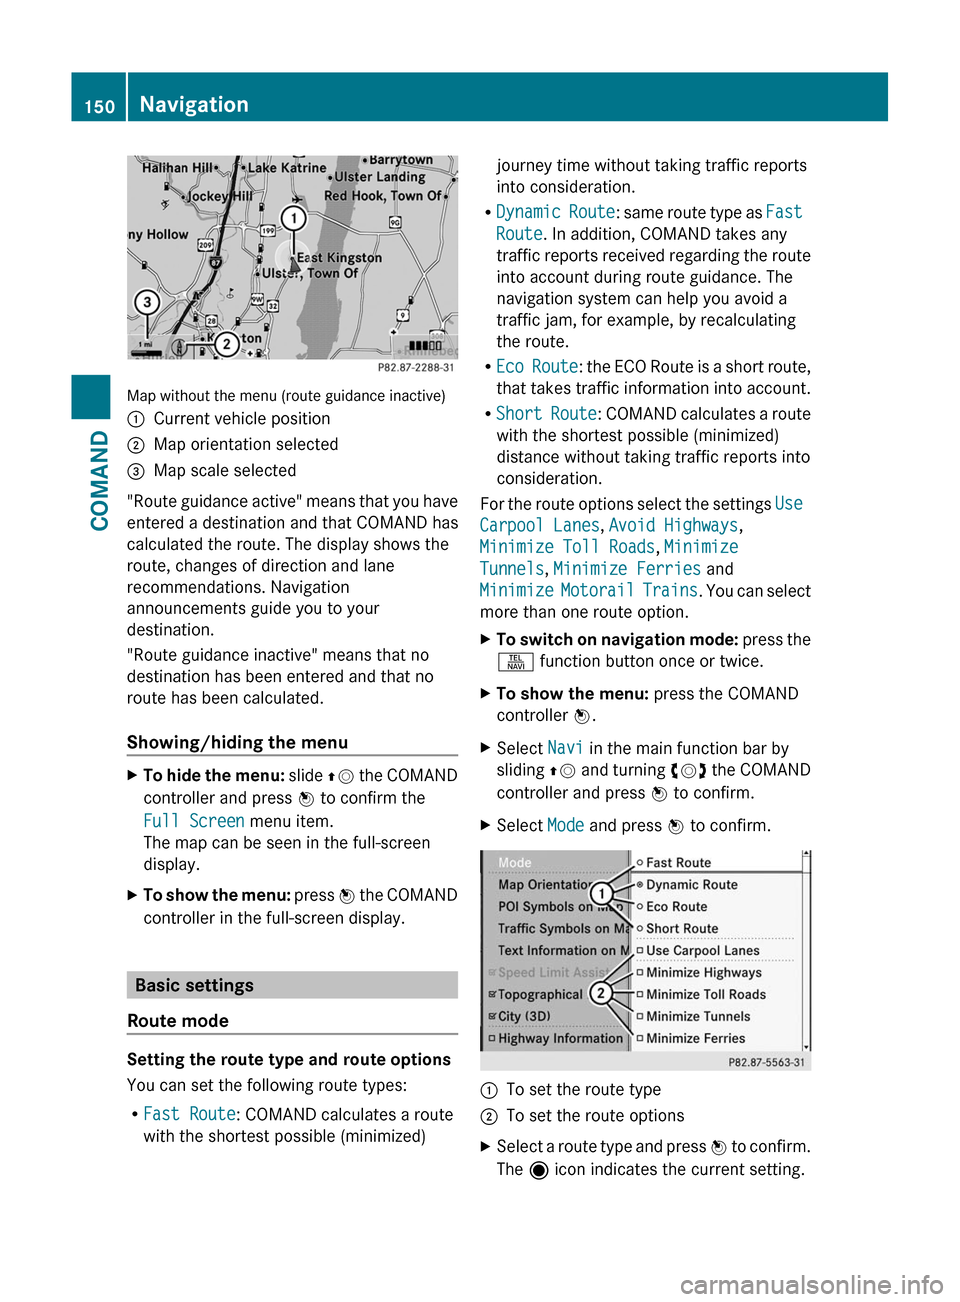
Map without the menu (route guidance inactive)
:Current vehicle position;Map orientation selected=Map scale selected
"Route guidance active" means that you have
entered a destination and that COMAND has
calculated the route. The display shows the
route, changes of direction and lane
recommendations. Navigation
announcements guide you to your
destination.
"Route guidance inactive" means that no
destination has been entered and that no
route has been calculated.
Showing/hiding the menu
XTo hide the menu: slide ZV the COMAND
controller and press W to confirm the
Full Screen menu item.
The map can be seen in the full-screen
display.
XTo show the menu: press W the COMAND
controller in the full-screen display.
Basic settings
Route mode
Setting the route type and route options
You can set the following route types:
RFast Route: COMAND calculates a route
with the shortest possible (minimized)
journey time without taking traffic reports
into consideration.
RDynamic Route: same route type as Fast
Route. In addition, COMAND takes any
traffic reports received regarding the route
into account during route guidance. The
navigation system can help you avoid a
traffic jam, for example, by recalculating
the route.
REco Route: the ECO Route is a short route,
that takes traffic information into account.
RShort Route: COMAND calculates a route
with the shortest possible (minimized)
distance without taking traffic reports into
consideration.
For the route options select the settings Use
Carpool Lanes, Avoid Highways,
Minimize Toll Roads, Minimize
Tunnels, Minimize Ferries and
Minimize Motorail Trains. You can select
more than one route option.
XTo switch on navigation mode: press the
S function button once or twice.
XTo show the menu: press the COMAND
controller W.
XSelect Navi in the main function bar by
sliding ZV and turning cVd the COMAND
controller and press W to confirm.
XSelect Mode and press W to confirm.:To set the route type;To set the route optionsXSelect a route type and press W to confirm.
The ä icon indicates the current setting.
150NavigationCOMAND