2011 MERCEDES-BENZ S-Class Reverse
[x] Cancel search: ReversePage 309 of 524

NNeutralDDrive
iThe DIRECT SELECT lever always returns
to its original position. The current
transmission position P, R , N or D appears
in the transmission position display
( Y page 308) in the multifunction display.
Engaging park position P
XPush the DIRECT SELECT lever in the
direction of the arrow P.
i
The automatic transmission shifts
automatically into park position P if you
open the driver's door when the vehicle is
stationary or at very low speed and the
transmission is in position D or R.
! If the engine speed is too high or the
vehicle is moving, do not shift the
automatic transmission directly from D to
R , from R to D or directly to P. The
automatic transmission could otherwise be
damaged.
Engaging reverse gear R
! Only shift the automatic transmission to
R when the vehicle is stationary.
i The ECO start/stop function is not
available when reverse gear is engaged.
For further information on the ECO start/
stop function ( Y page 302).
XWhen the vehicle is stationary, depress the
brake pedal.XPush the DIRECT SELECT lever up past the
first point of resistance.
Neutral N with ECO start/stop function
activated
The ECO start/stop function switches the
engine off automatically when the vehicle is
stationary if the vehicle is braked to a
standstill with neutral N engaged and the
brake depressed.
For further information on the ECO start/stop
function ( Y page 302).
Shifting to neutral NXWhen the vehicle is stationary, depress the
brake pedal.XPush the DIRECT SELECT lever up or down
to the first point of resistance.
When the engine is switched off, the
automatic transmission shifts to N
automatically.
Remaining in neutral N
If you wish to keep the automatic
transmission in neutral N, e.g. to wash the
vehicle in a car wash with a towing device,
observe the following:
GWarning!
When leaving the SmartKey in the starter
switch, do not leave children unattended in
the vehicle. It is possible for children to switch
on the ignition which could result in
unsupervised use of vehicle equipment.
Unsupervised use of vehicle equipment could
result in an accident and/or serious personal
injury.
Using the SmartKey:
R make sure the ignition is switched on.
R when the vehicle is stationary, depress the
brake pedal and keep it depressed.
R shift to neutral N.
R release the brake pedal.
R if applied, release the electric parking
brake.
R switch off the ignition and leave the
SmartKey in the ignition lock.
Using KEYLESS-GO:
R make sure the ignition is switched on.
R when the vehicle is stationary, depress the
brake pedal and keep it depressed.
R shift to park position P.
R release the brake pedal.
Automatic transmission307Driving and parkingZ
Page 311 of 524

Transmission positionsBPark position
Do not shift the transmission into
position P unless the vehicle is
stationary. The parking lock should
not be used as a brake when
parking. In addition to engaging the
parking lock, you must always
apply the electric parking brake to
secure the vehicle.
In the event of a fault in the vehicle
electronics, the transmission can
be locked in position P.
Have the vehicle electronics
checked immediately at a qualified
specialist workshop, e.g. an
authorized Mercedes-Benz Center.CReverse
Only shift the transmission to R
when the vehicle is stationary.ANeutral
Do not shift the transmission to N
while driving. The transmission
could otherwise be damaged.
No power is transmitted from the
engine to the drive wheels.
Releasing the brakes will allow you
to move the vehicle freely, e.g. to
push it or tow it.
If ESP ®
is deactivated or faulty:
only shift the transmission to
position N if the vehicle is in danger
of skidding, e.g. on icy roads.
! Driving in neutral N can
damage the drive train.7Drive
The automatic transmission
changes gear automatically. All
forward gears are available.Gearshifting
The automatic transmission shifts to the
individual gears automatically when it is in
transmission position D. This automatic
gearshifting behavior is determined by:
R a shift range restriction, if selected
R the selected drive program
E/S or, on AMG vehicles,
C/S/M (Y page 310)
R the position of the accelerator pedal
R the road speed
Driving tips
Kickdown
Use kickdown for maximum acceleration.
XVehicles for USA except AMG vehicles:
fully depress the accelerator pedal.
The transmission shifts to a lower gear
depending on the engine speed.XVehicles for Canada except AMG
vehicles: depress the accelerator pedal
beyond the pressure point.
The transmission shifts to a lower gear
depending on the engine speed.
Rocking the vehicle free
Rocking the vehicle free by repeatedly
shifting back and forth between transmission
positions D and R can help to free a vehicle
that has become stuck in mud or snow. The
engine management system of the vehicle
limits shifting back and forth between
transmission positions D and R to a maximum
speed of 5 mph (9 km/h). To shift back and
forth between transmission positions D and
R , move the selector lever up and down
beyond the pressure point.
Automatic transmission309Driving and parkingZ
Page 313 of 524

Automatic drive program
Drive program E (drive program C on AMG
vehicles) is characterized by the following:
R the vehicle pulling away more gently in
forward and reverse gears, unless the
accelerator pedal is depressed fully
R increased sensitivity, which improves
driving stability on slippery road surfaces,
for example
R the automatic transmission shifting up
sooner, which results in the vehicle being
driven at lower engine speeds and the
wheels being less likely to spin
In drive program S, the automatic
transmission shifts up later.
Shift ranges
Introduction
When the automatic transmission is in
position D, it is possible to restrict or
derestrict the shift range ( Y page 311).
The shift range selected is shown in the
multifunction display. The automatic
transmission shifts only as far as the selected
gear.
Driving situations=You can use the engine's braking
effect.5To use the braking effect of the
engine on downhill gradients and
for driving:
R on steep mountain roads
R in mountainous terrain
R in arduous conditions4To use the braking effect of the
engine on extremely steep downhill
gradients and on long downhill
stretchesRestricting the shift rangeXPull the left-hand steering wheel paddle
shifter.
The shift range is restricted.
i In order to prevent the engine from
overrevving, the automatic transmission
does not shift down when the engine speed
is too high.
i If the maximum engine speed for the shift
range is reached and you continue to
accelerate, the automatic transmission
shifts up in order to prevent the engine
from overrevving, even if the shift range is
restricted.
Derestricting the shift range
XPull the right-hand steering wheel paddle
shifter.
The shift range is derestricted.
Clearing the shift range restriction
XPull and hold the right-hand steering wheel
paddle shifter until D is shown again in the
multifunction display.
The automatic transmission shifts from the
current shift range directly to D.
Selecting the ideal shift range
XPull the left-hand steering wheel paddle
shifter and hold it in position.
The automatic transmission shifts to the
gear which allows ideal acceleration and
deceleration. To do this, the automatic
transmission shifts down one or more
gears.
Manual drive program
Switching on the manual drive program
The manual drive program is only available for
AMG vehicles.
Automatic transmission311Driving and parkingZ
Page 315 of 524

Problems with the transmissionProblemPossible causes/consequences and M SolutionsThe acceleration ability
is deteriorating.
The transmission no
longer changes gear.The transmission is in emergency mode.
It is only possible to shift into 2nd gear and reverse gear.XStop the vehicle.XShift the transmission to position P.XSwitch off the engine.XWait at least 10 seconds before restarting the engine.XShift the transmission to position D or R.
If D is selected, the transmission shifts into 2nd gear; if R is
selected, the transmission shifts into reverse gear.XHave the transmission checked at a qualified specialist
workshop immediately.Transfer case
This section is only valid for vehicles with 4-
wheel drive (4MATIC). Power is always
transmitted to both axles.
! Performance tests may only be carried
out on a 2-axle dynamometer. The brake
system or transfer case could otherwise be
damaged. Contact an authorized
Mercedes-Benz Center for a performance
test. Mercedes-Benz recommends that you
use an authorized Mercedes-Benz Center
for this purpose.
! To prevent ESP ®
from intervening, the
ignition must be switched off (SmartKey or
the Start/Stop button in position 0 or 1) if:
R the electric parking brake is being tested
on a brake dynamometer.
R the vehicle is being towed with only one
axle raised (not permitted for vehicles
with 4MATIC).
The brake system could otherwise be
damaged.Refueling
Important safety notes
GWarning
Gasoline is highly flammable and poisonous.
It burns violently and can cause serious
personal injury.
Never allow sparks, flames or smoking
materials near gasoline.
Turn off the engine before refueling.
Whenever you are around gasoline, avoid
inhaling fumes and any skin or clothing
contact.
Direct skin contact with fuels and the
inhalation of fuel vapors are damaging to your
health.
GWarning
Overfilling of the fuel tank may create
pressure in the system which could cause a
gas discharge. This could cause the gasoline
to spray back out when removing the fuel
pump nozzle, which could cause personal
injury.
Refueling313Driving and parkingZ
Page 346 of 524

soon as the turn signal on the driver's side is
activated. To park on the driver's side, you
must leave the driver's side turn signal
switched on until you have engaged reverse
gear. If a parking space is detected, parking
symbol ; changes to blue. Additionally, an
arrow pointing right = or left : is shown.
Parking Guidance will only detect parking
spaces:
Rthat are closed in at the back
Rthat are parallel to the direction of travel
Rthat are at least 5 ft (1.5 m) wide
Rthat are at least 4.3 ft (1.3 m) longer than
your vehicle
A parking space is displayed while you are
driving past it, and until you are
approximately 50 ft (15 m) away from it.
Parking
The following instructions refer to parking in
a space on the front-passenger side. To park
in a space on the driver's side, mirror the
instructions.
GWarning!
The Parking Guidance is only an aid and may
not detect all obstacles. The Parking
Guidance does not relieve you of the
responsibility to pay attention. You are always
responsible for safety and must continue to
pay attention to your immediate surroundings
when parking and maneuvering. Otherwise,
you could endanger yourself and others.
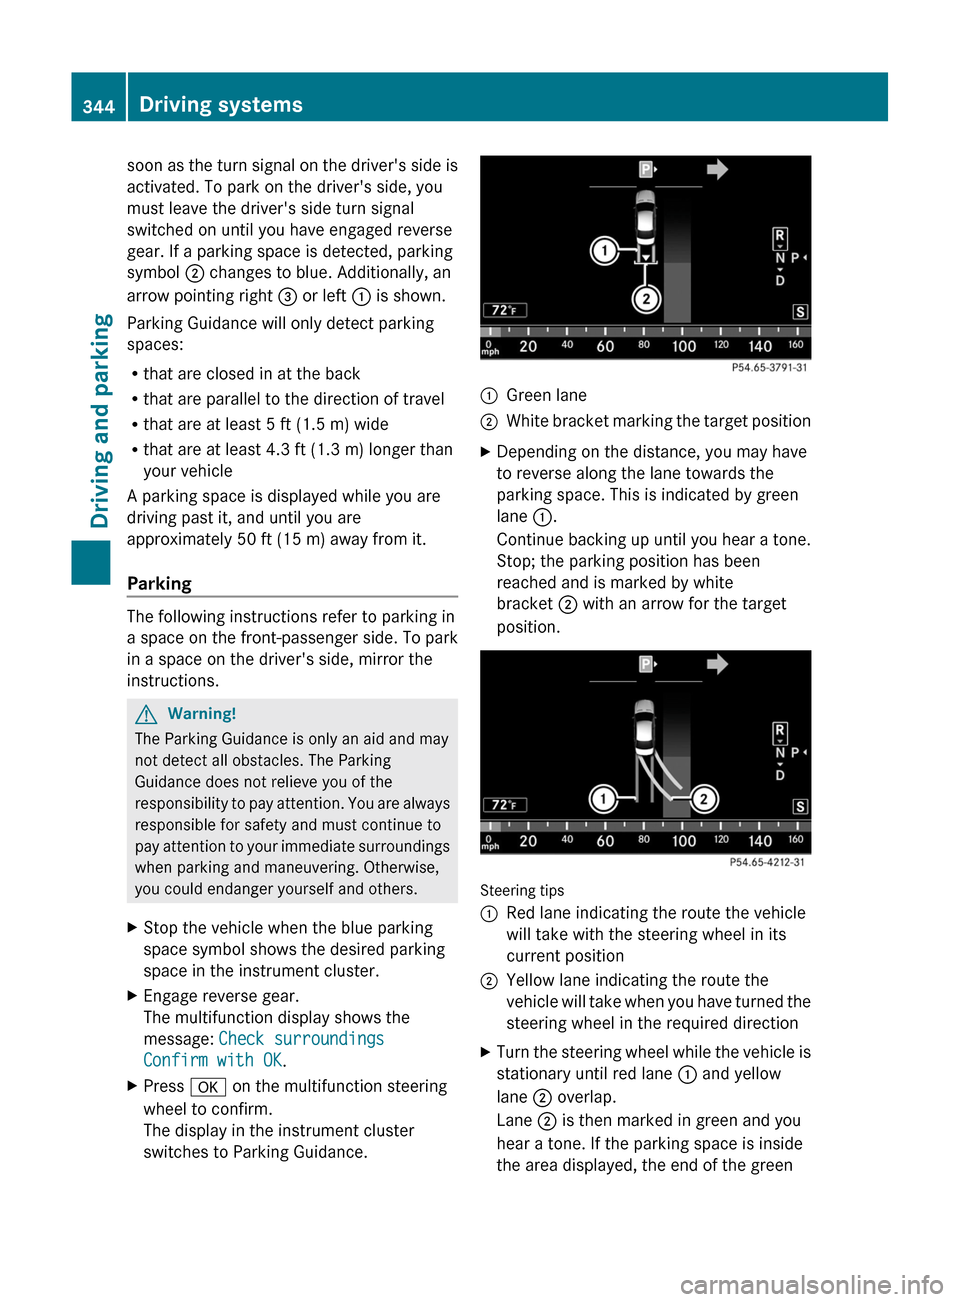
XStop the vehicle when the blue parking
space symbol shows the desired parking
space in the instrument cluster.
XEngage reverse gear.
The multifunction display shows the
message: Check surroundings
Confirm with OK.
XPress a on the multifunction steering
wheel to confirm.
The display in the instrument cluster
switches to Parking Guidance.
:Green lane;White bracket marking the target positionXDepending on the distance, you may have
to reverse along the lane towards the
parking space. This is indicated by green
lane :.
Continue backing up until you hear a tone.
Stop; the parking position has been
reached and is marked by white
bracket ; with an arrow for the target
position.
Steering tips
:Red lane indicating the route the vehicle
will take with the steering wheel in its
current position
;Yellow lane indicating the route the
vehicle will take when you have turned the
steering wheel in the required direction
XTurn the steering wheel while the vehicle is
stationary until red lane : and yellow
lane ; overlap.
Lane ; is then marked in green and you
hear a tone. If the parking space is inside
the area displayed, the end of the green
344Driving systemsDriving and parking
Page 347 of 524

lane is marked with a white bracket and an
arrow showing the target position.
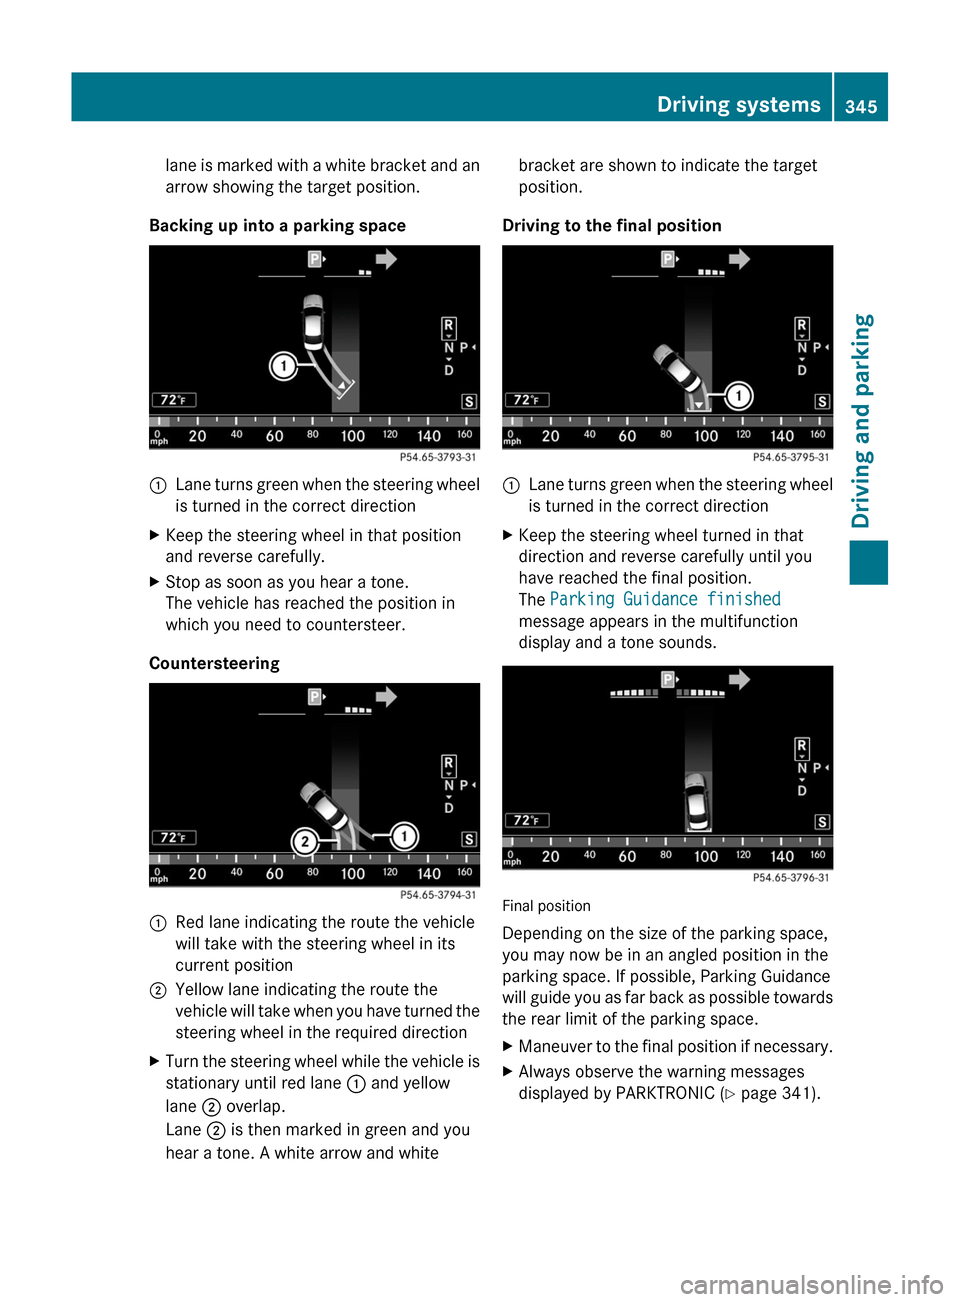
Backing up into a parking space
:Lane turns green when the steering wheel
is turned in the correct directionXKeep the steering wheel in that position
and reverse carefully.XStop as soon as you hear a tone.
The vehicle has reached the position in
which you need to countersteer.
Countersteering
:Red lane indicating the route the vehicle
will take with the steering wheel in its
current position;Yellow lane indicating the route the
vehicle will take when you have turned the
steering wheel in the required directionXTurn the steering wheel while the vehicle is
stationary until red lane : and yellow
lane ; overlap.
Lane ; is then marked in green and you
hear a tone. A white arrow and whitebracket are shown to indicate the target
position.
Driving to the final position
:Lane turns green when the steering wheel
is turned in the correct directionXKeep the steering wheel turned in that
direction and reverse carefully until you
have reached the final position.
The Parking Guidance finished
message appears in the multifunction
display and a tone sounds.
Final position
Depending on the size of the parking space,
you may now be in an angled position in the
parking space. If possible, Parking Guidance
will guide you as far back as possible towards
the rear limit of the parking space.
XManeuver to the final position if necessary.XAlways observe the warning messages
displayed by PARKTRONIC ( Y page 341).Driving systems345Driving and parkingZ
Page 349 of 524

Do not use the rear view camera in these
situations. Otherwise you could injure
yourself or others and/or damage property
including your vehicle while parking/
maneuvering.
Activating the rear view camera
XMake sure that the SmartKey is in
position 2 in the ignition lock.
XEngage reverse gear.
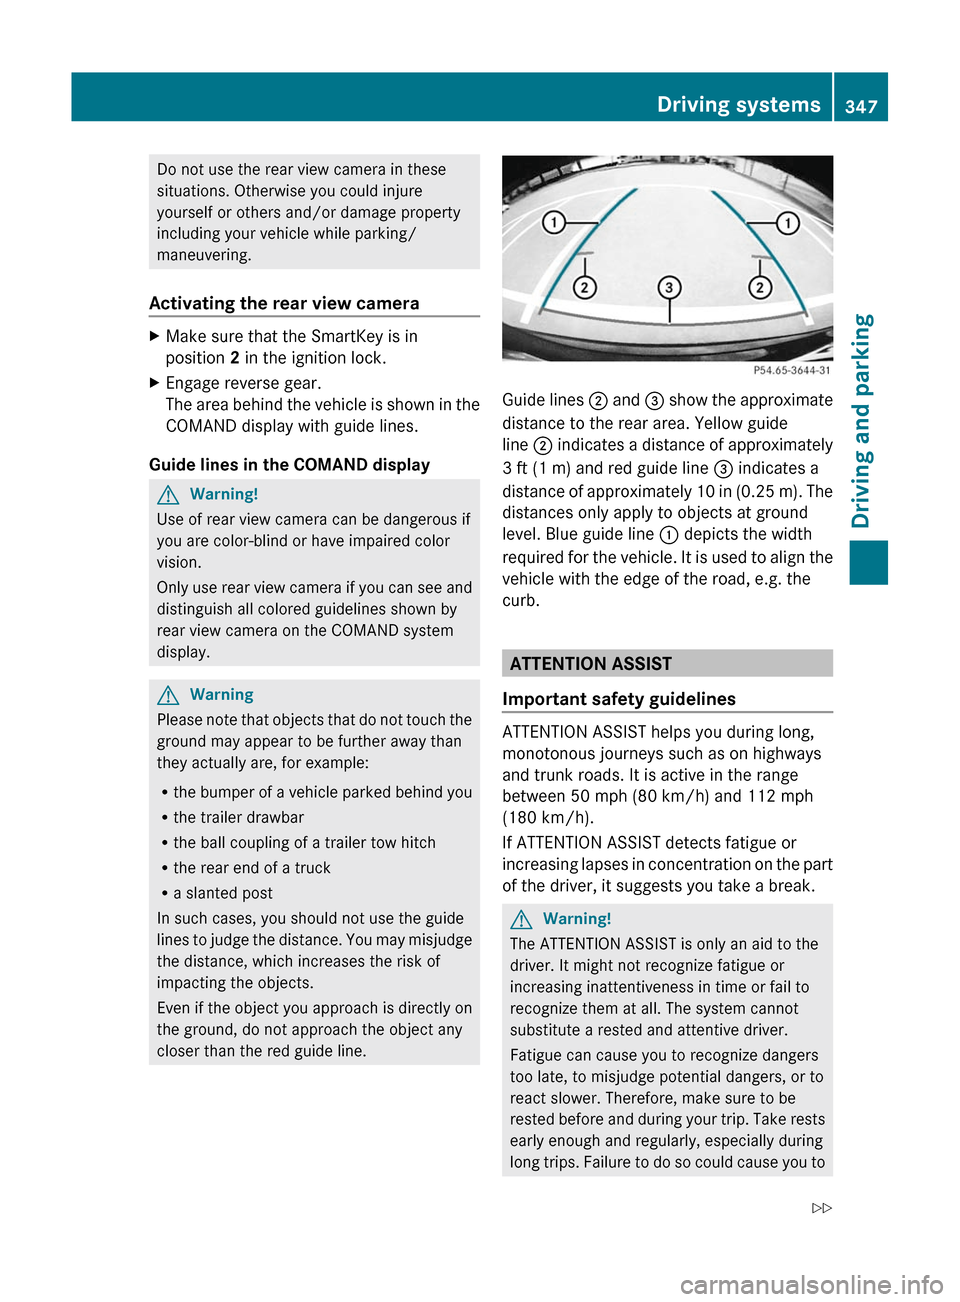
The area behind the vehicle is shown in the
COMAND display with guide lines.
Guide lines in the COMAND display
GWarning!
Use of rear view camera can be dangerous if
you are color-blind or have impaired color
vision.
Only use rear view camera if you can see and
distinguish all colored guidelines shown by
rear view camera on the COMAND system
display.
GWarning
Please note that objects that do not touch the
ground may appear to be further away than
they actually are, for example:
Rthe bumper of a vehicle parked behind you
Rthe trailer drawbar
Rthe ball coupling of a trailer tow hitch
Rthe rear end of a truck
Ra slanted post
In such cases, you should not use the guide
lines to judge the distance. You may misjudge
the distance, which increases the risk of
impacting the objects.
Even if the object you approach is directly on
the ground, do not approach the object any
closer than the red guide line.
Guide lines ; and = show the approximate
distance to the rear area. Yellow guide
line ; indicates a distance of approximately
3 ft (1 m) and red guide line = indicates a
distance of approximately 10 in (0.25 m). The
distances only apply to objects at ground
level. Blue guide line : depicts the width
required for the vehicle. It is used to align the
vehicle with the edge of the road, e.g. the
curb.
ATTENTION ASSIST
Important safety guidelines
ATTENTION ASSIST helps you during long,
monotonous journeys such as on highways
and trunk roads. It is active in the range
between 50 mph (80 km/h) and 112 mph
(180 km/h).
If ATTENTION ASSIST detects fatigue or
increasing lapses in concentration on the part
of the driver, it suggests you take a break.
GWarning!
The ATTENTION ASSIST is only an aid to the
driver. It might not recognize fatigue or
increasing inattentiveness in time or fail to
recognize them at all. The system cannot
substitute a rested and attentive driver.
Fatigue can cause you to recognize dangers
too late, to misjudge potential dangers, or to
react slower. Therefore, make sure to be
rested before and during your trip. Take rests
early enough and regularly, especially during
long trips. Failure to do so could cause you to
Driving systems347Driving and parkingZ
Page 351 of 524

accordance with traffic conditions. You could
otherwise put yourself and others in danger.
The system may be impaired or unavailable if:
Rthere is poor visibility, e.g. due to snow,
rain, fog or heavy spray.
Rthe windshield is dirty, fogged up or
covered, for instance by a sticker, in the
vicinity of the camera.
Ryou are driving on bends, uphill gradients
or downhill gradients.
Light from the headlamps of oncoming
vehicles does not affect the Night View Assist
Plus display in the multifunction display. This
is also the case if you cannot switch on the
high-beam headlamps because of oncoming
traffic.
GWarning!
The Night View Assist Plus cannot record
objects immediately in front of or next to the
vehicle. When maneuvering, continue to look
through the windshield. Make sure no
persons or animals are in the area in which
you are maneuvering. You could otherwise
injure them.
iInfrared light is not visible to the human
eye and therefore does not glare. Night
View Assist Plus can therefore remain
switched on even if there is oncoming
traffic.
:Night View Assist Plus cameraSwitching on Night View Assist Plus
You can only activate Night View Assist Plus
if:
Rthe SmartKey is in position 2 in the ignition
lock.
Rit is dark.
Rthe light switch is in the c or L
position.
Rreverse gear has not been engaged.
XPush rocker switch : up.
The Night View Assist Plus display appears
in the multifunction display.
:Night View Assist Plus display;Pedestrian recognized=Framing?Symbol for active pedestrian recognitionASpeed display
iThe infrared headlamps only switch on
when the vehicle is driving at speeds of at
least 6 mph (10 km/h). This means that you
do not have the full visual range while
Driving systems349Driving and parkingZ