2011 MERCEDES-BENZ S-Class tv menu
[x] Cancel search: tv menuPage 268 of 524

To switch back from operation of the rear-
compartment air-conditioning system from
the front:
XIn the climate control main menu, select
Front climate control and press W.
The air conditioning function bar shows the
climate control settings for the driver and
front passenger.
To switch off the rear-compartment air-
conditioning system:
XIn the climate control main menu, select
Rear climate control off and press
W.
To switch on automatic mode for the rear-
compartment air-conditioning system:
XIn the climate control main menu, select
Rear automatic and press W.
Automatic mode for the rear-compartment
air-conditioning system is switched on.
Seats
Lumbar supports
The lumbar support in the backrest of the
driver's and front-passenger seats can be
adjusted to provide optimum support for your
back.
XTo select the seat: press the T
function button.
The main area of the COMAND display is
active. A scale appears.
XTo move to the lower menu bar: select
by sliding ZVÆ the COMAND controller
and press W to confirm.
iWhen you press the T function button,
the previously adjusted seat is active.
XTo adjust the lumbar support: select by
sliding XVY or turning cVd the COMAND
controller and press W to confirm.
Multicontour seat
iInformation about the components and
operating principles of COMAND can be
found on (Y page 116).
The contour of the driver's seat and front-
passenger seat backrests can be individually
adjusted to provide optimum support for your
back. This is achieved by controlling the
pressure in the air chambers in the
multicontour seat.
The adjustments are made using the
COMAND display.
iWhen you adjust the multicontour seat,
you may hear the air being pumped in or
released.
You can adjust the following air cushions:
Rseat side bolsters
Rseat backrest side bolsters
Rbackrest curvature in the lumbar region
Rbackrest curvature in the upper back
region
XMake sure that the key is in position 2 in
the ignition lock.
XPress the T function button.
Selecting the seat
You must first select the seat for which you
wish to make adjustments.
XPress the T function button.
The main area is active.
XTo move to the lower menu bar: select
by sliding ZVÆ the COMAND controller
and press W to confirm.
266VehicleCOMAND
Page 269 of 524
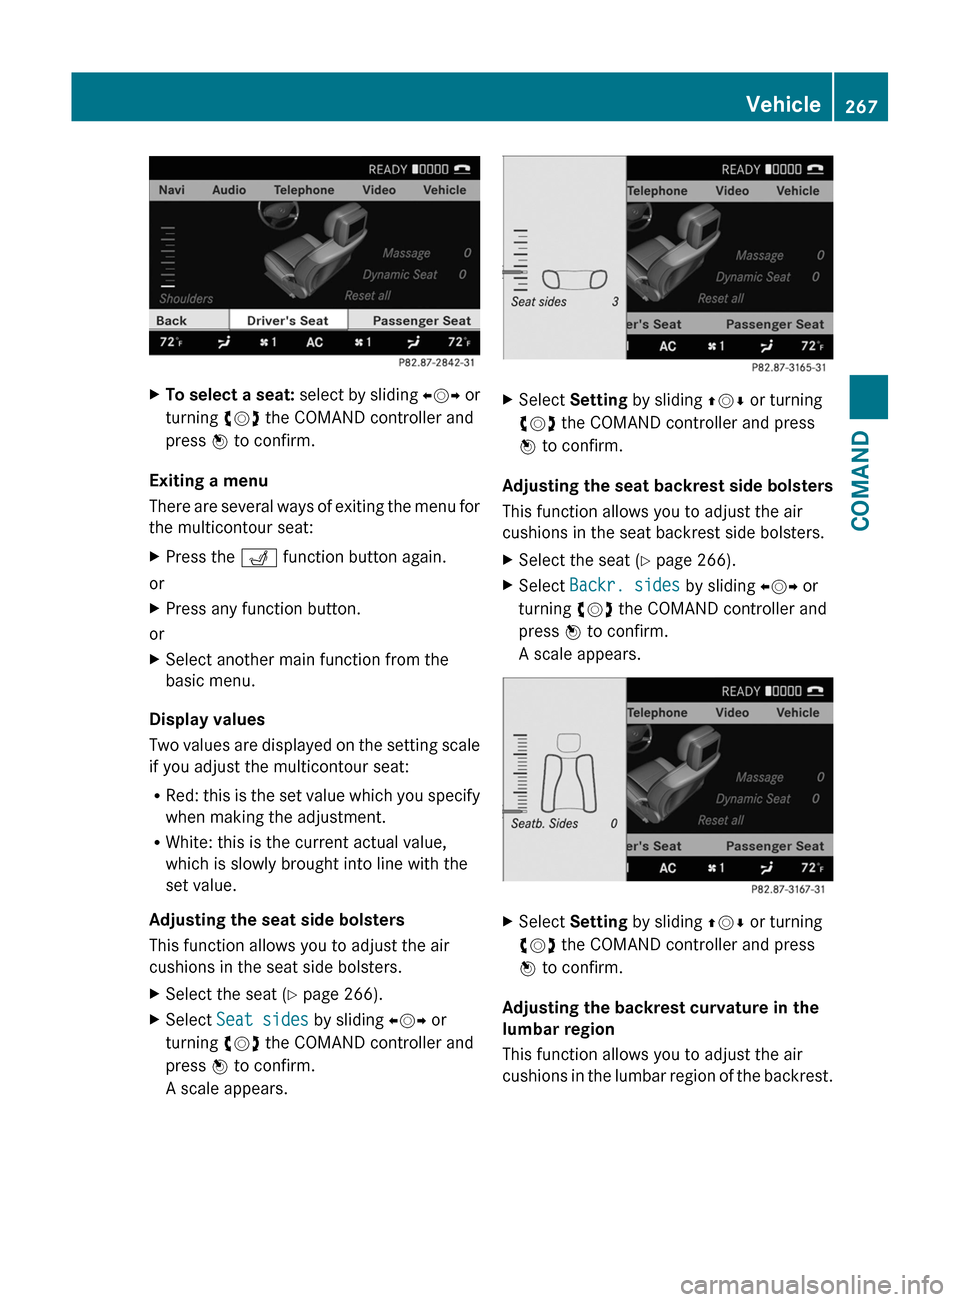
XTo select a seat: select by sliding XVY or
turning cVd the COMAND controller and
press W to confirm.
Exiting a menu
There are several ways of exiting the menu for
the multicontour seat:
XPress the T function button again.
or
XPress any function button.
or
XSelect another main function from the
basic menu.
Display values
Two values are displayed on the setting scale
if you adjust the multicontour seat:
RRed: this is the set value which you specify
when making the adjustment.
RWhite: this is the current actual value,
which is slowly brought into line with the
set value.
Adjusting the seat side bolsters
This function allows you to adjust the air
cushions in the seat side bolsters.
XSelect the seat (Y page 266).XSelect Seat sides by sliding XVY or
turning cVd the COMAND controller and
press W to confirm.
A scale appears.
XSelect Setting by sliding ZVÆ or turning
cVd the COMAND controller and press
W to confirm.
Adjusting the seat backrest side bolsters
This function allows you to adjust the air
cushions in the seat backrest side bolsters.
XSelect the seat (Y page 266).XSelect Backr. sides by sliding XVY or
turning cVd the COMAND controller and
press W to confirm.
A scale appears.
XSelect Setting by sliding ZVÆ or turning
cVd the COMAND controller and press
W to confirm.
Adjusting the backrest curvature in the
lumbar region
This function allows you to adjust the air
cushions in the lumbar region of the backrest.
Vehicle267COMANDZ
Page 271 of 524

XSelect Setting by sliding ZVÆ or turning
cVd the COMAND controller and press
W to confirm.
Massage function (PULSE)
The massage function helps you to prevent
muscle tension on long journeys.
XSelect the seat (Y page 266).XSelect Massage by sliding XVY or turning
cVd the COMAND controller and press
W to confirm.
A list appears.
You can select different types of massage
function:
R0: Off
R1: Slow and gentle
R2: Slow and vigorous
R3: Fast and gentle
R4: Fast and vigorous
XTo confirm your selection: press W.XSelect Setting by sliding ZVÆ or turning
cVd the COMAND controller and press
W to confirm.
The massage function runs for
approximately 6 to 20 minutes, depending
on the setting.
Uploading/downloading data
With this function, you can transfer COMAND
data from one system (vehicle) to another
system (vehicle). You can use either a USB
stick or an SD card as temporary storage.
You can only transfer the complete
transferable data record.
The following data is included in the complete
transferable data record:
Rnavigation destination memory and last
destination
Raddress book entries
Raudio station/video channel presets
Rsystem settings
Copying data to a storage medium
XInsert an SD card into the SD card slot
or
XInsert a USB stick into the socket on the
side in the glove box.
XSelect Vehicle in the main function bar by
turning cVd the COMAND controller and
press W to confirm.
The "Vehicle" menu appears.
XSelect System and press W to confirm.Vehicle269COMANDZ
Page 272 of 524
XSelect Upload/download data and press
W to confirm.XSelect Copy data to storage medium
and press W to confirm.XSelect the storage medium to which the
data should be copied.XSelect Start copying .
COMAND checks whether the storage
medium has enough storage capacity. If
there is enough storage capacity, the data
is copied to the storage medium.XIf there is not enough storage capacity,
remove the storage medium. Make more
storage space available on the storage
medium. Then, try to copy the COMAND
data to the storage medium again.XRemove the storage medium.
Transferring data to another system
(vehicle)
XInsert/connect the storage medium (SD
card or USB stick) with the saved data into/
to the relevant interface.XSelect Vehicle in the main function bar by
turning cVd the COMAND controller and
press W to confirm.
The "Vehicle" menu appears.XSelect System and press W to confirm.XSelect Upload/download data and press
W to confirm.XSelect Import data from storage
medium and press W to confirm.XSelect Start data import .
A prompt appears, asking whether the
COMAND data should be overwritten.XPress Yes to confirm that the data saved in
COMAND should be overwritten.
COMAND imports the data and restarts the
system.
or
XPress No to cancel the import process.270VehicleCOMAND
Page 334 of 524
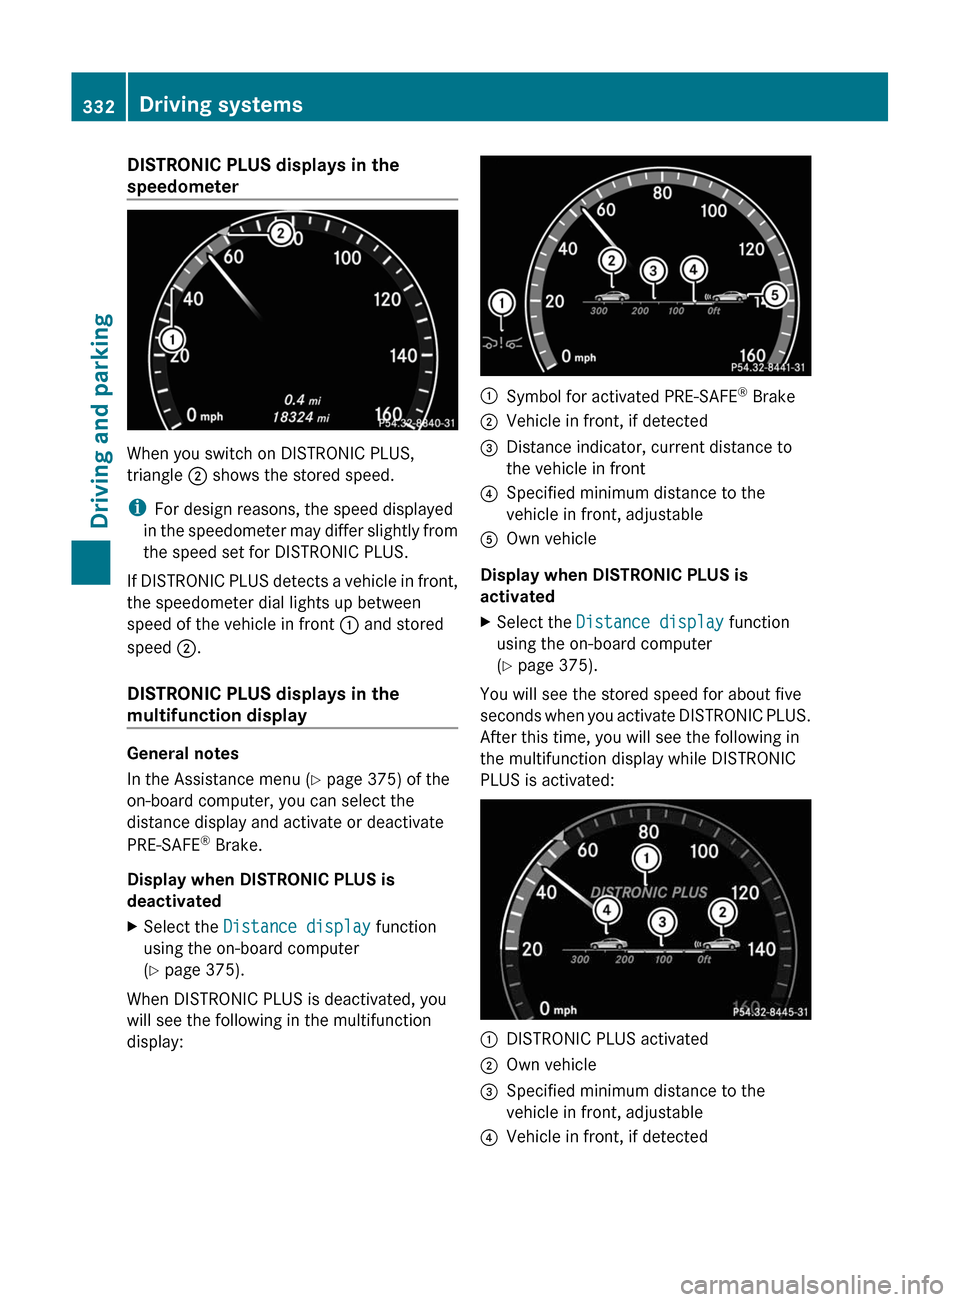
DISTRONIC PLUS displays in the
speedometer
When you switch on DISTRONIC PLUS,
triangle ; shows the stored speed.
iFor design reasons, the speed displayed
in the speedometer may differ slightly from
the speed set for DISTRONIC PLUS.
If DISTRONIC PLUS detects a vehicle in front,
the speedometer dial lights up between
speed of the vehicle in front : and stored
speed ;.
DISTRONIC PLUS displays in the
multifunction display
General notes
In the Assistance menu (Y page 375) of the
on-board computer, you can select the
distance display and activate or deactivate
PRE-SAFE® Brake.
Display when DISTRONIC PLUS is
deactivated
XSelect the Distance display function
using the on-board computer
(Y page 375).
When DISTRONIC PLUS is deactivated, you
will see the following in the multifunction
display:
:Symbol for activated PRE-SAFE® Brake;Vehicle in front, if detected=Distance indicator, current distance to
the vehicle in front
?Specified minimum distance to the
vehicle in front, adjustable
AOwn vehicle
Display when DISTRONIC PLUS is
activated
XSelect the Distance display function
using the on-board computer
(Y page 375).
You will see the stored speed for about five
seconds when you activate DISTRONIC PLUS.
After this time, you will see the following in
the multifunction display while DISTRONIC
PLUS is activated:
:DISTRONIC PLUS activated;Own vehicle=Specified minimum distance to the
vehicle in front, adjustable
?Vehicle in front, if detected332Driving systemsDriving and parking
Page 352 of 524

stationary and cannot check whether Night
View Assist Plus is working.
When you activate Night View Assist Plus,
speed display A in the multifunction display
changes. Speed display A is shown as a bar
at the bottom edge of the multifunction
display. This line is no longer available for
basic menus. You have to deactivate Night
View Assist Plus if you wish to change a
setting using the buttons on the multifunction
steering wheel.
Pedestrian recognition
The Night View Assist Plus recognizes
pedestrians using typical characteristics, i.e.
a silhouette in the shape of a person.
Pedestrian recognition is then switched on
automatically if:
R Night View Assist Plus is activated.
R you are driving above
approximately 6 mph (10 km/h).
R the surroundings are dark, e.g. when
driving outside built-up areas without
street lighting.
If pedestrian recognition is active,
symbol ? appears. If a pedestrian is now
recognized, they are framed = and thereby
highlighted. If the pedestrian recognition
system has brought a pedestrian to your
attention, look through the windshield to
evaluate the situation. The actual distance to
objects and pedestrians cannot be gauged
accurately by looking at a screen.
It may be the case that objects are highlighted
as well as pedestrians.
GWarning!
The pedestrian detection may be impaired or
unavailable when
R pedestrians are obstructed fully or in part
by other objects such as parking vehicles
R the silhouette in the Night View Assist Plus
image is displayed incomplete or
interrupted, e.g. by significant light
reflection
R a pedestrian's silhouette is not rich enough
in contrast compared to the background
R pedestrians are not in erected position but,
for example, sit, crouch down, or lie
i Animals are not identified by pedestrian
recognition.
Setting the brightness of the
multifunction displayXTo make brighter or dimmer : make sure
that Night View Assist Plus is activated.XTurn control : counterclockwise or
clockwise.
Fogged up or dirty windshield
If the windshield in front of the camera is
fogged up or dirty on the inside or outside, the
Night View Assist Plus display is affected.
GWarning!
Please do not forget that your primary
responsibility is to drive the vehicle. A driver's
attention to the road must always be his/her
primary focus when driving. For your safety
and the safety of others, stop before trying to
remove window fogging or cleaning the
windshield in front of the Night View Assist
Plus camera.
Bear in mind that at a speed of just 30 mph
(approximately 50 km/h), your vehicle is
covering a distance of 44 feet
(approximately 14 m) every second.
350Driving systemsDriving and parking
Page 365 of 524
Vehicle equipment ............................364
Important safety notes ....................364
Displays and operation ....................364
Menus and submenus ......................367
Display messages ............................. 380
Warning and indicator lamps in the
instrument cluster ............................413363On-board computer and displays
Page 367 of 524
The coolant temperature gauge is in the
instrument cluster on the left-hand side.
Under normal operating conditions and with
the specified coolant level, the coolant
temperature may rise to 248 ‡ (120 †).
! If the coolant temperature is too high a
display message is shown.
If the coolant temperature rises above
248 ‡(120 †), do not drive any further as
this could damage the engine.
Tachometer
The red band in the tachometer indicates the
engine's overrevving range.
! Do not drive in the overrevving range, as
this could damage the engine.
The fuel supply is interrupted to protect the
engine when the red band is reached.
Outside temperature display
The outside temperature display is in the
multifunction display.
GWarning!
The outside temperature indicator is not
designed to serve as an ice-warning device
and is therefore unsuitable for that purpose.
Indicated temperatures just above the
freezing point do not guarantee that the road
surface is free of ice. The road may still be icy,
especially in wooded areas or on bridges.
Changes in the outside temperature are
displayed after a short delay.
Operating the on-board computer
The on-board computer is activated as soon
as you turn the key to position 2 in the ignition
lock.
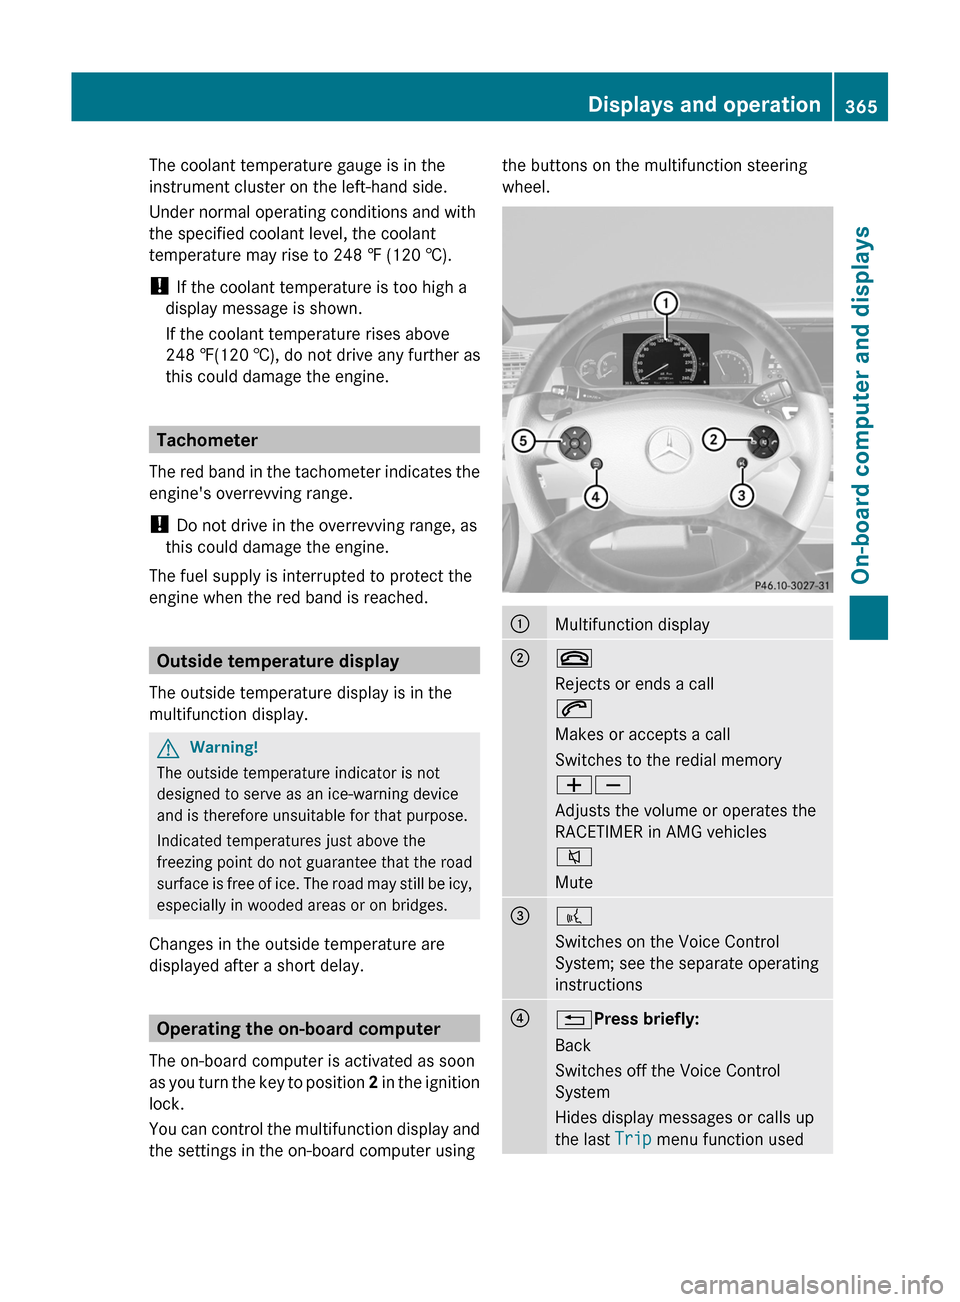
You can control the multifunction display and
the settings in the on-board computer using
the buttons on the multifunction steering
wheel.
:Multifunction display;~
Rejects or ends a call
6
Makes or accepts a call
Switches to the redial memory
WX
Adjusts the volume or operates the
RACETIMER in AMG vehicles
8
Mute
=?
Switches on the Voice Control
System; see the separate operating
instructions
?%Press briefly:
Back
Switches off the Voice Control
System
Hides display messages or calls up
the last Trip menu function used
Displays and operation365On-board computer and displaysZ