2011 MERCEDES-BENZ S-Class navigation
[x] Cancel search: navigationPage 253 of 524
DVD playback conditions
There may be playback problems when
playing copied discs. There are a large variety
of discs, DVD authoring software, disc writing
software and writers available. This variety
means that there is no guarantee that the
Rear Seat Entertainment System will be able
to play video DVDs that you have copied
yourself.
You will find further information in the Video
section (Y page 237). Information regarding
COMAND also applies to the Rear Seat
Entertainment System.
Function restrictions
Depending on the DVD, it is possible that
certain functions or actions described in this
section will be temporarily blocked or may not
function at all. As soon as you try to activate
these functions or actions, you will see the
K symbol in the display.
Inserting and removing a CD/DVD
XProceed as described in the "Audio CD/
DVD and MP3 mode" section
(Y page 247).
Activating video DVD mode
XInsert a video DVD.
The Rear Seat Entertainment System loads
the disc.
If disc mode was the last mode selected, it
will now be active.
If it was not, switch on video DVD mode as
described in the following instruction.
XSelect Disc in the menu using the
9=; buttons on the remote
control and press the 9 button to confirm.
If the video DVD fulfills the playback
criteria, the film either starts automatically
or the menu saved on the DVD appears. If
the DVD menu appears, you must start the
film manually.
XSelect the corresponding menu item in the
DVD menu.
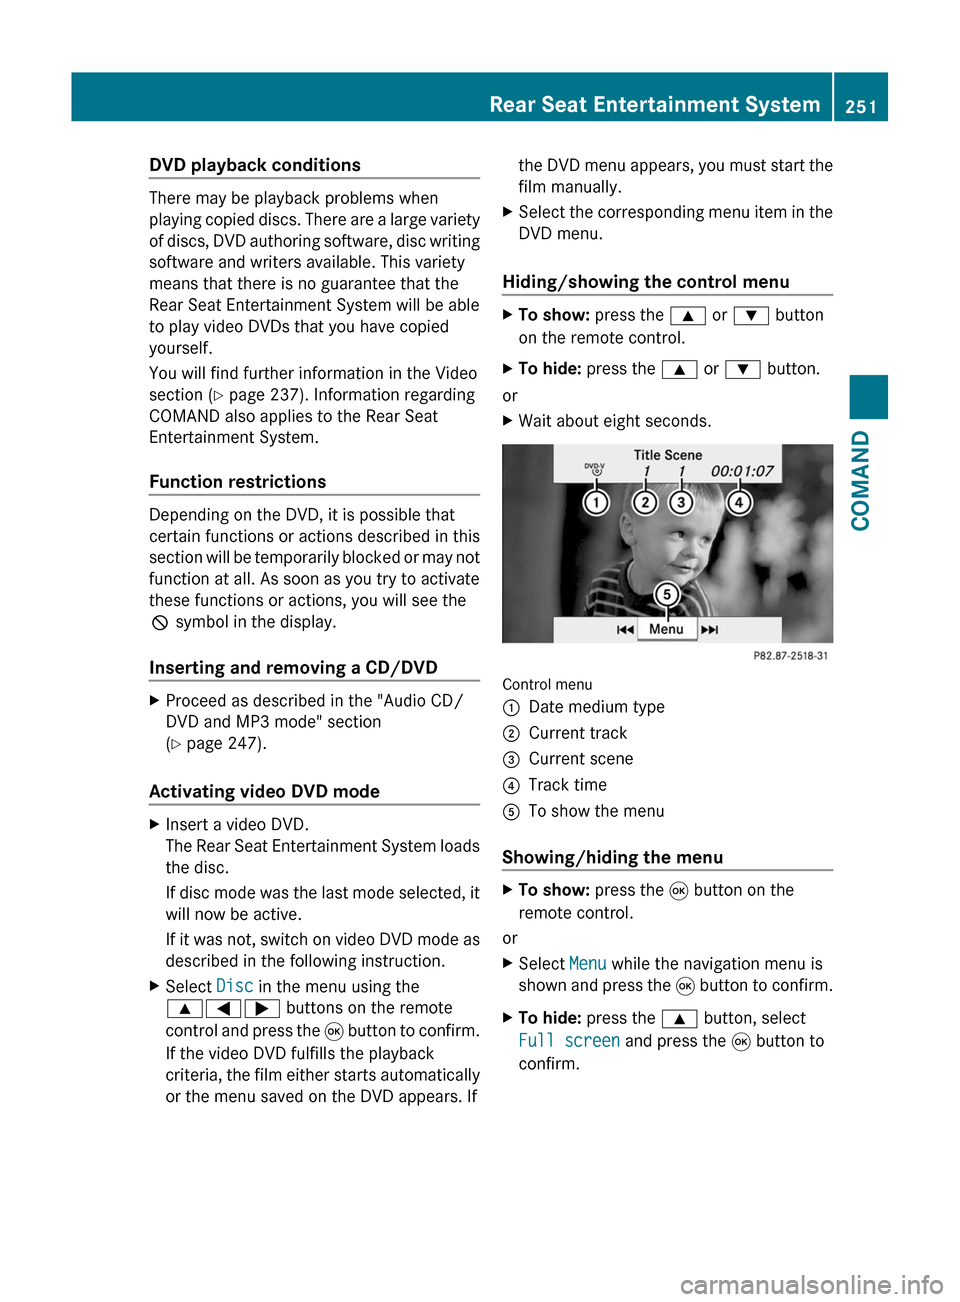
Hiding/showing the control menu
XTo show: press the 9 or : button
on the remote control.
XTo hide: press the 9 or : button.
or
XWait about eight seconds.
Control menu
:Date medium type;Current track=Current scene?Track timeATo show the menu
Showing/hiding the menu
XTo show: press the 9 button on the
remote control.
or
XSelect Menu while the navigation menu is
shown and press the 9 button to confirm.
XTo hide: press the 9 button, select
Full screen and press the 9 button to
confirm.
Rear Seat Entertainment System251COMANDZ
Page 254 of 524
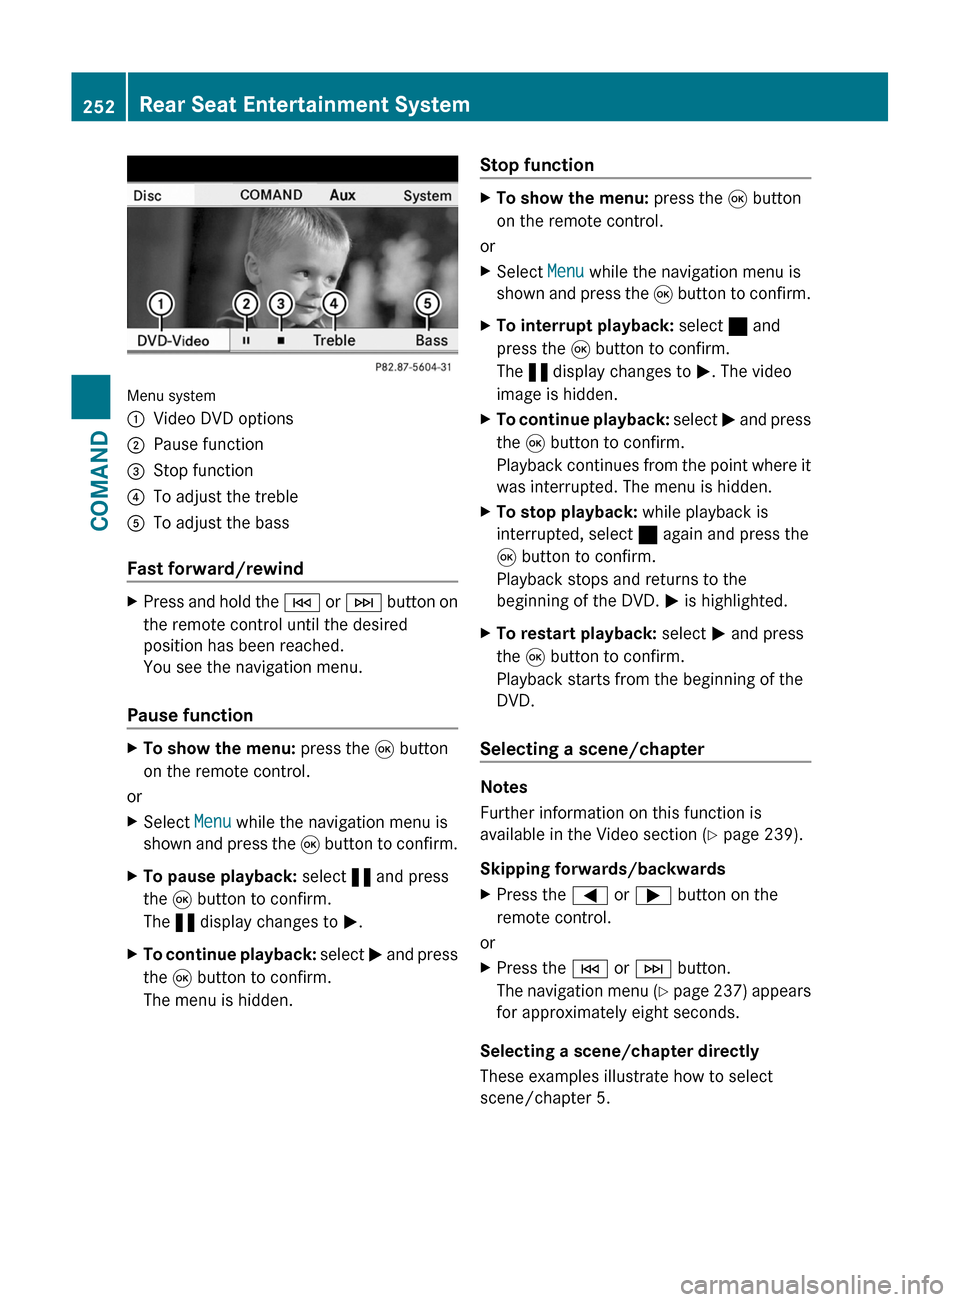
Menu system
:Video DVD options;Pause function=Stop function?To adjust the trebleATo adjust the bass
Fast forward/rewind
XPress and hold the E or F button on
the remote control until the desired
position has been reached.
You see the navigation menu.
Pause function
XTo show the menu: press the 9 button
on the remote control.
or
XSelect Menu while the navigation menu is
shown and press the 9 button to confirm.
XTo pause playback: select « and press
the 9 button to confirm.
The « display changes to M.
XTo continue playback: select M and press
the 9 button to confirm.
The menu is hidden.
Stop functionXTo show the menu: press the 9 button
on the remote control.
or
XSelect Menu while the navigation menu is
shown and press the 9 button to confirm.
XTo interrupt playback: select ± and
press the 9 button to confirm.
The « display changes to M. The video
image is hidden.
XTo continue playback: select M and press
the 9 button to confirm.
Playback continues from the point where it
was interrupted. The menu is hidden.
XTo stop playback: while playback is
interrupted, select ± again and press the
9 button to confirm.
Playback stops and returns to the
beginning of the DVD. M is highlighted.
XTo restart playback: select M and press
the 9 button to confirm.
Playback starts from the beginning of the
DVD.
Selecting a scene/chapter
Notes
Further information on this function is
available in the Video section (Y page 239).
Skipping forwards/backwards
XPress the = or ; button on the
remote control.
or
XPress the E or F button.
The navigation menu (Y page 237) appears
for approximately eight seconds.
Selecting a scene/chapter directly
These examples illustrate how to select
scene/chapter 5.
252Rear Seat Entertainment SystemCOMAND
Page 271 of 524

XSelect Setting by sliding ZVÆ or turning
cVd the COMAND controller and press
W to confirm.
Massage function (PULSE)
The massage function helps you to prevent
muscle tension on long journeys.
XSelect the seat (Y page 266).XSelect Massage by sliding XVY or turning
cVd the COMAND controller and press
W to confirm.
A list appears.
You can select different types of massage
function:
R0: Off
R1: Slow and gentle
R2: Slow and vigorous
R3: Fast and gentle
R4: Fast and vigorous
XTo confirm your selection: press W.XSelect Setting by sliding ZVÆ or turning
cVd the COMAND controller and press
W to confirm.
The massage function runs for
approximately 6 to 20 minutes, depending
on the setting.
Uploading/downloading data
With this function, you can transfer COMAND
data from one system (vehicle) to another
system (vehicle). You can use either a USB
stick or an SD card as temporary storage.
You can only transfer the complete
transferable data record.
The following data is included in the complete
transferable data record:
Rnavigation destination memory and last
destination
Raddress book entries
Raudio station/video channel presets
Rsystem settings
Copying data to a storage medium
XInsert an SD card into the SD card slot
or
XInsert a USB stick into the socket on the
side in the glove box.
XSelect Vehicle in the main function bar by
turning cVd the COMAND controller and
press W to confirm.
The "Vehicle" menu appears.
XSelect System and press W to confirm.Vehicle269COMANDZ
Page 369 of 524
Menus and submenus
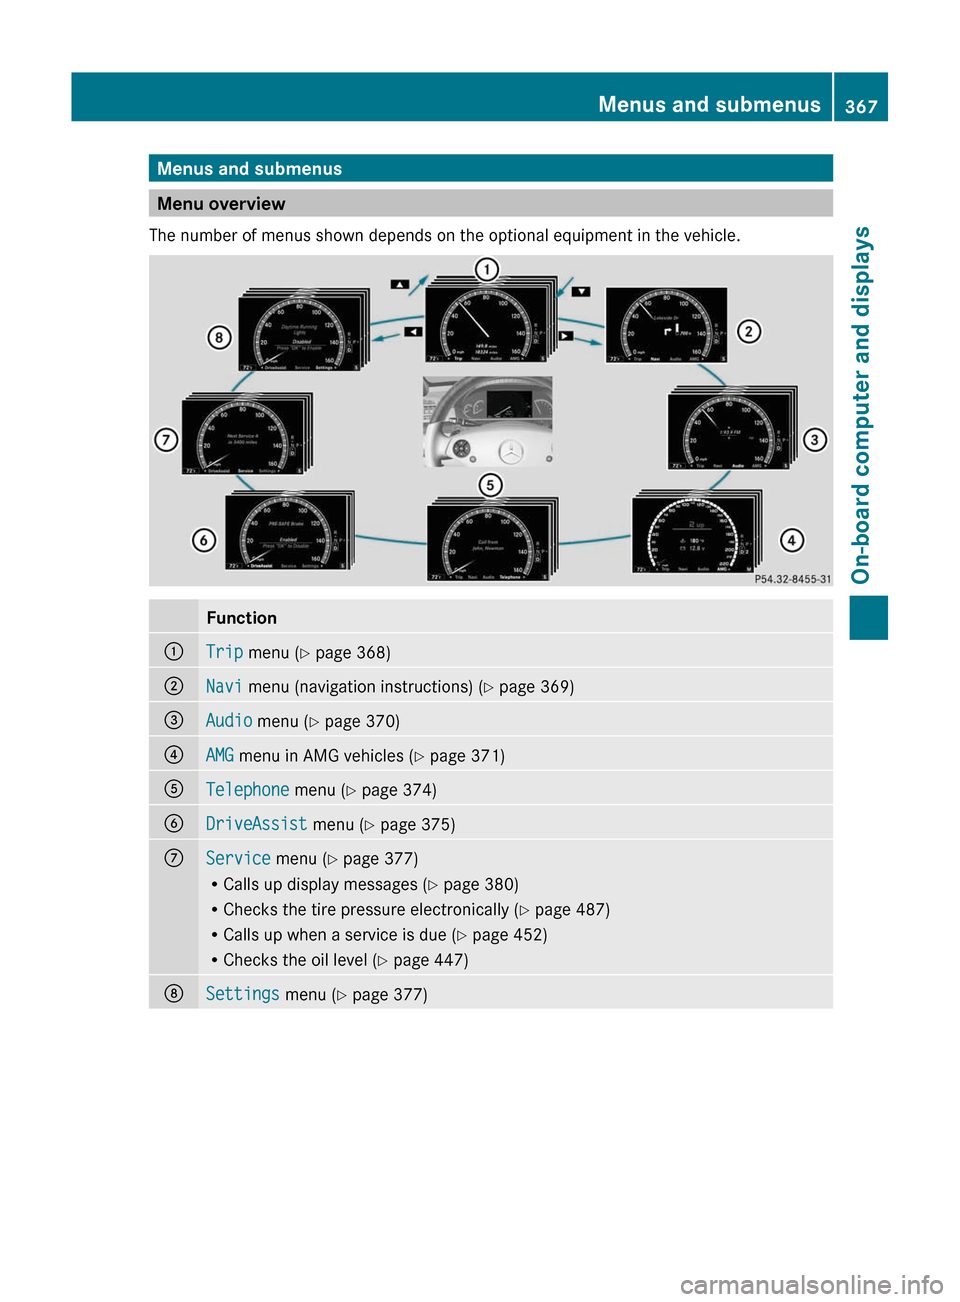
Menu overview
The number of menus shown depends on the optional equipment in the vehicle.
Function:Trip menu (Y page 368);Navi menu (navigation instructions) (Y page 369)=Audio menu (Y page 370)?AMG menu in AMG vehicles (Y page 371)ATelephone menu (Y page 374)BDriveAssist menu (Y page 375)CService menu (Y page 377)
RCalls up display messages (Y page 380)
RChecks the tire pressure electronically (Y page 487)
RCalls up when a service is due (Y page 452)
RChecks the oil level (Y page 447)
DSettings menu (Y page 377)Menus and submenus367On-board computer and displaysZ
Page 371 of 524
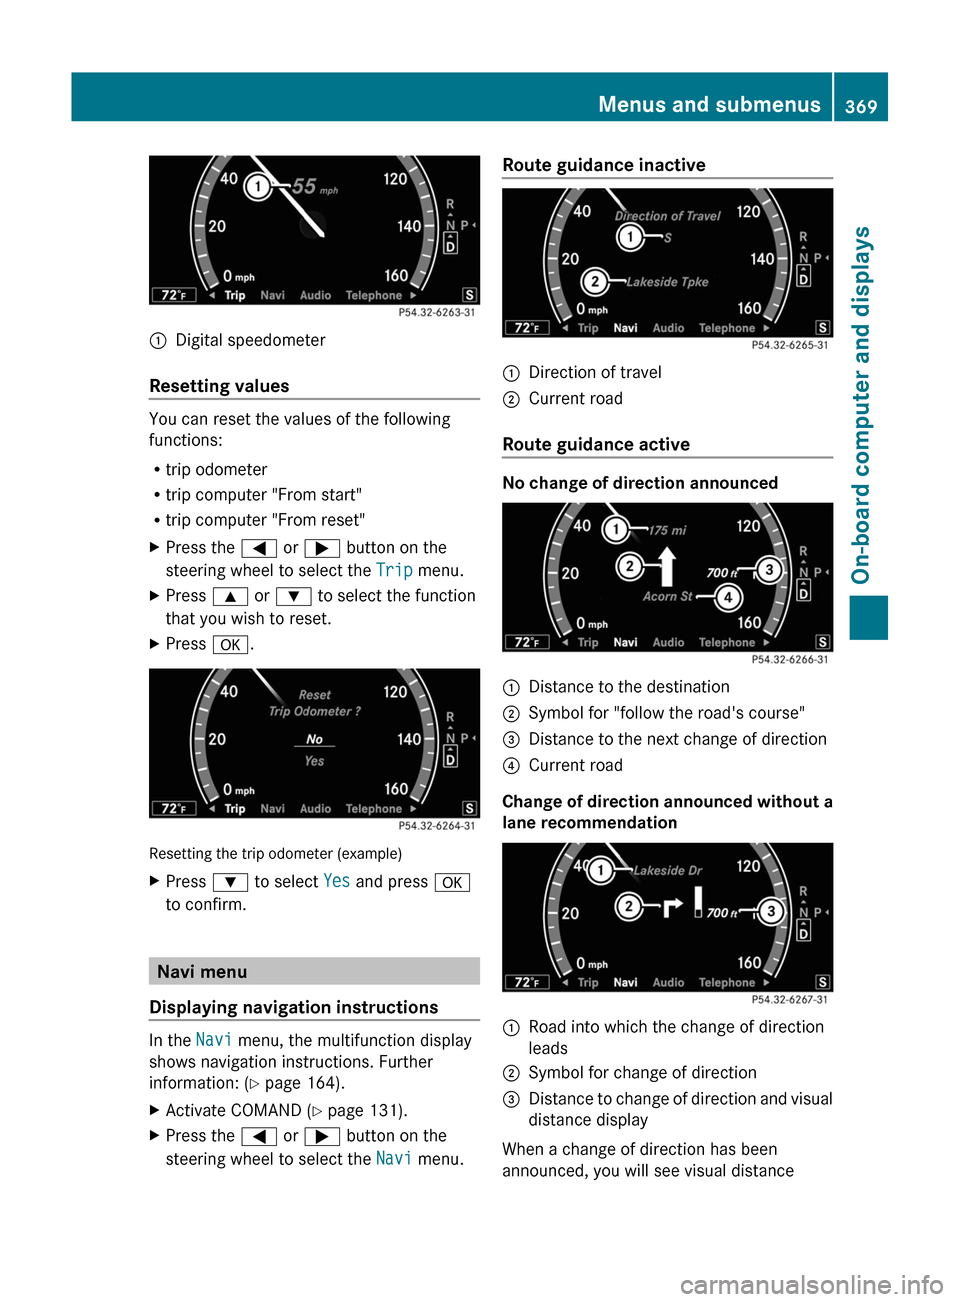
:Digital speedometer
Resetting values
You can reset the values of the following
functions:
Rtrip odometer
Rtrip computer "From start"
Rtrip computer "From reset"
XPress the = or ; button on the
steering wheel to select the Trip menu.
XPress 9 or : to select the function
that you wish to reset.
XPress a.
Resetting the trip odometer (example)
XPress : to select Yes and press a
to confirm.
Navi menu
Displaying navigation instructions
In the Navi menu, the multifunction display
shows navigation instructions. Further
information: (Y page 164).
XActivate COMAND (Y page 131).XPress the = or ; button on the
steering wheel to select the Navi menu.
Route guidance inactive:Direction of travel;Current road
Route guidance active
No change of direction announced
:Distance to the destination;Symbol for "follow the road's course"=Distance to the next change of direction?Current road
Change of direction announced without a
lane recommendation
:Road into which the change of direction
leads
;Symbol for change of direction=Distance to change of direction and visual
distance display
When a change of direction has been
announced, you will see visual distance
Menus and submenus369On-board computer and displaysZ
Page 372 of 524
display = next to the symbol for the change
of direction ;. This decreases in size as you
approach the announced change of direction.
Change of direction announced with a
lane recommendation
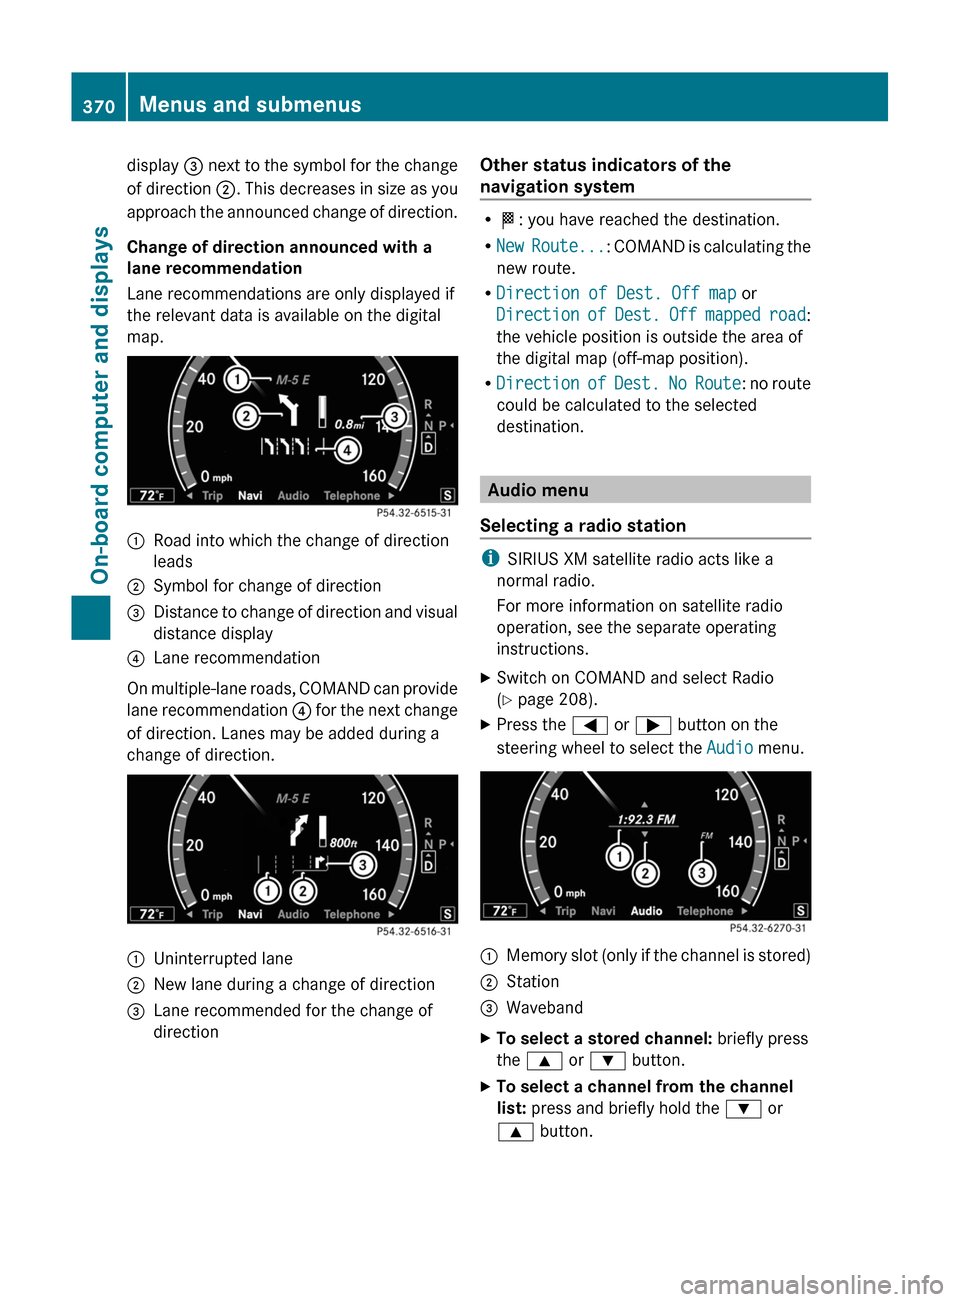
Lane recommendations are only displayed if
the relevant data is available on the digital
map.
:Road into which the change of direction
leads
;Symbol for change of direction=Distance to change of direction and visual
distance display
?Lane recommendation
On multiple-lane roads, COMAND can provide
lane recommendation ? for the next change
of direction. Lanes may be added during a
change of direction.
:Uninterrupted lane;New lane during a change of direction=Lane recommended for the change of
direction
Other status indicators of the
navigation system
RO: you have reached the destination.
RNew Route...: COMAND is calculating the
new route.
RDirection of Dest. Off map or
Direction of Dest. Off mapped road:
the vehicle position is outside the area of
the digital map (off-map position).
RDirection of Dest. No Route: no route
could be calculated to the selected
destination.
Audio menu
Selecting a radio station
iSIRIUS XM satellite radio acts like a
normal radio.
For more information on satellite radio
operation, see the separate operating
instructions.
XSwitch on COMAND and select Radio
(Y page 208).
XPress the = or ; button on the
steering wheel to select the Audio menu.
:Memory slot (only if the channel is stored);Station=WavebandXTo select a stored channel: briefly press
the 9 or : button.
XTo select a channel from the channel
list: press and briefly hold the : or
9 button.
370Menus and submenusOn-board computer and displays
Page 380 of 524

The selected unit of measurement for
distance applies to:
R the analog speedometer
R the digital speedometer in the Trip menu
R the odometer and the trip odometer
R the trip computer
R the navigation instruction in the Navi menu
R DISTRONIC PLUS
R ASSYST PLUS service interval display
The digital speedometer shows alternative
speed units ( Y page 377).XPress the = or ; button on the
steering wheel to select the Settings
menu.XPress 9 or : to select Units.XPress the a button to confirm.XPress the a button to save the setting.
The unit switches km/h and mph.
Switching the belt adjustment on/off
Further information on belt adjustment:
( Y page 58).
XPress = or ; on the steering wheel
to select the Settings menu.XPress the 9 or : button to select
Belt Adjustment .XPress the a button to confirm.XTo activate/deactivate: press a
again.
Activating/deactivating the acoustic
locking confirmation
If you activate the Acoustic Lock Feedb.
function, an audible signal sounds when the
vehicle is locked or unlocked. When
unlocking, the signal sounds once. When
locking, it sounds three times.
XPress the = or ; button on the
steering wheel to select the Settings
menu.XPress 9 or : to select Acoustic
Lock Feedb. .XPress the a button to confirm.XTo activate/deactivate: press a
again.
Activating/deactivating the radar
sensor system
The following systems are switched off when
the radar sensor system is deactivated:
R DISTRONIC PLUS ( Y page 325)
R BAS PLUS ( Y page 68)
R PRE-SAFE ®
Brake ( Y page 71)
R Blind Spot Assist ( Y page 352)
R Active Blind Spot Assist ( Y page 356)
i USA only: This device has been approved
by the FCC as a “Vehicular Radar System”.
The radar sensor is intended for use in an
automotive radar system only. Removal,
tampering, or altering of the device will void
any warranties, and is not permitted by the
FCC. Do not tamper with, alter, or use in
any non-approved way.
Any unauthorized modification to this
device could void the user’s authority to
operate the equipment.
i Canada only:
This device complies with RSS-210 of
Industry Canada. Operation is subject to
the following two conditions:
1. This device may not cause interference,
and
2. This device must accept any interference
received, including interference that may
cause undesired operation of the device.
Any unauthorized modification to this
device could void the user’s authority to
operate the equipment.
378Menus and submenusOn-board computer and displays
Page 437 of 524

pressed the SOS button. Carefully leave the
vehicle and move to a safe location. The
Response Center will automatically contact
local emergency officials with the vehicle's
approximate location if they receive an
automatic SOS signal and cannot make voice
contact with the vehicle occupants.
Roadside Assistance call buttonXOpen the stowage compartment under the
armrest ( Y page 423).XPress and hold Roadside Assistance
button : for more than two seconds.
A call to a Mercedes-Benz Roadside
Assistance Representative is initiated. The
indicator lamp in Roadside Assistance
button : flashes while the call is active.
The Connecting Call message appears in
the COMAND display and COMAND is
muted.
If a connection can be established, the Call
Connected message appears in the
COMAND display.
If a mobile phone network is available and
there is sufficient GPS reception, the mbrace
system transmits data to the Response
Center, for example:
R current location of the vehicle
R vehicle identification number
R vehicle model
R vehicle color
i The COMAND display shows that an
mbrace call is active. You can switch to the
navigation menu by pressing the
S button on COMAND during the call.
Spoken commands are not available.
A voice connection is established between
the Mercedes-Benz Roadside Assistance
Representative and the vehicle occupants.XDescribe the type of assistance needed.
The Mercedes-Benz Roadside Assistance
Representative either sends a qualified
Mercedes-Benz technician or organizes for
your vehicle to be transported to the nearest
authorized Mercedes-Benz Center. You may
be charged for services such as repair work
and/or towing. Further details are available
in your mbrace manual.
i If the indicator lamp in MB info call
button : flashes continuously and it was
not possible to establish a voice
connection to the Response Center, then
the mbrace system has failed to initiate a
Roadside Assistance call (e.g. the
corresponding cellular phone network is
not available). The Call Failed message
appears in the multifunction display.
The COMAND display shows the Call
could not be connected! message.
Press W to confirm the message.
XTo end a call: press the ~ button on the
multifunction steering wheel.
or
XPress the corresponding button for ending
a phone call on the COMAND telephone
keypad.
i Sign and Drive services 30
: you are not
charged for services such as jump-starting,
providing a few gallons of fuel for a fuel tank
that has been run dry or changing a flat tire
with the vehicle's own spare tire.
30 USA only.Features435Loading, stowing and featuresZ