2011 MERCEDES-BENZ M-CLASS SUV steering wheel
[x] Cancel search: steering wheelPage 153 of 389
Drive program
Sis characterised by the fol-
lowing:
R sporty engine and transmission settings
R the automatic transmission shifting up
later
R as aresul toft he later automatic transmis-
sion shift points, the fuel consumption pos-
sibly being higher Shif
tranges
Introduction In transmission position
D,you can use the
steering wheel gearshift paddle to restric tor
derestrict the shift range for the automatic
transmission (Y page 149).
The shift range selected is shown in the mul-
tifunc tion display. The automatic transmis-
sion shift sonly as far as the selected gear. Driving situations
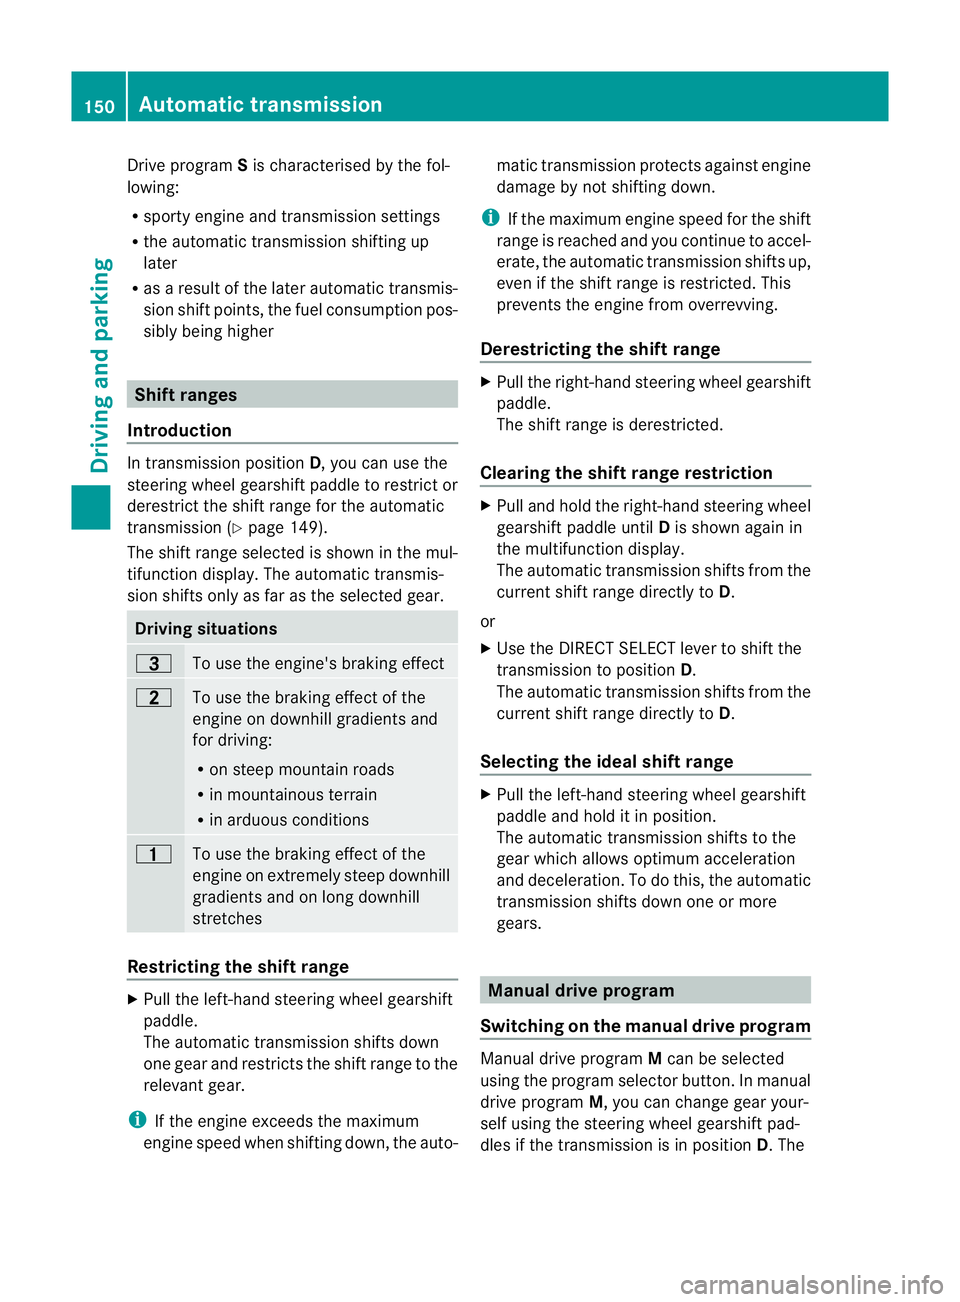
=
To use the engine's braking effect
5
To use the braking effect of the
engine on downhil lgradients and
for driving:
R on stee pmountain roads
R in mountainous terrain
R in arduous conditions 4
To use the brakin
geffect of the
engine on ext remely steep downhill
gradients and on long downhill
stretches Restricting the shift range
X
Pull the left-han dsteering whee lgearshift
paddle.
The automatic transmission shifts down
one gear and restrict sthe shift range to the
relevant gear.
i If the engin eexceed sthe maximum
engin espeed when shiftin gdown, the auto- matic transmission protect
sagainst engine
damage by not shifting down.
i If the maximum engin espeed for the shift
range is reached and you continue to accel-
erate, the automatic transmission shifts up,
even if the shift range is restricted. This
prevents the engine from overrevving.
Derestricting the shif trange X
Pul lthe right-hand steering wheel gearshift
paddle.
The shift range is derestricted.
Clearing th eshift rang erestriction X
Pull and hold the right-hand steering wheel
gearshift paddle until Dis shown again in
the multifunction display.
The automatic transmission shifts from the
current shift range directly to D.
or
X Use the DIRECT SELECT lever to shift the
transmission to position D.
The automatic transmission shifts from the
current shift range directly to D.
Selecting the ideal shift range X
Pull the left-hand steering wheel gearshift
paddle and hold it in position.
The automatic transmission shifts to the
gear which allow soptimum acceleration
and deceleration. To do this, the automatic
transmission shifts down one or more
gears. Manua
ldrive program
Switchin gonthe manua ldrive program Manual drive program
Mcan be selected
using the program selector button. In manual
drive program M,you can change gear your-
self using the steering wheel gearshift pad-
dles if the transmission is in position D.The 150
Automa
tict ran smissionDriving and parking
Page 154 of 389
gear curren
tlys elected and engaged is shown
in the multifunc tion display.
X Press the program selector button
(Y page 148) repeatedly until Mappear sin
the multifunction display.
X Vehicles with the ON&OFFROAD pack-
age: press the program selector button
(Y page 148).
M appears in the multifunction display.
Upshifting X
Pull the right-hand steering whee lgearshift
paddle (Y page 149).
The automatic transmission shifts up to the
next gear.
Downshifting X
Pull the left -hand steering wheel gearshift
paddle (Y page 149).
The automatic transmission shifts down to
the next gear.
i If you slow down or stop without shifting
down, the automatic transmission auto-
matically shifts down.
i For maximum acceleration, pull the left-
hand steering wheel gearshift paddle until
the transmission selects the optimum gear
for the current speed.
Kickdown You can also use kickdown for maximum
acceleration in manual drive program M.
X Depress the accelerator pedal beyond the
pressure point.
The transmission shifts to alower gear
depending on the engin espeed.
X Shif tback up once the desired spee dis
reached.
i If yo uapply full throttle, the automatic
transmission shifts up to the next gear
when the maximum engine speed is
reached. This prevent sthe engin efrom
overrevving. Switchin
goff the manual drive program X
Press th eprogram selecto rbutton
(Y page 148 )repeatedly until Eor S
appear sint he multifunc tion display.
X Vehicles with th eON&OFFROAD pack-
age: press the program selector button.
M is no longer shown in the multifunction
display. Automatic transmission
151Drivingand park ing Z
Page 163 of 389

X
Release AdBlue ®
refill bottle :.
X Turn AdBlue ®
refill bottle :anti-clockwise
and remove it.
X Screw the protective cap onto AdBlue ®
refill bottle :again.
Closing th eAdBlue ®
filler cap and fuel
filler flap X
Fit AdBlue ®
filler cap ;on the filler neck
and tur nitclockwise.
X To close th efuel filler flap ,press it in the
di rectio nofarrow:.
X Drive faster than 15 km/h.
The Refill AdBlue See Owner' sMan‐ ual messag
egoeso ut after approximately
on em inute.
i If the Refill AdBlue See Owner's Manual messag
eremain sinthe mu ltifunc-
tion display, you mus ttop up with more
AdBlue ®
. Parking
Important safety notes
G
WARNING
Only remove the key from the ignition lock
when the vehicle is stationary, as you can not
steer the vehicle when the key is removed.
Never leav echildren unsupervised in the vehi-
cle. They might release the electric parking
brake. This coul dlead to aserious or fatal
accident. G
WAR
NING
Under no circumstances should the exhaust
system come into contact with flammable
materials such as dry grass or petrol ,for
example. Do not par kthe vehicle on dry grass-
lan dorh arvested grain fields. The hot exhaust
system could otherwise ignite the flammable
material and set the vehicle on fire.
To ensure that the vehicle is secured against
rolling away unintentionally:
R the electric parking brake must be applied.
R the transmission must be in position Pand
the key must be removed from the ignition
lock.
R on steep uphill or downhill gradients, turn
the fron twheels towards the kerb. Switching of
fthe engine
Important safety notes G
WARNING
Neve rswitch off the engine while the vehicle
is in motion.
There is no brake boost for the service brake
if the engine is not running. If the ignition is
switched off, there is also no power assis-
tance for the steering.
You will require considerably more effort to
steer and brake and you could therefore lose
control of the vehicle and cause an accident.
X Apply the electric parking brake.
X Shift the transmission to position P.
Using the key X
Turn the key to position 0in the ignition
lock and remove it.
The immobiliser is activated.
i If you switch the engine off with the trans-
mission in position Ror D,t he automatic
transmission shift stoNautomatically. 160
ParkingDriving and parking
Page 168 of 389

!
The depth of water must not exceed the
value specified in the table. Not ethat the
possible fording depth is less in flowing
water.
R Establish how deep the water is and the
characteristic softhe body of water before
fording.
R Select the highest possible vehicle level.
R Restrict the shift range to 1or 2.
R Avoid high engin espeeds.
R Enter and exit the water at aflat place and
at as teady walking pace.
! Under no circumstances should you
accelerate before entering the water. The
bow wave could cause water to enter and
damage the engine and neighbouring
assemblies.
R Drive slowl yand at aconstant speed
through the water.
R Do not stop.
! Do not open any of the vehicle' sdoors
while fording. Otherwise, wate rcould get
int ot he vehicle interior and damage the
vehicle' selectronics and interior equip-
ment.
R Water offer sahigh degree of resistance,
and the ground is slippery and in some
cases unstable. Therefore, it is difficult and
dangerous to pull away in the water.
R Ensure that abow wav edoes not for mas
you drive.
R Clea nany mud from the tyre tread after
fording.
R Appl ythe brakes to dry them after fording. Winter driving
Genera lnotes G
WARNING
If the vehicle becomes trapped in snow,
ensure that snow is kept away from the
exhaust pipe and from around the vehicle as long as the engine is running. Otherwise, poi-
sonous carbon monoxide (CO) may enter the
vehicle, resulting in loss of consciousness and
even death.
To assure sufficient fresh air ventilation, open
aw indow slightly on the side of the vehicle
not facin gthe wind.
At the onset of winter, have your vehicle win-
terproofed at aqualified special istworkshop,
e.g. at aMercedes-Ben zService Centre.
Vehicles with the ON&OFFROAD package: if
driving in snow or with snow chains, select
the snow program (Y page 219) with the off-
road program selector wheel in the centre
console.
Driving with summer tyres Observ
ethe notes in the "Winter operation"
section (Y page 357).
Slippery roa dsurfaces G
WARNING
Do not shift down for additiona lengine brak-
ing on aslippery road surface. This could
cause the drive wheels to lose their grip and
the vehicle could skid.
You should drive particularly carefully on slip-
pery road surfaces. Avoid sudden accelera-
tion, steering and braking manoeuvres.
If the vehicle threatens to skid or cannot be
stopped when moving at low speed:
X Shift the transmission to position N.
X Try to bring the vehicle under control by
using corrective steering.
i For more information on drivin gwith
snow chains, see (Y page 358). Drivin
gtips
165Driving and park ing Z
Page 171 of 389
bodywork structure, steering, chassis and
exhaust system for damage.
X After driving for extended periods across
sand, mud, gravel, water or in similarly dirty
conditions, have the brak ediscs, wheels,
brake pads/linings and axle joints checked
and cleaned.
X If you detec tstrong vibrations afte roff-road
travel ,check for foreign objects in the
wheels and drive train and remov ethem if
nec essary. Foreign object scan disturb the
balance and cause vibrations.
Driving on sand Observe the following rules when driving on
sand:
R vehicles with the ON&OFFROAD pack-
age: select off-road program 1
(Y page 222).
R vehicles without the ON&OFFROAD
package: select the off-road program
(Y page 222).
R select ahigher vehicle level.
R select ashift range appropriate to the ter-
rain.
R drive quickly to overcom ethe rolling resist-
ance. Otherwise, the vehicle could dig itself
int ot he sand.
R drive in the track sofother vehicle sifpos-
sible. Make sure that the ruts ar enot too
deep, that the sand is fir menoug hand that
your vehicl ehas sufficient ground clear-
ance.
Rut sand gravel roa ds Observe the followin
grules when driving
along ruts in off-road terrain or on roads with
loos egravel:
! Check that th eruts are not too deep and
that your vehicle has sufficient clearance.
Otherwise, your vehicle could be damaged
or bottom out and get stuck. R
activate the off-road program
(Y page 222).
R vehicles with the AIRMATI Cpackage:
select araised vehicle level.
R avoid high engine speeds.
R restrict the shift range to 1.
R drive slowly.
R where ruts are too deep, drive with the
wheels on one side on the middle section
of turf if possible.
Driving over obstacles !
Obstacles could damage the floor of the
vehicle or components of the chassis .Ask
passenger sfor guidance when drivin gover
larg eobstacles. Any damage to the vehicle
always increases the risk of an accident.
Observe the followin grules when driving over
tree stumps, large stones and other obsta-
cles:
R Select the off-road program (Y page 222)
or the LOW RANGE off-road gear
(Y page 223).
R Raise the vehicle level.
R Avoid high engine speeds.
R Restrict the shift range to 1.
R Drive very slowly.
R Drive straight over the centre of obstacles. Travellin
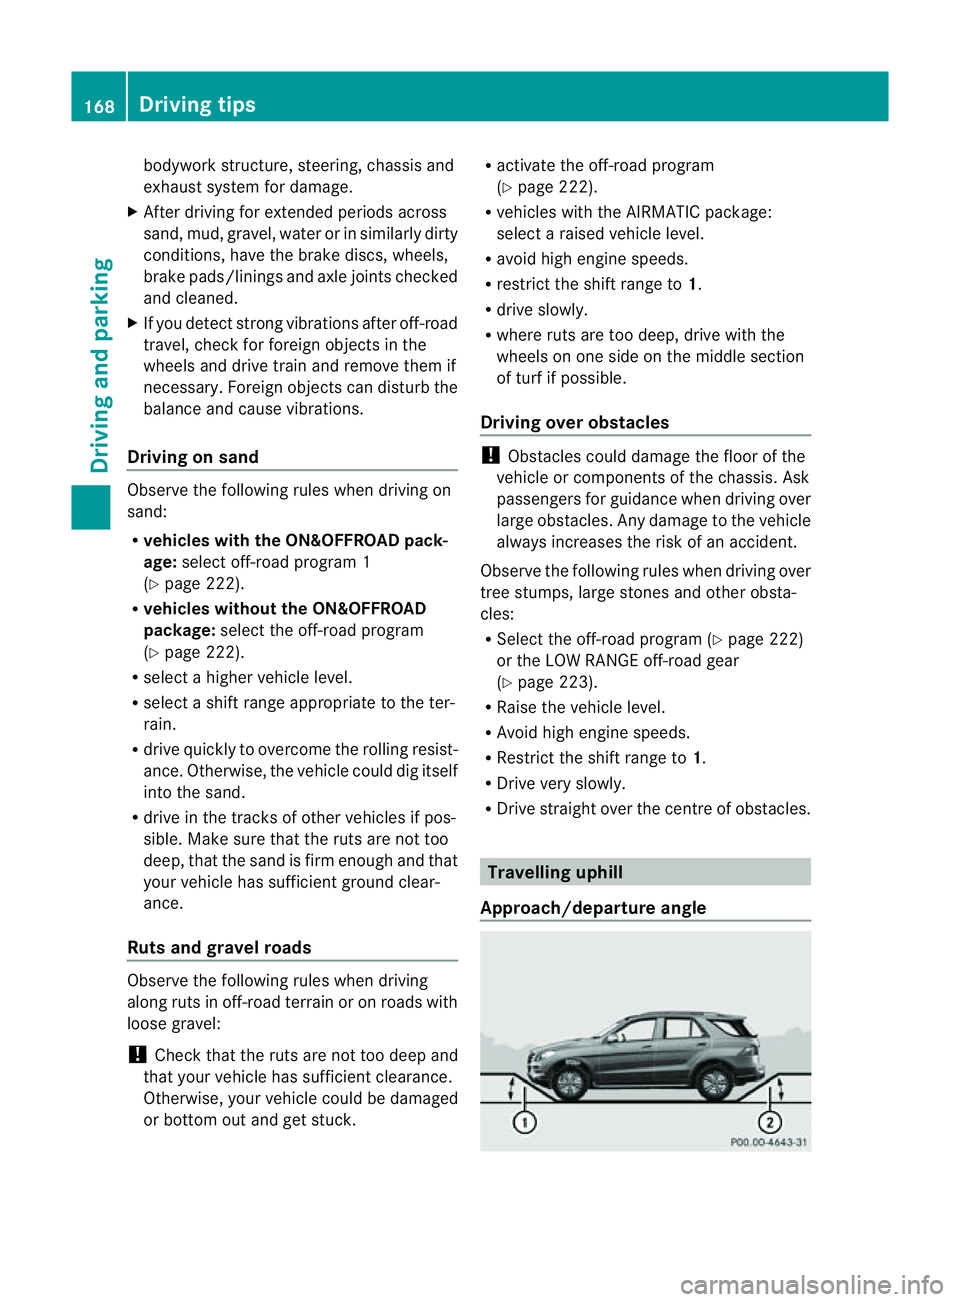
guphill
Approach/departur eangle 168
Driving tipsDriving and parking
Page 187 of 389
R
Off-road level 2: 60 mm abov ehighway
level
R Off-road level 3: 90 mm above highway
level
Highway/high-speed level !
Make sure there is enough ground clear-
ance when the vehicle is being lowered .It
could oth erwise hit the ground, damaging
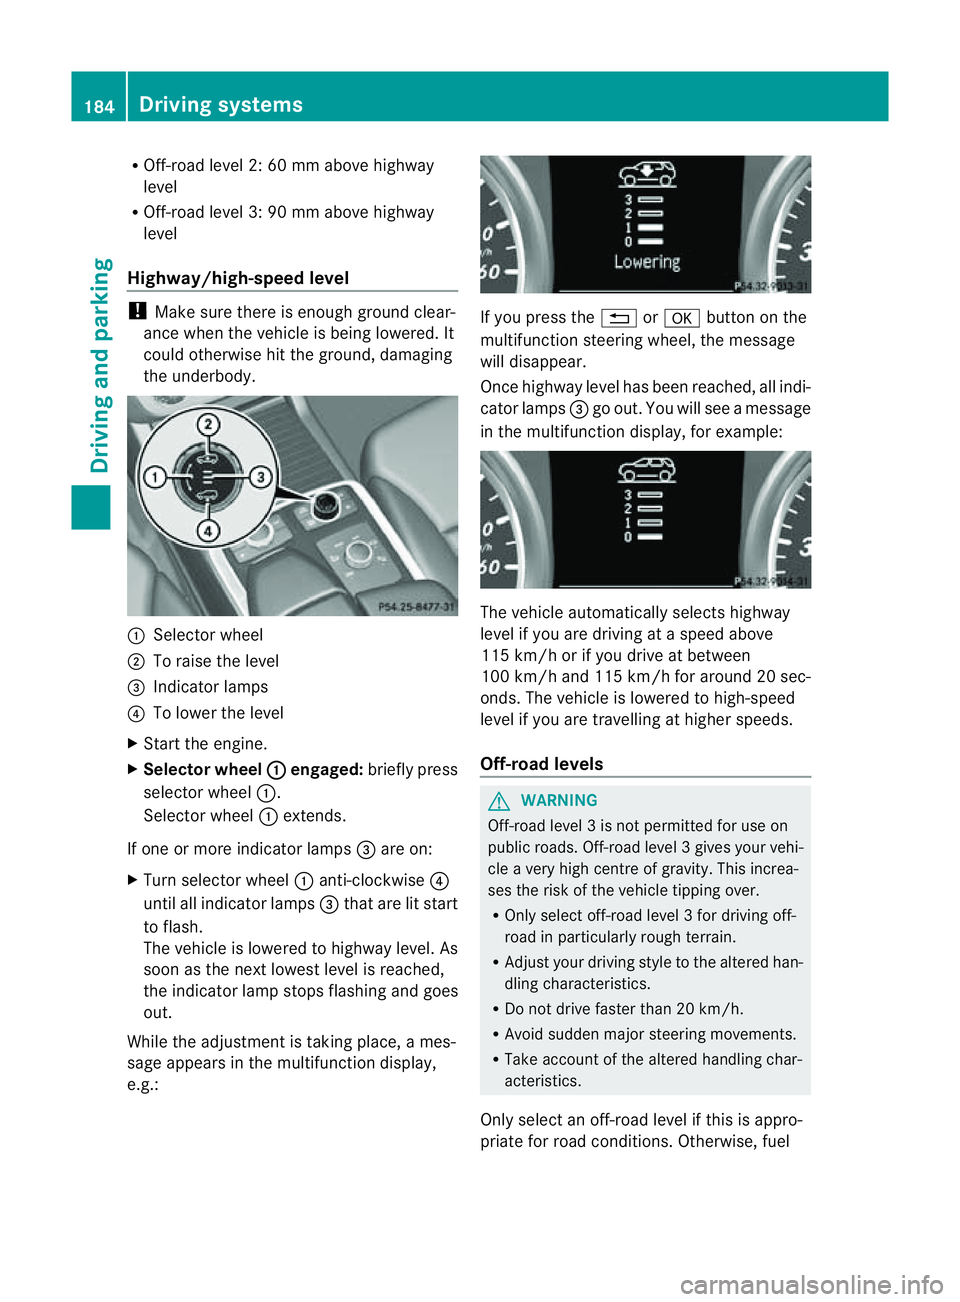
the underbody. :
Selector wheel
; To raise the level
= Indicator lamps
? To lowe rthe level
X Star tthe engine.
X Selector wheel : engaged:
brieflypress
selecto rwheel :.
Selector wheel :extends.
If one or mor eindicato rlamps =are on:
X Turn selector wheel :anti-clockwise ?
until all indicator lamps =that are lit start
to flash.
The vehicle is lowered to highway level. As
soon as the next lowes tlevel is reached,
the indicator lam pstops flashing and goes
out.
While the adjustment is taking place, ames-
sage appears in the multifunction display,
e.g.: If you press the
%ora button on the
multifunction steerin gwheel, the message
will disappear.
Onc ehighway level has been reached, all indi-
cator lamps =go out. You will see amessage
in the multifunction display, for example: The vehicle automatically select
shighway
level if you are drivin gataspeed above
11 5k m/ horify ou drive at between
10 0k m/ hand 11 5km/ hfor aroun d20sec-
onds. The vehicle is lowered to high-speed
level if you are travelling at higher speeds.
Off-road levels G
WARNING
Off-road level 3isnot perm itted for use on
public roads. Off-road leve l3gives your vehi-
cle avery high centr eofgravity. This increa-
se st he risk of the vehi clet ippin gover.
R Onl yselec toff-road level 3for drivin goff-
road in particularl yrough terrain.
R Adjust your drivin gstyle to the altered han-
dling charac teristics.
R Do not drive faster than 20 km/h.
R Avoid sudden majo rsteering movements.
R Take account of th ealtered handling char-
acteristics.
Only select an off-road level if this is appro-
priate for road conditions. Otherwise, fuel 184
Drivin
gsystemsDrivin gand parking
Page 188 of 389
cons
umption may incr easeand handling per-
formance may be affected. X
Start the engine.
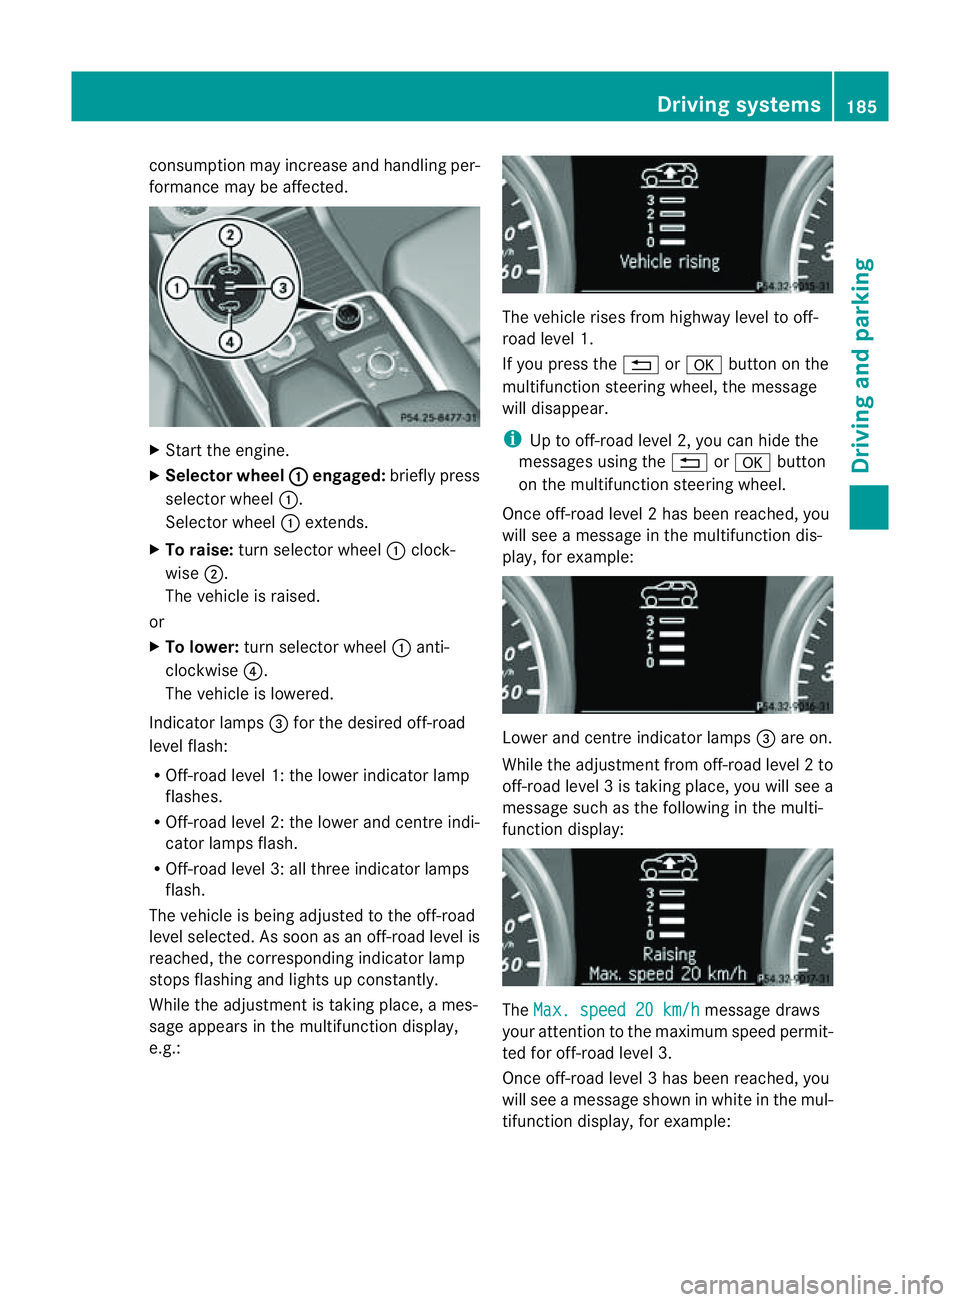
X Selecto rwheel : en
gaged: briefly press
selector wheel :.
Selector wheel :extends.
X To raise: turns elector wheel :clock-
wise ;.
The vehicle is raised.
or
X To lower: turns elector wheel :anti-
clockwise ?.
The vehicle is lowered.
Indicator lamps =for the desired off-road
level flash:
R Off-road level 1: thel ower indicator lamp
flashes.
R Off-road level 2: thel ower and centr eindi-
cator lamps flash.
R Off-road leve l3:allthree indicator lamps
flash.
The vehicle is being adjusted to the off-road
leve lselected. As soon as an off-road level is
reached, the corresponding indicator lamp
stops flashing and lights up constantly.
Whil ethe adjustment is taking place, ames-
sage appears in the multifunction display,
e.g.: The vehicle rises from highway level to off-
road level 1.
If you press the %ora button on the
multifunction stee ring wheel, the message
will disappear.
i Up to off-road level 2, you can hid ethe
messages usin gthe % ora button
on the multifunction steering wheel.
Onc eoff-roa dlevel 2has been reached, you
will see amessage in th emultifunction dis-
play, for example: Lower and
centre indicator lamps =areo n.
While the adjustment from off-ro adlevel 2to
off -ro ad level 3istaking place, you will see a
message such as the following in the multi-
function displ ay: The
Max. speed 20 km/h message draws
your attentio ntothe maximum speed permit-
ted for off-road level 3.
Onc eoff-roa dlevel 3has been reached, you
will see amessage shown in whit einthe mul-
ti fu nction display, for example: Driving systems
185Drivingand pa rking Z
Page 198 of 389
procedure is calculated, e. g. overhanging
loads, tail sections or loading ramps of goods
vehicles. In some cir
cumstances, Active Park-
ing Assist may therefore guide you into the
parking space too early. Thi smay lead to a
collision. For this reason, you shoul davoid
using Active Parking Assist in such situatio ns.G
WARNING
Th ef ront of th evehicle will veer out in the
direc tion of the oncomin gtraffic during the
parking operatio n. Insome cases the vehicle
will also take you onto section softhe oncom-
ing lan eduring the parking procedure.
You are responsible for safety at all times and
must pay attention to any road users
approaching or passing. Stop the vehicle if
necessary or cancel the Active Parking Assist
parking procedure. G
WARNING
Make sure that no persons or animals are in
the manoeuvring range. Otherwise, they
could be injured.
Use Active Parking Assis tfor parkin gspaces:
R that are parallel to the direction of travel
R that are on straight roads, not bends
R that are on the same level as the road, e.g.
not on the pavement
Parking tips:
R on narrow roads, driv easclosely as possi-
ble past the parkin gspace.
R parking spaces that are littered, overgrown
or partially occupied by trailer drawbars
might be identified incor rectly or not at all.
R snowfall or heavy rain may lea dtoap arking
space being measured inaccurately.
R pay attention to the PARKTRONIC
(Y page 192 )warning message sduring the
parking procedure.
R you can intervene in the steering procedure
to correc titatany time. Active Parking
Assist will then be cancelled. R
whe ntransporting aload which protrudes
from your vehicle, you should not use
Active Parkin gAssist.
R never use Ac tive Parkin gAssist when snow
chains or an emergenc yspare wheel are
fit ted.
R mak esure that the tyre pressures are
always correct. This has adirec tinfluence
on the parking characteristics of the vehi-
cle.
R the wa yyourv ehicle is positioned in the
parking space after parking is dependent
on various factor s. Theseinclude the posi-
tion and shape of the vehicles parked in
front and behind it and the conditions of the
location. In some cases, Active Parking
Assist may guid eyou too far int oaparking
space, or not far enough into it. In some
cases, it may also lead you across or onto
the kerb. If necessary, you should abort the
parking procedure with Active Parking
Assist.
R you can also engage forward gear prema-
turely. The vehicle redirects and does not
drive as far into the parking space. Should
ag ear be changed too earl ytoa chieve a
sensible parkin gposition ,the parkin gpro-
cedure wil lbeaborted.
! If unavoidable, you should driv eover
obstacles such as kerb sslowly and not at
as har pangle .Otherwise, you may damage
the wheels or tyres.
Detectin gparking spaces Active Parking Assis
tiss witched on automat-
ically when driving forwards. The system is
operational at speed sofuptoa pproximately
35 km/h. While in operation, the system inde-
pendently locates and measures parking
spaces on both sides of the vehicle. When
driving at speeds below 30 km/ h,you will see
the parking symbol as astatus indicato rinthe
instrumen tcluster. Activ eParking Assist only
displays parking spaces on the front-
passe nger side as standar d.Parking spaces
on the driver' sside are displayed as soon as Driving systems
195Drivingand parking Z