2011 MERCEDES-BENZ M-CLASS SUV steering wheel
[x] Cancel search: steering wheelPage 65 of 389

Off-road ABS
An AB
Ssystem specifically suited to off -road
ter rain is activated automatically once th eoff-
road program (Y page 222) is activated.
At speeds below 30 km/h, the front wheels
loc kc yclically durin gbraking .The digging-in
eff ect ac hieved in the process red ucesthe
stopping distanc eonoff-road terrain. This
limits steering capability. BAS (Brak
eAssist)
i Observ ethe "Importan tsafety notes" sec-
tion (Y page 61).
BAS operates in emergency braking situa-
tions. If you depress the brake pedal quickly,
BAS automatically boosts the braking force,
thus shortening the stopping distance.
X Keep the brake pedal firmly depressed until
the emergency braking situation is over.
ABS prevents the wheels from locking.
The brakes will function as usua lonce you
releas ethe brake pedal. BA Sisd eactivated. G
WARNING
If BAS has malfunctioned, the braking system
remains available with ful lbrake boosting
effect. However, braking force is not auto-
matically increased in emergency braking sit-
uations and th estopping distance may
increase. BAS PLU
S(Brak eAssist System Plus)
BA SP LUS is only availabl eonvehicles with
DI ST RONIC PLUS.
i Observe the "Important safety notes" sec-
tion (Y page 61).
BAS PLUS assists you in braking during haz-
ardous situations at speeds above 30 km/h
and uses the radar sensor syste mtoevaluate
the traffic situation.
With the hel pofthe radar sensor system ,BAS
PLUS can detect obstacles that are in the path of your vehicl
efor an exte nded period of
time.
At speeds up to approximately 70 km/h ,BAS
PLUS may also detect stationary obstacles,
for example ,stopped or parked vehicles.
Shoul dyou approach an obstacle and BAS
PLU Shas detected arisk of collision, BAS
PLU Scalculates the braking force necessary
to avoid arear-end collision .Should you apply
the brakes forcefully ,BAS PLUS can auto-
matically increase the braking force to alevel
suitabl efor the traffic conditions.
If BA SPLUS demand sparticularly high brak-
ing force, preventative passenger protection
measures (PRE-SAFE ®
)a re activate dsimul-
taneously.
X Keep the brake pedal depressed until the
emergenc ybraking situatio nisover.
ABS prevent sthe wheels from locking.
The brakes will wor knormally again if:
R you release the brake pedal.
R ther eisnol onger any danger of arear-end
collision.
R no obstacl eisdetected in front of your
vehicle.
BAS PLU Sisthen deactivated .Ifyou have
activated DSR (Y page 220), BASPLUS is
likewise deactivated.
Th er adar senso rsystem is switched off auto-
matically in the vicinity of radio telescope
facilities in the following vehicles:
R vehicles with COMAND Online and naviga-
tion
R vehicles with Audio 20 and Becker ®
MAP
PILOT
Becker ®
MAP PILOT must be connected;
see the separate Audio 20 operating
instructions. 62
Driving safety systemsSafety
Page 68 of 389

if the vehicle starts to skid or
awheel starts
to spin.
When you deactivate ESP ®
:
R ESP ®
no longer improves drivin gstabili ty.
R the engine's torque is no longer limited and
the drive wheels can spin. The spinning of
the wheels results in acuttin gaction, which
provides bet terg rip.
R tractio ncontrol is still activated.
R ESP ®
still provides suppor twhen you
bra ke.
If ESP ®
is deactivate dand one or more wheels
start to spin, the ÷ESP®
warning lamp in
the instrument cluster flashes. In such situa-
tions, ESP ®
will not stabilis ethe vehicle. X
To deactivate: press button:.
The å ESP®
OFF warnin glamp in the
instrument cluster lights up. G
WARNING
ESP ®
is deactivated if the åwarning lamp
in the instrument cluster lights up continu-
ously when the engine is running.
If the ÷ warning lamp and åwarning
lamp are lit continuously, ESP ®
is not availa-
ble due to amalfunction.
There is an increased risk of your vehicle skid-
ding in certain situations.
You shoul dalway sadapt your driving style to
suit the prevailing road and weather condi-
tions. X
To activate: press button :.
The å ESP®
OFF warning lamp in the
instrumen tcluster goes out.
Off- road ESP® An ESP
®
system specifically suited to off-road
terrain is activated automatically once the off-
road program (Y page 222)isa ctivated. It
intervene swithadelay if there is oversteering
or understeering, thus improvin gtraction.
ESP ®
traile rstabilisation If your vehicle with trailer (vehicle/trailer
combination) begins to lurch, you can only
stabilis ethe vehicle/ trailer combination by
depressing the brake firmly.
In this situation, ESP ®
assists you and can
detect if the vehicle/trailer combination
begins to lurch. ESP ®
slows the vehicle down
by brakin gand limiting the engine output until
the vehicle/traile rcombination has stabi-
lised.
Trailer stabilisation is active abov espeeds of
about 60 km/h. G
WARNING
If road and weather condi tions are poor,
trailer stabilisation will not be able to prevent
the trailer from swerving and will thus be
unable to reduce the risk of an accident .Trail-
ers wit hahigh centr eofgravity can tip over
before ESP ®
can detec tthis.
Trailer stabilisation does not work if ESP ®
is
deactivated or disable dbecause of amal-
function. EBD (electronic brake force distribu-
tion)
i Observe the "Important safety notes" sec-
tion (Y page61).
EBD monitors and control sthe brake pres-
sur eonthe rea rwheels to improv edriving
stab ility while braking. Driving safety systems
65Safety Z
Page 71 of 389

The radar sensor system must be switched off
using the on-boar dcomputer in the vicinit yof
radio telescop efacilities in the following vehi-
cles:
R vehicles without COMAND Online and nav-
igation
R vehicles without Audio 20 and Becker ®
MAP PILOT
R vehicles for Australia
Information about switching off the rad ar sen-
so rs ystem using the on-board computer can
be found in the "On-board computer and dis-
plays “section (Y page 249).
For PRE- SAFE®
Brake to assist you whe ndriv-
ing ,the radar sensor system must be
switc hed on (Y page 249) an dbeopera-
tional.
Followin gdamage to the fron tend of the vehi-
cle ,havet he configuration and operation of
the radar sensors checked at aqualified spe-
cialist workshop. This also applie stoc olli-
sions at slow speeds where ther eisnovisible
damage to the fron tofthe vehicle. STEE
RCONTROL
The steering assistan tSTEE RCONTROL helps
you by transmittin ganoticeable steering
force to the steering wheel in the direction
required for vehicle stabilisation.
This steering assistance is provided in partic-
ular if:
R both right wheels or both left wheels ar eon
aw et or slippery road surface when you
brake
R the vehicle starts to skid
You have control over the steerin gatall
times. G
WARNING
If there is an ESP ®
malfunction, you will not
receiv eany steering assistance from the
STEER CONTROL. The steering continues to
function with steering assistance. Anti-theft systems
Immobiliser
The immobilise rprevents your vehicl efrom
being starte dwithout the correct key.
X To activate with the key: removethe key
from the ignition lock.
X To activate wit hKEYLESS-GO: switch the
ignition off and open the driver' sdoor.
X To deactivate: switchont he ignition.
i The immobiliser is always deactivated
when you star tthe engine. ATA (Anti-Thef
tAlarm system)
Av isual and audible alarm is triggered if the
alarm system is prime dand you ope n:
R ad oor
R the vehicle with the emergency key ele-
ment
R the tailgate
R the bonnet
The alar misnot switched off ,even if you
close th eopen door that has triggere dit, for
example. X
To prime: lock the vehicle with the key or
KEYLESS-GO.
Indicator lamp :flashes. The alarm sys-
tem is primed after approximately 15 sec-
onds.
X To deactivate: unlock the vehicle with the
key or KEYL ESS-GO.68
Anti-thef
tsystemsSafety
Page 75 of 389

Usefu
linfor mati on
i This Owner's Manual describes all models
and all standard and optional equipment
available to your vehicle at the time of pub-
lication of the Owner's Manual. Country-
specific deviation sare possible .Please
not ethat your vehicle ma ynot be equipped
with all featur es described. This also
applies to safety-releva ntsystems and
functions.
i Please read the information on qualified
specialist workshops (Y page 24).Key
Key functions
Locking and unlocking centr ally The key centrally locks/unlocks:
R the doors
R the tailgate
R the fuel filler flap G
WAR
NING
Only for the Unite dKingdom: if the vehicle
has been locked with the key or with KEY-
LESS-GO, the double lock function is activa-
ted as standard. It is then not possible to open
the doors from inside the vehicle.
Therefore, do not leave any people behind in
the vehicle, particularly children ,elderly peo-
ple or people requirin gspecial assistance. As
ar esult, they may not be able to free them-
selves in the event of an emergency. They
could be seriously or even fatally inju redby
prolonged exposure to extremely high or low
temperatures, for example. In this case, res-
cuin gpeople from outside the vehicle is diffi-
cult.
Deac tivate th einterior motion sensor before
you lock the vehicle. The doors can then be
opened from the inside after the vehicl ehas
been locked from the outside. G
WARNING
If children are left unsupervised in the vehicle,
they could:
R open adoor from inside the vehicle at any
time, even if it has been locked
R star tthe vehicle usin gakey which has been
left in the vehicle
R release the electric parking brake
They could thereby endanger themselves and
others. Never leave children unsupervised in
the vehicle. Alway stake the key with you
when leaving the vehicle, even if you are only
leaving it for ashort time. G
WARNING
If ak ey rin gistoo heavy or too large, the
weight actin gonthe key coul dcause it to turn
in the ignition lock or catc honthe steering
wheel. This coul dcause the engine to be
switched off suddenly. You may lose control
of the vehicle and cause an accident. Do not
attac hany heavy or large key rings to the key
that is inserted in the ignition. :
& To lock the vehicle
; F To open/clos ethe tailgate
= % To unlock the vehicle
When unlocking, the tur nsignals flash once.
When locking, they flash three times.
When it is dark, the surroun dlighting also
comes on if it is activated in the on-board
computer (Y page 248).
You can also set an audible signal to confirm
that the vehicle has been locked. The audible 72
KeyOpening and clos
ing
Page 94 of 389

Usefu
linfor mation .............................. 92
Correct driver' sseat position ............92
Seats .................................................... 93
Steering wheel .................................... 98
Mir rors ............................................... 100
Memor yfunction .............................. 103 91Seats,
steering wheeland mirrors
Page 95 of 389

Usefu
linfor mati on
i This Owner's Manual describes all models
and all standard and optional equipment
available to your vehicle at the time of pub-
lication of the Owner's Manual. Country-
specific deviation sare possible .Please
not ethat your vehicle ma ynot be equipped
with all featur es described. This also
applies to safety-releva ntsystems and
functions.
i Please read the information on qualified
specialist workshops (Y page 24).Correct driver'
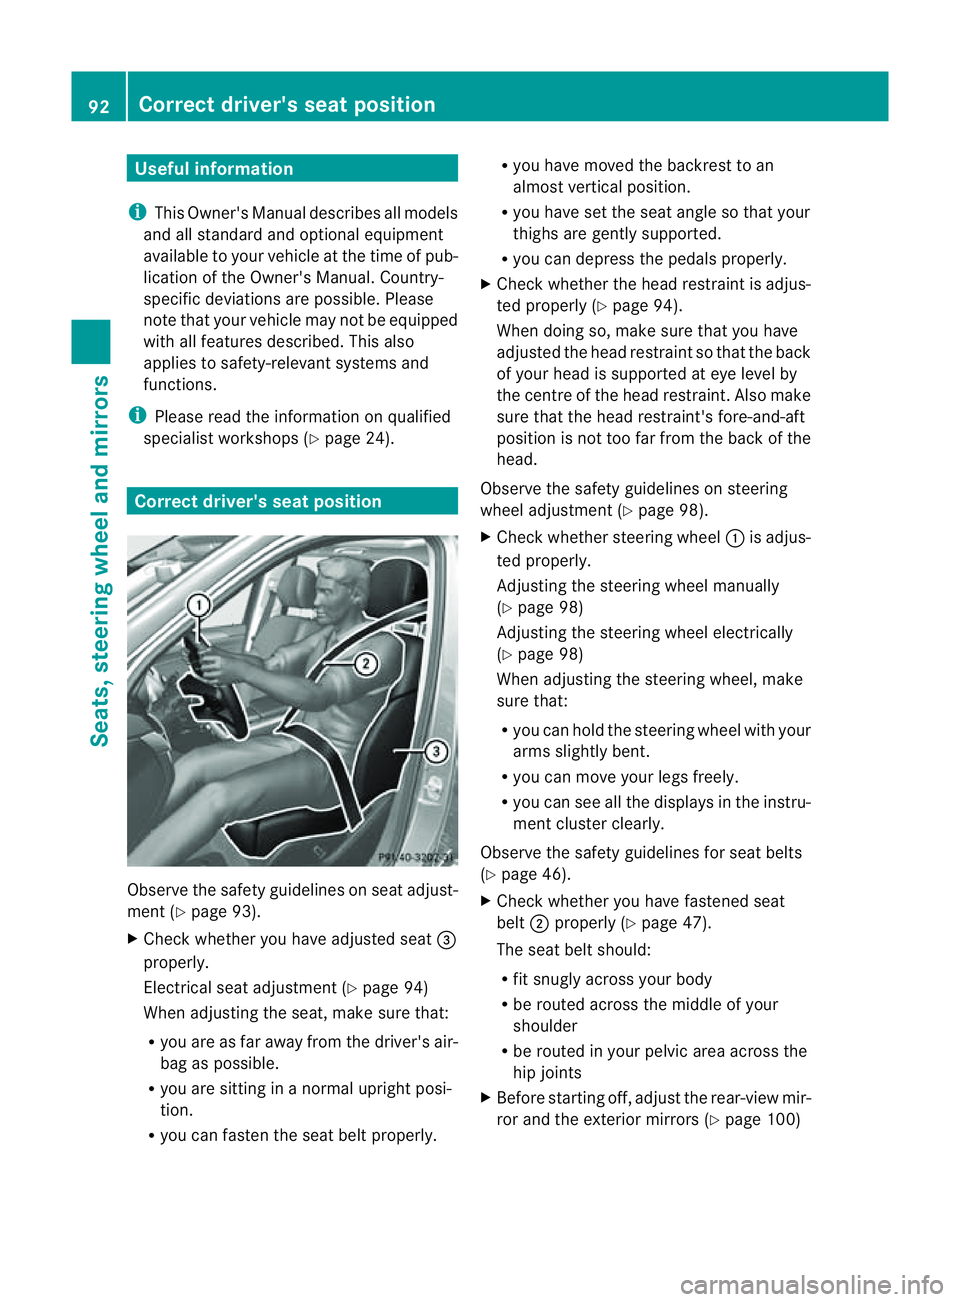
sseatp osition Observ
ethe safety guideli neso nseat adjust-
men t(Ypage 93).
X Chec kwhether you hav eadjusted seat =
properly.
Electrical seat adjustment (Y page 94)
When adjusting the seat, mak esure that:
R you are as far away from the driver' sair-
bag as possible.
R you are sitting in anormal upright posi-
tion.
R you can fasten the seat belt properly. R
you have moved the backrest to an
almost vertical position.
R you have set the seat angle so that your
thighs ar egently supported.
R you can depress the pedals properly.
X Check whether the head restraint is adjus-
ted properly (Y page 94).
When doing so, mak esure that you have
adjusted the head restraint so that the back
of your head is supported at eye level by
the centre of the head restraint .Also make
sure that the head restraint's fore-and-aft
position is not too far from the bac kofthe
head.
Observ ethe safety guidelines on steering
wheel adjustment (Y page 98).
X Chec kwhether steering wheel :is adjus-
ted properly.
Adjusti ngthe steering whee lmanually
(Y page 98)
Adjustin gthe steering wheel electrically
(Y page 98)
When adjustin gthe steering wheel, make
sur ethat:
R you can hold the steering wheel with your
arms slightl ybent.
R you can mov eyour legs freely.
R you can see all the displays in the instru-
men tcluster clearly.
Observe the safety guidelines for seat belts
(Y page 46).
X Check whether you have fastened seat
belt ;properly (Y page 47).
The seat belt should:
R fit snugly across your body
R be routed across the middle of your
shoulder
R be routed in your pelvic area across the
hip joints
X Befor estartin goff, adjus tthe rear-vie wmir-
ror and the exterior mirrors (Y page 100)92
Correct driver's seat positionSeats, steerin
gwhee land mirrors
Page 96 of 389

in such
away that you have agood view of
roa dand traffic conditions.
X Vehicles with amemory function: save
the seat, steerin gwheel and exterior mirror
settings (Y page 103). Sea
ts Important safety notes
G
WARNING
The seats can still be adjusted when ther eis
no key in the ignition lock. For this reaso n,
children shoul dnever be left unsupervised in
the vehicle. They could adjust the seat sand
become trapped. G
WARNING
Only adjus tthe driver' sseat when the vehicle
is stationary. You will otherwise be distrac ted
from the road and traffic conditions and you
could lose control of the vehicle as aresult of
the seat moving. This could cause an acci-
dent. G
WAR
NING
If you adjus tthe seat height car elessly, you or
others could be trapped and thereb yinjured.
Children in particular could unintentionally
pres sthe buttons to electrically adjust the
seat sand become trapped.
Take care that:
R whil emoving the seats, your hands do not
get under the lever assembly of the seat
adjustmen tsystem.
R children in the vehicl edonot slidetheir
hands unde rthe levers. G
WARNING
Make sur ethat nobody can becom etrapped
when adjusting the seats.
Observe the notes on airbags.
Secure children as recomm ended; see the
"Children in the vehicle" section. G
WAR
NING
Make sure that the back of your head is sup-
ported at eye level by the central area of the
head restraint .Ifyour head is not supported
correctly by the head restraint ,you coul dsuf-
fer asever eneck injury in the event of an
accident .Never driv eifthe head rest raints are
not engaged and set correctly. G
WARNING
As eat belt can only offer its intended degree
of protection when the back rest is almost ver-
tical and the occupan tiss itting upright. Avoid
seat positions that do not allow the seat belt
to be routed correctly. Adjust the backrest so
that it is as upright as possible .Never travel
with the back rest reclined too fa rbackwards.
You could otherwise be seriousl yoreven
fatally injured in th eevent of an accident or
sudden braking.
! To avoid damag etothe seats and the seat
heating, observe the followin ginformation:
R do not spill any liquids on the seats. If
liquid is spilled on the seats, dry them as
soon as possible.
R if the sea tcover sare damp or wet, do not
switc hont he seat heating. The seat
heating should also not to be used to dry
the seats.
R clea nthe seat cover sasrecommended;
see the "In terior care" section.
R do not transport heav yloads on the
seats. Do not plac eshar pobjects on the
seat cushions ,e.g. knives, nails or tools.
Th es eats should only be occupied by
passengers, if possible.
R when the seat heatin gisinoperation ,do
not cover the seats with insulating mate-
rials, e.g. blanke ts,c oats, bags, seat cov-
ers, child seats or booster seats.
! When you mov ethe seats, make sur ethat
ther eare no objects in th efootwell or
behind the seats. Otherwise, you could
damage the seats and the objects. Seats
93Seats,steering wheeland mirrors Z
Page 97 of 389

!
When the rear bench seat is folded for-
wards, the front seats cannot be moved to
their rearmost position. You could other-
wise damage the seats and the rear bench
seat.
! Make sure that the sun visor is folded up
befor eadjustin gthe backrest and head
restraint height. The head restraint and sun
viso rcould otherwise collide when the head
restraint is fully extended.
i It is not possible to remove thehead
restraint sfrom th efront seats .The rear-
compartment head restraint scan be
removed (Y page 96).
Pleas econtact aMercedes-Ben zService
Centre for mor einformation.
i Related topics:
R Luggag ecompartmen tenlargement
(folding dow nthe rea rbench seat) Adjusting the seat
selectrically :
Head restraint height
; Seat cushion angle
= Seat height
? Seat fore-and-aft adjustment
A Backrest angle
i Vehicles with memory function :ifP RE-
SAFE ®
has been triggered ,the front-
passenger seat will be moved to abetter
position if it was previously in an unfavour-
able position. i
You can store the seat settings using the
memory function (Y page 103).
i Vehicles with memory function :when the
seat is moved forwards or rearwards, the
headrest is moved up or down automati-
cally. Adjusting th
ehead restraints
Adjusting the head restraints manually Adjusting the head restraint height
! The head restraints must only be removed
at aq ualified special istw orkshop.
Mercedes-Benz recommends that you use
aM ercedes-Ben zService Centre for this
purpose. X
To raise: pull the head restraint up to the
desired position.
X To lower: press release catch :in the
direction of the arrow and push the head
restraint down to the desired position. 94
SeatsSeats, steering wheel and mirrors