2011 MERCEDES-BENZ M-CLASS SUV bulb
[x] Cancel search: bulbPage 116 of 389

Changing bulbs
Important safety notes
Xenon bulbs If your vehicle is equipped wit
hxenon bulb s,
you ca nrecognise this by th efollowing: the
cone of light from th exenon bulbs moves
from th etop to the bottomand back again
whe nyou star tthe engine. Fo rthis to be
observed ,the lights must be switched on
before startin gthe engine. G
DANGER
Xenon bulb scarry ahigh voltage. You could
get an electric shock and be seriously or even
fatally injured if you touch the electric con-
tacts on xenon bulbs. Therefore, never
remov ethe cover from xenon bulbs.
Do not change xenon bulbs yourself, but have
them replaced at aqualified specialist work-
sho pwhich has the necessar yspecialist
knowledge and tools to carry out the work
required.
Mercedes-Ben zrecom mends that you use a
Mercedes-Benz Service Centre for this pur-
pose. In particular, work relevant to safety or
on safety-related systems must be carried out
at aq ualified specialist workshop.
Bulbs and lamps are an important aspect of
vehicle safety. You must therefore make sure
that thes efunction correctly at all times.
Have the headlamp setting checked regularly.
Other bulbs There are bulbs other than the xenon bulbs
that you cannot replace. Replace only the
bulbs listed (Y page 113). Have the bulbs that
you cannot replace yourself changed at a
qualified specialist workshop.
Mercedes -Benz recommends that you use a
Mercedes-Benz Ser vice Centre for thi spur-
pose .Inp articular, work relevant to safety or
on safety-related systems must be carried out
at aq ualified specialist workshop. If you require assistanc
echangi ngbulbs, con-
sult aqualified specialist workshop.
Do not touch the glass tube of new bulbs with
your bare hands. Even minor contamination
can burn into the glass surface and reduce
the servic elife of the bulbs. Always use alint-
free cloth or only touch the base of the bulb
when fitting.
Only use bulbs of the correct type.
If the new bulb still does not light up, consult
aq ualified specialist workshop.
Bulbs and lamps are an important aspect of
vehicle safety. You must therefore make sure
that these function correctly at all times.
Have the headlamp setting checked regularly. G
WARNING
Bulbs and lights can become very hot. For this
reason, allow them to cool down before
changin gthem. Otherwise, you coul dburn
yourself when you touch them.
Keep bulbs out of the reach of children. Oth-
er wise ,they could damage them, for example,
and inj uret hemselves.
Never use abulbw hich ha sbeend ropped.
Suc hab ulbm ay explod eand injure you.
Halogen bulb sare pressu rised and could
explode when yo uchange them, especiall yif
the yarever yhot. Yo ushould therefor ewear
eye protec tion and gloves when you are
changing them. Overview of bulb replacement
–bulbs
Yo uc an replace the following bulbs. The
details for the bul btype can be found in the
legend. Changing bulbs
113Lightsand windsc reenwipers Z
Page 117 of 389
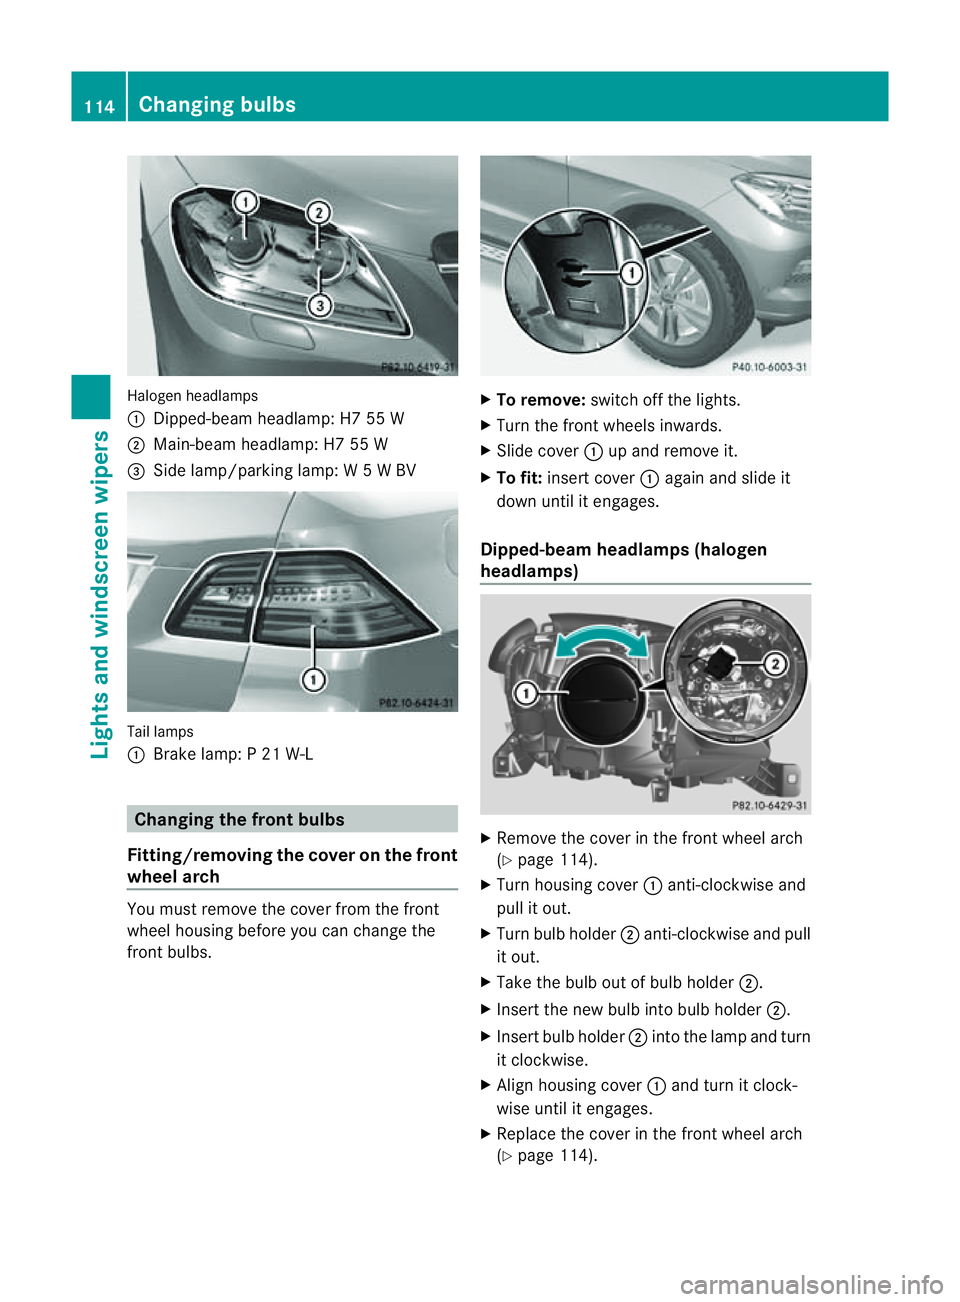
Halogen he
adlamps
: Dipped-bea mheadlamp: H7 55 W
; Main-beam headlamp: H7 55 W
= Side lamp/parkin glamp: W5WBV Tail lamps
:
Brak elamp: P21W -L Changing the front bulbs
Fitting/removing the cover on the front
wheel arch You must remove the cover from the front
wheel housing before you can chang ethe
fron tbulbs. X
To remove: switchoff the lights.
X Turn the front wheels inwards.
X Slide cover :up and remove it.
X To fit: insert cover :again and slide it
down until it engages.
Dipped-beam headlamps (halogen
headlamps) X
Remove the cover in the front wheel arch
(Y page 114).
X Turn housing cover :anti-clockwise and
pull it out.
X Turn bulb holder ;anti-clockwise and pull
it out.
X Take the bulb out of bulb holder ;.
X Insert the new bulb into bulb holder ;.
X Insert bulb holder ;into the lamp and turn
it clockwise.
X Align housing cover :and turn it clock-
wise until it engages.
X Replace the cover in the front wheel arch
(Y page 114). 114
Changin
gbulbsLight sand windscreen wipers
Page 118 of 389
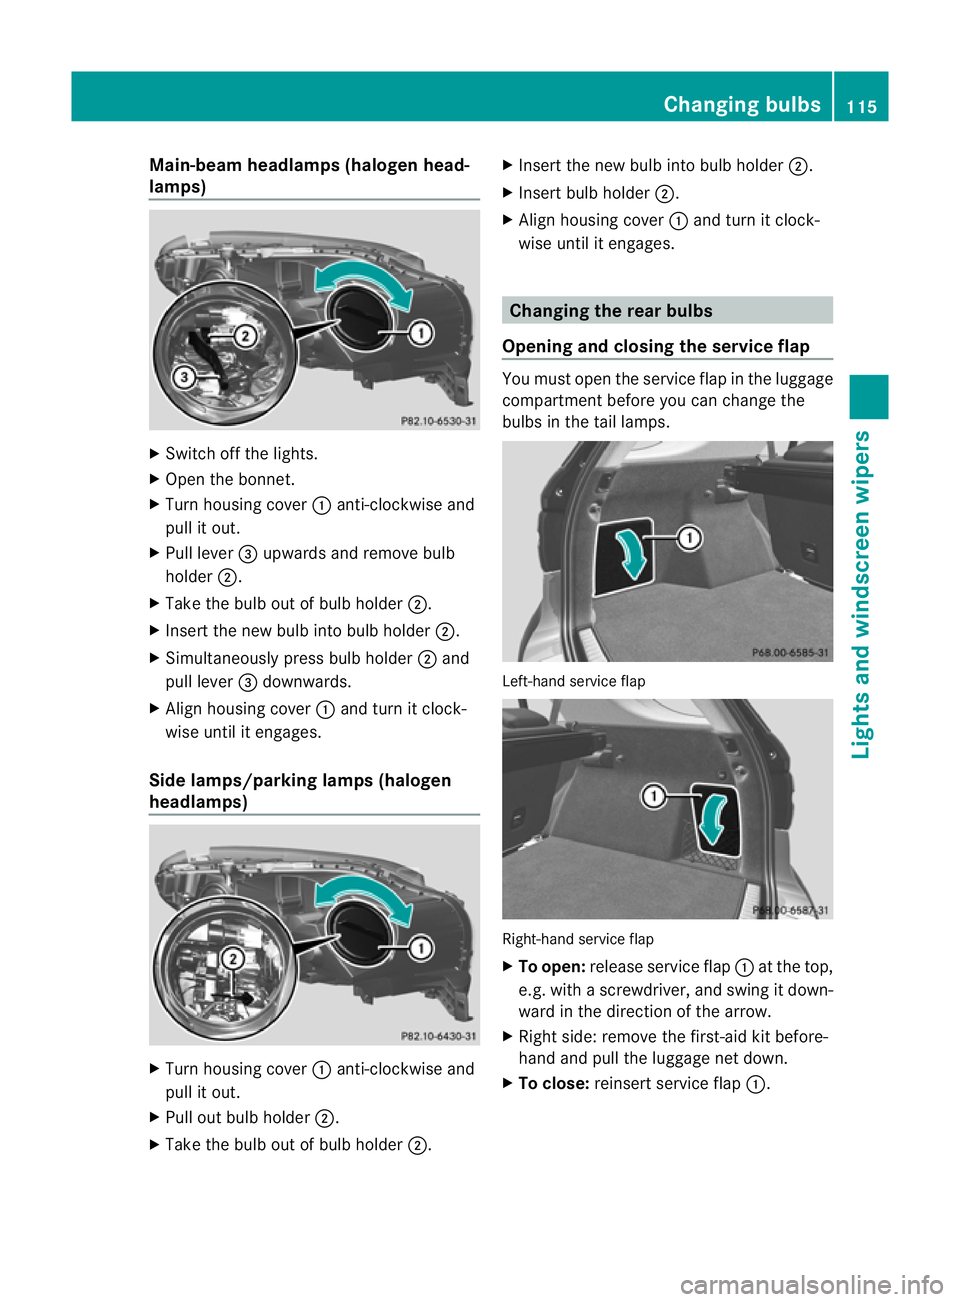
Main-beam headlamps (hal
ogen head-
lamps) X
Switch off the lights.
X Open the bonnet.
X Turn housing cover :anti-clockwis eand
pul lito ut.
X Pul llever =upwards and remove bulb
holder ;.
X Take the bulb out of bulb holder ;.
X Insert the new bulb into bulb holder ;.
X Simultaneously press bulb holder ;and
pull lever =downwards.
X Align housing cover :and tur nitclock-
wis euntil it enga ges.
Side lamps/parking lamps (halogen
headlamps) X
Tur nhousing cover :anti-clockwise and
pull it out.
X Pull out bulb holder ;.
X Take the bulb out of bulb holder ;.X
Insert the new bulb int obulbh older ;.
X Insert bulb holder ;.
X Align housing cover :and tur nitclock-
wis euntil it enga ges. Changing th
erear bulbs
Opening and closin gthe serv icef lap You must open the service flap in the luggage
compartm entb efor eyou can change the
bulbs in the tail lamps. Left-hand service flap
Right-han
dservice flap
X To open: release servic eflap :at the top,
e.g. with ascrewdriver, and swing it do wn-
ward in the direction of the arrow.
X Right side :remov ethe first-ai dkit before-
hand and pull the luggage net down.
X To close: reinsertservice flap :. Changing bulbs
115Lightsand windscreen wipers Z
Page 119 of 389

Brake lamp
X
Switch off the lights.
X Ope nthe luggage compartment.
X Open the service fla p(Ypage 115). :
Brake lamp
X Turn the bulb holder anti-clockwise and
remove it.
X Remov ethe bulb from the bulb holder.
X Insert the new bulb int othe bulb holder.
X Insert the bulb holder and tur nitclockwise.
X Close the servic eflap (Y page 115). Windscreen wipers
Switching the windscreen wipers on/
off G
WARNING
The windscreen will not longer be wiped prop-
erly if the wiper blades are worn. This could
preven tyou from observing the traffic condi-
tions, thereby causing an accident .Replace
the wiper blades twic eayear, ideally in spring
and autumn.
! Do not operate the windscreen wipers
when the windscreen is dry, as this could
damage the wiper blades. Moreover ,dust
that has collected on the windscreen can
scratc hthe glass if wipin gtakes place when
the windscreen is dry. !
If the windscreen wipers leave smears on
the windscreen after the vehicle has been
washe dinana utomatic car wash, this may
be due to wax or other residue. Clea nthe
windscreen with washer fluid after an auto-
matic car wash. Combination switch
1
$ Windscreen wiper soff
2 Ä Intermittent wipe, low 7
3 Å Intermittent wipe, high 8
4 ° Continuous wipe, slow
5 ¯ Continuous wipe, fast
B í Single wipe
C î To wip ewith washer fluid
X Turn the key to position 1or 2in the ignition
lock.
X Turn the combination switch to the appro-
priate position or press the button on the
side.
! Intermittent wiping with rain sensor: due
to optical influences and the windscreen
becoming dirty in dry weather conditions,
the windscreen wipers may be activated
inadvertently. This could damage the wind-
screen wiper blades or scratc hthe wind-
screen.
For this reason, you should always switch
off the windscreen wiper sind ry weather.
In the ÄorÅ position, th eappropriate
wiping frequenc yisset automatically accord-
ing to the intensity of the rain. In the Å
7 Rain sensor set to low sensitivity.
8 Rain sensor set to high sensitivity. 116
Windscreen wipersLights and windscreen wipers
Page 234 of 389
X
To switc hthe conn ected powe rsupply
on or off: turn thekey in the ignition lock
to position 2or 0respectivel y. Bulb failure indi
cator for LE Dlamps
i If LED lamps are fitte dinthe trailer, an
error message ma yappear in the multi-
function display even if there is no fault. The
reason for the error message may be that
the current has fallen below the minimum
of 50 milliamper es(mA).
To ensure reliabl eoperation of the bul bfailure
indicator, each LED chai ninthe trailer lighting
must be guaranteed aminimum current of
50 mA. Trailer with 7-pin connector
Genera linforma tion If your trailer has
a7-pin connector, you can
connect it to the 13-pin socket on the ball
coupling using an adapter or, if necessary, an
adapter cable .Both of these can be obtained
at aq ualified specialist workshop, e.g. at a
Mercedes-Ben zService Centre.
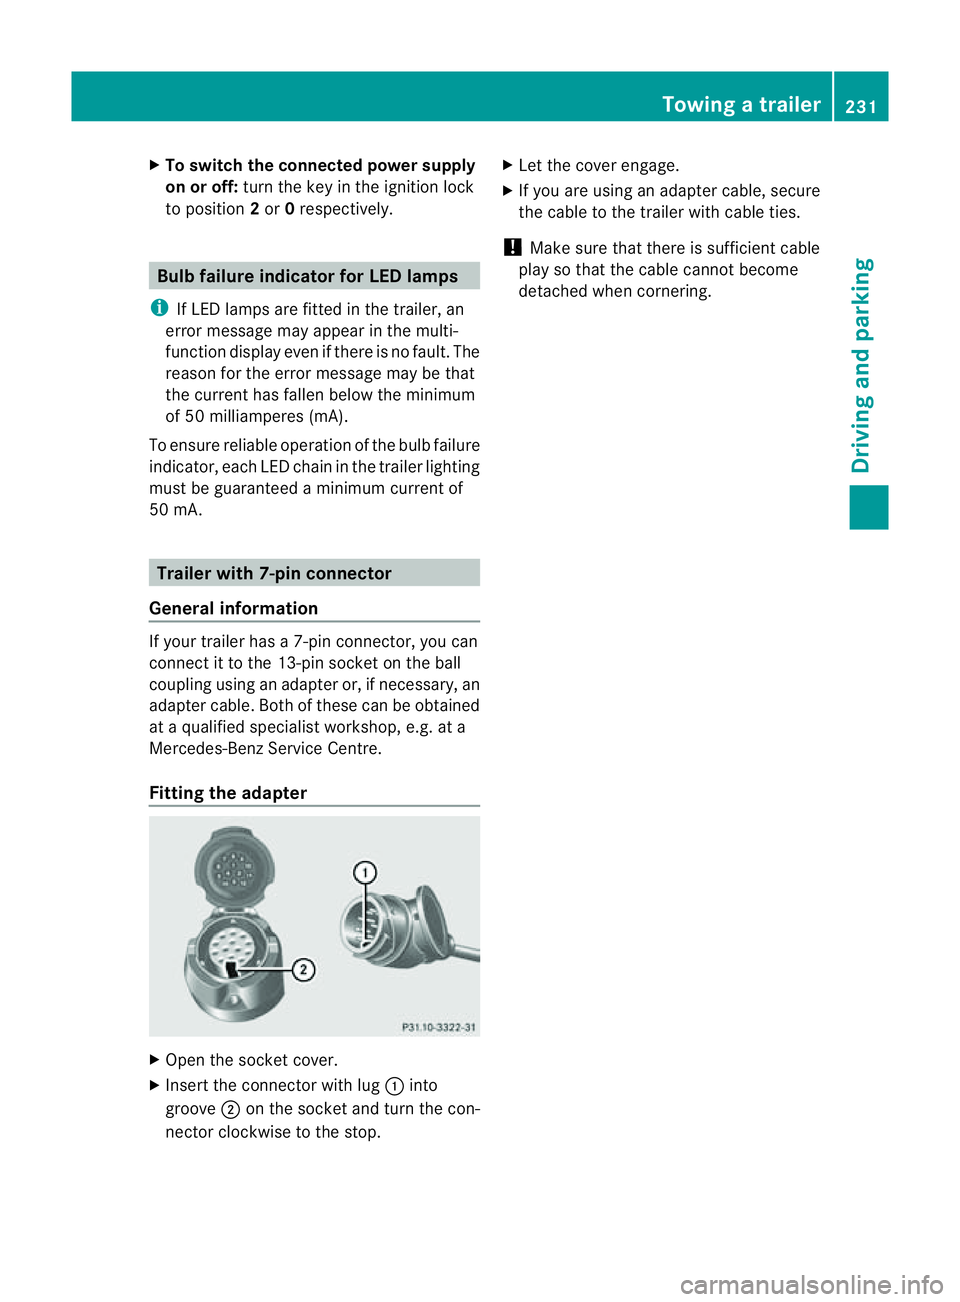
Fitting the adapter X
Open the socket cover.
X Insert the connector with lug :into
groove ;on the socket and tur nthe con-
nec torc lockwise to the stop. X
Let the cover engage.
X If you are using an adapter cable, secure
the cable to the trailer with cable ties.
! Make sure that there is sufficient cable
play so that the cable cannot become
detached when cornering. Towing
atrailer
231Driving andparki ng Z
Page 265 of 389
Displa
ymessages Possible causes/consequences and
M Solutions
6
Re
ar centre mal‐ function Consult
workshop G
Risk of in
jury
SRS has malfunctioned at the rear centre. The 6warning lamp
als olights up in th einstrument cluster.
X Visi taqualified specialist workshop. 6
Left
windowbag mal‐
function Consult
workshop orR
ight windowba
gmalfunc‐ tion Consult work‐
shop G
Ris
kofi njury
There is amalfunction in the left-han dand/or right-han dwindow-
bag. The 6warnin glamp also lights up in the instrumen tclus-
ter.
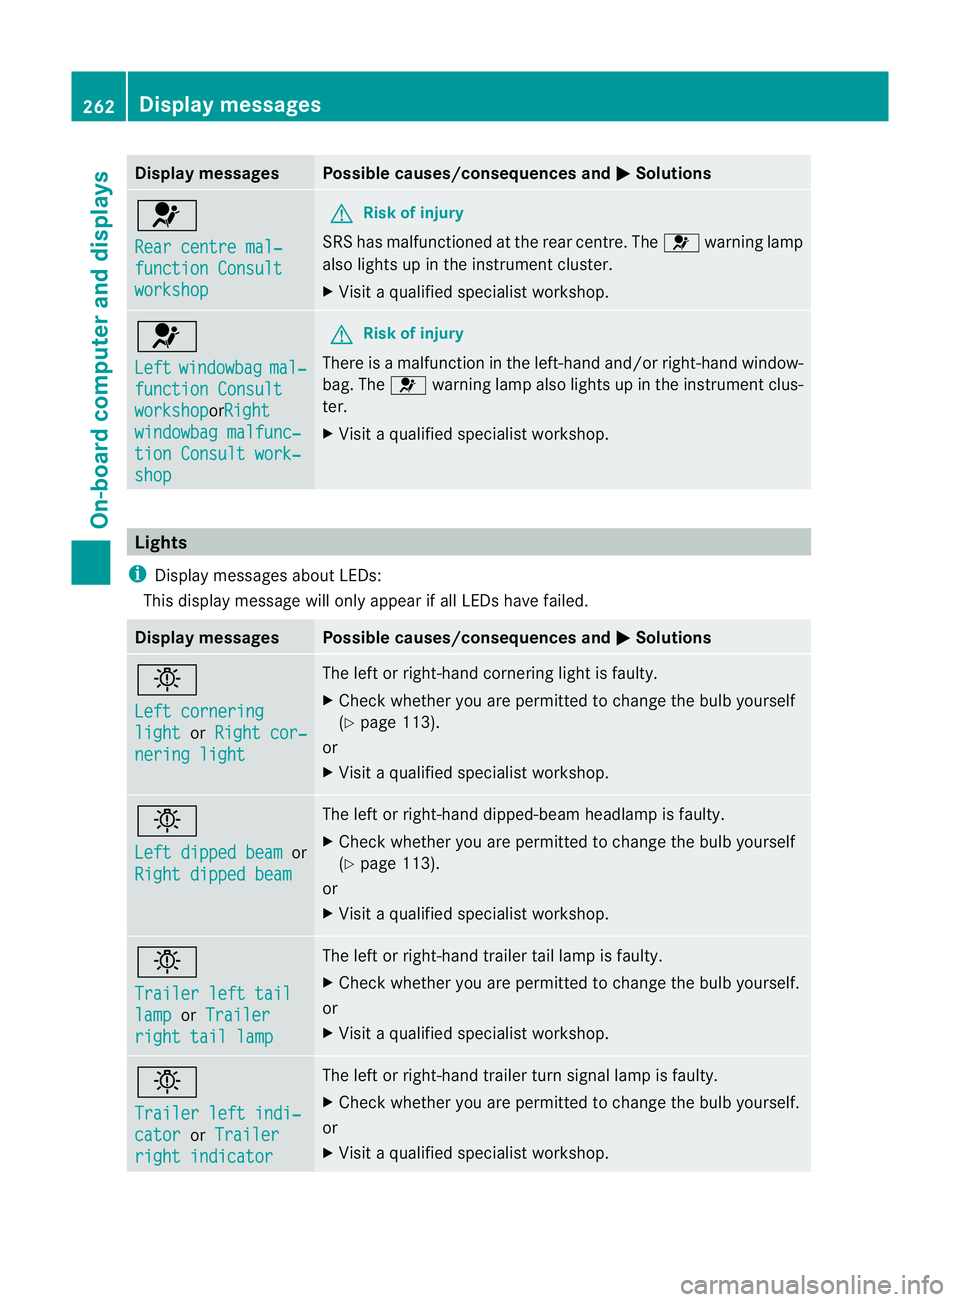
X Visit aqualified specialist workshop. Lights
i Display messages about LEDs:
This display message will only appear if all LEDs have failed. Displa
ymessages Possible causes/consequences and
M Solutions
b
Le
ft cornering light or
Right cor‐ nering light Th
eleft or right-hand cornering light is faulty.
X Chec kwhether you ar epermitted to change the bulb yourself
(Y page 113).
or
X Visit aqualified specialist workshop. b
Left dipped beam
or
Righ tdipped beam Th
eleft or right-hand dipped-beam headlamp is faulty.
X Check whether you are permitted to change the bulb yourself
(Y page 113).
or
X Visit aqualified specialist workshop. b
Traile
rleft tail lamp or
Trailer right tail lamp Th
eleft or right-hand trailer tail lam pisfaulty.
X Check whethe ryou ar epermitted to change the bulb yourself.
or
X Visit aqualified specialist workshop. b
Traile
rleft indi‐ cator or
Trailer right indicator Th
eleft or right-hand trailer tur nsignal lamp is faulty.
X Check whether you are permitted to change the bulb yourself.
or
X Visit aqualified specialist workshop. 262
Display messagesOn-board computer and displ
ays
Page 266 of 389

Displa
ymessages Possible causes/consequences and
M Solutions
b
Tr
ailerb rake lamp Th
et railer brak elamp is faulty.
X Chec kwhether you ar epermitted to change the bulb yourself.
or
X Visit aqualified specialist workshop. b
Rear
left indicator
or
Rear righ tindi‐ cator Th
er ear left-hand or rear right-hand tur nsignal is faulty.
X Check whether you are permitted to change the bulb yourself
(Y page 113).
or
X Visit aqualified specialist workshop. b
Fron
tleft indica‐ tor or
Front right indicator Th
ef ront left-hand or fron tright-hand turn signal is faulty.
X Check whether you are permitted to change the bulb yourself
(Y page 113).
or
X Visit aqualified specialist workshop. b
Left
mirror indica‐
tor or
Righ tmir‐ ror indicator Th
et urn signal in the left-hand or right-hand exterior mirror is
faulty.
X Check whether you are permitted to change the bulb yourself
(Y page 113).
or
X Visit aqualified specialist workshop. b
Thir
dbrake lamp Th
et hir db rake lamp is faulty.
X Check whether yo uare permitted to change th ebulb yourself
(Y page 113).
or
X Visit aqualified specialist workshop. b
Left-han
dtail lamp/brake lamp or
Right-hand tail lamp/brake lamp Th
eleft or right-hand brak elamp is faulty.
X Check whethe ryou ar epermitted to change the bulb yourself
(Y page 113).
or
X Visit aqualified specialist workshop. b
Left main beam
or
Righ tmain beam Th
eleft or right-hand high beam is faulty.
X Check whether you are permitted to change the bulb yourself
(Y page 113).
or
X Visit aqualified specialist workshop. Display messages
263On-boardcomputer and displays Z
Page 267 of 389
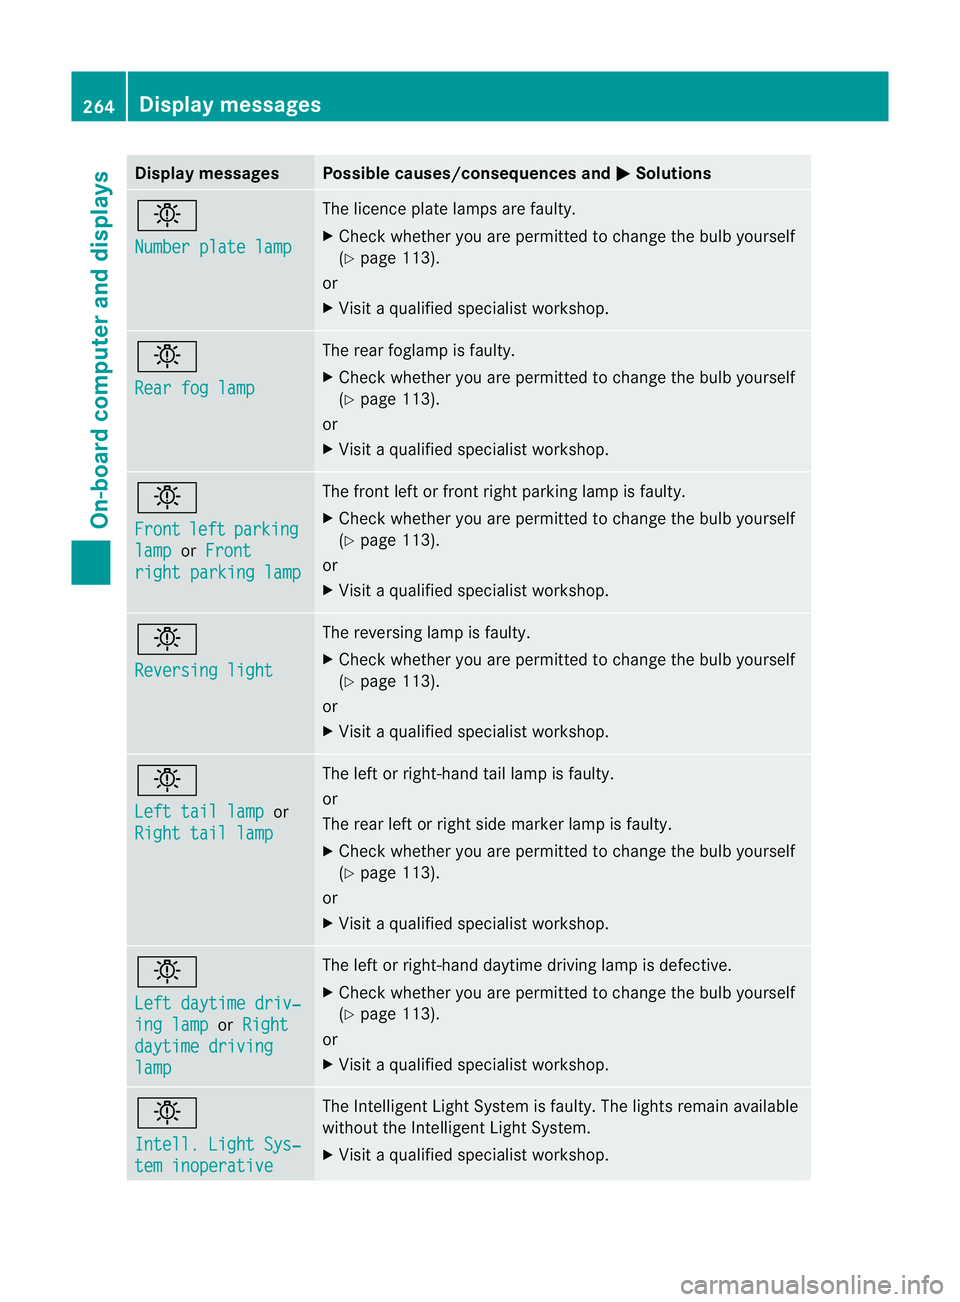
Displa
ymessages Possible causes/consequences and
M Solutions
b
Nu
mber plate lamp Th
elicence plat elamp sare faul ty.
X Chec kwhether you ar epermitted to change the bulb yourself
(Y page 113).
or
X Visit aqualified specialist workshop. b
Rear fo
glamp Th
er ear foglam pisfaulty.
X Check whethe ryou ar epermitted to change the bulb yourself
(Y page 113).
or
X Visit aqualified specialist workshop. b
Front
left parking
lamp or
Front righ
tparking lamp Th
ef ront left or fron tright parkin glamp is faulty.
X Check whethe ryou ar epermitted to change the bulb yourself
(Y page 113).
or
X Visit aqualified specialist workshop. b
Reversin
glight Th
er eversing lam pisfaulty.
X Check whethe ryou ar epermitted to change the bulb yourself
(Y page 113).
or
X Visit aqualified specialist workshop. b
Left tail lamp
or
Righ ttail lamp Th
eleft or right-hand tail lam pisfaulty.
or
The rear left or right side marker lamp is faulty.
X Check whethe ryou ar epermitted to change the bulb yourself
(Y page 113).
or
X Visit aqualified specialist workshop. b
Left daytim
edriv‐ ing lamp or
Right daytime driving
lamp Th
eleft or right-hand daytime driving lam pisdefective.
X Check whether you are permitted to change the bulb yourself
(Y page 113).
or
X Visit aqualified specialist workshop. b
Intell
.Light Sys‐ tem inoperative Th
eI ntelligent Light Syste misfaulty. The lights remain available
without the Intelligent Light System.
X Visit aqualified specialist workshop. 264
Display messagesOn-board computer and displays