Page 287 of 372
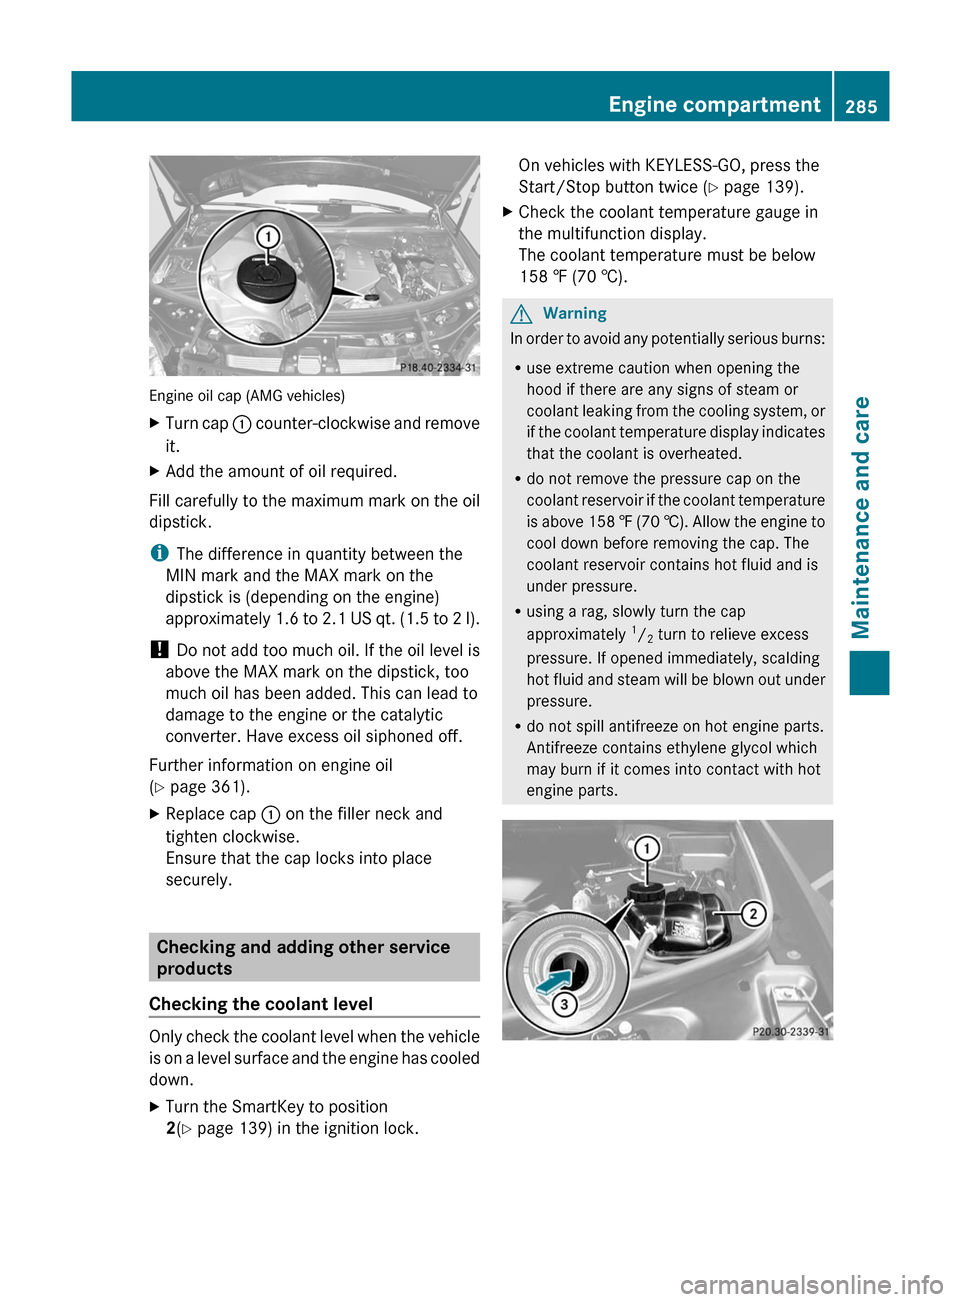
Engine oil cap (AMG vehicles)
XTurn cap : counter-clockwise and remove
it.XAdd the amount of oil required.
Fill carefully to the maximum mark on the oil
dipstick.
i The difference in quantity between the
MIN mark and the MAX mark on the
dipstick is (depending on the engine)
approximately 1.6 to 2.1 US qt. (1.5 to 2 l).
! Do not add too much oil. If the oil level is
above the MAX mark on the dipstick, too
much oil has been added. This can lead to
damage to the engine or the catalytic
converter. Have excess oil siphoned off.
Further information on engine oil
( Y page 361).
XReplace cap : on the filler neck and
tighten clockwise.
Ensure that the cap locks into place
securely.
Checking and adding other service
products
Checking the coolant level
Only check the coolant level when the vehicle
is on a level surface and the engine has cooled
down.
XTurn the SmartKey to position
2 (Y page 139) in the ignition lock.On vehicles with KEYLESS-GO, press the
Start/Stop button twice ( Y page 139).XCheck the coolant temperature gauge in
the multifunction display.
The coolant temperature must be below
158 ‡ (70 †).GWarning
In order to avoid any potentially serious burns:
R use extreme caution when opening the
hood if there are any signs of steam or
coolant leaking from the cooling system, or
if the coolant temperature display indicates
that the coolant is overheated.
R do not remove the pressure cap on the
coolant reservoir if the coolant temperature
is above 158 ‡ (70 †). Allow the engine to
cool down before removing the cap. The
coolant reservoir contains hot fluid and is
under pressure.
R using a rag, slowly turn the cap
approximately 1
/ 2 turn to relieve excess
pressure. If opened immediately, scalding
hot fluid and steam will be blown out under
pressure.
R do not spill antifreeze on hot engine parts.
Antifreeze contains ethylene glycol which
may burn if it comes into contact with hot
engine parts.
Engine compartment285Maintenance and careBA 164.1 USA, CA Edition B 2011; 1; 2, en-USd2mskotVersion: 3.0.3.52010-04-21T17:25:06+02:00 - Seite 285Z
Page 316 of 372

On vehicles with COMAND and a
navigation system, the clock is set
automatically.
R reset the sliding sunroof ( Y page 89)
R reset the function for folding the exterior
mirrors in/out automatically by folding
the mirrors out once ( Y page 102)
R reset the side windows ( Y page 87)
Charging the battery
GWarning
Never charge a battery while still installed in
the vehicle unless the accessory battery
charge unit approved by Mercedes-Benz is
being used. Gases may escape during
charging and cause explosions that may
result in paint damage, corrosion or personal
injury.
An accessory battery charge unit specially
adapted for Mercedes-Benz vehicles and
tested and approved by Mercedes-Benz is
available. It permits the charging of the
battery in its installed position. Contact an
authorized Mercedes-Benz Center for
information and availability.
Charge the battery in accordance with the
separate instructions for the accessory
battery charger.
GWarning!
There is a risk of acid burns during the
charging process due to the gases which
escape from the battery. Do not lean over the
battery during the charging process.
GWarning!
Battery acid is caustic. Avoid contact with the
skin, eyes or clothing.
! Only charge the installed battery with a
battery charger which has been tested and
approved by Mercedes-Benz. These battery
chargers allow the battery to be charged
while still installed.
! Only use battery chargers with a
maximum charging voltage of 14.8 V.
! Only charge the battery using the jump-
starting connection point.
The jump-starting connection point is in the
engine compartment ( Y page 315).XOpen the hood ( Y page 282).XConnect the battery charger to the positive
terminal and earth point in the same order
as when connecting the donor battery in
the jump-starting procedure
( Y page 315).314BatteryRoadside assistance
BA 164.1 USA, CA Edition B 2011; 1; 2, en-USd2mskotVersion: 3.0.3.52010-04-21T17:25:06+02:00 - Seite 314
Page 318 of 372

iJumper cables and further information about jump-starting can be obtained from any
authorized Mercedes-Benz Center.XMake sure that the two vehicles do not touch.XApply the parking brake firmly.XShift the transmission to position P.XSwitch off all electrical consumers (e.g. radio, blower etc.).XOpen the hood ( Y page 282).
Position number C identifies the charged battery of the other vehicle or an equivalent jump-
starting device.
! Never swap the terminal connections.
XLift up cover : of positive terminal ; in the direction of the arrow.XConnect positive terminal ; on your vehicle to positive terminal = of donor battery C
using the jumper cable, beginning with your own battery.XStart the engine of the donor vehicle and run it at idling speed.XRemove cover A from earth point B.XConnect negative terminal ? of donor battery C to earth point B of your vehicle using
the jumper cable, connecting the jumper cable to donor battery C first.XStart the engine.316Jump-startingRoadside assistance
BA 164.1 USA, CA Edition B 2011; 1; 2, en-USd2mskotVersion: 3.0.3.52010-04-21T17:25:06+02:00 - Seite 316
Page 323 of 372

Before changing a fuseXPark the vehicle and apply the parking
brake.XSwitch off all electrical consumers.XRemove the key from the ignition lock.
The fuses are located in various fuse boxes:
R fuse box on the front-passenger side of the
dashboard
R fuse box in the engine compartment on the
right-hand side of the vehicle, when viewed
in the direction of travel
R fuse box in the cargo compartment on the
right-hand side of the vehicle, when viewed
in the direction of travel
The fuse allocation chart is located in the
vehicle tool kit ( Y page 298) in the stowage
compartment under the trunk floor.
Fuse box in the cockpit
! Do not use a pointed object such as a
screwdriver to open the cover in the
dashboard. You could damage the
dashboard or the cover.
XTo open: pull cover : outwards in the
direction of the arrow and remove it.XTo close: clip in cover : on the front of
the dashboard.XFold cover : inwards until it engages.Fuse box in the engine compartmentXOpen the hood ( Y page 282).
Example shows ML 350 (ML 350 BlueTEC, ML 550,
AMG vehicles are similar)
XRemove any existing moisture from the
fuse box using a dry cloth.XTo open: open clamps ;.XFold up cover : and remove it towards the
front of the vehicle.XTo close: check whether the rubber seal is
lying correctly in cover :.XInsert cover : at the rear of the fuse box
into the retainer.XFold down cover : and close clamps ;.
!
The cover must be seated properly,
otherwise moisture or dirt could impair the
function of the fuses.
XClose the hood ( Y page 283).
Fuse box in the cargo compartment
XOpen the tailgate.Fuses321Roadside assistanceBA 164.1 USA, CA Edition B 2011; 1; 2, en-USd2mskotVersion: 3.0.3.52010-04-21T17:25:06+02:00 - Seite 321Z
Page:
< prev 1-8 9-16 17-24