2011 MERCEDES-BENZ GLK-Class lamp
[x] Cancel search: lampPage 65 of 304
ESP®
(Electronic Stability Program)
Important safety notesGWarning
Observe "Important safety notes"
( Y page 61).
If ESP ®
detects that the vehicle is deviating
from the direction desired by the driver, one
or more wheels are braked to stabilize the
vehicle. If necessary, the engine output is also
modified to keep the vehicle on the desired
course within physical limits. ESP ®
assists
the driver when pulling away on wet or
slippery roads. ESP ®
can also stabilize the
vehicle during braking.
If ESP ®
intervenes, the ä warning lamp
flashes in the instrument cluster.
GWarning!
Never switch off the ESP when you see the
ESP warning lamp ä flashing in the
instrument cluster. In this case proceed as
follows:
R When driving off, apply as little throttle as
possible.
R While driving, ease up on the accelerator
pedal.
R Adapt your speed and driving style to the
prevailing road conditions.
Failure to observe these guidelines could
cause the vehicle to skid. The ESP cannot
prevent accidents resulting from excessive
speed.
! Vehicles without 4MATIC: switch the
ignition off when:
R the parking brake is being tested using a
dynamometer
R the vehicle is being towed with the front/
rear axle raised
Application of the brakes by ESP ®
may
otherwise destroy the brake system.
! Vehicles with 4MATIC: switch off the
ignition when the parking brake is being
tested on a brake dynamometer.
Application of the brakes by ESP ®
may
otherwise destroy the brake system.
! Vehicles with 4MATIC: function or
performance tests may only be carried out
on a 2-axle dynamometer. If you wish to
operate the vehicle on such a
dynamometer, please consult an
authorized Mercedes-Benz Center in
advance. You could otherwise damage the
drive train or the brake system.
i Only use wheels with the recommended
tire sizes. Only then will ESP ®
function
properly.
ETS/4ETS (Electronic Traction System)GWarning
Observe "Important safety notes"
( Y page 61).
Traction control is part of ESP ®
.
Traction control brakes the drive wheels
individually if they spin. This enables you to
pull away and accelerate on slippery surfaces,
for example if the road surface is slippery on
one side. On vehicles with 4MATIC, more
drive torque is also transferred to the wheel
or wheels with traction.
Traction control remains active if you
deactivate ESP ®
.
Deactivating/activating ESP ®
GWarning
The ESP
®
should not be switched off during
normal driving other than in the
circumstances described below. Disabling
the system will reduce vehicle stability in
driving maneuvers.
Do not switch off the ESP ®
when a spare
wheel is mounted.
Driving safety systems63SafetyBA 204.9 USA, CA Edition A 2011; 1; 6, en-USd2mwentsVersion: 3.0.3.62010-06-15T08:58:39+02:00 - Seite 63Z
Page 66 of 304
ESP®
is activated automatically when the
engine is running.
It may be best to deactivate ESP ®
in the
following situations:
R when using snow chains
R in deep snow
R on sand or gravelGWarning!
Activate ESP ®
as soon as the situations
described above no longer apply. ESP ®
will
otherwise not be able to stabilize the vehicle
if the vehicle starts to skid or a wheel starts
to spin.
When you deactivate ESP ®
:
R ESP ®
no longer improves driving stability.
R the engine's torque is no longer limited and
the drive wheels can spin. The spinning of
the wheels results in a cutting action, which
provides better grip.
R traction control is still activated.
R ESP ®
still provides support when you
brake.
If ESP ®
is deactivated and one or more wheels
start to spin, the ä warning lamp in the
instrument cluster flashes. In such situations,
ESP ®
will not stabilize the vehicle.
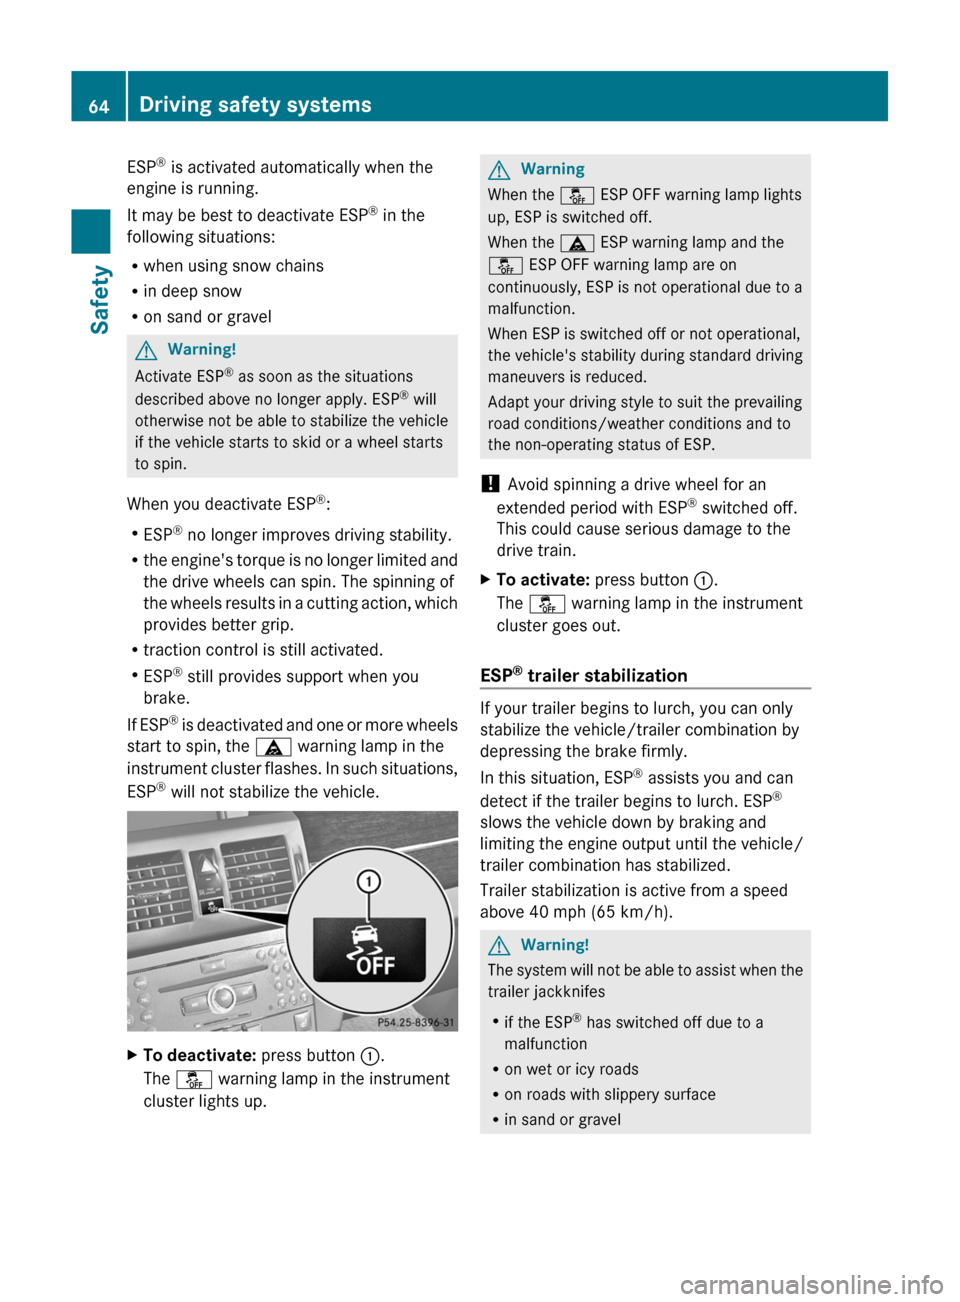
XTo deactivate: press button :.
The å warning lamp in the instrument
cluster lights up.GWarning
When the å ESP OFF warning lamp lights
up, ESP is switched off.
When the ä ESP warning lamp and the
å ESP OFF warning lamp are on
continuously, ESP is not operational due to a
malfunction.
When ESP is switched off or not operational,
the vehicle's stability during standard driving
maneuvers is reduced.
Adapt your driving style to suit the prevailing
road conditions/weather conditions and to
the non-operating status of ESP.
! Avoid spinning a drive wheel for an
extended period with ESP ®
switched off.
This could cause serious damage to the
drive train.
XTo activate: press button :.
The å warning lamp in the instrument
cluster goes out.
ESP ®
trailer stabilization
If your trailer begins to lurch, you can only
stabilize the vehicle/trailer combination by
depressing the brake firmly.
In this situation, ESP ®
assists you and can
detect if the trailer begins to lurch. ESP ®
slows the vehicle down by braking and
limiting the engine output until the vehicle/
trailer combination has stabilized.
Trailer stabilization is active from a speed
above 40 mph (65 km/h).
GWarning!
The system will not be able to assist when the
trailer jackknifes
R if the ESP ®
has switched off due to a
malfunction
R on wet or icy roads
R on roads with slippery surface
R in sand or gravel
64Driving safety systemsSafety
BA 204.9 USA, CA Edition A 2011; 1; 6, en-USd2mwentsVersion: 3.0.3.62010-06-15T08:58:39+02:00 - Seite 64
Page 68 of 304
XTo arm: lock the vehicle with the SmartKey
or KEYLESS-GO.
Indicator lamp : flashes. The alarm
system is armed after approximately 15
seconds.XTo deactivate: unlock the vehicle using the
SmartKey or KEYLESS-GO.XTo stop the alarm using the SmartKey:
insert the SmartKey into the ignition lock.
The alarm is switched off.
or
XPress the % or & button on the
SmartKey.
The alarm is switched off.XTo stop the alarm using KEYLESS-GO:
grasp the outside door handle. The key
must be outside the vehicle.
The alarm is switched off.
or
XPress the Start/Stop button on the
dashboard. The key must be inside the
vehicle.
The alarm is switched off.66Anti-theft systemsSafety
BA 204.9 USA, CA Edition A 2011; 1; 6, en-USd2mwentsVersion: 3.0.3.62010-06-15T08:58:39+02:00 - Seite 66
Page 73 of 304

X To unlock the vehicle: touch the inner
surface of the door handle.
XTo lock the vehicle: touch sensor
surface :.
If you pull on the handle of the tailgate, only
the cargo area of the vehicle is unlocked.
iIf the vehicle has been parked for a long
time, the sensor surfaces are deactivated
automatically.
Pull the door handle to unlock the door and
turn on the ignition once to activate the
sensor surfaces again.
Changing the settings of the locking
system
You can change the settings of the locking
system in such a way that only the driver's
door and the fuel filler flap are unlocked. This
is useful if you frequently travel on your own.
XTo change the setting: press the %
and & buttons simultaneously for
approximately six seconds until the battery
check lamp flashes twice.
The SmartKey now functions as follows:
XTo unlock the driver's door: press the
% button once.
XTo unlock centrally: press the %
button twice.
XTo lock centrally: press the & button.The KEYLESS-GO function is changed as
follows:
XTo unlock the driver's door: touch the
inner surface of the door handle on the
driver's door.
XTo unlock centrally: touch the inner
surface of the door handle on the front-
passenger door or the rear door.
XTo lock centrally: touch sensor
surface : on one of the door handles.
Restoring the factory settings
XPress the % and & buttons
simultaneously for approximately six
seconds until the battery check lamp
flashes twice.
Mechanical key
General notes
If the vehicle can no longer be locked or
unlocked with the SmartKey, use the
mechanical key.
If you use the mechanical key to unlock and
open the driver's door, the anti-theft alarm
system will be triggered (Y page 65).
There are several ways to turn off the alarm:
XPress the % or & button on the
SmartKey.
or
XInsert the SmartKey into the ignition lock.
or
XPress the Start/Stop button in the ignition
lock. The SmartKey must be in the vehicle.
or
XLock or unlock the vehicle using KEYLESS-
GO. The SmartKey must be outside the
vehicle.
If you unlock the vehicle using the mechanical
key, the fuel filler flap will not be unlocked
automatically.
SmartKey71Opening and closingBA 204.9 USA, CA Edition A 2011; 1; 6, en-USd2mwentsVersion: 3.0.3.62010-06-15T08:58:39+02:00 - Seite 71Z
Page 74 of 304

Removing the mechanical keyXPush release catch : in the direction of
the arrow and at the same time remove
mechanical key ; from the SmartKey.
SmartKey battery
Important safety notes
It is advisable to have batteries replaced at a
qualified specialist workshop, e.g. at an
authorized Mercedes-Benz Center.
GWarning!
Batteries are toxic and contain caustic
substances. For this reason, keep batteries
out of the reach of children.
If a battery has been swallowed, visit a doctor
immediately.
GWarning
SmartKey batteries contain perchlorate
material, which may require special handling
and regard for the environment. Check with
your local government's disposal guidelines.
California residents, see www.dtsc.ca.gov/
HazardousWaste/Perchlorate/
index.cfm .
Checking the batteryXPress the & or % button.
The battery is working properly if battery
charge indicator lamp : lights up briefly.
If battery charge indicator lamp : does not
light up briefly during the test, the key
batteries are discharged.
XChange the key battery ( Y page 72).
i
Consult any authorized Mercedes-Benz
Center for a key battery.
i If the battery is tested within the signal
range of the vehicle, you can open or close
the vehicle by pressing & or %
respectively.
Changing the battery
You require a CR 2025 3 V cell battery.
XTake the mechanical key out of the
SmartKey ( Y page 71).XPress mechanical key ; into the opening
in the SmartKey in the direction of the72SmartKeyOpening and closing
BA 204.9 USA, CA Edition A 2011; 1; 6, en-USd2mwentsVersion: 3.0.3.62010-06-15T08:58:39+02:00 - Seite 72
Page 97 of 304
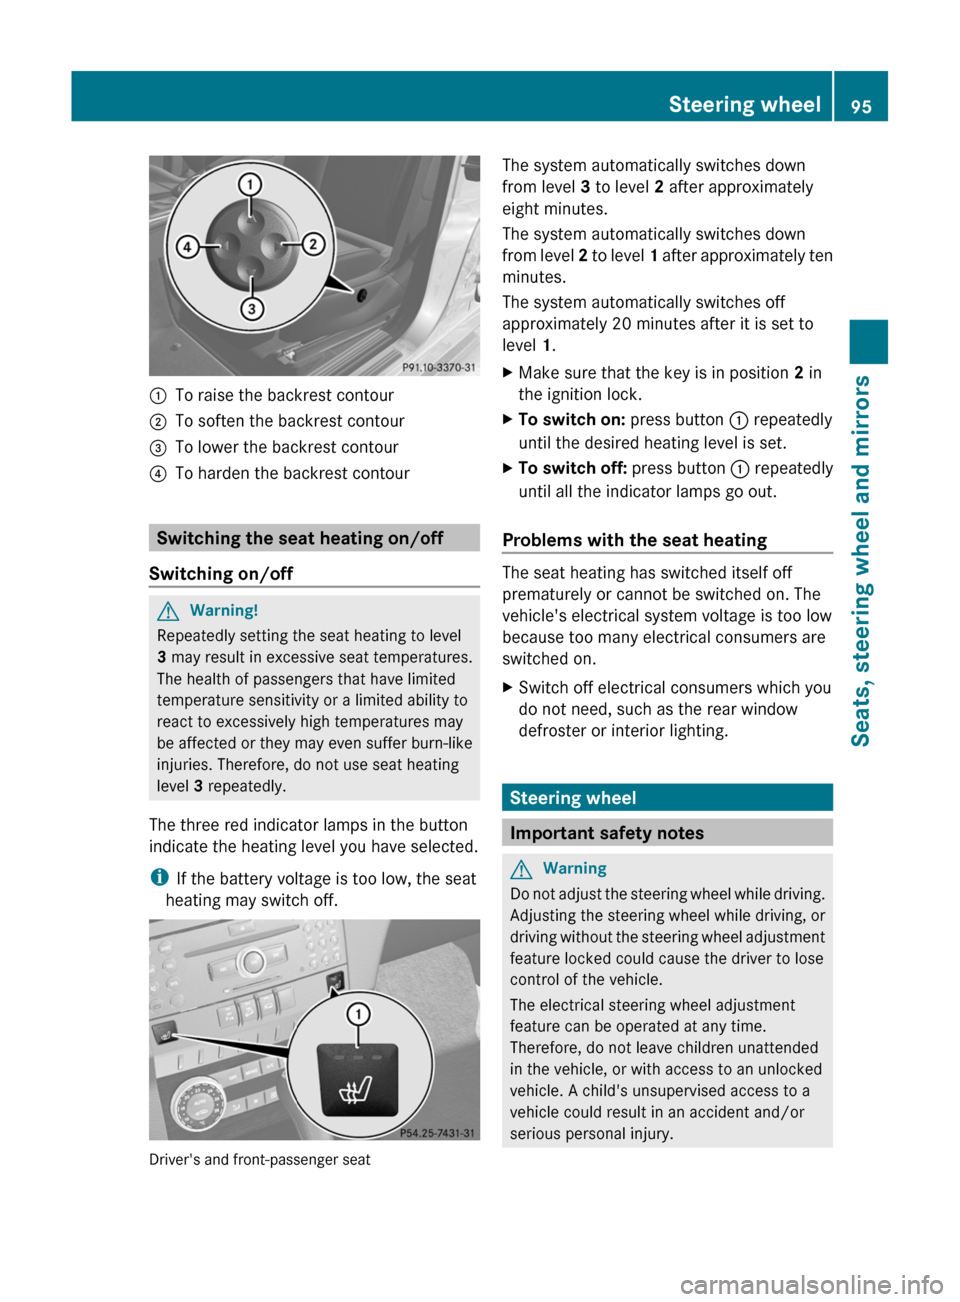
:To raise the backrest contour;To soften the backrest contour=To lower the backrest contour?To harden the backrest contour
Switching the seat heating on/off
Switching on/off
GWarning!
Repeatedly setting the seat heating to level
3 may result in excessive seat temperatures.
The health of passengers that have limited
temperature sensitivity or a limited ability to
react to excessively high temperatures may
be affected or they may even suffer burn-like
injuries. Therefore, do not use seat heating
level 3 repeatedly.
The three red indicator lamps in the button
indicate the heating level you have selected.
iIf the battery voltage is too low, the seat
heating may switch off.
Driver's and front-passenger seat
The system automatically switches down
from level 3 to level 2 after approximately
eight minutes.
The system automatically switches down
from level 2 to level 1 after approximately ten
minutes.
The system automatically switches off
approximately 20 minutes after it is set to
level 1.
XMake sure that the key is in position 2 in
the ignition lock.
XTo switch on: press button : repeatedly
until the desired heating level is set.
XTo switch off: press button : repeatedly
until all the indicator lamps go out.
Problems with the seat heating
The seat heating has switched itself off
prematurely or cannot be switched on. The
vehicle's electrical system voltage is too low
because too many electrical consumers are
switched on.
XSwitch off electrical consumers which you
do not need, such as the rear window
defroster or interior lighting.
Steering wheel
Important safety notes
GWarning
Do not adjust the steering wheel while driving.
Adjusting the steering wheel while driving, or
driving without the steering wheel adjustment
feature locked could cause the driver to lose
control of the vehicle.
The electrical steering wheel adjustment
feature can be operated at any time.
Therefore, do not leave children unattended
in the vehicle, or with access to an unlocked
vehicle. A child's unsupervised access to a
vehicle could result in an accident and/or
serious personal injury.
Steering wheel95Seats, steering wheel and mirrorsBA 204.9 USA, CA Edition A 2011; 1; 6, en-USd2mwentsVersion: 3.0.3.62010-06-15T08:58:39+02:00 - Seite 95Z
Page 99 of 304
also automatically moved to the previously
set position.
The last position of the steering wheel is
stored when you switch off the ignition or
when you store the setting with the memory
function (Y page 100).
You can activate and deactivate the EASY-
ENTRY/EXIT feature in the on-board
computer (Y page 173).
GWarning
Let the system complete the adjustment
procedure before setting the vehicle in
motion. All steering wheel adjustment must
be completed before setting the vehicle in
motion. Driving off with the steering wheel
still adjusting could cause the driver to lose
control of the vehicle.
iIf the crash-responsive EASY-EXIT feature
is triggered in an accident, the steering
column will move upwards when the
driver's door is opened. This occurs
irrespective of the position of the key in the
ignition lock. This makes it easier to exit the
vehicle and rescue the occupants.
The crash-responsive EASY-EXIT feature is
only operational after an accident if the
EASY-EXIT/ENTRY feature is activated in
the on-board computer.
Mirrors
Rear-view mirror
Rear-view mirror (manual anti-glare)
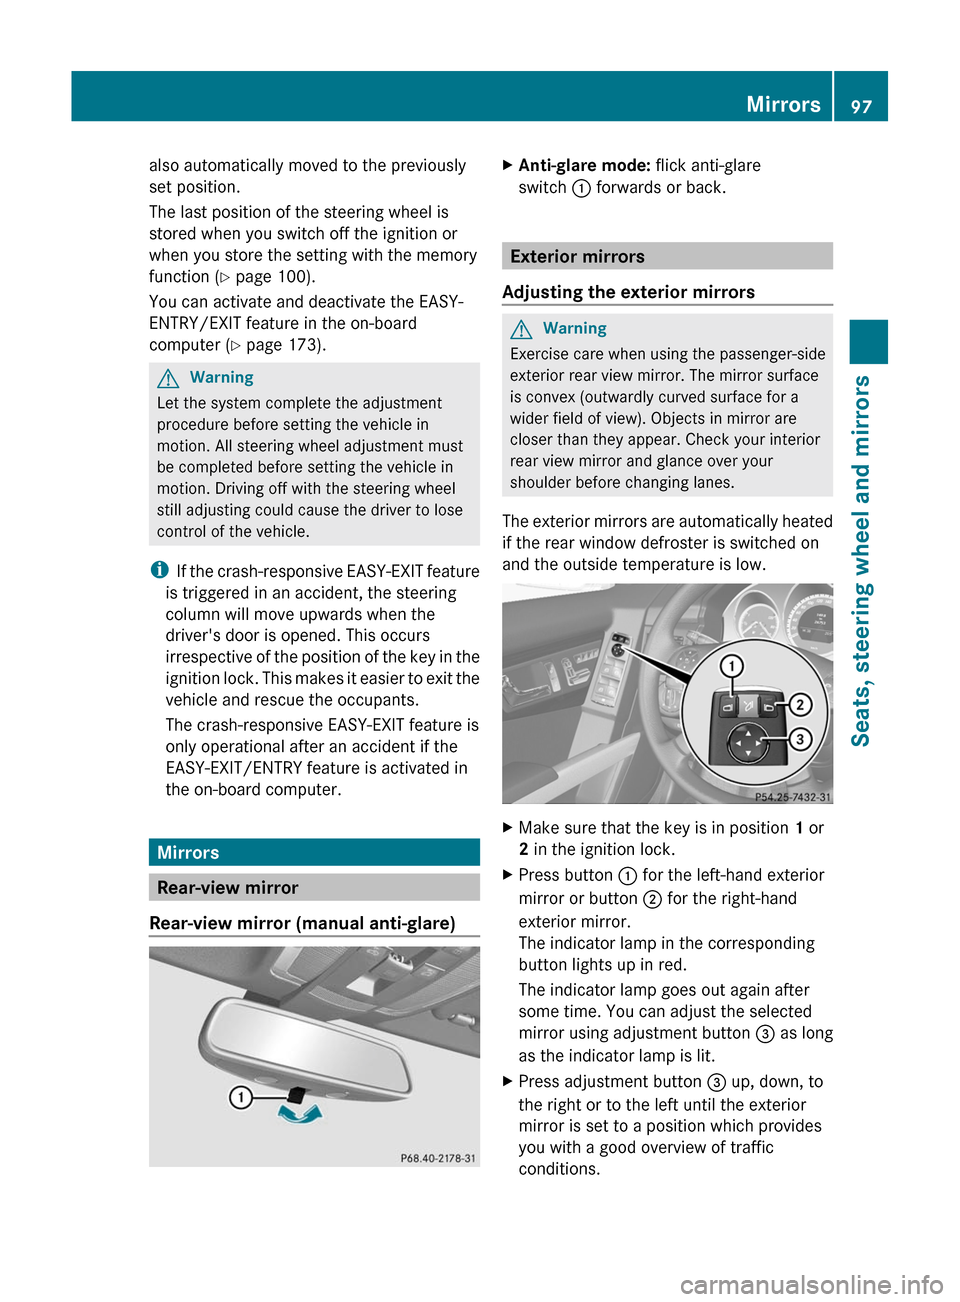
XAnti-glare mode: flick anti-glare
switch : forwards or back.
Exterior mirrors
Adjusting the exterior mirrors
GWarning
Exercise care when using the passenger-side
exterior rear view mirror. The mirror surface
is convex (outwardly curved surface for a
wider field of view). Objects in mirror are
closer than they appear. Check your interior
rear view mirror and glance over your
shoulder before changing lanes.
The exterior mirrors are automatically heated
if the rear window defroster is switched on
and the outside temperature is low.
XMake sure that the key is in position 1 or
2 in the ignition lock.
XPress button : for the left-hand exterior
mirror or button ; for the right-hand
exterior mirror.
The indicator lamp in the corresponding
button lights up in red.
The indicator lamp goes out again after
some time. You can adjust the selected
mirror using adjustment button = as long
as the indicator lamp is lit.
XPress adjustment button = up, down, to
the right or to the left until the exterior
mirror is set to a position which provides
you with a good overview of traffic
conditions.
Mirrors97Seats, steering wheel and mirrorsBA 204.9 USA, CA Edition A 2011; 1; 6, en-USd2mwentsVersion: 3.0.3.62010-06-15T08:58:39+02:00 - Seite 97Z
Page 101 of 304

Light hitting the mirror(s) at certain angles
(incident light) could blind you. As a result,
you may not be able to observe traffic
conditions and could cause an accident.
The rear-view mirror and the exterior mirror
on the driver's side automatically go into anti-
glare mode if the ignition is switched on and
incident light from headlamps strikes the
sensor in the rear-view mirror.
The mirrors do not go into anti-glare mode if
reverse gear is engaged or the interior lighting
is switched on.
Parking position for the exterior
mirror on the front-passenger side
Setting and storing the parking position
You can position the front-passenger side
exterior mirror in such a way that you can see
the rear wheel on that side as soon as you
engage reverse gear. You can store this
position.
XMake sure that the vehicle is stationary and
that the key is in position 2 in the ignition
lock.
XPress button ; for the exterior mirror on
the front-passenger side.
XEngage reverse gear.
The exterior mirror on the front-passenger
side moves to the preset parking position.
XUse adjustment button = to adjust the
exterior mirror to a position which allows
you to see the rear wheel and the curb.
The parking position is stored.
iIf you shift the transmission to another
position, the exterior mirror on the front-
passenger side returns to the driving
position.
iYou can also store the parking position
using memory button M ?.
XWith the key in position 2 in the
ignition lock and with the exterior
mirror on the front-passenger side
activated, use adjustment button = to
set the exterior mirror such that the
rear wheel and curb are visible.
XPress memory button M ? and one of
the arrows on adjustment button =
within three seconds.
The parking position is stored if the
exterior mirror does not move.
If the mirror moves out of position, repeat
the steps.
Calling up a stored parking position
setting
XWith the key in position 2 in the ignition
lock and the exterior mirror on the front-
passenger side activated, engage reverse
gear.
The exterior mirror on the front-passenger
side moves to the stored parking position.
The exterior mirror on the front-passenger
side moves back to its original position:
Ras soon as you exceed a speed of 6 mph
(10 km/h)
Rabout ten seconds after you have
disengaged reverse gear
Rif you press button : for the exterior
mirror on the driver's side
Mirrors99Seats, steering wheel and mirrorsBA 204.9 USA, CA Edition A 2011; 1; 6, en-USd2mwentsVersion: 3.0.3.62010-06-15T08:58:39+02:00 - Seite 99Z