2011 MERCEDES-BENZ GLK-Class mirror
[x] Cancel search: mirrorPage 186 of 304

Display messagesPossible causes/consequences and M Solutionsb
Turn Signal Rear
Left
or
Chk. Rear Rt Turn
SignalThe rear left-hand or rear right-hand turn signal is faulty.XCheck whether you are permitted to change the bulb yourself
( Y page 107).
or
XVisit a qualified specialist workshop.b
Chk. Front Lt.
Turn Signal
or
Front right
indicatorThe front left-hand or front right-hand turn signal is faulty.XCheck whether you are permitted to change the bulb yourself
( Y page 107).
or
XVisit a qualified specialist workshop.b
Check Left Mirror
Signal
or
Check Right Mirror
SignalThe turn signal in the left-hand and/or right-hand exterior mirror
is faulty.XCheck whether you are permitted to change the bulb yourself
( Y page 107).
or
XVisit a qualified specialist workshop.b
Chk. Center Brake
LampThe high-mounted brake lamp is faulty.XCheck whether you are permitted to change the bulb yourself
( Y page 107).
or
XVisit a qualified specialist workshop.b
Chk. Lt. Tail
+Brake Lmp.
or
Chk. Rt. Tail
+Brake Lmp.The left or right-hand tail lamp/brake lamp is faulty.XCheck whether you are permitted to change the bulb yourself
( Y page 107).
or
XVisit a qualified specialist workshop.b
Check Left High
Beam
or
Check Right High
BeamThe left or right-hand high beam is faulty. XCheck whether you are permitted to change the bulb yourself
( Y page 107).
or
XVisit a qualified specialist workshop.184Display messagesOn-board computer and displays
BA 204.9 USA, CA Edition A 2011; 1; 6, en-USd2mwentsVersion: 3.0.3.62010-06-15T08:58:39+02:00 - Seite 184
Page 217 of 304

Sun visors
Overview of the sun visor
GWarning
Do not use the vanity mirror while driving.
Keep the vanity mirrors in the sun visors
closed while the vehicle is in motion.
Reflected glare can endanger you and others.
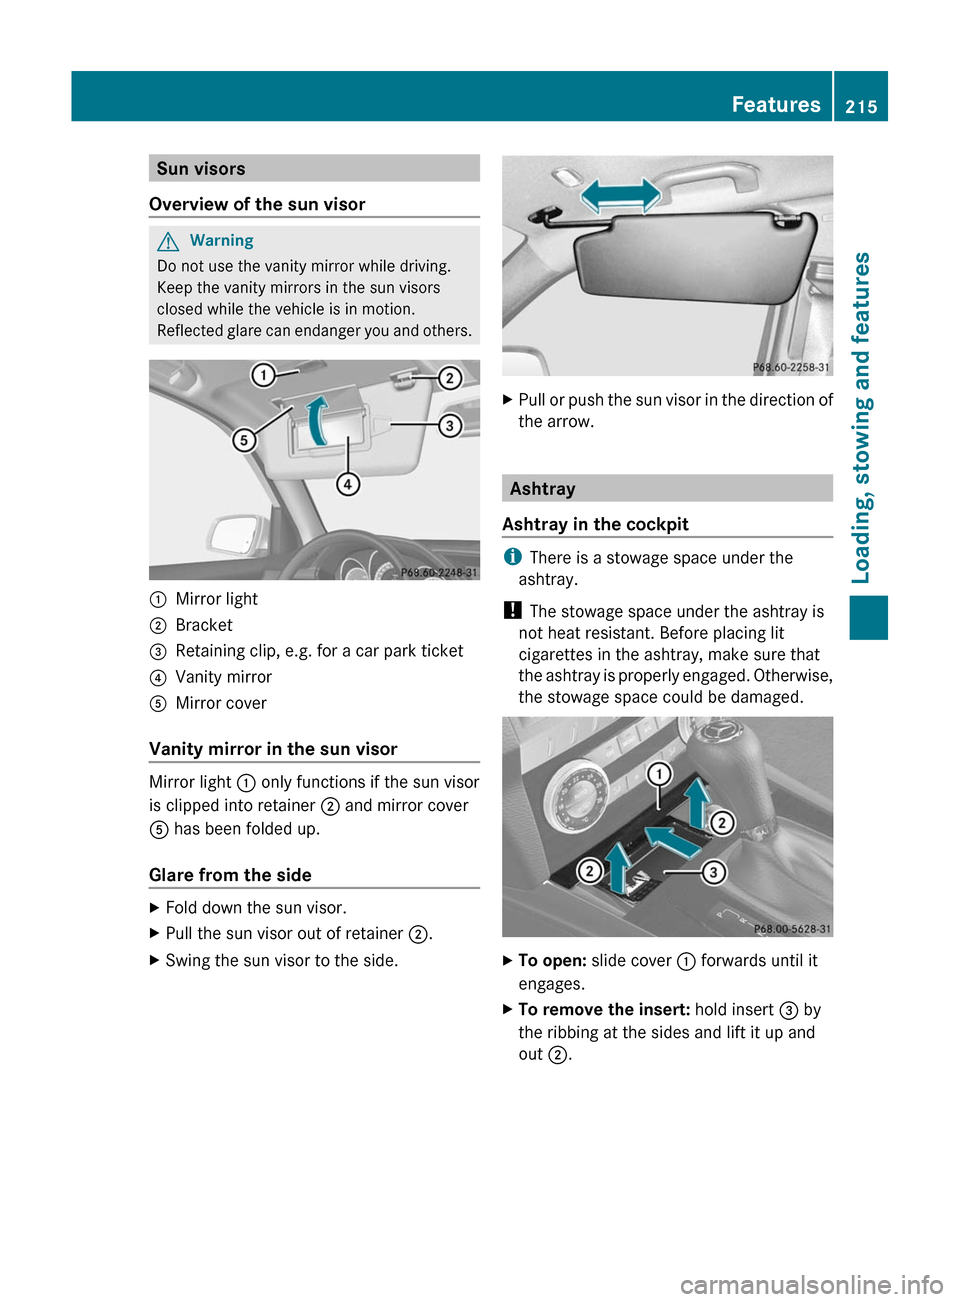
:Mirror light;Bracket=Retaining clip, e.g. for a car park ticket?Vanity mirrorAMirror cover
Vanity mirror in the sun visor
Mirror light : only functions if the sun visor
is clipped into retainer ; and mirror cover
A has been folded up.
Glare from the side
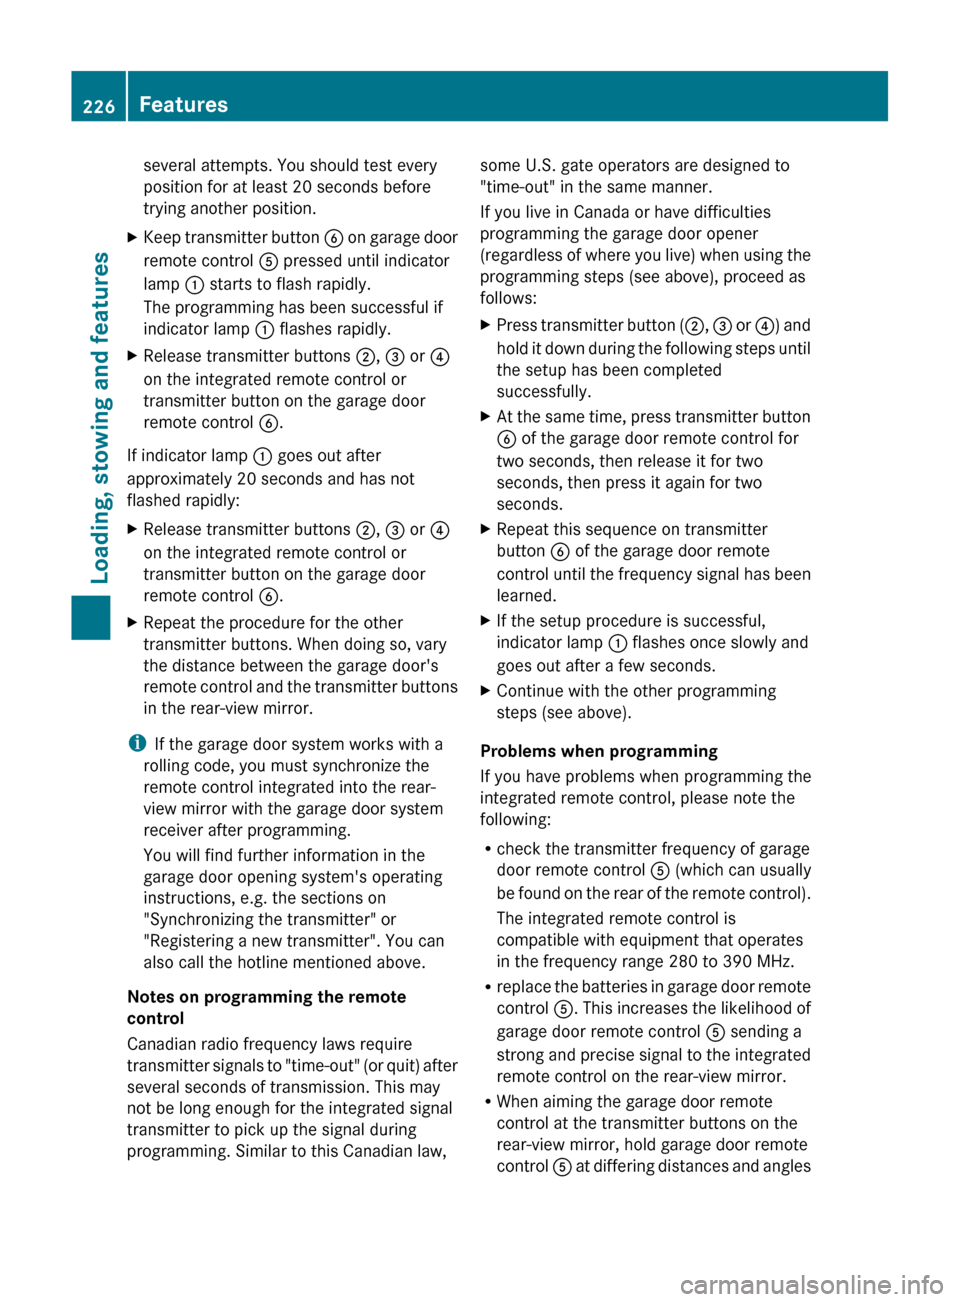
XFold down the sun visor.XPull the sun visor out of retainer ;.XSwing the sun visor to the side.XPull or push the sun visor in the direction of
the arrow.
Ashtray
Ashtray in the cockpit
iThere is a stowage space under the
ashtray.
! The stowage space under the ashtray is
not heat resistant. Before placing lit
cigarettes in the ashtray, make sure that
the ashtray is properly engaged. Otherwise,
the stowage space could be damaged.
XTo open: slide cover : forwards until it
engages.
XTo remove the insert: hold insert = by
the ribbing at the sides and lift it up and
out ;.
Features215Loading, stowing and featuresBA 204.9 USA, CA Edition A 2011; 1; 6, en-USd2mwentsVersion: 3.0.3.62010-06-15T08:58:39+02:00 - Seite 215Z
Page 227 of 304

Do not run the engine while programming the
integrated remote control. Inhalation of
exhaust gas is hazardous to your health. All
exhaust gas contains carbon monoxide (CO),
and inhaling it can cause unconsciousness
and possible death. All exhaust gas contains
carbon monoxide (CO), and inhaling it can
cause unconsciousness and possible death.
i USA only:
This device complies with part 15 of the
FCC rules. Operation is subject to the
following two conditions:
1. The device must not cause harmful
interference.
2. The device must withstand any
interference received, including
interference that may cause undesired
operation.
Unauthorized modification of this device
could void the device's operating permit.
i Canada only:
This device complies with the RSS-210
requirements of Industry Canada.
Operation is subject to the following two
conditions:
1. The device must not cause harmful
interference.
2. The device must accept any interference
received, including interference that may
cause undesired operation.
Unauthorized modification of this device
could void the user's authority to legally
operate the device.
Programming the remote control
Programming
GWarning!
Only press the transmitter button on the
integrated remote control if there are no
persons or objects present within the sweep
of the garage door. People could otherwise be
injured by the movement of the door.
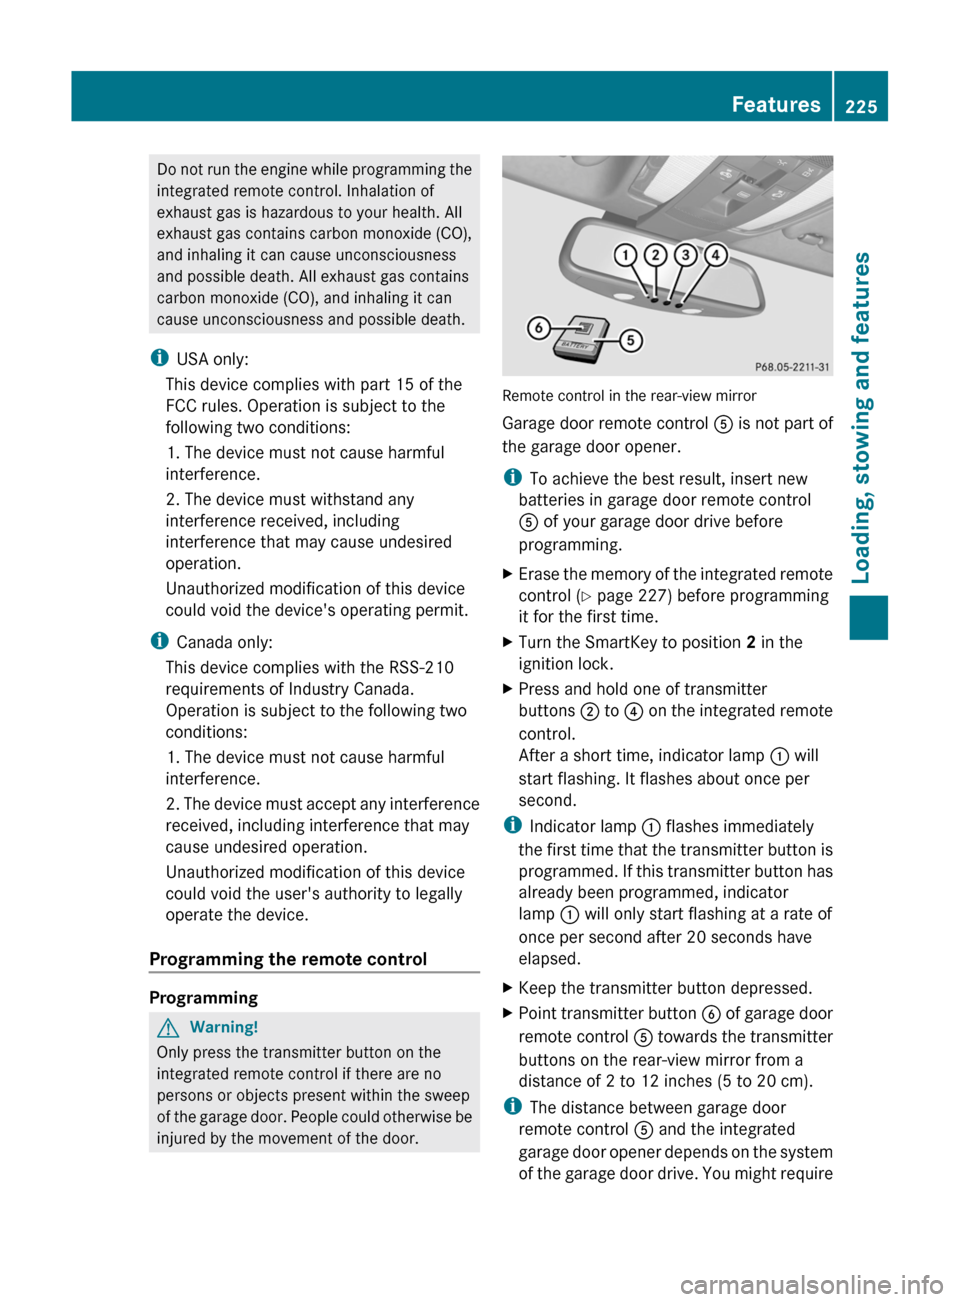
Remote control in the rear-view mirror
Garage door remote control A is not part of
the garage door opener.
i To achieve the best result, insert new
batteries in garage door remote control
A of your garage door drive before
programming.
XErase the memory of the integrated remote
control ( Y page 227) before programming
it for the first time.XTurn the SmartKey to position 2 in the
ignition lock.XPress and hold one of transmitter
buttons ; to ? on the integrated remote
control.
After a short time, indicator lamp : will
start flashing. It flashes about once per
second.
i Indicator lamp : flashes immediately
the first time that the transmitter button is
programmed. If this transmitter button has
already been programmed, indicator
lamp : will only start flashing at a rate of
once per second after 20 seconds have
elapsed.
XKeep the transmitter button depressed.XPoint transmitter button B of garage door
remote control A towards the transmitter
buttons on the rear-view mirror from a
distance of 2 to 12 inches (5 to 20 cm).
i The distance between garage door
remote control A and the integrated
garage door opener depends on the system
of the garage door drive. You might require
Features225Loading, stowing and featuresBA 204.9 USA, CA Edition A 2011; 1; 6, en-USd2mwentsVersion: 3.0.3.62010-06-15T08:58:39+02:00 - Seite 225Z
Page 228 of 304

several attempts. You should test every
position for at least 20 seconds before
trying another position.XKeep transmitter button B on garage door
remote control A pressed until indicator
lamp : starts to flash rapidly.
The programming has been successful if
indicator lamp : flashes rapidly.XRelease transmitter buttons ;, = or ?
on the integrated remote control or
transmitter button on the garage door
remote control B.
If indicator lamp : goes out after
approximately 20 seconds and has not
flashed rapidly:
XRelease transmitter buttons ;, = or ?
on the integrated remote control or
transmitter button on the garage door
remote control B.XRepeat the procedure for the other
transmitter buttons. When doing so, vary
the distance between the garage door's
remote control and the transmitter buttons
in the rear-view mirror.
i If the garage door system works with a
rolling code, you must synchronize the
remote control integrated into the rear-
view mirror with the garage door system
receiver after programming.
You will find further information in the
garage door opening system's operating
instructions, e.g. the sections on
"Synchronizing the transmitter" or
"Registering a new transmitter". You can
also call the hotline mentioned above.
Notes on programming the remote
control
Canadian radio frequency laws require
transmitter signals to "time-out" (or quit) after
several seconds of transmission. This may
not be long enough for the integrated signal
transmitter to pick up the signal during
programming. Similar to this Canadian law,
some U.S. gate operators are designed to
"time-out" in the same manner.
If you live in Canada or have difficulties
programming the garage door opener
(regardless of where you live) when using the
programming steps (see above), proceed as
follows:XPress transmitter button ( ;, = or ?) and
hold it down during the following steps until
the setup has been completed
successfully.XAt the same time, press transmitter button
B of the garage door remote control for
two seconds, then release it for two
seconds, then press it again for two
seconds.XRepeat this sequence on transmitter
button B of the garage door remote
control until the frequency signal has been
learned.XIf the setup procedure is successful,
indicator lamp : flashes once slowly and
goes out after a few seconds.XContinue with the other programming
steps (see above).
Problems when programming
If you have problems when programming the
integrated remote control, please note the
following:
R check the transmitter frequency of garage
door remote control A (which can usually
be found on the rear of the remote control).
The integrated remote control is
compatible with equipment that operates
in the frequency range 280 to 390 MHz.
R replace the batteries in garage door remote
control A. This increases the likelihood of
garage door remote control A sending a
strong and precise signal to the integrated
remote control on the rear-view mirror.
R When aiming the garage door remote
control at the transmitter buttons on the
rear-view mirror, hold garage door remote
control A at differing distances and angles
226FeaturesLoading, stowing and features
BA 204.9 USA, CA Edition A 2011; 1; 6, en-USd2mwentsVersion: 3.0.3.62010-06-15T08:58:39+02:00 - Seite 226
Page 229 of 304

from the transmitter button that you are
programming. Try different angles from a
distance of 2 to 12 inches (5 to 30 cm) or
the same angle from differing distances.
R If there is another garage door remote
control for the same device, perform the
programming steps again using the remote
control. Before performing these steps,
make sure that new batteries have been
installed in the garage door remote control.
R Align the antenna cable of the garage door
opener unit. This can improve signal
reception/transmission.
Opening or closing the garage door
Once programmed, the integrated remote
control will assume the function of the garage
door system's remote control. Please also
read the operating instructions for the garage
door system.
XTurn the SmartKey to position 2 in the
ignition lock.XPress transmitter button ;, = or ? in the
overhead control panel that you have
programmed to operate the garage door.
Garage door system with fixed code:
indicator lamp : lights up continuously.
Garage door system with rolling code:
indicator lamp : flashes briefly and then
lights up for approximately two seconds.
This is repeated for up to 20 seconds.
i The transmitter will transmit a signal for
as long as the transmitter button is being
pressed. The transmission will be halted
after a maximum of 20 seconds and
indicator lamp : will flash. Press the
transmitter button again, if necessary.
Clearing the remote control memoryXTurn the SmartKey to position 2 in the
ignition lock.XPress and hold transmitter buttons ;
and ? for approximately 20 seconds until
indicator lamp : flashes rapidly.
The memory is cleared.
i You should clear the remote control
memory before selling the vehicle.
Compass
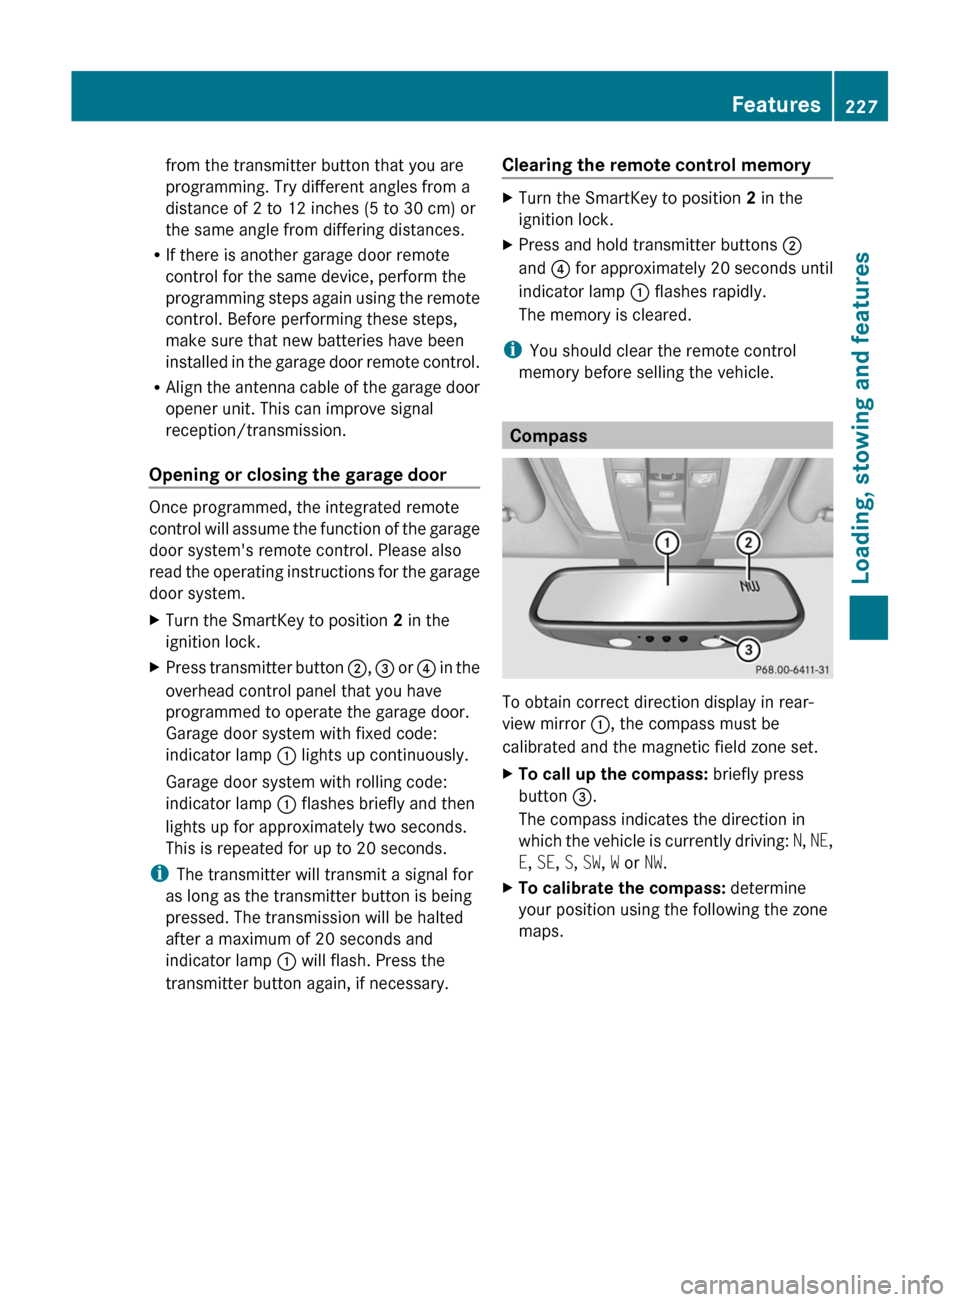
To obtain correct direction display in rear-
view mirror :, the compass must be
calibrated and the magnetic field zone set.
XTo call up the compass: briefly press
button =.
The compass indicates the direction in
which the vehicle is currently driving: N, NE ,
E , SE , S , SW , W or NW.XTo calibrate the compass: determine
your position using the following the zone
maps.Features227Loading, stowing and featuresBA 204.9 USA, CA Edition A 2011; 1; 6, en-USd2mwentsVersion: 3.0.3.62010-06-15T08:58:39+02:00 - Seite 227Z
Page 256 of 304

Never lean over batteries while connecting.
You might get injured.
Battery fluid contains sulfuric acid. Do not
allow this fluid to come in contact with eyes,
skin or clothing. In case it does, immediately
flush affected area with water and seek
medical help if necessary.
A battery will also produce hydrogen gas,
which is flammable and explosive. Keep
flames or sparks away from battery, avoid
improper connection of jumper cables,
smoking etc.GWarning
Do not place any metal objects on the battery
as this could result in a short circuit.
Use leak-proof batteries only to avoid the risk
of acid burns in the event of an accident.
Take care that you do not become statically
charged, e.g. by wearing synthetic clothing or
rubbing against textiles. For this reason, you
also should not pull or push the battery over
carpets or other synthetic materials.
Never touch the battery first. First, touch the
outside body of the vehicle in order to release
any possible electrostatic charges.
Do not rub the battery with rags or cloths. The
battery could explode if touched due to
electrostatic charge or due to spark
formation.
! Switch off the engine and remove the key
before disconnecting the terminal clamps
from the battery. On vehicles with
KEYLESS-GO, make sure that the ignition is
switched off. Check that all the indicator
lamps in the instrument cluster are off. You
may otherwise destroy electronic
components, such as the alternator.
! Like other batteries, the vehicle battery
may discharge over time if you do not use
the vehicle. In this case, have the battery
disconnected at a qualified specialist
workshop, e.g. an authorized Mercedes-
Benz Center. You can also charge the
battery with a charger recommended by
Mercedes-Benz. Contact an authorized
Mercedes-Benz Center for further
information.
The battery, breather hose and cover of the
positive terminal clamp must be installed
securely during operation.
i Remove the key if you park the vehicle
and do not require any electrical
consumers. The vehicle will then use very
little energy, thus conserving battery
power.
Mercedes-Benz recommends that you do not
carry out work on batteries yourself, e.g.
removing, charging or replacing. Always have
this work performed at a qualified specialist
workshop, e.g. an authorized Mercedes-Benz
Center.
i If the power supply has been interrupted,
e.g. if the battery has been reconnected,
you must carry out the following tasks:
R set the clock ( Y page 171).
R reset the panorama roof with power tilt/
sliding panel ( Y page 87).
R reset the function for automatically
folding the exterior mirrors in/out by
folding the mirrors out once
( Y page 98).
Charging the battery
GWarning
Never charge a battery while still installed in
the vehicle unless the accessory battery
charge unit approved by Mercedes-Benz is
being used. Gases may escape during
charging and cause explosions that may
result in paint damage, corrosion or personal
injury.
An accessory battery charge unit specially
adapted for Mercedes-Benz vehicles and
tested and approved by Mercedes-Benz is
available. It permits the charging of the
battery in its installed position. Contact an
254BatteryRoadside Assistance
BA 204.9 USA, CA Edition A 2011; 1; 6, en-USd2mwentsVersion: 3.0.3.62010-06-15T08:58:39+02:00 - Seite 254
Page 301 of 304

overheating. In the Service Booklet, you can
find information on the intervals for renewal.
The renewal interval is determined by the
coolant type and the cooling system design.
The renewal interval in the Service Booklet is
only valid if the coolant is added or renewed
with Mercedes-Benz approved products.
Therefore, only use MB 326.0 antifreeze/
corrosion inhibitor or another Mercedes-Benz
approved product of the same specification.
Information on other Mercedes-Benz
approved products of the same specification
can be obtained at any authorized Mercedes-
Benz Center or on the Internet at
http://bevo.mercedes-benz.com .
The coolant is checked at every service date
at an authorized Mercedes-Benz Center.
The antifreeze/corrosion inhibitor
concentration in the cooling system should:
R be at least 50%. This will protect the cooling
system against freezing down to around
-35 ‡ (-37 †).
R not exceed 55% (antifreeze protection
down to -49 ‡ (-45 †); otherwise, heat will
not be dissipated as effectively.
If the coolant level is too low, MB 326.0
antifreeze/corrosion inhibitor should be
added. Have the cooling system checked for
leaks.
Windshield and headlamp cleaning
system
GWarning
Washer solvent/antifreeze is highly
flammable. Do not spill washer solvent/
antifreeze on hot engine parts, because it may
ignite and burn. You could be seriously
burned.
XUse MB Windshield Washer Concentrate
MB SummerFit.XAt temperatures above freezing: add 1
part MB SummerFit to 100 parts water, e.g.
1.34 fl oz (40 ml) MB SummerFit to 1 gal
(4.0 l) of water.XAt temperatures below freezing: add 1
part MB SummerFit to 100 parts washer
fluid, e.g. 1.34 fl oz (40 ml) MB SummerFit
to 1 gal (4.0 l) of water.
Vehicle data
Vehicle data, GLK 350
The data quoted here refers specifically to a
vehicle with standard equipment. Contact an
authorized Mercedes-Benz Center for the
data for all vehicle variants and trim levels.
i This vehicle is only available in the USA.
Vehicle dimensions, GLK 350Vehicle length178.3 in (4528 mm)179.4 in
(4556 mm) 39Vehicle width
including exterior
mirrors79.4 in (2016 mm)Vehicle height66.5 in (1688 mm)66.4 in (1686 mm) 39Wheel base108.5 in (2755 mm)Front track61.7 in (1568 mm)Rear track62.5 in (1589 mm)Ground clearance8.2 in (208 mm)40Turning circle37.7 ft (11.5 m)39
Vehicles with the AMG Sports package.
40 When the vehicle is loaded and ready to drive: fuel tank full, all fluids filled, with driver.Vehicle data299Technical dataBA 204.9 USA, CA Edition A 2011; 1; 6, en-USd2mwentsVersion: 3.0.3.62010-06-15T08:58:39+02:00 - Seite 299Z
Page 302 of 304

Vehicle weight, GLK 350Maximum roof
loadMaximum 165 lb
(75 kg)
Vehicle data, GLK 350 4MATIC
The data quoted here refers specifically to a
vehicle with standard equipment. Contact an
authorized Mercedes-Benz Center for the
data for all vehicle variants and trim levels.
Vehicle dimensions, GLK 350 4MATICVehicle length178.3 in (4528 mm)179.4 in
(4556 mm) 41Vehicle width
including exterior
mirrors79.4 in (2016 mm)Vehicle height66.5 in (1688 mm)66.4 in (1686 mm) 41Wheel base108.5 in (2755 mm)Front track61.7 in (1568 mm)Rear track62.5 in (1589 mm)Ground clearance8.2 in (208 mm)42Turning circle37.7 ft (11.5 m)Vehicle weight, GLK 350 4MATICMaximum roof
loadMaximum 165 lb
(75 kg)41 Vehicles with the AMG Sports package.
42 When the vehicle is loaded and ready to drive: fuel tank full, all fluids filled, with driver.300Vehicle dataTechnical data
BA 204.9 USA, CA Edition A 2011; 1; 6, en-USd2mwentsVersion: 3.0.3.62010-06-15T08:58:39+02:00 - Seite 300