2011 MERCEDES-BENZ GLK-Class ignition
[x] Cancel search: ignitionPage 81 of 304

Open or close the tailgate fully using the
automatic function if you have stopped the
tailgate in an intermediate position.
XPress and hold the F button on the
SmartKey until the tailgate opens.
or
XWhen the tailgate is unlocked, pull the
handle and let it go again immediately.
iYou can also close the tailgate manually
if it is fully opened.
! If you have opened the tailgate
automatically, you should wait a moment
before closing the tailgate manually.
Closing the trunk lid
GWarning!
Monitor the closing procedure carefully to
make sure no one is in danger of being
injured. To prevent possible personal injury,
always keep hands and fingers away from the
cargo compartment opening when closing the
tailgate. Be especially careful when small
children are around. To stop the closing
procedure, do one of the following:
RPress or pull the remote tailgate opening/
closing switch on the driver’s door.
RPress the tailgate closing switch.
RPress the KEYLESS-GO locking/closing
switch.
RPull outside handle on the tailgate.
RWhen no SmartKey is inserted in the starter
switch (vehicles with KEYLESS-GO: Make
sure the vehicle’s on-board electronics
have status 0): Press button F on the
SmartKey.
You can close the tailgate automatically using
the SmartKey, the closing button4 or the
locking button5.
Example: vehicle with the EASY-PACK tailgate andKEYLESS-GO
XTo close: press closing button : on the
tailgate or press and hold down the F
button on the SmartKey until the tailgate
closes.
XTo close and lock simultaneously:
Press locking button ; on the tailgate.
iThe tailgate can only be opened and
closed with the SmartKey if there is no
SmartKey in the ignition lock.
If the tailgate touches an object while
closing, the closing procedure is
interrupted and the tailgate reopens.
iOnly with KEYLESS-GO: if you leave a
KEYLESS-GO key in the cargo area, the
tailgate will not lock.
The tailgate is not closed unless a
KEYLESS-GO key is detected.
Automatic opening and closing from
the inside
You can open and close the tailgate from the
driver's seat when the vehicle is stationary.
GWarning!
Maintain sight of the area around the rear of
the vehicle while operating the tailgate with
the door-mounted remote tailgate switch.
Monitor the closing procedure carefully to
4For vehicles with the EASY-PACK tailgate only.5For vehicles with the EASY-PACK tailgate and KEYLESS-GO only.
Cargo compartment79Opening and closingBA 204.9 USA, CA Edition A 2011; 1; 6, en-USd2mwentsVersion: 3.0.3.62010-06-15T08:58:39+02:00 - Seite 79Z
Page 82 of 304

make sure no one is in danger of being
injured.
To interrupt the closing procedure, press or
pull the door-mounted remote tailgate switch.
GWarning!
To prevent possible personal injury, always
keep hands and fingers away from the cargo
compartment opening when closing the
tailgate. Be especially careful when small
children are around.
GWarning!
Make sure the tailgate is closed when the
engine is running and while driving. Among
other dangers, deadly carbon monoxide (CO)
gases may enter vehicle interior resulting in
unconsciousness and death.
GWarning!
Maintain sight of the area around the rear of
the vehicle while operating the tailgate with
the door-mounted remote tailgate switch.
Monitor the opening procedure carefully to
make sure no one is in danger of being
injured.
To interrupt the opening procedure, press or
pull the door-mounted remote tailgate switch.
When the SmartKey is not inserted in the
starter switch (vehicles with KEYLESS-GO:
Make sure the vehicle’s on-board electronics
have status 0): Press button F on the
SmartKey.
XTo open: pull remote operating switch :
for the tailgate until the tailgate opens.
XTo close: turn the SmartKey to position 1
or 2 in the ignition lock.
XPress remote operating switch for
tailgate : until the tailgate is closed.
You will hear an acoustic signal during the
closing procedure.
Limiting the opening angle of the
tailgate
Important safety guidelines
You can limit the opening angle of the
tailgate. This is possible in the top half of its
opening range, up to approximately
0.6 ft (20 cm) before the stop.
Limiting the opening angle can be useful if
there is not sufficient clearance above the
open tailgate, for example.
! Make sure there is sufficient clearance to
open the tailgate fully when setting the
opening angle. The tailgate could otherwise
be damaged. Ideally, set the opening angle
outside.
Activating the tailgate
XTo open the tailgate: pull the handle on
the tailgate.
XTo stop the opening procedure at the
desired position: press the close button
(Y page 78) on the tailgate or pull the
handle on the outside of the tailgate again.
XTo store the position: press and hold the
closing button on the tailgate until you hear
a short tone.
The opening angle limiter is activated. The
tailgate will now stop in the stored position
when opening.
iIf you wish to open the tailgate fully, pull
the handle of the tailgate again after it has
stopped automatically. This does not
delete the stored position.
80Cargo compartmentOpening and closing
BA 204.9 USA, CA Edition A 2011; 1; 6, en-USd2mwentsVersion: 3.0.3.62010-06-15T08:58:39+02:00 - Seite 80
Page 84 of 304

GWarning!
When opening or closing the door windows,
make sure there is no danger of anyone being
harmed by the opening/closing procedure.
The door windows are equipped with the
express operation and automatic reversal
function. If in express operation mode a door
window encounters an obstruction that
blocks its path, the automatic reversal
function will stop the door window and open
it slightly.
The door windows operate differently when
the switch is pulled and held. See the section
about the side windows.
The closing of the door windows can be
immediately halted by releasing the switch or,
if the switch was pulled past the resistance
point and released, by either pressing or
pulling the respective switch.
If a door window encounters an obstruction
that blocks its path in a circumstance where
you are closing the door windows by pressing
and holding button & on the SmartKey the
automatic reversal function will not operate.
Activate the override switch when children
are riding in the back seats of the vehicle. The
children may otherwise injure themselves,
e.g. by becoming trapped in the door window
opening.
GWarning!
Do not keep any part of your body up against
the window pane when opening a window. The
downward motion of the pane may pull that
part of your body down between the window
pane and the door frame and trap it there. If
there is a risk of entrapment, release the
switch and pull it to close the window.
Opening and closing the side
windows:Front left;Front right=Rear right?Rear left
The switches for all side windows are located
on the driver's door. There is also a switch on
each door for the corresponding side window.
i Operation of the side windows in the rear
compartment is not possible when the
override switch for the side windows is
activated.
XTurn the key to position 2 in the ignition
lock.
i You can continue to operate the side
windows after you switch off the engine.
This function remains active for five
minutes or until one of the front doors is
opened.
XTo open: press the corresponding switch.XTo close: pull the corresponding switch.
i
If you press the switch beyond the point
of resistance, an automatic opening/
closing process is started in the
corresponding direction. You can stop
automatic operation by pressing again.
82Side windowsOpening and closing
BA 204.9 USA, CA Edition A 2011; 1; 6, en-USd2mwentsVersion: 3.0.3.62010-06-15T08:58:39+02:00 - Seite 82
Page 86 of 304

Using KEYLESS-GO
The SmartKey with KEYLESS-GO must be
outside the vehicle but no more than 3 ft (1 m)
away from a door.
XClose all the doors.XTouch the sensor surface on door
handle : until the side windows and the
panorama roof with power tilt/sliding
panel are fully closed.
iMake sure you only touch sensor
surface :.
XMake sure that all the side windows and the
panorama roof with power tilt/sliding
panel are closed.
On vehicles with a panorama roof with power
tilt/sliding panel:
XTouch sensor surface : on the door
handle again until the roller sunblinds of the
panorama roof with power tilt/sliding
panel close.
XTo interrupt convenience closing:
release sensor surface : on the door
handle.
Resetting the side windows
You must reset all the side windows if the side
window cannot be closed fully.
XClose all the doors.XTurn the key to position 2 in the ignition
lock.
XPull on the corresponding switch on the
door control panel until the side window is
completely closed (Y page 82).
XHold the switch for an additional second.
If the side window opens again slightly:
XPull the corresponding switch again
immediately and hold it for approximately
one second.
Problems with the side windows
Problem: a side window cannot be closed
because objects are trapped between the
side window and the door frame.
XRemove the objects.XClose the side window.
Problem: a side window cannot be closed
because objects in the guide rail are
preventing the window from being raised.
XRemove the objects.XClose the side window.
Problem: a side window cannot be closed,
and you cannot see the cause.
GWarning!
Closing the side windows with increased force
or without the anti-entrapment feature could
lead to serious or even fatal injury. Make sure
that nobody can become trapped when
closing the side windows.
If a side window is obstructed during closing
and reopens again slightly:
XImmediately after the window blocks, pull
on the corresponding switch again until the
side window has closed.
The side window is closed with increased
force.
84Side windowsOpening and closing
BA 204.9 USA, CA Edition A 2011; 1; 6, en-USd2mwentsVersion: 3.0.3.62010-06-15T08:58:39+02:00 - Seite 84
Page 88 of 304

entire body parts or portions of them may
protrude from the passenger compartment.
! Only open the sliding sunroof if it is free
of snow and ice. Otherwise, malfunctions
may occur.
Do not allow anything to protrude from the
sliding sunroof. Otherwise, the seals could
be damaged.
! If the sliding sunroof cannot be opened or
closed due to a malfunction, contact a
qualified specialist workshop, e.g. an
authorized Mercedes-Benz Center.
! Do not forget that the weather can
change abruptly. Make certain that the
sliding sunroof is closed when you leave the
vehicle. The vehicle electronics can be
damaged if water enters the vehicle
interior.
i Resonance noises can occur in addition
to the usual airflow noises when the sliding
sunroof is open. They are caused by minor
pressure fluctuations in the vehicle interior.
Change the position of the sliding sunroof
or open a side window slightly to reduce or
eliminate these noises.Operating the panorama sliding
sunroof
Opening and closing
Overhead control panel
:To raise;To open=To close
The panorama roof with power tilt/sliding
panel can only be moved when the roller
sunblinds are open.
XTurn the key to position 2 in the ignition
lock.XPush or pull the 3 switch in the
corresponding direction.
i If you press the 3 switch beyond the
point of resistance, an automatic opening/
closing process is started in the
corresponding direction. You can stop
automatic operation by pressing again.
Automatic raising is only available if the
panorama roof with power tilt/sliding
panel is in the closed position.
Operating the roller sunblinds of the
panorama sliding sunroof
General notes
The roller sunblinds provide protection from
the sun. The two roller sunblinds can only be
opened and closed together when the
panorama roof with power tilt/sliding panel
is closed.
86Sliding sunroofOpening and closing
BA 204.9 USA, CA Edition A 2011; 1; 6, en-USd2mwentsVersion: 3.0.3.62010-06-15T08:58:39+02:00 - Seite 86
Page 89 of 304

GWarning
When opening the roller sunblinds, make sure
that nobody can be injured during the opening
procedure.
The roller sunblinds are equipped with the
express operation and anti-entrapment
features. If the roller sunblinds block during
the opening procedure, the anti-entrapment
feature stops the roller sunblinds and opens
them again slightly.
The opening procedure of the roller sunblinds
can be stopped immediately by releasing the
roof switch or by operating the roof switch in
any direction if the roof switch has been
pressed beyond the point of resistance and
has been released.
Opening and closing
Overhead control panel
:To open;To open=To closeXTurn the key to position 2 in the ignition
lock.XPush or pull the 3 switch in the
corresponding direction.
i If you press the 3 switch beyond the
point of resistance, an automatic opening/
closing process is started in the
corresponding direction. You can stop
automatic operation by pressing again.
Resetting the panorama roof with
power tilt/sliding panel and the roller
sunblinds
Reset the panorama roof with power tilt/
sliding panel and the roller sunblinds if the
panorama roof with power tilt/sliding panel
or the roller sunblind do not open smoothly.
! Do not open the panorama sliding sunroof
until it has been reset properly. Otherwise,
the panorama roof with power tilt/sliding
panel may lock in the open position.
If the panorama roof with power tilt/sliding
panel cannot be closed or adjusted,
contact a qualified specialist workshop,
e.g. a Mercedes-Benz Service Center.
XTurn the key to position 2 in the ignition
lock.XPress the 3 switch to the point of
resistance in the direction of arrow ; and
hold it until the roller sunblinds are fully
open.XPress the 3 switch to the point of
resistance in the direction of arrow ; and
hold it until the panorama roof with power
tilt/sliding panel has opened about 10 cm.XPull the 3 switch repeatedly to the point
of resistance in the direction of arrow =
until the panorama roof with power tilt/
sliding panel is fully closed.XKeep the 3 switch pulled for an
additional second.XPull the 3 switch to the point of
resistance in the direction of arrow = and
hold it until the roller sunblinds are fully
closed.XKeep the 3 switch pulled for an
additional second.XMake sure that the panorama roof with
power tilt/sliding panel can be opened fully
again ( Y page 86).XIf this is not the case, the previously
described steps must be repeated or you
should consult a qualified specialist
workshop.Sliding sunroof87Opening and closingBA 204.9 USA, CA Edition A 2011; 1; 6, en-USd2mwentsVersion: 3.0.3.62010-06-15T08:58:39+02:00 - Seite 87Z
Page 94 of 304

Do not drive the vehicle without the seat head
restraints. Head restraints are intended to
help reduce injuries during an accident.
! To avoid damage to the seats and the seat
heating, observe the following information:
R do not spill any liquids on the seats. If
liquid is spilled on the seats, dry them as
soon as possible.
R if the seat covers are damp or wet, do not
switch on the seat heating. The seat
heating should also not to be used to dry
the seats.
R clean the seat covers as recommended;
see the " Interior care" section.
R do not transport heavy loads on the
seats. Do not place sharp objects on the
seat cushions, e.g. knives, nails or tools.
The seats should only be occupied by
passengers, if possible.
R when the seat heating is in operation, do
not cover the seats with insulating
materials, e.g. covers, bags, seat covers,
child seats or booster seats.
! When you move the seats, make sure that
there are no objects in the footwell or
behind the seats. Otherwise, you could
damage the seats and the objects.
i The head restraints in the front seats are
installed with the NECK-PRO system
( Y page 49). For this reason, it is not
possible to remove the head restraints
from the front seats.
The rear-compartment head restraints can
be removed ( Y page 94).
Please contact an authorized Mercedes-
Benz Center for more information.
i Related topics:
R Cargo compartment enlargement
(folding the rear bench seat forwards)
( Y page 208)Adjusting the seats
i Vehicles without the memory function:
the seats can be adjusted within five
minutes of opening a front door.
The time span starts over if, within these
five minutes, you:
R open or close a front door
R insert the key into or remove the key
from the ignition lock
R switch the ignition on or off.
If the key is in position 2 in the ignition, you
can adjust the seats at any time.
Depending on the equipment, the seat
adjustment switches are located either on the
side of the seat or on the door control panel.:Seat cushion angle;Seat height=Seat fore-and-aft adjustment?Backrest angleAHead restraint height 66
Only for vehicles with the memory function.92SeatsSeats, steering wheel and mirrors
BA 204.9 USA, CA Edition A 2011; 1; 6, en-USd2mwentsVersion: 3.0.3.62010-06-15T08:58:39+02:00 - Seite 92
Page 97 of 304
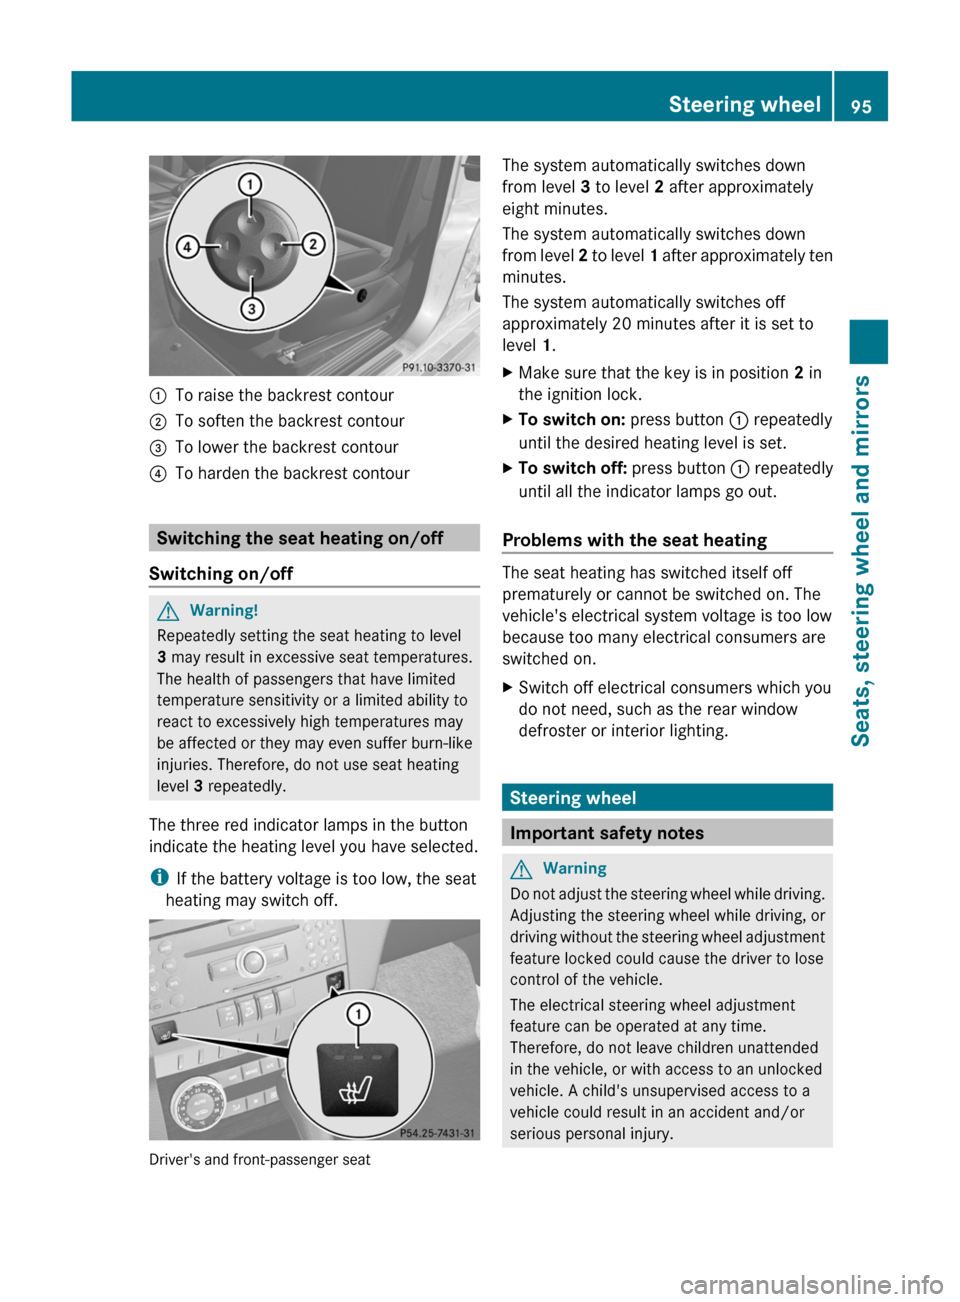
:To raise the backrest contour;To soften the backrest contour=To lower the backrest contour?To harden the backrest contour
Switching the seat heating on/off
Switching on/off
GWarning!
Repeatedly setting the seat heating to level
3 may result in excessive seat temperatures.
The health of passengers that have limited
temperature sensitivity or a limited ability to
react to excessively high temperatures may
be affected or they may even suffer burn-like
injuries. Therefore, do not use seat heating
level 3 repeatedly.
The three red indicator lamps in the button
indicate the heating level you have selected.
iIf the battery voltage is too low, the seat
heating may switch off.
Driver's and front-passenger seat
The system automatically switches down
from level 3 to level 2 after approximately
eight minutes.
The system automatically switches down
from level 2 to level 1 after approximately ten
minutes.
The system automatically switches off
approximately 20 minutes after it is set to
level 1.
XMake sure that the key is in position 2 in
the ignition lock.
XTo switch on: press button : repeatedly
until the desired heating level is set.
XTo switch off: press button : repeatedly
until all the indicator lamps go out.
Problems with the seat heating
The seat heating has switched itself off
prematurely or cannot be switched on. The
vehicle's electrical system voltage is too low
because too many electrical consumers are
switched on.
XSwitch off electrical consumers which you
do not need, such as the rear window
defroster or interior lighting.
Steering wheel
Important safety notes
GWarning
Do not adjust the steering wheel while driving.
Adjusting the steering wheel while driving, or
driving without the steering wheel adjustment
feature locked could cause the driver to lose
control of the vehicle.
The electrical steering wheel adjustment
feature can be operated at any time.
Therefore, do not leave children unattended
in the vehicle, or with access to an unlocked
vehicle. A child's unsupervised access to a
vehicle could result in an accident and/or
serious personal injury.
Steering wheel95Seats, steering wheel and mirrorsBA 204.9 USA, CA Edition A 2011; 1; 6, en-USd2mwentsVersion: 3.0.3.62010-06-15T08:58:39+02:00 - Seite 95Z