2011 MERCEDES-BENZ GLK-Class heating
[x] Cancel search: heatingPage 201 of 304

ProblemPossible causes/consequences and M Solutionsä
The yellow ESP ®
warning lamp flashes
while the vehicle is in
motion.At least one wheel is spinning and ETS (Electronic Traction
System) is deactivated to prevent the brakes on the drive wheels
from overheating.XObserve the additional display messages in the multifunction
display.
ETS switches back on again as soon as the brakes have cooled
down.
The display message disappears and the ä warning lamp goes
out.
å
The yellow ESP ®
OFF
warning lamp is lit while
the engine is running.GRisk of accident
ESP ®
and ESP ®
trailer stabilization are deactivated. ESP ®
will not
stabilize the vehicle if it starts to skid or if a wheel starts to spin.
XReactivate ESP ®
.
Exceptions: ( Y page 63).XAdapt your driving style to suit the road and weather conditions.
If ESP ®
cannot be activated:
XHave ESP ®
checked at a qualified specialist workshop.äå
The yellow ESP ®
and
ESP ®
OFF warning
lamps are lit while the
engine is running.GRisk of accident
ESP ®
, BAS, hill start assist and ESP ®
trailer stabilization are not
available, due to a malfunction. ESP ®
will not stabilize the vehicle
if it starts to skid or if a wheel starts to spin.
The brake system continues to function normally, but without the
functions listed above.
XObserve the additional display messages in the multifunction
display.XDrive on carefully.XVisit a qualified specialist workshop.6
The red SRS warning
lamp is lit while the
engine is running.GRisk of injury
The restraint systems are malfunctioning. The air bags or ETDs
may either be triggered unintentionally or, in the event of an
accident, not be triggered at all.
XDrive on carefully.XVisit a qualified specialist workshop immediately.GWarning
In the event a malfunction of the SRS is indicated as outlined above, the SRS may not be
operational.
Warning and indicator lamps in the instrument cluster199On-board computer and displaysBA 204.9 USA, CA Edition A 2011; 1; 6, en-USd2mwentsVersion: 3.0.3.62010-06-15T08:58:39+02:00 - Seite 199Z
Page 218 of 304

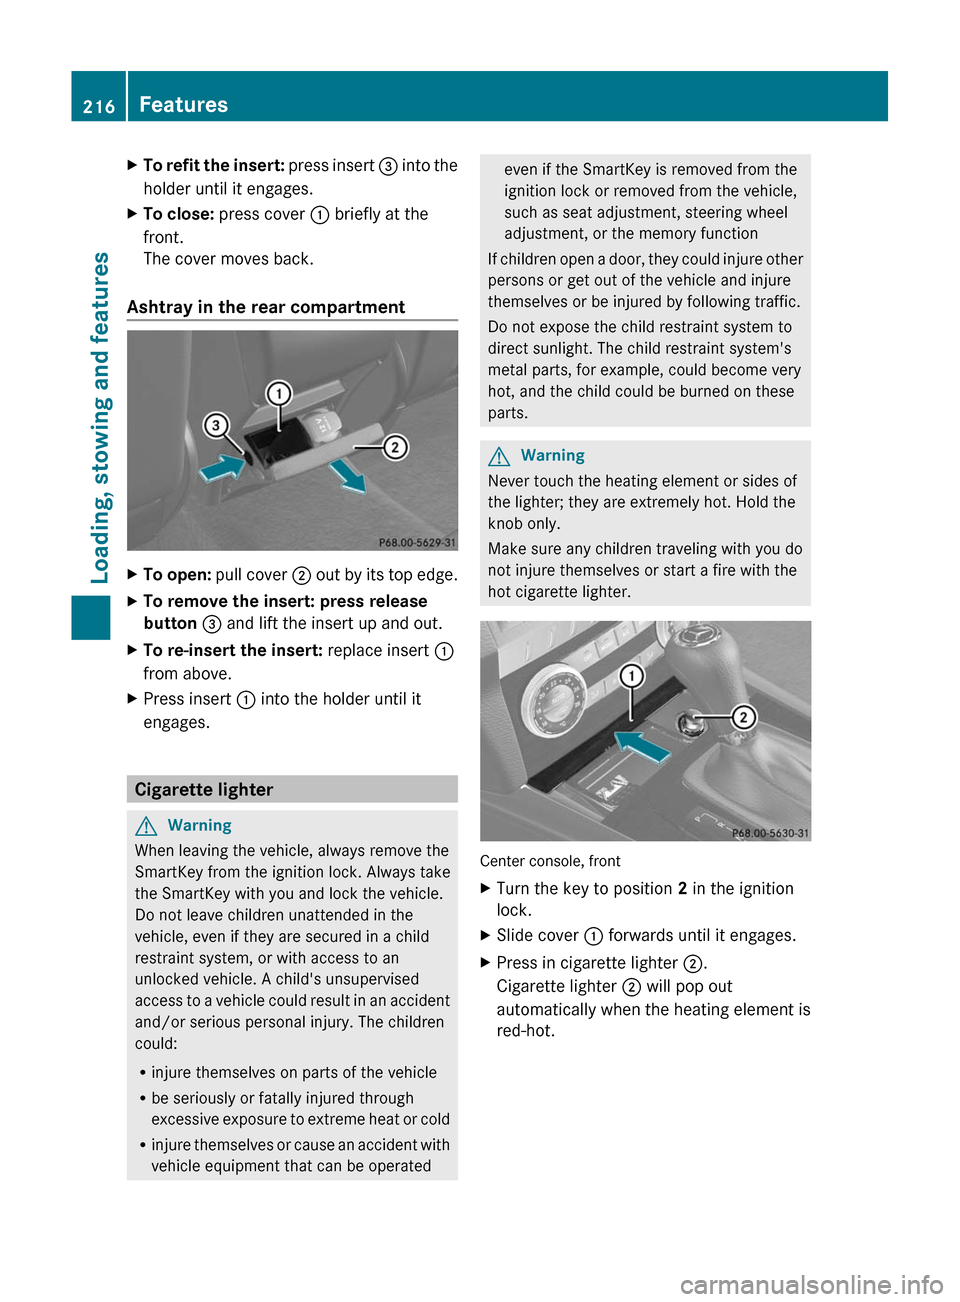
XTo refit the insert: press insert = into the
holder until it engages.
XTo close: press cover : briefly at the
front.
The cover moves back.
Ashtray in the rear compartment
XTo open: pull cover ; out by its top edge.XTo remove the insert: press release
button = and lift the insert up and out.
XTo re-insert the insert: replace insert :
from above.
XPress insert : into the holder until it
engages.
Cigarette lighter
GWarning
When leaving the vehicle, always remove the
SmartKey from the ignition lock. Always take
the SmartKey with you and lock the vehicle.
Do not leave children unattended in the
vehicle, even if they are secured in a child
restraint system, or with access to an
unlocked vehicle. A child's unsupervised
access to a vehicle could result in an accident
and/or serious personal injury. The children
could:
Rinjure themselves on parts of the vehicle
Rbe seriously or fatally injured through
excessive exposure to extreme heat or cold
Rinjure themselves or cause an accident with
vehicle equipment that can be operated
even if the SmartKey is removed from the
ignition lock or removed from the vehicle,
such as seat adjustment, steering wheel
adjustment, or the memory function
If children open a door, they could injure other
persons or get out of the vehicle and injure
themselves or be injured by following traffic.
Do not expose the child restraint system to
direct sunlight. The child restraint system's
metal parts, for example, could become very
hot, and the child could be burned on these
parts.
GWarning
Never touch the heating element or sides of
the lighter; they are extremely hot. Hold the
knob only.
Make sure any children traveling with you do
not injure themselves or start a fire with the
hot cigarette lighter.
Center console, front
XTurn the key to position 2 in the ignition
lock.
XSlide cover : forwards until it engages.XPress in cigarette lighter ;.
Cigarette lighter ; will pop out
automatically when the heating element is
red-hot.
216FeaturesLoading, stowing and features
BA 204.9 USA, CA Edition A 2011; 1; 6, en-USd2mwentsVersion: 3.0.3.62010-06-15T08:58:39+02:00 - Seite 216
Page 230 of 304

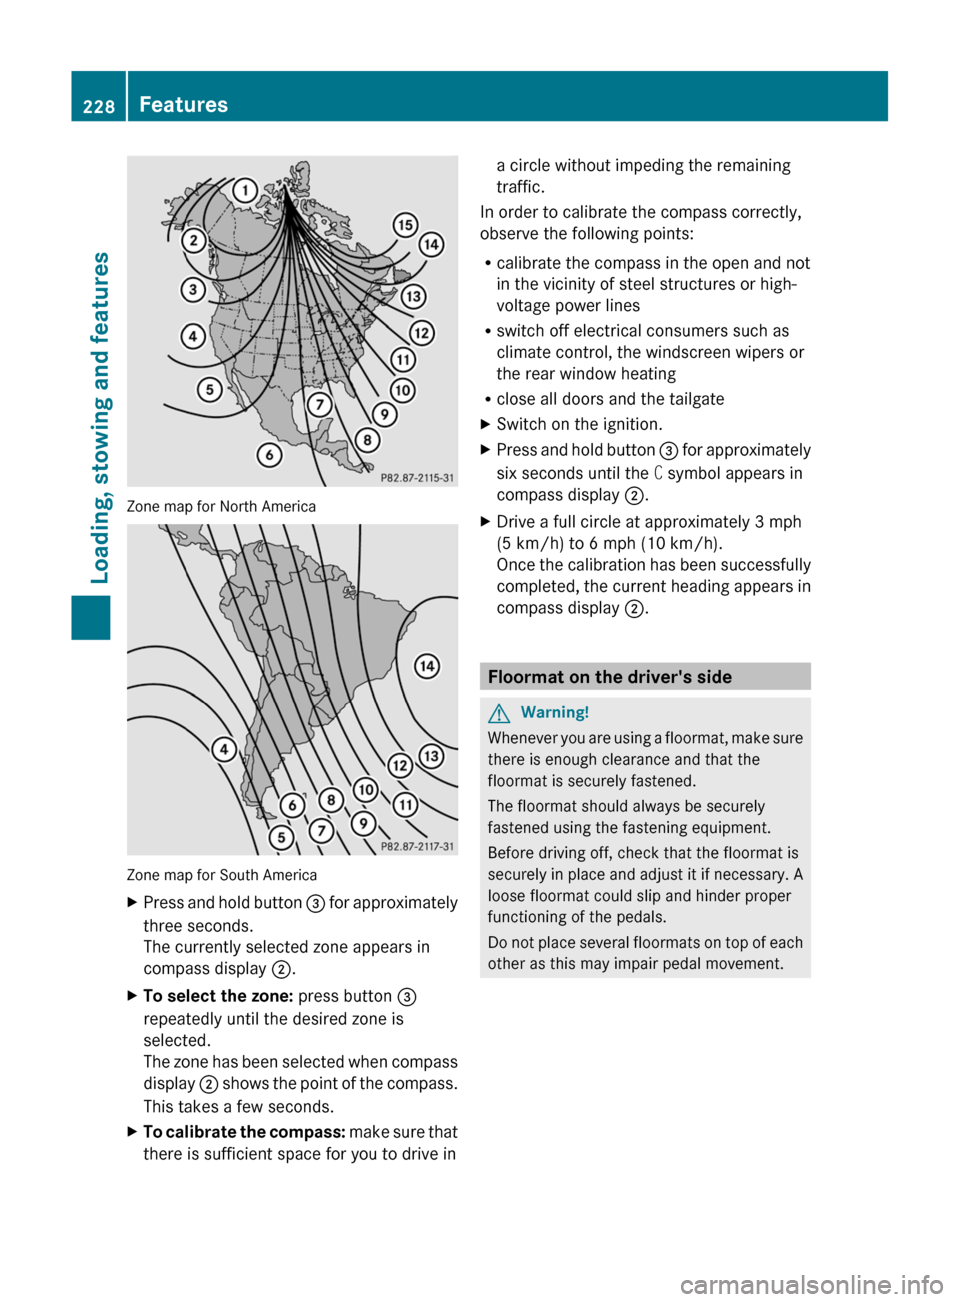
Zone map for North America
Zone map for South America
XPress and hold button = for approximately
three seconds.
The currently selected zone appears in
compass display ;.XTo select the zone: press button =
repeatedly until the desired zone is
selected.
The zone has been selected when compass
display ; shows the point of the compass.
This takes a few seconds.XTo calibrate the compass: make sure that
there is sufficient space for you to drive ina circle without impeding the remaining
traffic.
In order to calibrate the compass correctly,
observe the following points:
R calibrate the compass in the open and not
in the vicinity of steel structures or high-
voltage power lines
R switch off electrical consumers such as
climate control, the windscreen wipers or
the rear window heating
R close all doors and the tailgate
XSwitch on the ignition.XPress and hold button = for approximately
six seconds until the C symbol appears in
compass display ;.XDrive a full circle at approximately 3 mph
(5 km/h) to 6 mph (10 km/h).
Once the calibration has been successfully
completed, the current heading appears in
compass display ;.
Floormat on the driver's side
GWarning!
Whenever you are using a floormat, make sure
there is enough clearance and that the
floormat is securely fastened.
The floormat should always be securely
fastened using the fastening equipment.
Before driving off, check that the floormat is
securely in place and adjust it if necessary. A
loose floormat could slip and hinder proper
functioning of the pedals.
Do not place several floormats on top of each
other as this may impair pedal movement.
228FeaturesLoading, stowing and features
BA 204.9 USA, CA Edition A 2011; 1; 6, en-USd2mwentsVersion: 3.0.3.62010-06-15T08:58:39+02:00 - Seite 228
Page 240 of 304

carefully after washing the vehicle until the
brakes have dried.
You can wash the vehicle in an automatic car
wash from the very start.
! Never clean your vehicle in a Touchless
Automatic Car Wash as these use special
cleaning agents. These cleaning agents can
damage the paintwork or plastic parts.
If the vehicle is very dirty, pre-wash it before
cleaning it in an automatic car wash.
! In car washes with a towing mechanism,
make sure that AUTOTRONIC is in
transmission position N, otherwise the
vehicle could be damaged.
! Make sure that the side windows are
completely closed, that the ventilation/
heating is switched off and that the
windshield wiper switch is set to 0.
Otherwise, the rain/light sensor could be
activated, triggering unintended wiper
movements. This can cause damage to the
vehicle.
After using an automatic car wash, wipe off
wax from the windshield and the wiper
blades. This will prevent smears and reduce
wiping noises caused by residue on the
windshield.
Washing by hand
Carefully remove all deposits of road salt as
soon as possible when driving in winter.
Also, clean the insides of the wheels when
washing the underbody of the vehicle.
XDo not use hot water and do not wash the
vehicle in direct sunlight.XUse a soft car sponge for cleaning.XUse a gentle cleaning agent, e.g. a
Mercedes-Benz approved car shampoo.XWash down the vehicle with a gentle water
jet.XDo not point the water jet directly at the air
inlets.XUse plenty of water and rinse the sponge
frequently.XRinse the vehicle with clean water and dry
it thoroughly with a chamois.XDo not allow the cleaning agent to dry on
the paintwork.
Power washers
GWarning!
Do not use power washers with circular-jet
nozzles (dirt grinders) to clean your vehicle, in
particular the tires. You could otherwise
damage the tires and cause an accident.
! Keep the distance between the vehicle
and the nozzle of the power washer at
11.8 in (30 cm). Information about the
correct distance is available from the
equipment manufacturer.
Move the power washer nozzle around
when cleaning your vehicle.
Do not aim directly at any of the following:
R tires
R door joint
R electrical components
R battery
R connectors
R lights
R seals
R trim elements
R ventilation slots
Damaged seals or electrical components
can lead to leaks or failures.
Cleaning the wheels
! Do not use acidic wheel cleaning products
to remove brake dust. This could damage
wheel bolts and brake components.
! Do not park the vehicle for an extended
period right after cleaning it, particularly
after having cleaned the wheels with wheel
cleaner. Wheel cleaners could cause
increased corrosion of the brake discs and
238CareMaintenance and care
BA 204.9 USA, CA Edition A 2011; 1; 6, en-USd2mwentsVersion: 3.0.3.62010-06-15T08:58:39+02:00 - Seite 238
Page 301 of 304

overheating. In the Service Booklet, you can
find information on the intervals for renewal.
The renewal interval is determined by the
coolant type and the cooling system design.
The renewal interval in the Service Booklet is
only valid if the coolant is added or renewed
with Mercedes-Benz approved products.
Therefore, only use MB 326.0 antifreeze/
corrosion inhibitor or another Mercedes-Benz
approved product of the same specification.
Information on other Mercedes-Benz
approved products of the same specification
can be obtained at any authorized Mercedes-
Benz Center or on the Internet at
http://bevo.mercedes-benz.com .
The coolant is checked at every service date
at an authorized Mercedes-Benz Center.
The antifreeze/corrosion inhibitor
concentration in the cooling system should:
R be at least 50%. This will protect the cooling
system against freezing down to around
-35 ‡ (-37 †).
R not exceed 55% (antifreeze protection
down to -49 ‡ (-45 †); otherwise, heat will
not be dissipated as effectively.
If the coolant level is too low, MB 326.0
antifreeze/corrosion inhibitor should be
added. Have the cooling system checked for
leaks.
Windshield and headlamp cleaning
system
GWarning
Washer solvent/antifreeze is highly
flammable. Do not spill washer solvent/
antifreeze on hot engine parts, because it may
ignite and burn. You could be seriously
burned.
XUse MB Windshield Washer Concentrate
MB SummerFit.XAt temperatures above freezing: add 1
part MB SummerFit to 100 parts water, e.g.
1.34 fl oz (40 ml) MB SummerFit to 1 gal
(4.0 l) of water.XAt temperatures below freezing: add 1
part MB SummerFit to 100 parts washer
fluid, e.g. 1.34 fl oz (40 ml) MB SummerFit
to 1 gal (4.0 l) of water.
Vehicle data
Vehicle data, GLK 350
The data quoted here refers specifically to a
vehicle with standard equipment. Contact an
authorized Mercedes-Benz Center for the
data for all vehicle variants and trim levels.
i This vehicle is only available in the USA.
Vehicle dimensions, GLK 350Vehicle length178.3 in (4528 mm)179.4 in
(4556 mm) 39Vehicle width
including exterior
mirrors79.4 in (2016 mm)Vehicle height66.5 in (1688 mm)66.4 in (1686 mm) 39Wheel base108.5 in (2755 mm)Front track61.7 in (1568 mm)Rear track62.5 in (1589 mm)Ground clearance8.2 in (208 mm)40Turning circle37.7 ft (11.5 m)39
Vehicles with the AMG Sports package.
40 When the vehicle is loaded and ready to drive: fuel tank full, all fluids filled, with driver.Vehicle data299Technical dataBA 204.9 USA, CA Edition A 2011; 1; 6, en-USd2mwentsVersion: 3.0.3.62010-06-15T08:58:39+02:00 - Seite 299Z