2011 MERCEDES-BENZ GLK-Class oil
[x] Cancel search: oilPage 236 of 304

Adding engine oilHEnvironmental note
When adding oil, take care not to spill any. If
oil enters the soil or waterways, it is harmful
to the environment.
! Only use engine oils and oil filters which
have been approved for vehicles with a
service system. A list of the engine oils and
oil filters that have been tested and
approved according to the Mercedes-Benz
specifications for service products can be
found on the Internet at http://
www.mbusa.com (USA only). Further
information on tested and approved engine
oils and oil filters can be obtained from any
authorized Mercedes-Benz Center.
The following causes engine failure or
damage to the exhaust system:
Rusing engine oils and oil filters that are
not specifically approved for the service
system
Rreplacing the engine oil and oil filter later
than the specified replacement interval
required by the service system
Rusing engine oil additives
Example: engine oil cap
XTurn cap : counter-clockwise and remove
it.
XAdd the amount of oil required.
Fill carefully to the maximum mark on the oil
dipstick.
iThe difference in quantity between the
MIN mark and the MAX mark on the
dipstick is (depending on the engine)
approximately 1.6 to 2.1 US qt. (1.5 to 2 l).
! Do not add too much oil. If the oil level is
above the MAX mark on the dipstick, too
much oil has been added. This can lead to
damage to the engine or the catalytic
converter. Have excess oil siphoned off.
Further information on engine oil
(Y page 297).
XReplace cap : on the filler neck and
tighten clockwise.
Ensure that the cap locks into place
securely.
Checking and adding other service
products
Checking the coolant level
Only check the coolant level when the vehicle
is on a level surface and the engine has cooled
down.
XTurn the SmartKey to position
2(Y page 129) in the ignition lock.
On vehicles with KEYLESS-GO, press the
Start/Stop button twice (Y page 129).
XCheck the coolant temperature display in
the instrument cluster.
The coolant temperature must be below
158 ‡ (70 †).
GWarning
In order to avoid any potentially serious burns:
Ruse extreme caution when opening the
hood if there are any signs of steam or
coolant leaking from the cooling system, or
if the coolant temperature display indicates
that the coolant is overheated.
Rdo not remove the pressure cap on the
coolant reservoir if the coolant temperature
is above 158 ‡ (70 †). Allow the engine to
cool down before removing the cap. The
234Engine compartmentMaintenance and care
BA 204.9 USA, CA Edition A 2011; 1; 6, en-USd2mwentsVersion: 3.0.3.62010-06-15T08:58:39+02:00 - Seite 234
Page 241 of 304

brake pads/linings. For this reason, you
should drive for a few minutes after
cleaning. Braking heats the brake discs and
brake pads, thus drying them. The vehicle
can then be parked up.
Cleaning the paintwork
Scratches, corrosive deposits, areas affected
by corrosion and damage caused by
inadequate care cannot always be completely
repaired. In such cases, visit a qualified
specialist workshop immediately, e.g. an
authorized Mercedes-Benz Center.
XRemove impurities immediately, where
possible, whilst avoiding rubbing too hard.XSoak insect remains with insect remover
and rinse off the treated areas afterwards.XSoak bird droppings with water and rinse
off the treated areas afterwards.XRemove coolant, brake fluid, tree resin,
oils, fuels and greases by rubbing gently
with a cloth soaked in petroleum ether or
lighter fluid.XUse tar remover to remove tar stains.XUse silicone remover to remove wax.
! Do not affix:
R stickers
R films
R magnetic plates or similar items
to painted surfaces. You could otherwise
damage the paintwork.
If water no longer forms "beads" on the
painted surface, paint care products should
be used that have been approved and
recommended by Mercedes-Benz. This is the
case approximately every three to five
months, depending on climatic conditions
and the care product used.
If dirt has entered the paint surface or the
paintwork has become dull, a paint cleaner
should be used that has been approved and
recommended by Mercedes-Benz.
Never use such care products in direct
sunlight or on a hot hood.
XUse a suitable touch-up stick, e.g. MB
Touch Up stick, for quick, temporary repair
of damaged paintwork.
Cleaning the windows
GWarning
Switch off the windshield wipers and remove
the SmartKey from the ignition lock before
cleaning the windshield or the wiper blades.
On vehicles with KEYLESS-GO, press the
Start/Stop button repeatedly until all
indicator lamps in the instrument cluster have
gone off. The windshield wipers could
otherwise move and injure you.
! Only fold the windshield wipers away from
the windshield when vertical. Otherwise,
you will damage the hood.
XClean the inside and outside of the
windows with a damp cloth and a cleaning
agent that is recommended and approved
by Mercedes-Benz.
! Do not use dry cloths, abrasive products,
solvents or cleaning agents containing
solvents to clean the inside of the windows.
Do not use hard objects to clean the insides
of the windows, e.g. an ice scraper or ring.
There is otherwise a risk of damaging the
windows.
! Clean the water drainage channels of the
windshield and the rear window at regular
intervals. Deposits such as leaves, petals
and pollen may under certain
circumstances prevent water from draining
away. This can lead to corrosion damage
and damage to electronic components.
Cleaning the wiper blades
GWarning
Switch off the windshield wipers and remove
the SmartKey from the ignition lock before
cleaning the windshield or the wiper blades.
On vehicles with KEYLESS-GO, press the
Start/Stop button repeatedly until all
Care239Maintenance and careBA 204.9 USA, CA Edition A 2011; 1; 6, en-USd2mwentsVersion: 3.0.3.62010-06-15T08:58:39+02:00 - Seite 239Z
Page 243 of 304

Cleaning the exhaust tail pipes
Impurities combined with the effects of road
grit and corrosive environmental factors may
cause flash rust to form on the surface. You
can restore the original shine of the exhaust
tail pipe by cleaning it regularly, especially in
winter and after washing.
! Do not clean the exhaust tail pipes with
alkaline-based cleaning agents, such as
wheel cleaner.
XClean the exhaust tail pipes with a chrome
care product tested and approved by
Mercedes-Benz.
Interior care
Cleaning the display
XBefore cleaning the display, make sure that
it is switched off and has cooled down.XClean the display surface using a
commercially-available microfiber cloth
and TFT/LCD display cleaner.XDry the display surface using a dry
microfiber cloth.
! For cleaning, do not use any of the
following:
R alcohol-based thinner or gasoline
R abrasive cleaning agents
R commercially-available household
cleaning agents
These may damage the display surface. Do
not put pressure on the display surface
when cleaning. This could lead to
irreparable damage to the display.
Cleaning the plastic trim
GWarning!
When cleaning the steering wheel boss and
dashboard, do not use cockpit sprays or
cleaning agents containing solvents. Cleaning
agents containing solvents cause the surface
to become porous, and as a result, plastic
parts may break away and be thrown around
the interior when an air bag is deployed, which
may result in severe injuries.
! Do not affix the following to plastic
surfaces:
R stickers
R films
R scented oil bottles or similar items
You can otherwise damage the plastic.
! Do not allow cosmetics, insect repellent
or sunscreen to come into contact with the
plastic trim. This maintains the high-quality
look of the surfaces.XWipe the plastic trim with a damp, lint-free
cloth, e.g. a microfiber cloth.XHeavy soiling: use car care and cleaning
products recommended and approved by
Mercedes-Benz.
The surface may change color temporarily.
Wait until the surface is dry again.
Cleaning the steering wheel and gear or
selector lever
XWash thoroughly with a damp cloth or use
a leather care agent that has been
recommended and approved by Mercedes-
Benz.
Cleaning real wood and trim strips
XWipe the wooden trim and trim strips with
a damp, lint-free cloth, e.g. a microfiber
cloth.XHeavy soiling: use car care and cleaning
products recommended and approved by
Mercedes-Benz.
! Do not use solvent-based cleaning agents
such as tar remover, wheel cleaners,
polishes or waxes. There is otherwise a risk
of damaging the surface.
! Do not use chrome polish for trim strips.
The trim strips have a chrome look but are
mostly made of anodized aluminum and
Care241Maintenance and careBA 204.9 USA, CA Edition A 2011; 1; 6, en-USd2mwentsVersion: 3.0.3.62010-06-15T08:58:39+02:00 - Seite 241Z
Page 244 of 304

can lose their shine if chrome polish is
used. Use a damp, lint-free cloth instead
when cleaning the trim strips.
Chrome polish can be used to remove very
heavy soiling from trim strips which you are
sure are made of chrome. If you are unsure
as to whether a trim strip is chrome-plated
or not, consult an authorized Mercedes-
Benz Center.
Cleaning the seat covers
! Do not use microfiber cloths to clean
genuine leather, artificial leather or
Alcantara ®
covers. If used often, these can
damage the cover.
! Observe the following when cleaning:
R clean genuine leather covers carefully
with a damp cloth and then wipe the
covers down with a dry cloth. Make sure
that the leather does not become
soaked. It may otherwise become rough
and cracked. Only use leather care
agents that have been tested and
approved by Mercedes-Benz. You can
obtain these from a qualified specialist
workshop, e.g. an authorized Mercedes-
Benz Center.
R clean artificial leather covers with a cloth
moistened with a solution containing 1%
detergent (e.g. dish washing liquid).
R clean cloth covers with a microfiber cloth
moistened with a solution containing 1%
detergent (e.g. dish washing liquid). Rub
carefully and always wipe entire seat
sections to avoid leaving visible lines.
Leave the seat to dry afterwards.
Cleaning results depend on the type of
dirt and how long it has been there.
R clean Alcantara ®
covers with a damp
cloth. Make sure you wipe entire seat
sections to avoid leaving visible lines.
i Note that regular care is essential to
ensure that the appearance and comfort of
the covers is retained over time.
Cleaning the seat beltsXUse clean, luke-warm water and soap
solution.
! Do not clean the seat belts using chemical
cleaning agents. Do not dry the seat belts
by warming them above 176 ‡ (80 †) or
placing them in direct sunlight.
GWarning
Do not bleach or dye seat belts as this may
severely weaken them. In a crash, they may
not be able to provide adequate protection.
Cleaning the headliner and carpets
XRoof lining: use soft brushes or dry
shampoo if it is particularly dirty.XCarpets: use carpet and textile cleaners
that have been approved and
recommended by Mercedes-Benz.242CareMaintenance and care
BA 204.9 USA, CA Edition A 2011; 1; 6, en-USd2mwentsVersion: 3.0.3.62010-06-15T08:58:39+02:00 - Seite 242
Page 252 of 304

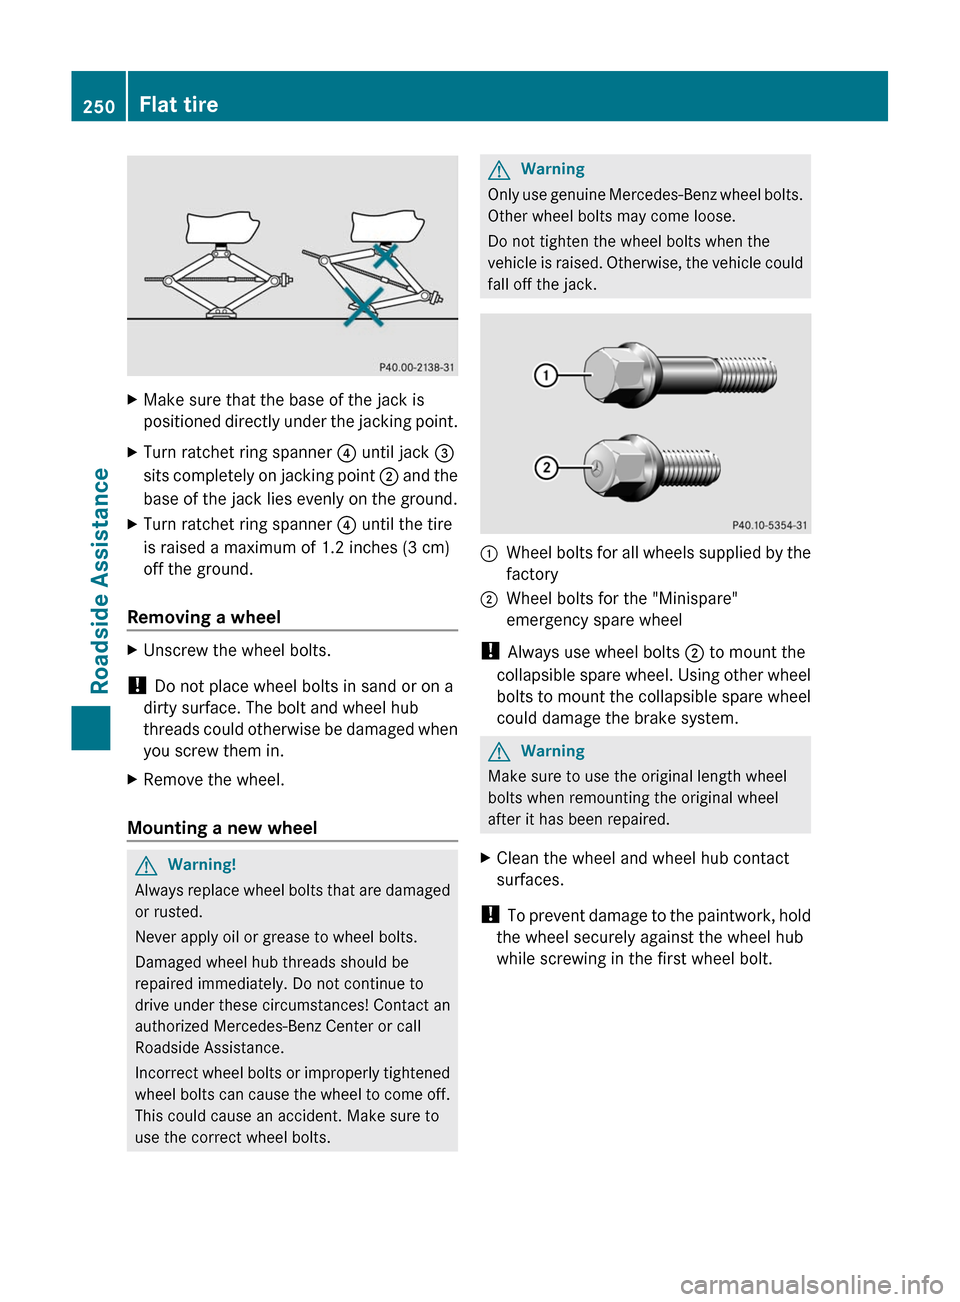
XMake sure that the base of the jack is
positioned directly under the jacking point.XTurn ratchet ring spanner ? until jack =
sits completely on jacking point ; and the
base of the jack lies evenly on the ground.XTurn ratchet ring spanner ? until the tire
is raised a maximum of 1.2 inches (3 cm)
off the ground.
Removing a wheel
XUnscrew the wheel bolts.
! Do not place wheel bolts in sand or on a
dirty surface. The bolt and wheel hub
threads could otherwise be damaged when
you screw them in.
XRemove the wheel.
Mounting a new wheel
GWarning!
Always replace wheel bolts that are damaged
or rusted.
Never apply oil or grease to wheel bolts.
Damaged wheel hub threads should be
repaired immediately. Do not continue to
drive under these circumstances! Contact an
authorized Mercedes-Benz Center or call
Roadside Assistance.
Incorrect wheel bolts or improperly tightened
wheel bolts can cause the wheel to come off.
This could cause an accident. Make sure to
use the correct wheel bolts.
GWarning
Only use genuine Mercedes-Benz wheel bolts.
Other wheel bolts may come loose.
Do not tighten the wheel bolts when the
vehicle is raised. Otherwise, the vehicle could
fall off the jack.
:Wheel bolts for all wheels supplied by the
factory;Wheel bolts for the "Minispare"
emergency spare wheel
! Always use wheel bolts ; to mount the
collapsible spare wheel. Using other wheel
bolts to mount the collapsible spare wheel
could damage the brake system.
GWarning
Make sure to use the original length wheel
bolts when remounting the original wheel
after it has been repaired.
XClean the wheel and wheel hub contact
surfaces.
! To prevent damage to the paintwork, hold
the wheel securely against the wheel hub
while screwing in the first wheel bolt.
250Flat tireRoadside Assistance
BA 204.9 USA, CA Edition A 2011; 1; 6, en-USd2mwentsVersion: 3.0.3.62010-06-15T08:58:39+02:00 - Seite 250
Page 268 of 304

Depending upon the weather and/or road
surface (conditions), the tire traction varies
widely.
Do not use tires until they are excessively
worn as the tire traction on wet road surfaces
decreases significantly when the tread depth
is less than 1
/ 8 in (3 mm).
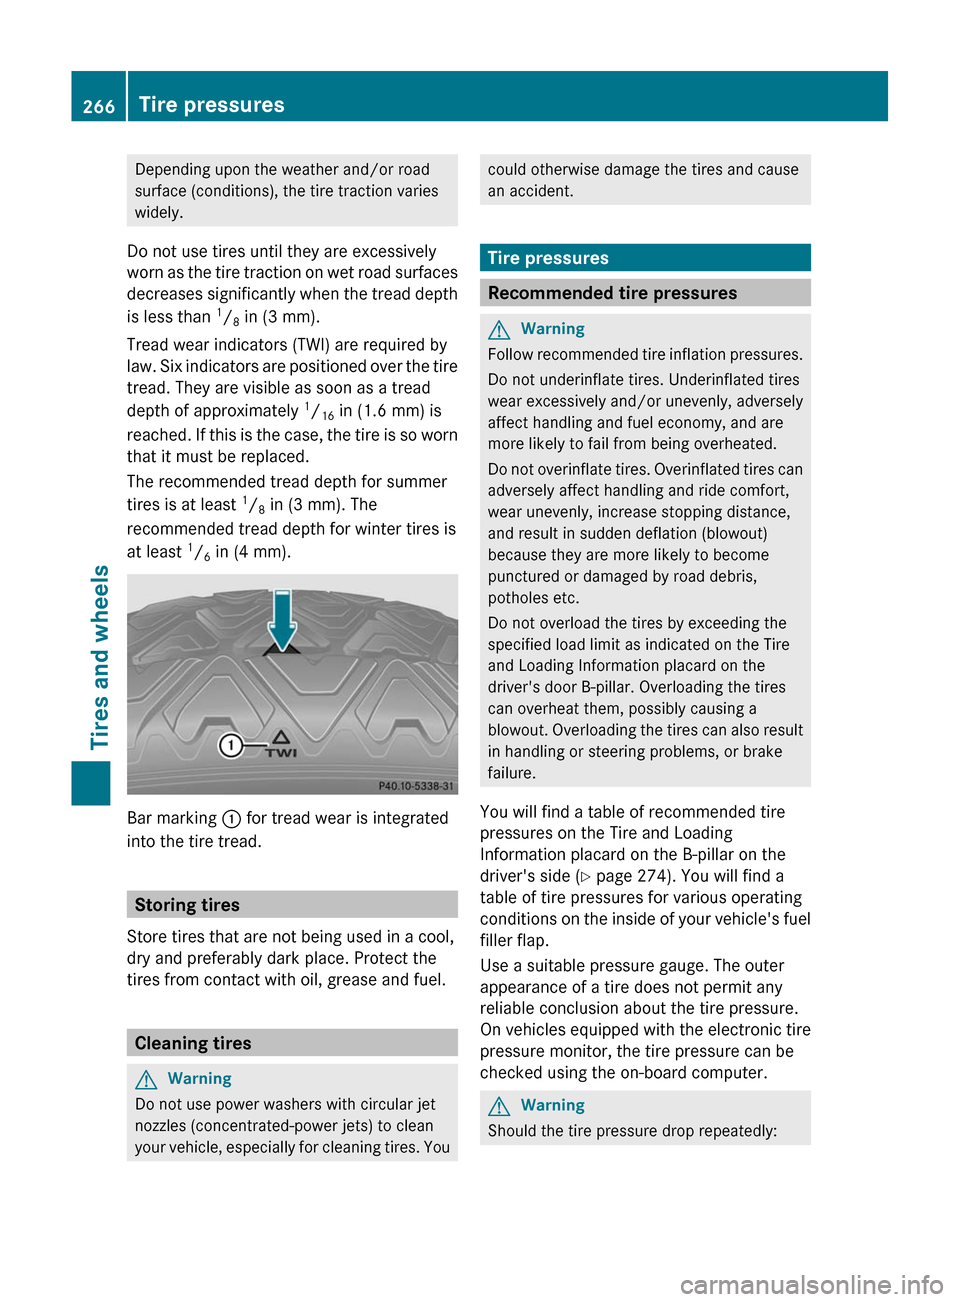
Tread wear indicators (TWI) are required by
law. Six indicators are positioned over the tire
tread. They are visible as soon as a tread
depth of approximately 1
/ 16 in (1.6 mm) is
reached. If this is the case, the tire is so worn
that it must be replaced.
The recommended tread depth for summer
tires is at least 1
/ 8 in (3 mm). The
recommended tread depth for winter tires is
at least 1
/ 6 in (4 mm).
Bar marking
: for tread wear is integrated
into the tire tread.
Storing tires
Store tires that are not being used in a cool,
dry and preferably dark place. Protect the
tires from contact with oil, grease and fuel.
Cleaning tires
GWarning
Do not use power washers with circular jet
nozzles (concentrated-power jets) to clean
your vehicle, especially for cleaning tires. You
could otherwise damage the tires and cause
an accident.
Tire pressures
Recommended tire pressures
GWarning
Follow recommended tire inflation pressures.
Do not underinflate tires. Underinflated tires
wear excessively and/or unevenly, adversely
affect handling and fuel economy, and are
more likely to fail from being overheated.
Do not overinflate tires. Overinflated tires can
adversely affect handling and ride comfort,
wear unevenly, increase stopping distance,
and result in sudden deflation (blowout)
because they are more likely to become
punctured or damaged by road debris,
potholes etc.
Do not overload the tires by exceeding the
specified load limit as indicated on the Tire
and Loading Information placard on the
driver's door B-pillar. Overloading the tires
can overheat them, possibly causing a
blowout. Overloading the tires can also result
in handling or steering problems, or brake
failure.
You will find a table of recommended tire
pressures on the Tire and Loading
Information placard on the B-pillar on the
driver's side ( Y page 274). You will find a
table of tire pressures for various operating
conditions on the inside of your vehicle's fuel
filler flap.
Use a suitable pressure gauge. The outer
appearance of a tire does not permit any
reliable conclusion about the tire pressure.
On vehicles equipped with the electronic tire
pressure monitor, the tire pressure can be
checked using the on-board computer.
GWarning
Should the tire pressure drop repeatedly:
266Tire pressuresTires and wheels
BA 204.9 USA, CA Edition A 2011; 1; 6, en-USd2mwentsVersion: 3.0.3.62010-06-15T08:58:39+02:00 - Seite 266
Page 287 of 304

Wheel rim
The part of the wheel on which the tire is
mounted.
GAWR (Gross Axle Weight Rating)
The GAWR is the maximum gross axle weight
rating. The actual load on an axle must never
exceed the gross axle weight rating. The
gross axle weight rating can be found on the
vehicle identification plate on the B-pillar on
the driver's side.
Speed index
The speed index is part of the tire
identification. Specifies the speed range for
which the tire is approved.
GTW (Gross Trailer Weight)
The GTW is the weight of a trailer including
the weight of the load, luggage, accessories
etc. on the trailer.
GVW (Gross Vehicle Weight)
The gross vehicle weight includes the weight
of the vehicle including fuel, tools, the spare
wheel, accessories installed, occupants,
luggage and the drawbar noseweight if
applicable. The gross vehicle weight must not
exceed the gross vehicle weight rating GVWR
as specified on the vehicle identification plate
on the B-pillar on the driver's side.
GVWR (Gross Vehicle Weight Rating)
The GVWR is the maximum permissible gross
weight of a fully loaded vehicle (the weight of
the vehicle including all accessories,
occupants, fuel, luggage and the drawbar
noseweight if applicable). The gross vehicle
weight rating is specified on the vehicle
identification plate on the B-pillar on the
driver's side.
Maximum weight of the laden vehicle
The maximum weight is the sum of the
unladen weight of the vehicle, the weight of
the accessories, the maximum load and the
weight of the optional equipment installed at
the factory.
Kilopascal (kPa)
Metric unit for tire pressure. 6.9 kPa is the
equivalent of 1 psi. Another unit for tire
pressure is bar. 100 kilopascal (kPa) is the
equivalent of 1 bar.
Load index
In addition to the load bearing index, the load
index may also be imprinted on the sidewall
of the tire. This specifies the load bearing
capacity more precisely.
Unladen weight
The weight of a vehicle with standard
equipment including the maximum capacity
of fuel, oil and coolant. It also includes the air-
conditioning system and optional equipment
if these are installed on the vehicle, but does
not include passengers or luggage.
Maximum tire load
The maximum tire load in kilograms or
pounds is the maximum weight for which a
tire is approved.
Maximum permissible tire pressure
Maximum permissible tire pressure for one
tire.
Definitions for tires and loading285Tires and wheelsBA 204.9 USA, CA Edition A 2011; 1; 6, en-USd2mwentsVersion: 3.0.3.62010-06-15T08:58:39+02:00 - Seite 285Z
Page 296 of 304

Engine number:Emissions control information label,
including the certification of both federal
and Californian emissions reference
values;Engine number (stamped into the
crankcase)=VIN (on the lower edge of the windshield)
Service products and capacities
Important safety notes
Service products include the following:
R fuels (e.g. gasoline, diesel)
R lubricants (e.g. engine oil, transmission oil)
R coolant
R brake fluid
R windshield washer fluid
Vehicle components and their respective
lubricants must match. You should therefore
only use products that have been tested and
approved by Mercedes-Benz.
Information on tested and approved products
can be obtained at an authorized Mercedes-
Benz Center or on the Internet at http://
www.mbusa.com (USA only).
GWarning
Comply with all valid regulations with respect
to handling, storing and disposing of service
fluids. Otherwise, you could endanger
persons or the environment.
Keep service fluids out of the reach of
children.
For health reasons, you should prevent
service fluids from coming into direct contact
with your skin or clothing.
If a service fluid is swallowed, contact a
physician immediately.
294Service products and capacitiesTechnical data
BA 204.9 USA, CA Edition A 2011; 1; 6, en-USd2mwentsVersion: 3.0.3.62010-06-15T08:58:39+02:00 - Seite 294