2011 MERCEDES-BENZ GL350 BlueTEC lock
[x] Cancel search: lockPage 118 of 376
With the engine running: depending on the
brightness of the ambient light, the daytime
running lamps 11
or the low-beam
headlamps are switched on or off
automatically.
When the low-beam headlamps are
switched on, the L indicator lamp in the
instrument cluster lights up.
Fog lamps and rear fog lamps
Front fog lamps
Only vehicles with front fog lamps have the
"fog lamps" function.
GWarning!
If you suspect that driving conditions will be
foggy, turn the light switch to L before you
start your journey. Otherwise, your vehicle
may not be visible and you could endanger
yourself and others.
GWarning
In low ambient lighting or foggy conditions,
only switch from position à to L with
the vehicle at a standstill in a safe location.
Switching from à to L will briefly
switch off the headlamps. Doing so while
driving in low ambient lighting conditions may
result in an accident.
XTo switch on the front fog lamps: turn
the key in the ignition lock to position 2 or
start the engine.XTurn the light switch to L or T . If the
light switch is set to Ã, you cannot
switch on the fog lamps.XPull the light switch out to the first detent.
The green N indicator lamp on the light
switch lights up.XTo switch off the front fog lamps: press
the light switch in as far as it will go.
The green N indicator lamp on the light
switch goes out.Rear fog lampXTo switch on (vehicles with front fog
lamps): turn the key in the ignition lock to
position 2 or start the engine.XTurn the light switch to L or T . When
the light switch is set to Ã, you cannot
switch on the rear fog lamp.XPull the light switch out to the second stop.
The yellow R indicator lamp on the light
switch lights up.XTo switch off the rear fog lamp: press the
light switch in as far as it will go.
The yellow R indicator lamp on the light
switch goes out.XTo switch on (vehicles without front fog
lamps): turn the key in the ignition lock to
position 2 or start the engine.XTurn the light switch to L. When the
light switch is set to Ã, you cannot
switch on the rear fog lamp.XPull the light switch out to the stop.
The yellow R indicator lamp on the light
switch lights up.XTo switch off the rear fog lamp: press the
light switch in as far as it will go.
The yellow R indicator lamp on the light
switch goes out.11 Only if daytime running lamps have been activated via the on-board computer.116Exterior lightingLights and windshield wipers
BA 164.8 USA, CA Edition B 2011; 1; 2, en-USd2sboikeVersion: 3.0.3.52010-04-21T15:08:44+02:00 - Seite 116
Page 119 of 376

Combination switch
Turn signals:High-beam headlamps;Right turn signal=High beam flasher?Left turn signalXTo indicate briefly: press the combination
switch briefly to the pressure point in the
direction of arrow ; or ?.
The corresponding turn signal flashes three
times.XTo indicate: press the combination switch
beyond the pressure point in the direction
of arrow ; or ?.
High-beam headlamps
XTo switch on the high-beam headlamps:
turn the key in the ignition lock to position
2 or start the engine.XTurn the light switch to L.XPress the combination switch beyond the
pressure point in the direction of
arrow :.
The K indicator lamp in the instrument
cluster lights up.XTo switch off the high-beam
headlamps: move the combination switch
back to its normal position.
The K indicator lamp in the instrument
cluster goes out.High beam flasherXTo switch on: turn the key in the ignition
lock to position 1 or 2 or start the engine.XPull the combination switch briefly in the
direction of arrow =.
Hazard warning lamps
The hazard warning lamps automatically
switch on:
R if an air bag is deployed
R the vehicle decelerates rapidly from a
speed of more than 45 mph (70 km/h) and
comes to a standstill.
XTo switch on the hazard warning lamps:
press button :.
All turn signals flash. If you now switch on
a turn signal using the combination switch,
only the turn signal lamp on the
corresponding side of the vehicle will flash.XTo switch off the hazard warning
lamps: press button :.
The hazard warning lamp switches off
automatically after full brake application if the
vehicle then reaches a speed above
6 mph (10 km/h) again.
i The hazard warning lamps still operate if
the ignition is switched off.
Headlamp cleaning system
The headlamps are cleaned automatically if
the "Wipe with washer fluid" function is
Exterior lighting117Lights and windshield wipersBA 164.8 USA, CA Edition B 2011; 1; 2, en-USd2sboikeVersion: 3.0.3.52010-04-21T15:08:44+02:00 - Seite 117Z
Page 121 of 376
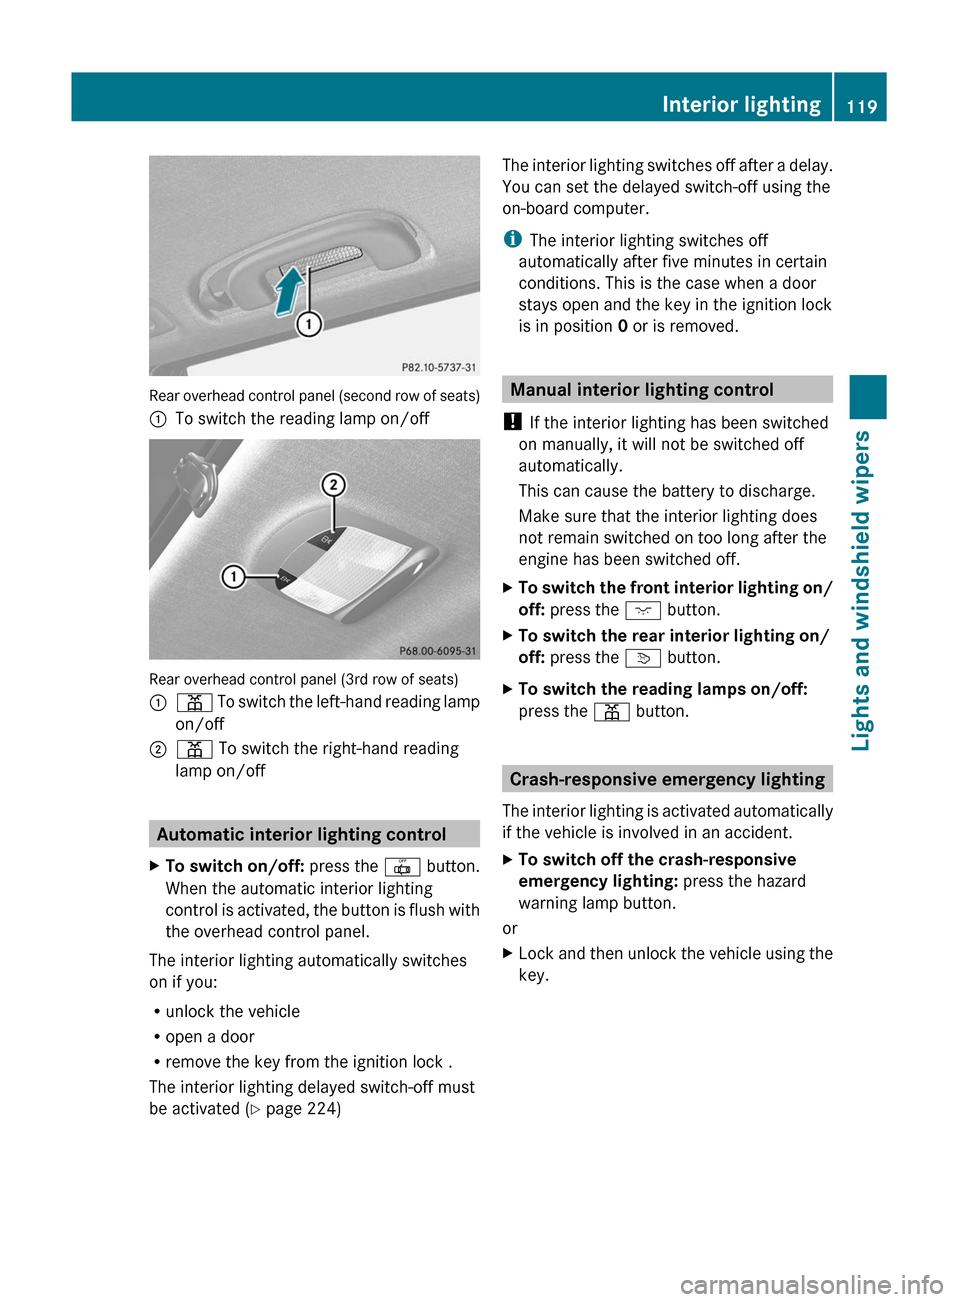
Rear overhead control panel (second row of seats)
:To switch the reading lamp on/off
Rear overhead control panel (3rd row of seats)
:p To switch the left-hand reading lamp
on/off;p To switch the right-hand reading
lamp on/off
Automatic interior lighting control
XTo switch on/off: press the | button.
When the automatic interior lighting
control is activated, the button is flush with
the overhead control panel.
The interior lighting automatically switches
on if you:
R unlock the vehicle
R open a door
R remove the key from the ignition lock .
The interior lighting delayed switch-off must
be activated ( Y page 224)
The interior lighting switches off after a delay.
You can set the delayed switch-off using the
on-board computer.
i The interior lighting switches off
automatically after five minutes in certain
conditions. This is the case when a door
stays open and the key in the ignition lock
is in position 0 or is removed.
Manual interior lighting control
! If the interior lighting has been switched
on manually, it will not be switched off
automatically.
This can cause the battery to discharge.
Make sure that the interior lighting does
not remain switched on too long after the
engine has been switched off.
XTo switch the front interior lighting on/
off: press the c button.XTo switch the rear interior lighting on/
off: press the v button.XTo switch the reading lamps on/off:
press the p button.
Crash-responsive emergency lighting
The interior lighting is activated automatically
if the vehicle is involved in an accident.
XTo switch off the crash-responsive
emergency lighting: press the hazard
warning lamp button.
or
XLock and then unlock the vehicle using the
key.Interior lighting119Lights and windshield wipersBA 164.8 USA, CA Edition B 2011; 1; 2, en-USd2sboikeVersion: 3.0.3.52010-04-21T15:08:44+02:00 - Seite 119Z
Page 124 of 376
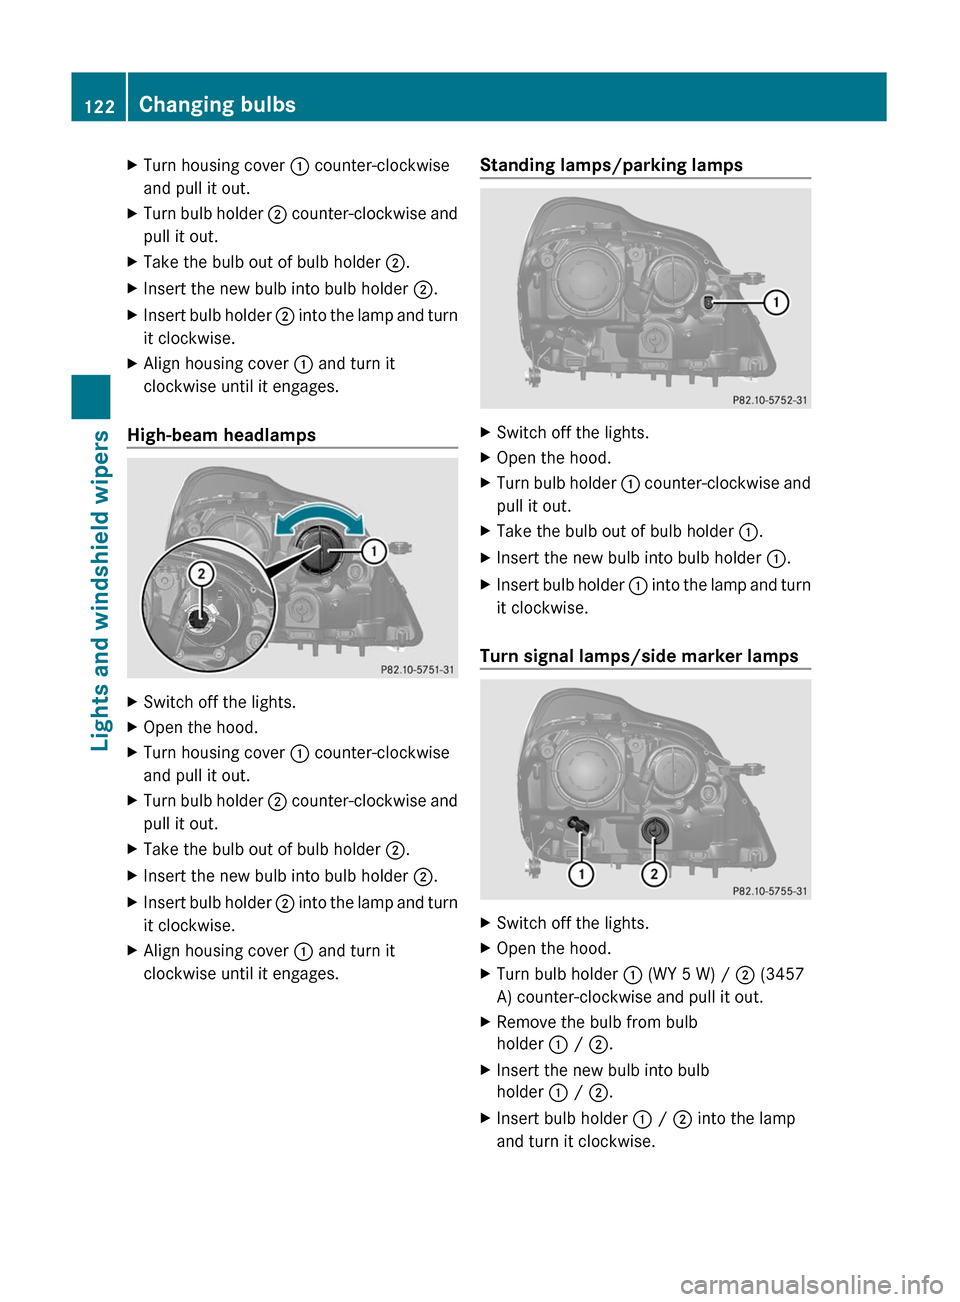
XTurn housing cover : counter-clockwise
and pull it out.XTurn bulb holder ; counter-clockwise and
pull it out.XTake the bulb out of bulb holder ;.XInsert the new bulb into bulb holder ;.XInsert bulb holder ; into the lamp and turn
it clockwise.XAlign housing cover : and turn it
clockwise until it engages.
High-beam headlamps
XSwitch off the lights.XOpen the hood.XTurn housing cover : counter-clockwise
and pull it out.XTurn bulb holder ; counter-clockwise and
pull it out.XTake the bulb out of bulb holder ;.XInsert the new bulb into bulb holder ;.XInsert bulb holder ; into the lamp and turn
it clockwise.XAlign housing cover : and turn it
clockwise until it engages.Standing lamps/parking lampsXSwitch off the lights.XOpen the hood.XTurn bulb holder : counter-clockwise and
pull it out.XTake the bulb out of bulb holder :.XInsert the new bulb into bulb holder :.XInsert bulb holder : into the lamp and turn
it clockwise.
Turn signal lamps/side marker lamps
XSwitch off the lights.XOpen the hood.XTurn bulb holder : (WY 5 W) / ; (3457
A) counter-clockwise and pull it out.XRemove the bulb from bulb
holder : / ; .XInsert the new bulb into bulb
holder : / ; .XInsert bulb holder : / ; into the lamp
and turn it clockwise.122Changing bulbsLights and windshield wipers
BA 164.8 USA, CA Edition B 2011; 1; 2, en-USd2sboikeVersion: 3.0.3.52010-04-21T15:08:44+02:00 - Seite 122
Page 125 of 376
Changing the rear bulbs
Opening/closing the side trim
You must open the side trim panel in the
cargo compartment before you can change
the bulbs in the tail lamps.
Left-hand side trim panel
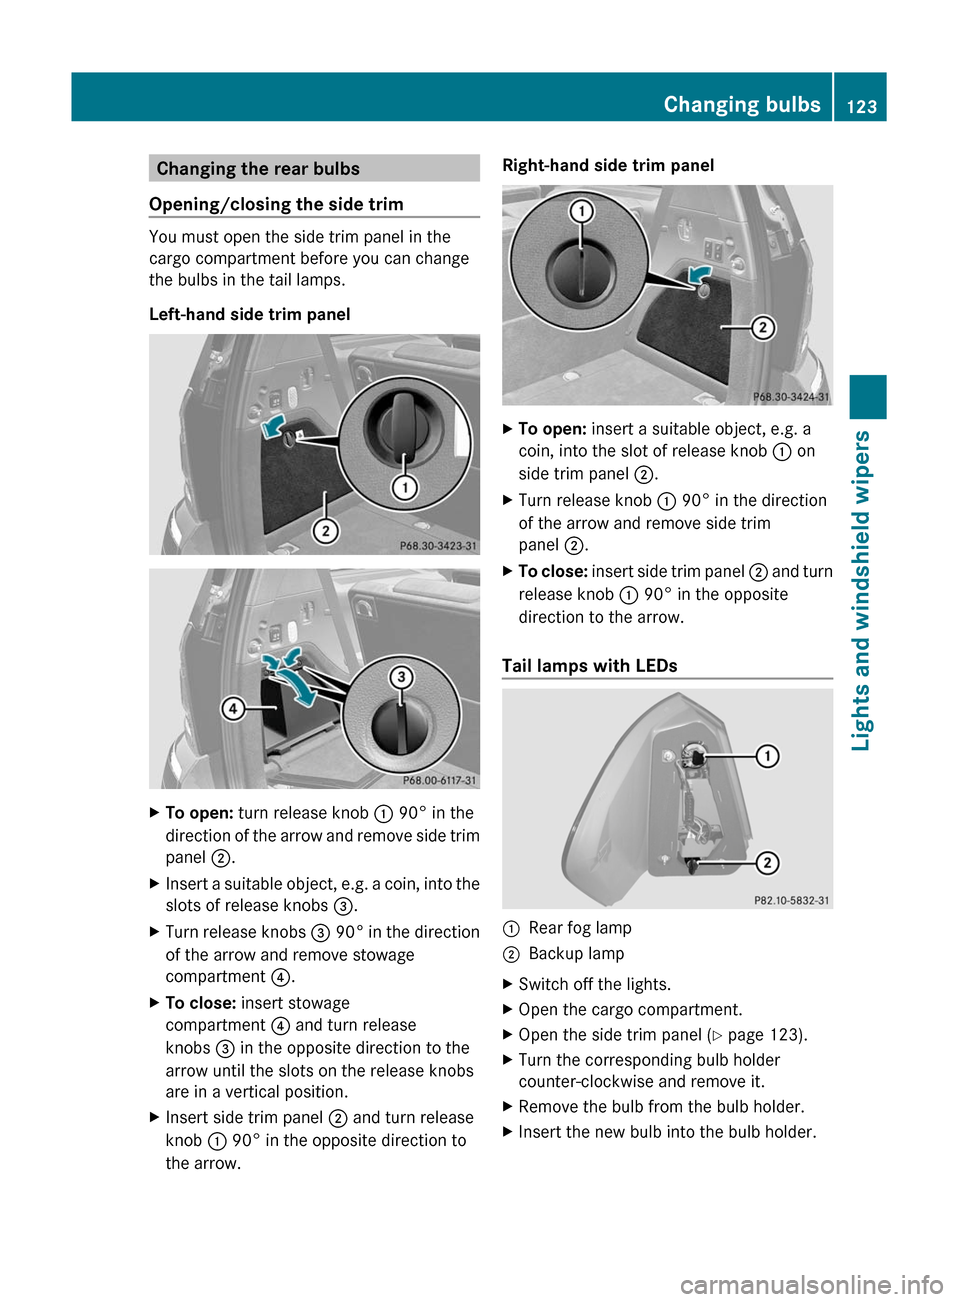
XTo open: turn release knob : 90° in the
direction of the arrow and remove side trim
panel ;.XInsert a suitable object, e.g. a coin, into the
slots of release knobs =.XTurn release knobs = 90° in the direction
of the arrow and remove stowage
compartment ?.XTo close: insert stowage
compartment ? and turn release
knobs = in the opposite direction to the
arrow until the slots on the release knobs
are in a vertical position.XInsert side trim panel ; and turn release
knob : 90° in the opposite direction to
the arrow.Right-hand side trim panelXTo open: insert a suitable object, e.g. a
coin, into the slot of release knob : on
side trim panel ;.XTurn release knob : 90° in the direction
of the arrow and remove side trim
panel ;.XTo close: insert side trim panel ; and turn
release knob : 90° in the opposite
direction to the arrow.
Tail lamps with LEDs
:Rear fog lamp ;Backup lamp XSwitch off the lights.XOpen the cargo compartment.XOpen the side trim panel ( Y page 123).XTurn the corresponding bulb holder
counter-clockwise and remove it.XRemove the bulb from the bulb holder.XInsert the new bulb into the bulb holder.Changing bulbs123Lights and windshield wipersBA 164.8 USA, CA Edition B 2011; 1; 2, en-USd2sboikeVersion: 3.0.3.52010-04-21T15:08:44+02:00 - Seite 123Z
Page 126 of 376

XInsert the bulb holder and turn it clockwise.XClose the side trim panel (Y page 123).
License plate lamp
XSwitch off the lights.XOpen the tailgate.XRemove screws :.XRemove the license plate lamp.XReplace the bulb.XInsert the license plate lamp.XReplace and tighten screws :.
Setting the headlamps
:V vertical axis;H (horizontal) height, measured from the
center
Setting the headlamps correctly is extremely
important. Setting the high-beam headlamps
also sets the low-beam headlamps. (The term
headlamps covers both high and low beam.)
To check and adapt the headlamp setting,
proceed as follows:
XPark the vehicle on level ground at a
distance of 25 feet (7.6 m) from a wall or
similar.
XMake sure that the vehicle load is in the
normal range.
XSwitch on the L low-beam headlamps.
If the light of the headlamps is not distributed
as shown in the illustration above, follow the
instructions below:
XOpen the hood (Y page 294).
The adjustment screws are located under the
cover.
XInsert a suitable tool into the openings in
the cover. The directions of arrow =
and ? indicate the angle at which the tool
needs to be inserted in order to reach the
adjustment screws.
XTurn both screws uniformly until the
vertical setting corresponds to :. Turn the
screws clockwise to adjust the headlamp
upwards and counterclockwise to adjust it
downwards.
Gradation:
RScrew at arrow =: 0.67˚ angle of
inclination
RScrew at arrow ?: 0.50˚ angle of
inclination
The left and right headlamp need to be
adjusted individually.
iIf it is not possible to adjust the
headlamps accurately, have the
124Changing bulbsLights and windshield wipers
BA 164.8 USA, CA Edition B 2011; 1; 2, en-USd2sboikeVersion: 3.0.3.52010-04-21T15:08:44+02:00 - Seite 124
Page 128 of 376

prevents a person from being splashed
inadvertently when getting into or out of the
vehicle.
Intermittent wiping continues when all doors
are closed and
R you shift the automatic transmission to
drive position D or reverse gear R
or
R you change the wipe setting on the
combination switch.
i To prevent smearing on the windshield or
noise when wiping, wipe the windshield
occasionally with washer fluid.
Switching the rear window wiper on/
off
Combination switch
:è Switch2ô To wipe with washer fluid3I To switch on intermittent wiping40 To switch off intermittent wiping5ô To wipe with washer fluidXTurn the key to position 1 or 2 in the ignition
lock.XTurn switch : on the combination switch
to the corresponding position.
When the rear window wiper is switched on,
the icon appears in the instrument cluster.Replacing the wiper blades
Important safety notesGWarning
For safety reasons, switch off the windshield
wipers and remove the key from the ignition
lock before changing the wiper blades
(vehicles with KEYLESS-GO: make sure that
the on-board electronics are in state 0).
Otherwise, the wiper motor could be switched
on suddenly and cause injury.
! To avoid damaging the wiper blades,
make sure that you touch only the wiper
arm of the wiper.
! Never open the hood if a windshield wiper
arm has been folded away from the
windshield.
Never fold a windshield wiper arm without
a wiper blade back onto the windshield.
Hold the windshield wiper arm firmly when
you change the wiper blade. If you release
the windshield wiper arm without a wiper
blade and it falls onto the windshield, the
windshield can be damaged by the force of
the impact.
Mercedes-Benz recommends that you have
the wiper blades replaced by a qualified
specialist workshop, e.g. at an authorized
Mercedes-Benz Center.
Replacing the windshield wiper blades
Removing the wiper blades
XRemove the SmartKey from the ignition
lock.XFold the wiper arm away from the
windshield.126Windshield wipersLights and windshield wipers
BA 164.8 USA, CA Edition B 2011; 1; 2, en-USd2sboikeVersion: 3.0.3.52010-04-21T15:08:44+02:00 - Seite 126
Page 129 of 376
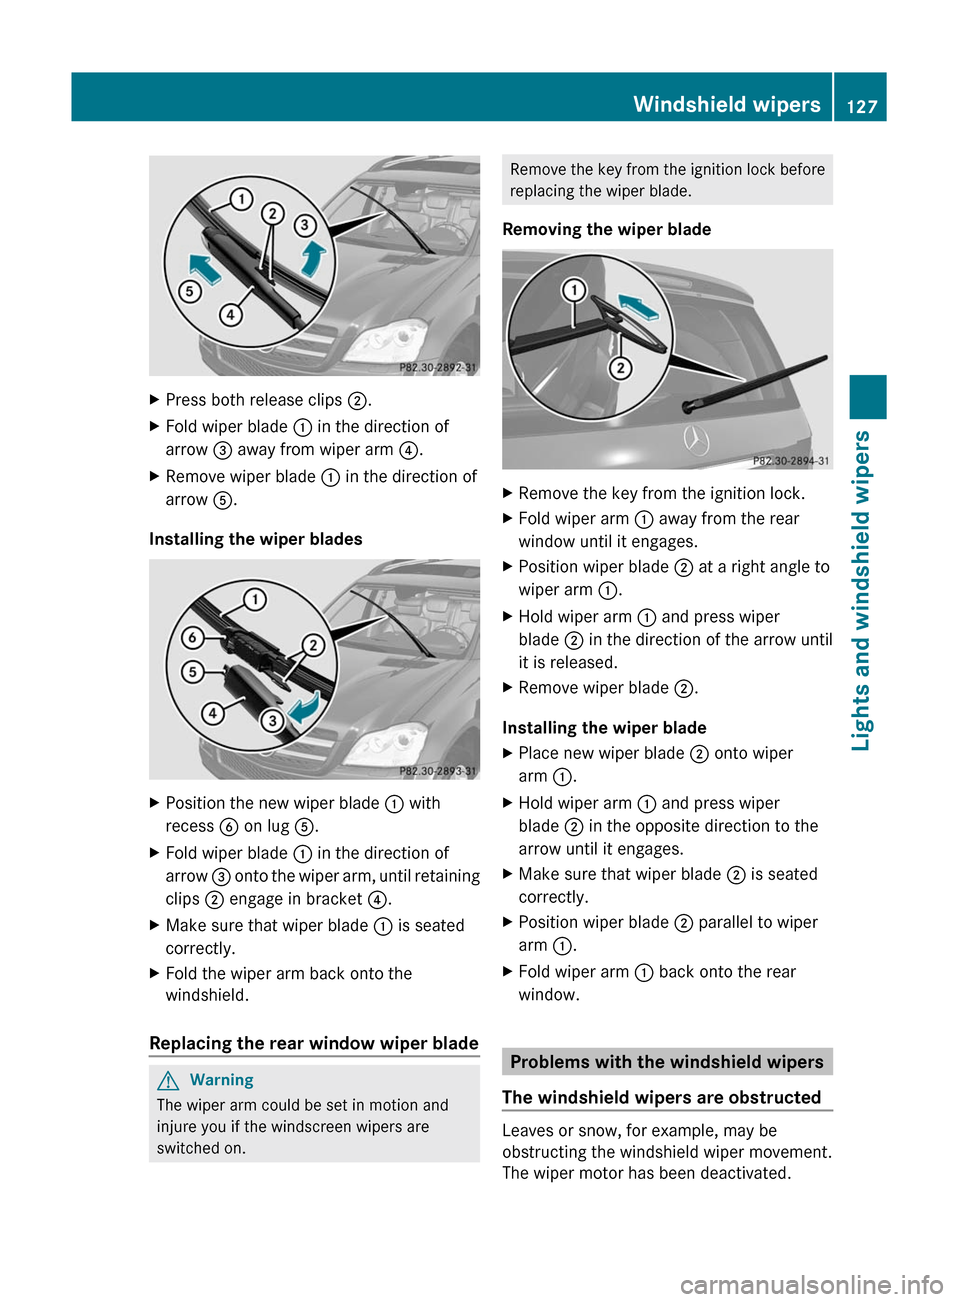
XPress both release clips ;.XFold wiper blade : in the direction of
arrow = away from wiper arm ?.XRemove wiper blade : in the direction of
arrow A.
Installing the wiper blades
XPosition the new wiper blade : with
recess B on lug A.XFold wiper blade : in the direction of
arrow = onto the wiper arm, until retaining
clips ; engage in bracket ?.XMake sure that wiper blade : is seated
correctly.XFold the wiper arm back onto the
windshield.
Replacing the rear window wiper blade
GWarning
The wiper arm could be set in motion and
injure you if the windscreen wipers are
switched on.
Remove the key from the ignition lock before
replacing the wiper blade.
Removing the wiper bladeXRemove the key from the ignition lock.XFold wiper arm : away from the rear
window until it engages.XPosition wiper blade ; at a right angle to
wiper arm :.XHold wiper arm : and press wiper
blade ; in the direction of the arrow until
it is released.XRemove wiper blade ;.
Installing the wiper blade
XPlace new wiper blade ; onto wiper
arm :.XHold wiper arm : and press wiper
blade ; in the opposite direction to the
arrow until it engages.XMake sure that wiper blade ; is seated
correctly.XPosition wiper blade ; parallel to wiper
arm :.XFold wiper arm : back onto the rear
window.
Problems with the windshield wipers
The windshield wipers are obstructed
Leaves or snow, for example, may be
obstructing the windshield wiper movement.
The wiper motor has been deactivated.
Windshield wipers127Lights and windshield wipersBA 164.8 USA, CA Edition B 2011; 1; 2, en-USd2sboikeVersion: 3.0.3.52010-04-21T15:08:44+02:00 - Seite 127Z