2011 MERCEDES-BENZ GL350 BlueTEC belt
[x] Cancel search: beltPage 269 of 376
vehicle occupants unless the items are
securely fastened in the vehicle.
Always use the cargo tie-down rings.GWarning!
Never drive a vehicle with the tailgate open.
Deadly carbon monoxide (CO) gases may
enter vehicle interior resulting in
unconsciousness and death.
! Release and fold the seat cushion
upwards before folding the rear bench seat
forward. Otherwise, the backrests may be
damaged.
When the backrest is folded forwards, the
front seats cannot be moved to their
rearmost position. Otherwise, the front
seats and the rear bench seat could be
damaged.
The left-hand and right-hand backrests in the
2nd row of seats can be folded forwards
separately to increase the cargo
compartment capacity. On vehicles with a 3rd
row of seats, you must fold down the 3rd row
of seats beforehand ( Y page 100) to obtain
maximum cargo compartment enlargement.
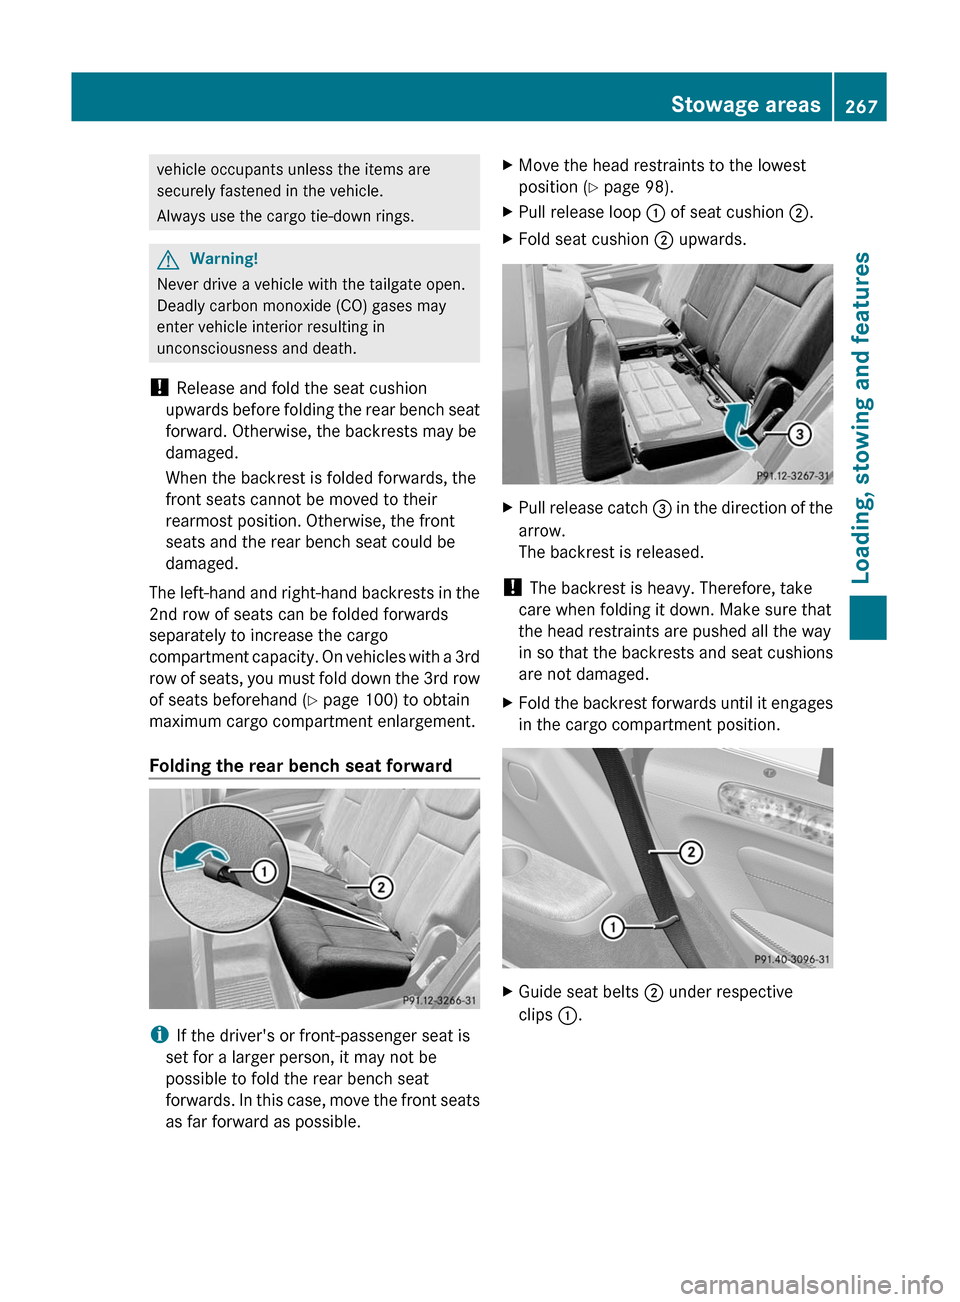
Folding the rear bench seat forward
i If the driver's or front-passenger seat is
set for a larger person, it may not be
possible to fold the rear bench seat
forwards. In this case, move the front seats
as far forward as possible.
XMove the head restraints to the lowest
position ( Y page 98).XPull release loop : of seat cushion ;.XFold seat cushion ; upwards.XPull release catch = in the direction of the
arrow.
The backrest is released.
! The backrest is heavy. Therefore, take
care when folding it down. Make sure that
the head restraints are pushed all the way
in so that the backrests and seat cushions
are not damaged.
XFold the backrest forwards until it engages
in the cargo compartment position.XGuide seat belts ; under respective
clips :.Stowage areas267Loading, stowing and featuresBA 164.8 USA, CA Edition B 2011; 1; 2, en-USd2sboikeVersion: 3.0.3.52010-04-21T15:08:44+02:00 - Seite 267Z
Page 270 of 376
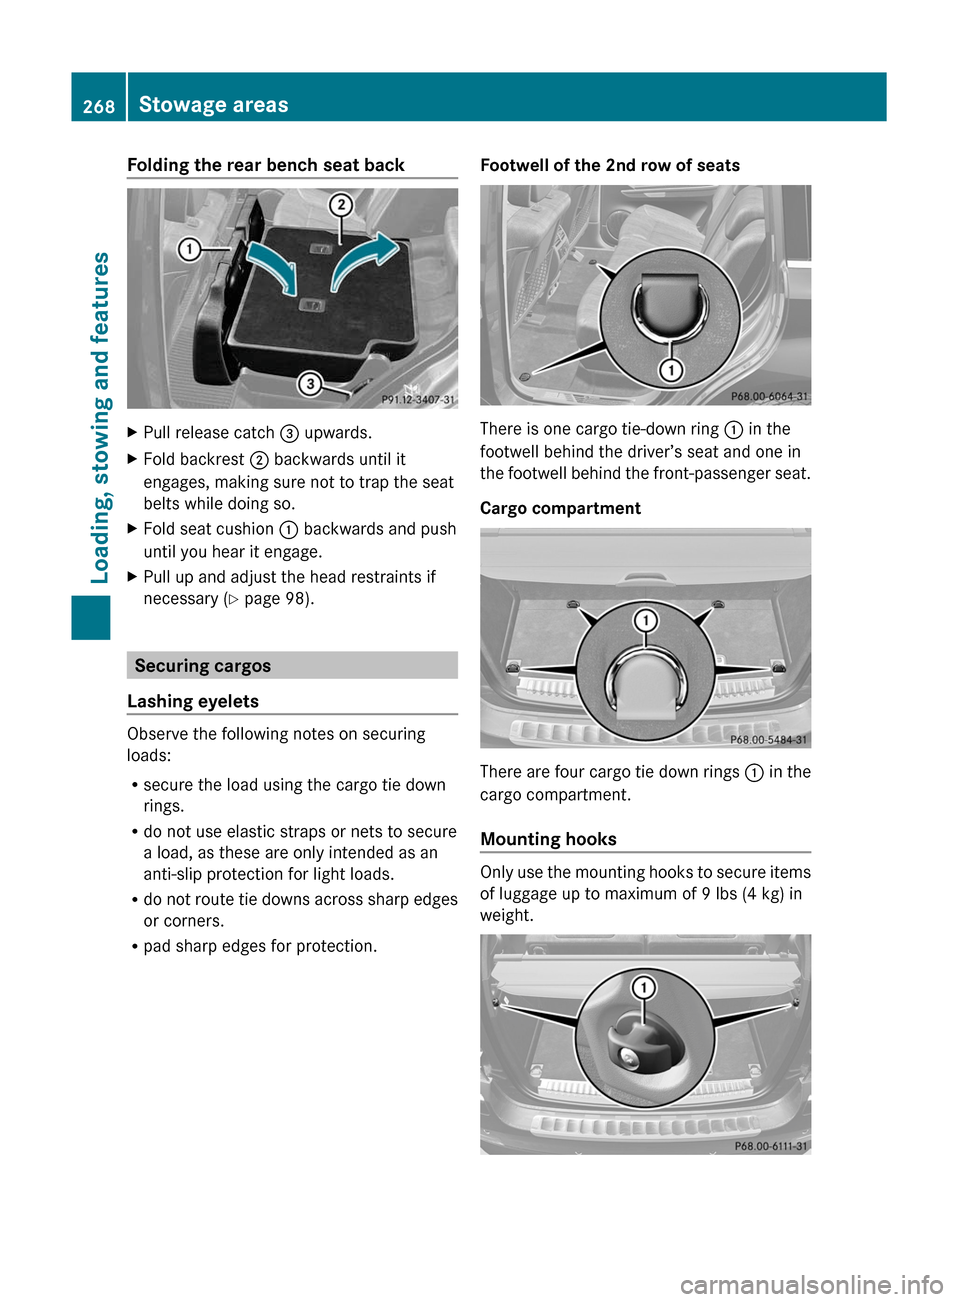
Folding the rear bench seat backXPull release catch = upwards.XFold backrest ; backwards until it
engages, making sure not to trap the seat
belts while doing so.XFold seat cushion : backwards and push
until you hear it engage.XPull up and adjust the head restraints if
necessary ( Y page 98).
Securing cargos
Lashing eyelets
Observe the following notes on securing
loads:
R secure the load using the cargo tie down
rings.
R do not use elastic straps or nets to secure
a load, as these are only intended as an
anti-slip protection for light loads.
R do not route tie downs across sharp edges
or corners.
R pad sharp edges for protection.
Footwell of the 2nd row of seats
There is one cargo tie-down ring : in the
footwell behind the driver’s seat and one in
the footwell behind the front-passenger seat.
Cargo compartment
There are four cargo tie down rings : in the
cargo compartment.
Mounting hooks
Only use the mounting hooks to secure items
of luggage up to maximum of 9 lbs (4 kg) in
weight.
268Stowage areasLoading, stowing and features
BA 164.8 USA, CA Edition B 2011; 1; 2, en-USd2sboikeVersion: 3.0.3.52010-04-21T15:08:44+02:00 - Seite 268
Page 272 of 376
cover ; into the recess of the side trim on
the left-hand side.XGuide cargo compartment cover ; in front
of the recess on the right.XPress button : and insert the right-hand
side section into the recess of the side trim.
Cargo net
Important safety notes
GWarning!
Make sure the cargo net is properly engaged
at top and bottom position and the tightening
belts are securely fastened.
Never use a damaged cargo net.
Always use cargo net when transporting
cargo. This helps to avoid personal injury from
smaller objects being thrown around in the
occupant compartment during a collision or
sudden maneuver.
The cargo net cannot prevent the movement
of large, heavier objects into the passenger
compartment in an accident. Such items must
be properly secured using the cargo tie-down
rings in the cargo compartment floor.
Passenger use of seats behind installed cargo
net is restricted because of the footwell being
taken up by the net.
When the vehicle is loaded with objects that
extend beyond the seat backrests, using a
cargo net is particularly important. For
reasons of safety, a cargo net should always
be used when transporting cargo.
Preparing the cargo net
The cargo net can be used in two different
positions (behind the B-pillar or the C-pillar).
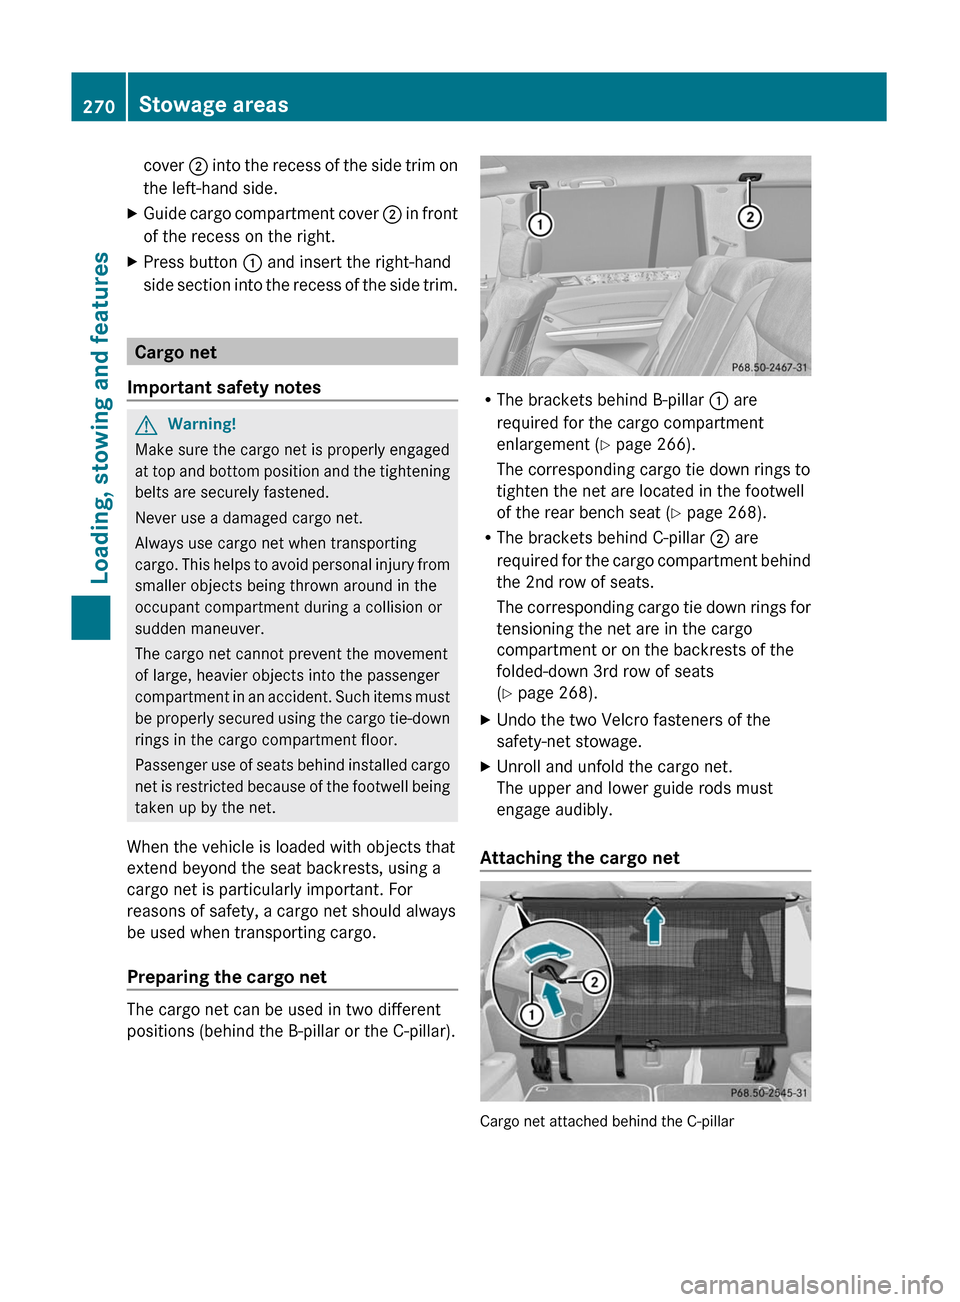
R The brackets behind B-pillar : are
required for the cargo compartment
enlargement ( Y page 266).
The corresponding cargo tie down rings to
tighten the net are located in the footwell
of the rear bench seat ( Y page 268).
R The brackets behind C-pillar ; are
required for the cargo compartment behind
the 2nd row of seats.
The corresponding cargo tie down rings for
tensioning the net are in the cargo
compartment or on the backrests of the
folded-down 3rd row of seats
( Y page 268).
XUndo the two Velcro fasteners of the
safety-net stowage.XUnroll and unfold the cargo net.
The upper and lower guide rods must
engage audibly.
Attaching the cargo net
Cargo net attached behind the C-pillar
270Stowage areasLoading, stowing and features
BA 164.8 USA, CA Edition B 2011; 1; 2, en-USd2sboikeVersion: 3.0.3.52010-04-21T15:08:44+02:00 - Seite 270
Page 273 of 376
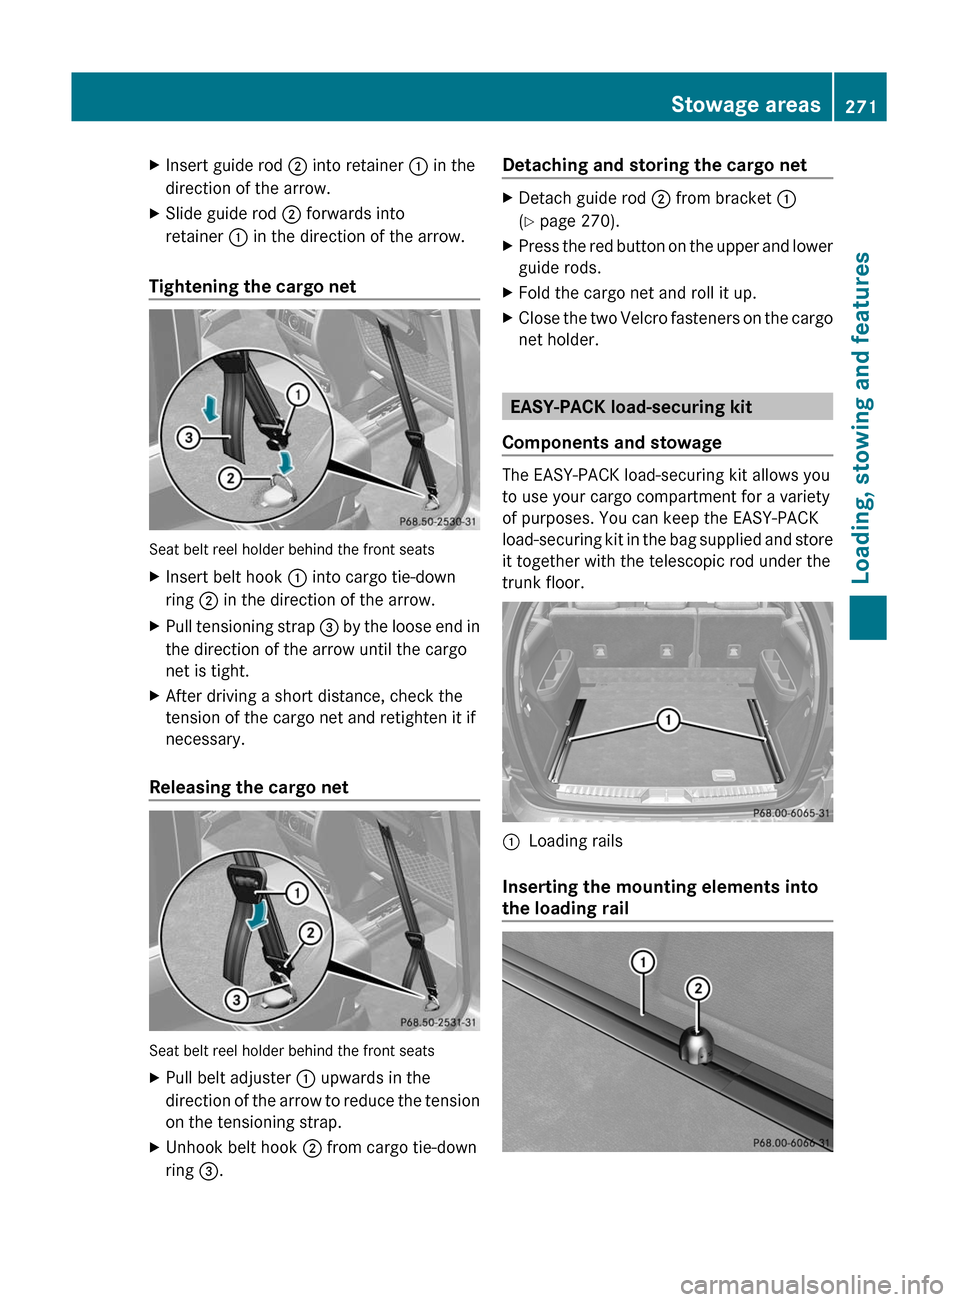
XInsert guide rod ; into retainer : in the
direction of the arrow.XSlide guide rod ; forwards into
retainer : in the direction of the arrow.
Tightening the cargo net
Seat belt reel holder behind the front seats
XInsert belt hook : into cargo tie-down
ring ; in the direction of the arrow.XPull tensioning strap = by the loose end in
the direction of the arrow until the cargo
net is tight.XAfter driving a short distance, check the
tension of the cargo net and retighten it if
necessary.
Releasing the cargo net
Seat belt reel holder behind the front seats
XPull belt adjuster : upwards in the
direction of the arrow to reduce the tension
on the tensioning strap.XUnhook belt hook ; from cargo tie-down
ring =.Detaching and storing the cargo netXDetach guide rod ; from bracket :
( Y page 270).XPress the red button on the upper and lower
guide rods.XFold the cargo net and roll it up.XClose the two Velcro fasteners on the cargo
net holder.
EASY-PACK load-securing kit
Components and stowage
The EASY-PACK load-securing kit allows you
to use your cargo compartment for a variety
of purposes. You can keep the EASY-PACK
load-securing kit in the bag supplied and store
it together with the telescopic rod under the
trunk floor.
:Loading rails
Inserting the mounting elements into
the loading rail
Stowage areas271Loading, stowing and featuresBA 164.8 USA, CA Edition B 2011; 1; 2, en-USd2sboikeVersion: 3.0.3.52010-04-21T15:08:44+02:00 - Seite 271Z
Page 274 of 376
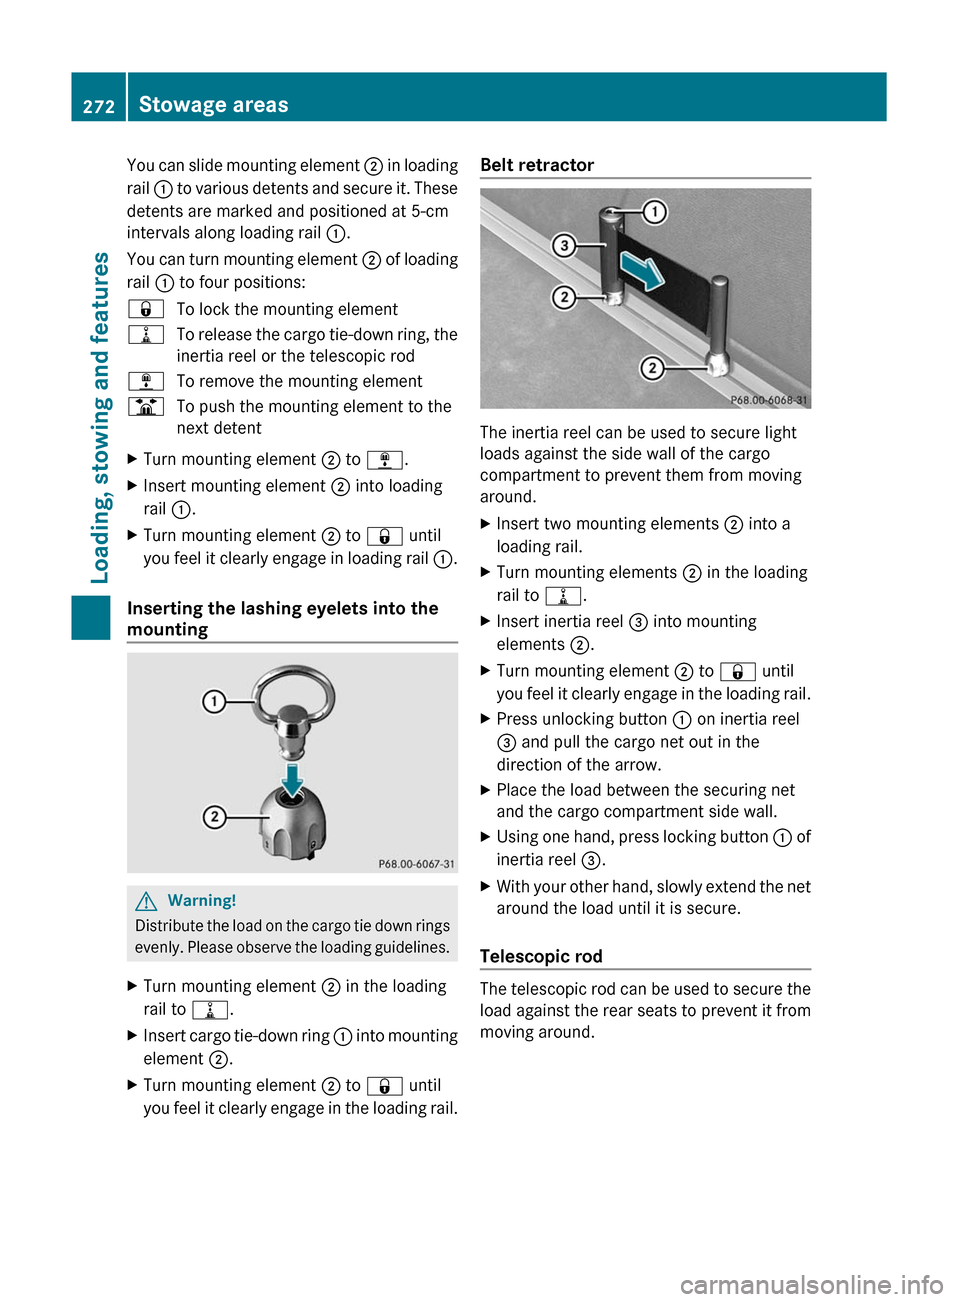
You can slide mounting element ; in loading
rail : to various detents and secure it. These
detents are marked and positioned at 5-cm
intervals along loading rail :.
You can turn mounting element ; of loading
rail : to four positions:&To lock the mounting element=To release the cargo tie-down ring, the
inertia reel or the telescopic rod;To remove the mounting elementBTo push the mounting element to the
next detentXTurn mounting element ; to ; .XInsert mounting element ; into loading
rail :.XTurn mounting element ; to & until
you feel it clearly engage in loading rail :.
Inserting the lashing eyelets into the
mounting
GWarning!
Distribute the load on the cargo tie down rings
evenly. Please observe the loading guidelines.
XTurn mounting element ; in the loading
rail to =.XInsert cargo tie-down ring : into mounting
element ;.XTurn mounting element ; to & until
you feel it clearly engage in the loading rail.Belt retractor
The inertia reel can be used to secure light
loads against the side wall of the cargo
compartment to prevent them from moving
around.
XInsert two mounting elements ; into a
loading rail.XTurn mounting elements ; in the loading
rail to =.XInsert inertia reel = into mounting
elements ;.XTurn mounting element ; to & until
you feel it clearly engage in the loading rail.XPress unlocking button : on inertia reel
= and pull the cargo net out in the
direction of the arrow.XPlace the load between the securing net
and the cargo compartment side wall.XUsing one hand, press locking button : of
inertia reel =.XWith your other hand, slowly extend the net
around the load until it is secure.
Telescopic rod
The telescopic rod can be used to secure the
load against the rear seats to prevent it from
moving around.
272Stowage areasLoading, stowing and features
BA 164.8 USA, CA Edition B 2011; 1; 2, en-USd2sboikeVersion: 3.0.3.52010-04-21T15:08:44+02:00 - Seite 272
Page 307 of 376
Cleaning results depend on the type of
dirt and how long it has been there.
R clean Alcantara ®
covers with a damp
cloth. Make sure you wipe entire seat
sections to avoid leaving visible lines.
i Note that regular care is essential to
ensure that the appearance and comfort of
the covers is retained over time.
Cleaning the seat beltsXUse clean, luke-warm water and soap
solution.
! Do not clean the seat belts using chemical
cleaning agents. Do not dry the seat belts
by warming them above 176 ‡ (80 †) or
placing them in direct sunlight.
GWarning
Do not bleach or dye seat belts as this may
severely weaken them. In a crash, they may
not be able to provide adequate protection.
Cleaning the headliner and carpets
XRoof lining: use soft brushes or dry
shampoo if it is particularly dirty.XCarpets: use carpet and textile cleaners
that have been approved and
recommended by Mercedes-Benz.Care305Maintenance and careBA 164.8 USA, CA Edition B 2011; 1; 2, en-USd2sboikeVersion: 3.0.3.52010-04-21T15:08:44+02:00 - Seite 305Z
Page 356 of 376
Tire type code: tire type code ? can be
used by the manufacturer as a code to
describe specific characteristics of the tire.
Date of manufacture: date of manufacture
A provides information about the age of a
tire. The first and second positions represent
the week of manufacture, starting with "01"
for the first calendar week. Positions three
and four represent the year of manufacture.
For example, a tire that is marked with
"3208", was manufactured in week 32 in
2008.
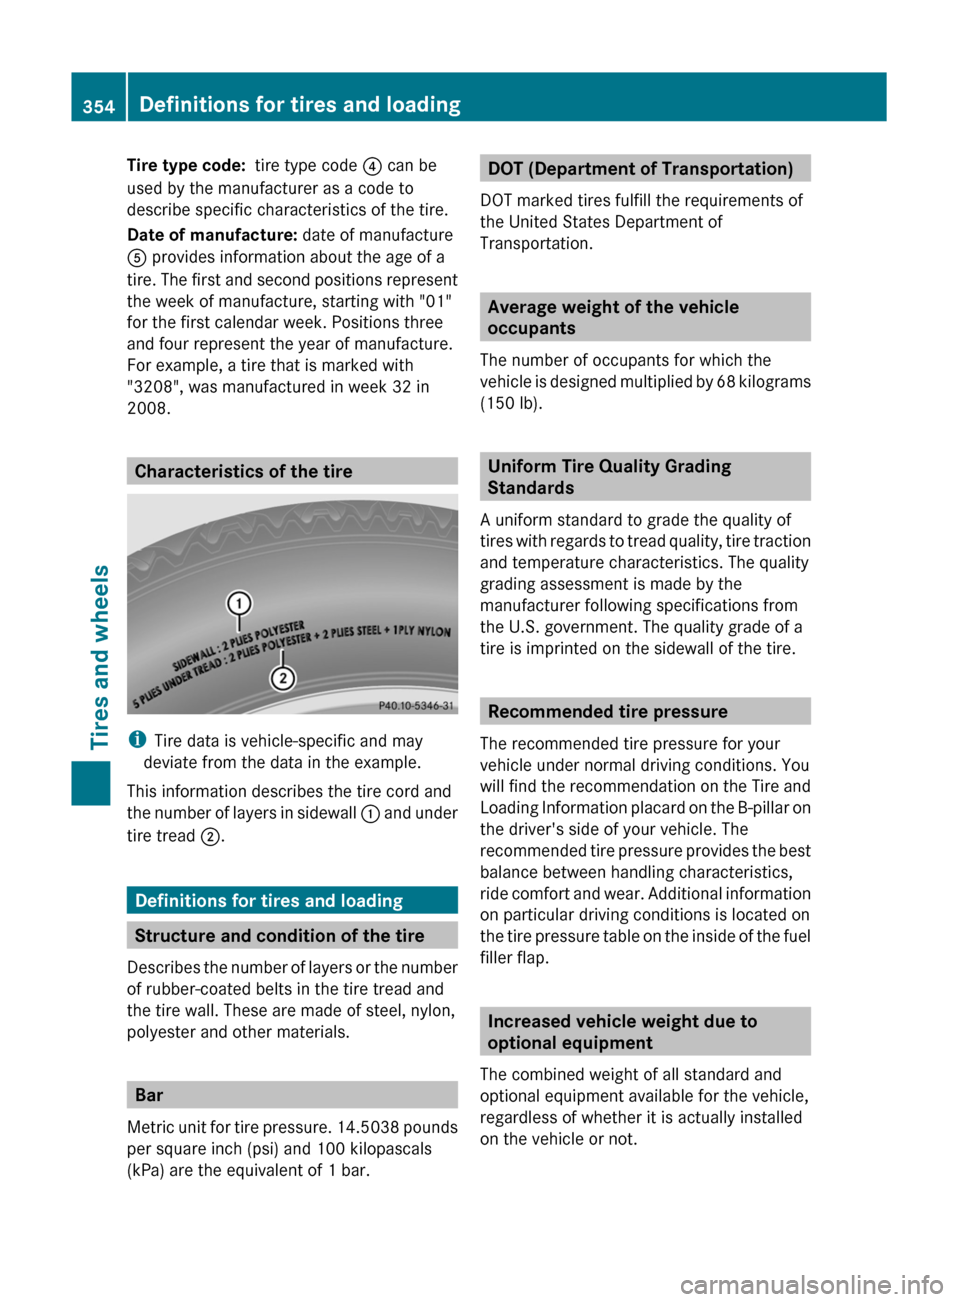
Characteristics of the tire
i Tire data is vehicle-specific and may
deviate from the data in the example.
This information describes the tire cord and
the number of layers in sidewall : and under
tire tread ;.
Definitions for tires and loading
Structure and condition of the tire
Describes the number of layers or the number
of rubber-coated belts in the tire tread and
the tire wall. These are made of steel, nylon,
polyester and other materials.
Bar
Metric unit for tire pressure. 14.5038 pounds
per square inch (psi) and 100 kilopascals
(kPa) are the equivalent of 1 bar.
DOT (Department of Transportation)
DOT marked tires fulfill the requirements of
the United States Department of
Transportation.
Average weight of the vehicle
occupants
The number of occupants for which the
vehicle is designed multiplied by 68 kilograms
(150 lb).
Uniform Tire Quality Grading
Standards
A uniform standard to grade the quality of
tires with regards to tread quality, tire traction
and temperature characteristics. The quality
grading assessment is made by the
manufacturer following specifications from
the U.S. government. The quality grade of a
tire is imprinted on the sidewall of the tire.
Recommended tire pressure
The recommended tire pressure for your
vehicle under normal driving conditions. You
will find the recommendation on the Tire and
Loading Information placard on the B-pillar on
the driver's side of your vehicle. The
recommended tire pressure provides the best
balance between handling characteristics,
ride comfort and wear. Additional information
on particular driving conditions is located on
the tire pressure table on the inside of the fuel
filler flap.
Increased vehicle weight due to
optional equipment
The combined weight of all standard and
optional equipment available for the vehicle,
regardless of whether it is actually installed
on the vehicle or not.
354Definitions for tires and loadingTires and wheels
BA 164.8 USA, CA Edition B 2011; 1; 2, en-USd2sboikeVersion: 3.0.3.52010-04-21T15:08:44+02:00 - Seite 354