2011 MERCEDES-BENZ GL350 BlueTEC park assist
[x] Cancel search: park assistPage 205 of 376
dynamometer, please consult an
authorized Mercedes-Benz Center
beforehand. You could otherwise damage
the drive train or the brake system.
Information on "Off-road driving"; see
( Y page 173).
DSR (Downhill Speed Regulation)
Important safety guidelines
DSR is an aid to assist you when driving
downhill. It keeps the speed of travel at the
speed selected on the on-board computer.
The steeper the downhill gradient, the greater
the DSR braking effect on the vehicle. When
driving on flat stretches of road or on an uphill
gradient, the DSR braking effect is minimal or
non-existent.
The speed is set to 4 mph (6 km/h) at the
factory; you can adjust this in the on-board
computer ( Y page 226).
GWarning!
Downhill Speed Regulation (DSR) is a
convenience system designed to assist the
driver during vehicle operation. The system
setting must be appropriate to the
topographical and weather conditions
encountered, which can change quickly. The
driver is responsible for the vehicle speed and
for safe brake operation at all times.
Depending on the programmed speed, actual
vehicle speed and gradient, switching on DSR
while driving can cause the vehicle to slow
down rapidly, and you may hear a sound,
caused by the activation of the vehicle's brake
system through DSR. Sudden and unexpected
deceleration can result in loss of vehicle
control, causing an accident and/or serious
personal injury to you and others. Do not
switch on DSR in a situation where rapid
deceleration could result in a loss of vehicle
control.
DSR controls the set speed when it is active
and the automatic transmission is in the D,
R or N position. You can drive at a higher or
a lower speed than that set on the on-board
computer at any time by accelerating or
braking.GWarning!
If you depress the accelerator pedal with DSR
activated, the vehicle can drive faster than the
programmed set speed. You should therefore
drive downhill with particular caution as it
could lead to an accident and/or serious
injury to you or others. Keep in mind that as
soon as you remove your foot from the
accelerator pedal with DSR switched on, DSR
will start regulating the vehicle's speed
including use of brakes if required. Depending
on the programmed set speed, actual vehicle
speed and gradient, DSR can cause the
vehicle to slow down rapidly. Sudden and
unexpected deceleration can result in loss of
vehicle control, causing an accident and/or
serious personal injury to you and others.
Information on "Off-road driving"; see
( Y page 173).
Activating/deactivating DSR
Activating
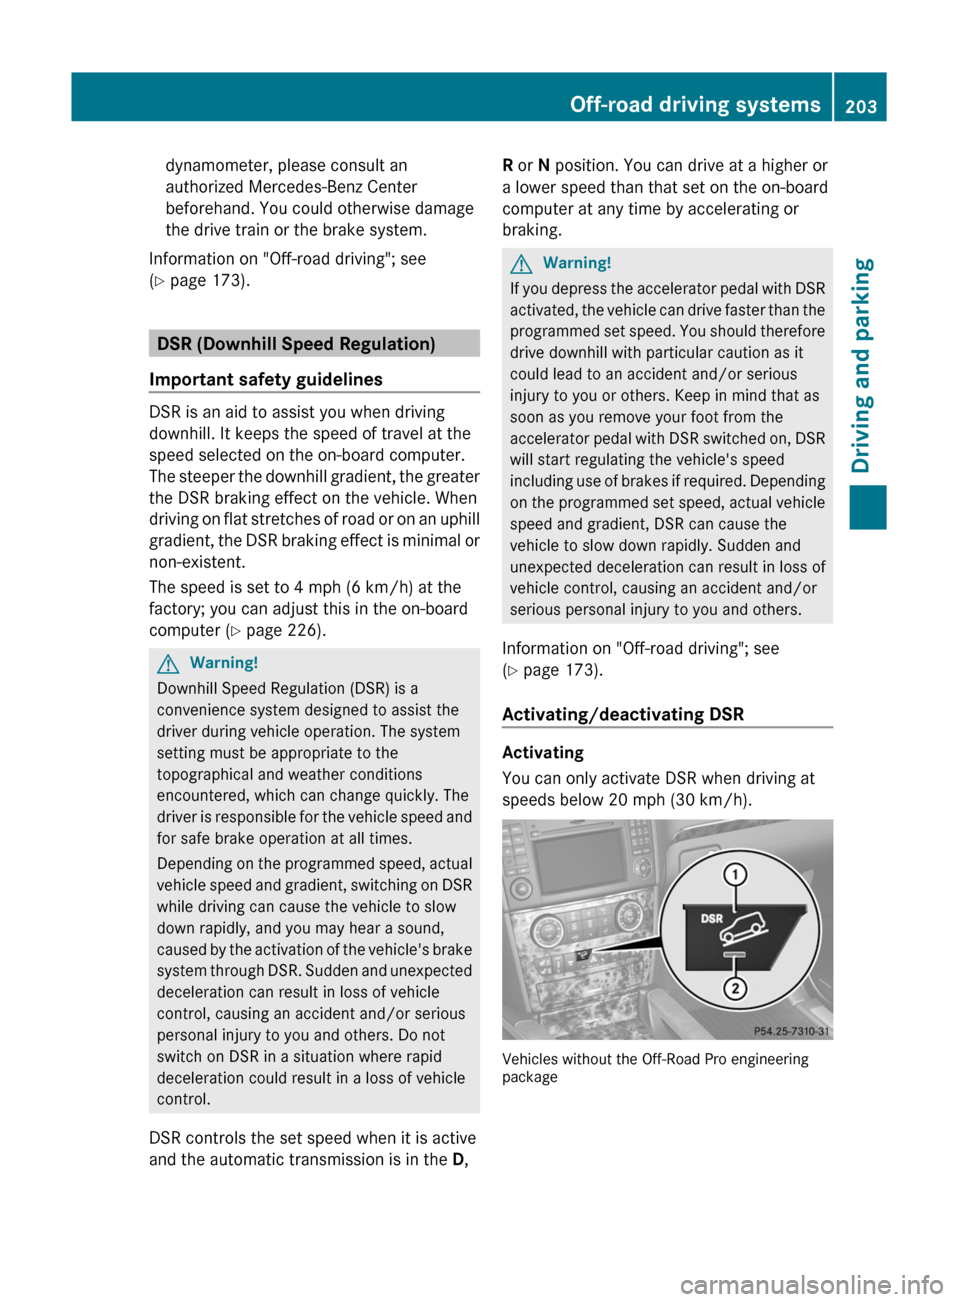
You can only activate DSR when driving at
speeds below 20 mph (30 km/h).
Vehicles without the Off-Road Pro engineering
package
Off-road driving systems203Driving and parkingBA 164.8 USA, CA Edition B 2011; 1; 2, en-USd2sboikeVersion: 3.0.3.52010-04-21T15:08:44+02:00 - Seite 203Z
Page 206 of 376
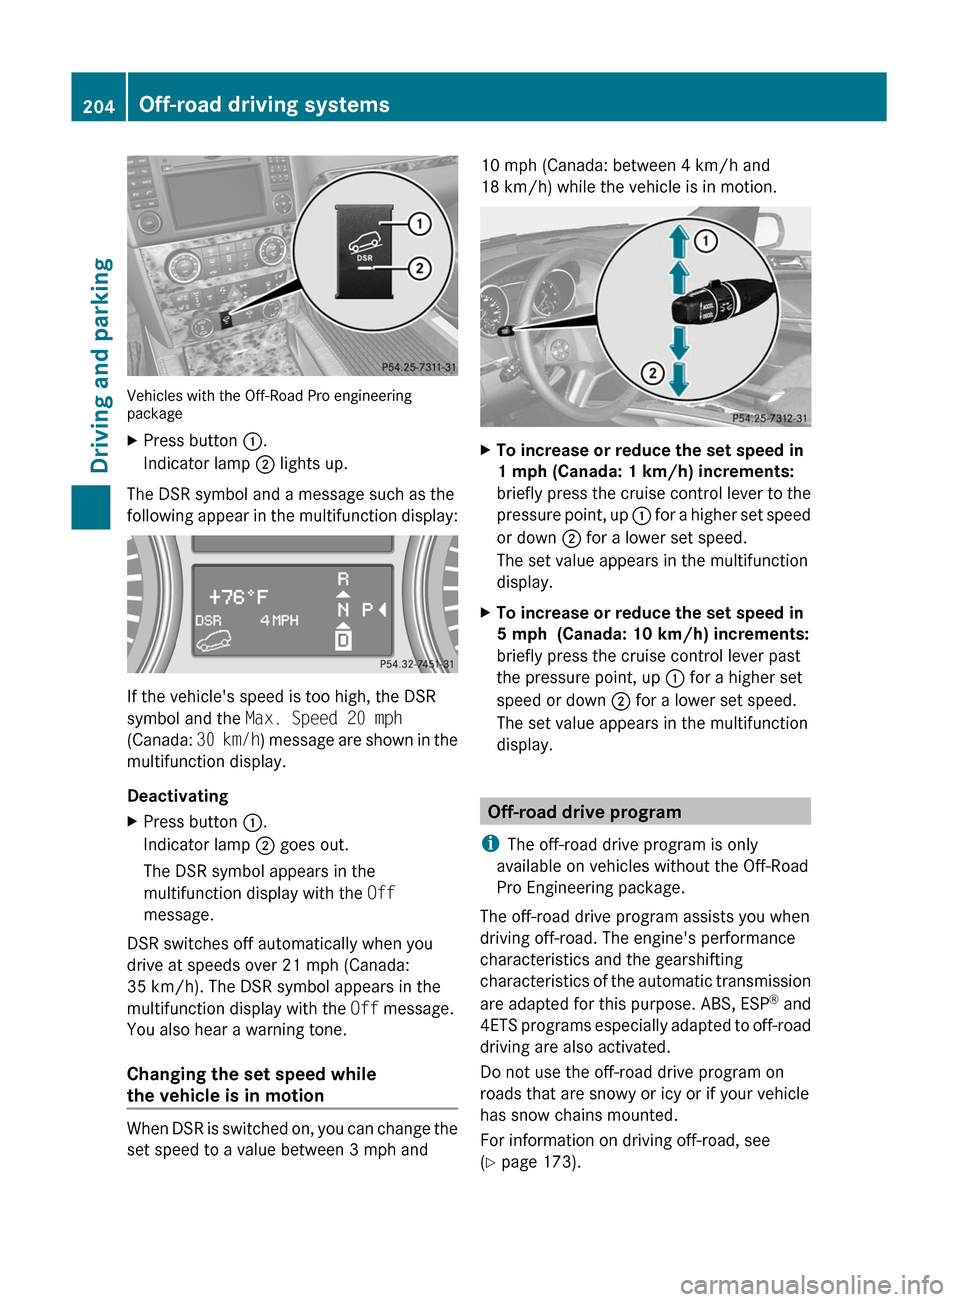
Vehicles with the Off-Road Pro engineering
package
XPress button :.
Indicator lamp ; lights up.
The DSR symbol and a message such as the
following appear in the multifunction display:
If the vehicle's speed is too high, the DSR
symbol and the Max. Speed 20 mph
(Canada: 30 km/h) message are shown in the
multifunction display.
Deactivating
XPress button :.
Indicator lamp ; goes out.
The DSR symbol appears in the
multifunction display with the Off
message.
DSR switches off automatically when you
drive at speeds over 21 mph (Canada:
35 km/h). The DSR symbol appears in the
multifunction display with the Off message.
You also hear a warning tone.
Changing the set speed while
the vehicle is in motion
When DSR is switched on, you can change the
set speed to a value between 3 mph and
10 mph (Canada: between 4 km/h and
18 km/h) while the vehicle is in motion.XTo increase or reduce the set speed in
1 mph (Canada: 1 km/h) increments:
briefly press the cruise control lever to the
pressure point, up : for a higher set speed
or down ; for a lower set speed.
The set value appears in the multifunction
display.XTo increase or reduce the set speed in
5 mph (Canada: 10 km/h) increments:
briefly press the cruise control lever past
the pressure point, up : for a higher set
speed or down ; for a lower set speed.
The set value appears in the multifunction
display.
Off-road drive program
i The off-road drive program is only
available on vehicles without the Off-Road
Pro Engineering package.
The off-road drive program assists you when
driving off-road. The engine's performance
characteristics and the gearshifting
characteristics of the automatic transmission
are adapted for this purpose. ABS, ESP ®
and
4ETS programs especially adapted to off-road
driving are also activated.
Do not use the off-road drive program on
roads that are snowy or icy or if your vehicle
has snow chains mounted.
For information on driving off-road, see
( Y page 173).
204Off-road driving systemsDriving and parking
BA 164.8 USA, CA Edition B 2011; 1; 2, en-USd2sboikeVersion: 3.0.3.52010-04-21T15:08:44+02:00 - Seite 204
Page 207 of 376
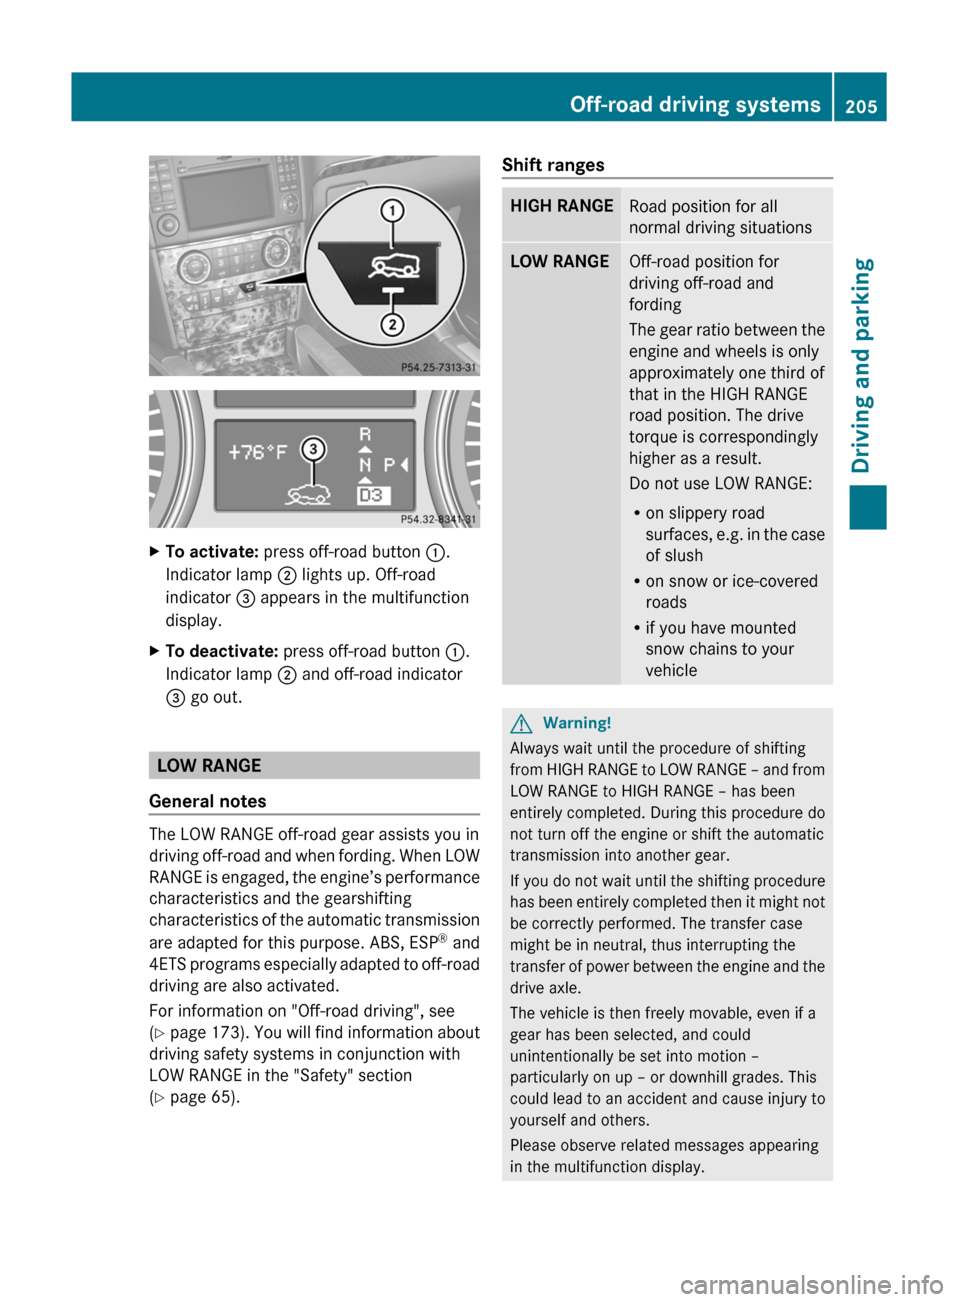
XTo activate: press off-road button :.
Indicator lamp ; lights up. Off-road
indicator = appears in the multifunction
display.XTo deactivate: press off-road button :.
Indicator lamp ; and off-road indicator
= go out.
LOW RANGE
General notes
The LOW RANGE off-road gear assists you in
driving off-road and when fording. When LOW
RANGE is engaged, the engine’s performance
characteristics and the gearshifting
characteristics of the automatic transmission
are adapted for this purpose. ABS, ESP ®
and
4ETS programs especially adapted to off-road
driving are also activated.
For information on "Off-road driving", see
( Y page 173) . You will find information about
driving safety systems in conjunction with
LOW RANGE in the "Safety" section
( Y page 65).
Shift rangesHIGH RANGERoad position for all
normal driving situationsLOW RANGEOff-road position for
driving off-road and
fording
The gear ratio between the
engine and wheels is only
approximately one third of
that in the HIGH RANGE
road position. The drive
torque is correspondingly
higher as a result.
Do not use LOW RANGE:
R on slippery road
surfaces, e.g. in the case
of slush
R on snow or ice-covered
roads
R if you have mounted
snow chains to your
vehicleGWarning!
Always wait until the procedure of shifting
from HIGH RANGE to LOW RANGE – and from
LOW RANGE to HIGH RANGE – has been
entirely completed. During this procedure do
not turn off the engine or shift the automatic
transmission into another gear.
If you do not wait until the shifting procedure
has been entirely completed then it might not
be correctly performed. The transfer case
might be in neutral, thus interrupting the
transfer of power between the engine and the
drive axle.
The vehicle is then freely movable, even if a
gear has been selected, and could
unintentionally be set into motion –
particularly on up – or downhill grades. This
could lead to an accident and cause injury to
yourself and others.
Please observe related messages appearing
in the multifunction display.
Off-road driving systems205Driving and parkingBA 164.8 USA, CA Edition B 2011; 1; 2, en-USd2sboikeVersion: 3.0.3.52010-04-21T15:08:44+02:00 - Seite 205Z
Page 226 of 376
you switch off the engine, the following
remain lit:
R the parking lamps
R the license plate lamp
R the tail lamps
R the fog lamps 33
R the low-beam headlamps 34
R the side marker lampsXPress V or U on the steering wheel
to select the Settings menu.XPress & to call up the selection of
submenus.XPress the W or X button to select the
Lighting submenu.XPress the & button to select Headlamp
Delayed Shut-off .XPress the W or X button to activate
or deactivate the Headlamp Delayed
Shut-off function.XBefore switching off the engine, turn the
light switch to position Ã.
The exterior lighting delayed shut-off is
activated.XPress the &, V or U button to
select a different display.
To deactivate the delayed shut-off
temporarily:
XBefore leaving the vehicle, turn the
SmartKey to position 0 in the ignition lock.XTurn the SmartKey to position 2 in the
ignition lock and back to position 0.
The delayed shut-off is deactivated.
The delayed shut-off is reactivated the next
time you start the engine.
Activating/deactivating the interior
lighting delayed switch-off
When you activate the Interior Lighting
Delayed Shut-off function and remove the
SmartKey from the ignition lock, the interior
lighting remains on for 10 seconds.
XPress V or U on the steering wheel
to select the Settings menu.XPress & to call up the selection of
submenus.XPress the W or X button to select the
Lighting submenu.XPress the & button to select Interior
Lighting Delayed Shut-off .XPress the W or X button to activate
or deactivate the Interior Lighting
Delayed Shut-off function.XPress the &, V or U button to
select a different display.
Vehicle
Activating/deactivating the automatic
locking feature
When you activate the Automatic Door
Locking function, your vehicle will be
centrally locked above a speed of
approximately 9 mph (15 km/h).
i Further information on the automatic
locking feature ( Y page 79).
XPress V or U on the steering wheel
to select the Settings menu.XPress & to call up the selection of
submenus.XPress the W or X button to select the
Vehicle submenu.XPress & to select Automatic Door
Locking .XPress W or X to switch Automatic
Door Locking on or off.XPress the &, V or U button to
select a different display.
Activating/deactivating the radar sensor
system
If the radar sensor system is switched off,
Blind Spot Assist (Y page 200) is deactivated.
33
Only for vehicles with front fog lamps.
34 Only for vehicles without front fog lamps.224Menus and submenusOn-board computer and displays
BA 164.8 USA, CA Edition B 2011; 1; 2, en-USd2sboikeVersion: 3.0.3.52010-04-21T15:08:44+02:00 - Seite 224
Page 238 of 376
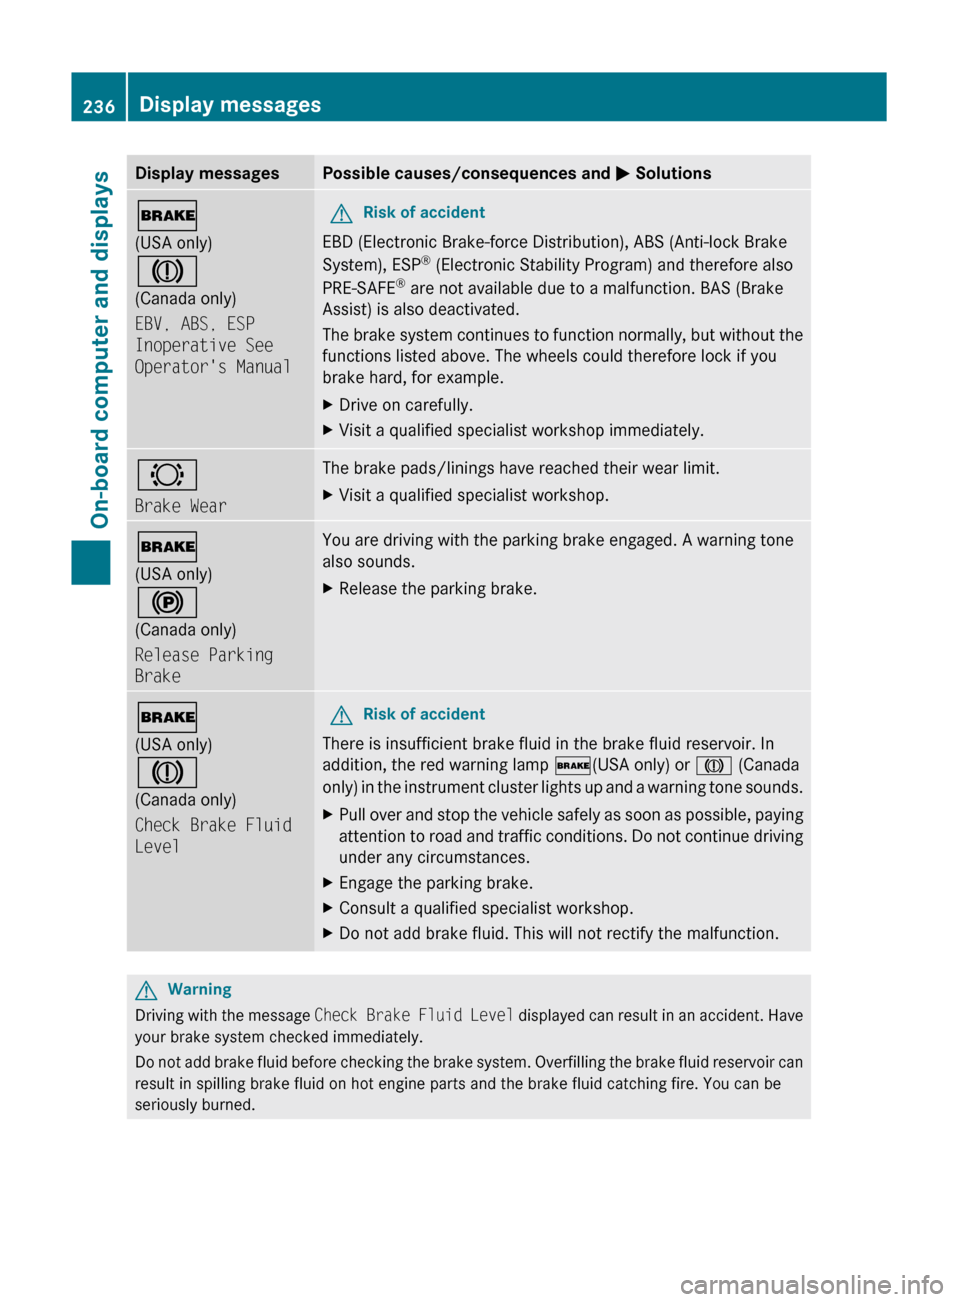
Display messagesPossible causes/consequences and M Solutions$
(USA only)
J
(Canada only)
EBV, ABS, ESP
Inoperative See
Operator's ManualGRisk of accident
EBD (Electronic Brake-force Distribution), ABS (Anti-lock Brake
System), ESP ®
(Electronic Stability Program) and therefore also
PRE-SAFE ®
are not available due to a malfunction. BAS (Brake
Assist) is also deactivated.
The brake system continues to function normally, but without the
functions listed above. The wheels could therefore lock if you
brake hard, for example.
XDrive on carefully.XVisit a qualified specialist workshop immediately.#
Brake WearThe brake pads/linings have reached their wear limit.XVisit a qualified specialist workshop.$
(USA only)
!
(Canada only)
Release Parking
BrakeYou are driving with the parking brake engaged. A warning tone
also sounds.XRelease the parking brake.$
(USA only)
J
(Canada only)
Check Brake Fluid
LevelGRisk of accident
There is insufficient brake fluid in the brake fluid reservoir. In
addition, the red warning lamp $(USA only) or J (Canada
only) in the instrument cluster lights up and a warning tone sounds.
XPull over and stop the vehicle safely as soon as possible, paying
attention to road and traffic conditions. Do not continue driving
under any circumstances.XEngage the parking brake.XConsult a qualified specialist workshop.XDo not add brake fluid. This will not rectify the malfunction.GWarning
Driving with the message Check Brake Fluid Level displayed can result in an accident. Have
your brake system checked immediately.
Do not add brake fluid before checking the brake system. Overfilling the brake fluid reservoir can
result in spilling brake fluid on hot engine parts and the brake fluid catching fire. You can be
seriously burned.
236Display messagesOn-board computer and displays
BA 164.8 USA, CA Edition B 2011; 1; 2, en-USd2sboikeVersion: 3.0.3.52010-04-21T15:08:44+02:00 - Seite 236
Page 253 of 376
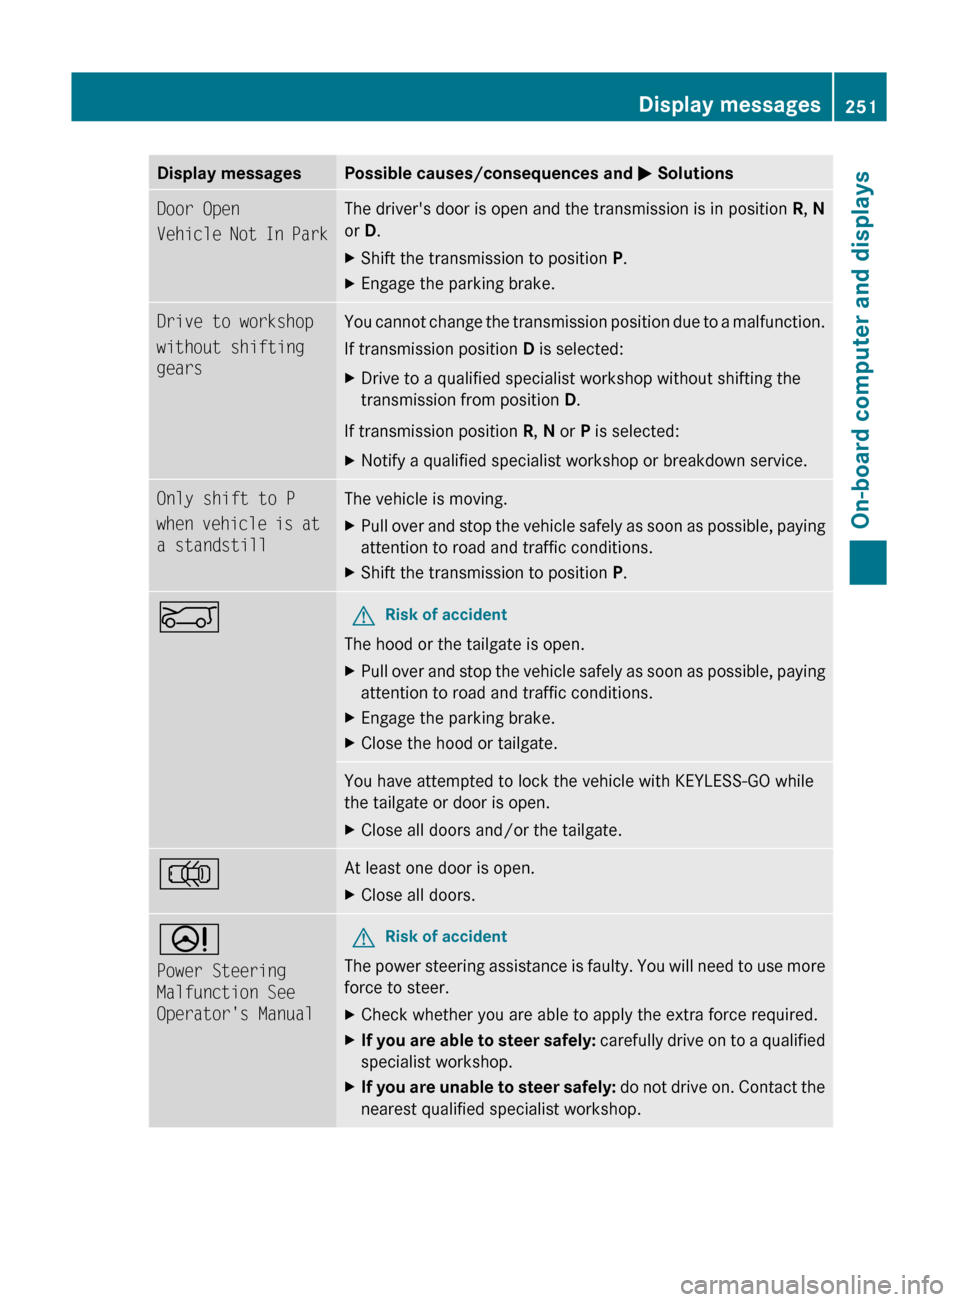
Display messagesPossible causes/consequences and M SolutionsDoor Open
Vehicle Not In ParkThe driver's door is open and the transmission is in position R, N
or D.XShift the transmission to position P.XEngage the parking brake.Drive to workshop
without shifting
gearsYou cannot change the transmission position due to a malfunction.
If transmission position D is selected:XDrive to a qualified specialist workshop without shifting the
transmission from position D.
If transmission position R, N or P is selected:
XNotify a qualified specialist workshop or breakdown service.Only shift to P
when vehicle is at
a standstillThe vehicle is moving.XPull over and stop the vehicle safely as soon as possible, paying
attention to road and traffic conditions.XShift the transmission to position P.EGRisk of accident
The hood or the tailgate is open.
XPull over and stop the vehicle safely as soon as possible, paying
attention to road and traffic conditions.XEngage the parking brake.XClose the hood or tailgate.You have attempted to lock the vehicle with KEYLESS-GO while
the tailgate or door is open.XClose all doors and/or the tailgate.;At least one door is open. XClose all doors.D
Power Steering
Malfunction See
Operator's ManualGRisk of accident
The power steering assistance is faulty. You will need to use more
force to steer.
XCheck whether you are able to apply the extra force required.XIf you are able to steer safely: carefully drive on to a qualified
specialist workshop.XIf you are unable to steer safely: do not drive on. Contact the
nearest qualified specialist workshop.Display messages251On-board computer and displaysBA 164.8 USA, CA Edition B 2011; 1; 2, en-USd2sboikeVersion: 3.0.3.52010-04-21T15:08:44+02:00 - Seite 251Z
Page 290 of 376
section using your ID number and
password 40
.
i Vehicle remote unlocking is only possible
if the corresponding cellular phone
network is accessible.
The SOS button flashes and the Call
Connected message appears in the
multifunction display to confirm that the
command for vehicle remote unlocking has
been received.
If you pull the tailgate handle for more than
20 seconds before receiving authorization
for remote unlocking from the Response
Center, you must wait 15 minutes before
you can pull on the handle of the tailgate
again.
Stolen Vehicle Recovery Services
If your vehicle has been stolen:
XContact the police.
The police will issue an incident report. This
report has a number.XThis number will be forwarded to the
Response Center together with your PIN.
The Response Center will then attempt to
covertly contact the mbrace system. The
Response Center contacts you and the
local law enforcement authority if the
vehicle is located. However, only the law
enforcement authority is informed of the
location of the vehicle.
i If the anti-theft alarm system remains
activated for longer than thirty seconds,
mbrace is automatically connected to the
Customer Assistance Center.
Garage door opener
Important safety notes
Up to three different door and gate systems
can be operated using the remote control
integrated in the overhead control panel.
i Certain garage door openers are not
compatible with the integrated remote
control. If you experience difficulties with
the programming of the integrated remote
control, contact an authorized Mercedes-
Benz Center or call the following telephone
assistance service:
R USA: Mercedes-Benz Customer
Assistance Center on
1-800-FOR-MERCedes
R Canada: Customer Service
on1-800-387-0100GWarning
Before programming the integrated remote
control to a garage door opener or gate
operator, make sure people and objects are
out of the way of the device to prevent
potential harm or damage. When
programming a garage door opener, the door
moves up or down. When programming a gate
operator, the gate opens or closes.
Do not use the integrated remote control with
any garage door opener that lacks safety stop
and reverse features as required by U.S.
federal safety standards (this includes any
garage door opener model manufactured
before April 1, 1982). A garage door that
cannot detect an object - signaling the door
to stop and reverse - does not meet current
U.S. federal safety standards.
When programming a garage door opener,
park vehicle outside the garage.
Do not run the engine while programming the
integrated remote control. Inhalation of
exhaust gas is hazardous to your health. All
exhaust gas contains carbon monoxide (CO),
and inhaling it can cause unconsciousness
and possible death. All exhaust gas contains
carbon monoxide (CO), and inhaling it can
cause unconsciousness and possible death.
i USA only:
40
USA only.288FeaturesLoading, stowing and features
BA 164.8 USA, CA Edition B 2011; 1; 2, en-USd2sboikeVersion: 3.0.3.52010-04-21T15:08:44+02:00 - Seite 288
Page 313 of 376

:Alignment bolt;Towing eye=Lug wrench?Ratchet ring spannerAVelcro fastenerBJackCWheel boltsDFolding wheel chockEFuse allocation chartFStowage well
"Minispare" emergency spare wheel
The "Minispare" emergency spare wheel can
be found in the stowage well under the cargo
compartment floor.
XLift the trunk floor up ( Y page 310).XTake out the jack.XTurn emergency spare wheel retainer :
counter-clockwise and remove it.XRemove insert =.XRemove "Minispare" emergency spare
wheel ;.
For further information on changing a wheel
and mounting the spare wheel, see
( Y page 316).
Flat tire
Preparing the vehicle
Your vehicle could be equipped with a
"Minispare" emergency spare wheel or the
MOExtended run-flat system( Y page 321).
i Vehicle preparation is not necessary on
vehicles with the MOExtended run-flat
system.
i Vehicles featuring the MOExtended run-
flat system are not equipped with the
TIREFIT kit at the factory. It is therefore
recommended that you additionally equip
your vehicle with the TIREFIT kit if you
mount tires that do not feature run-flat
properties, e.g. winter tires. You can obtain
a TIREFIT kit from an authorized Mercedes-
Benz Center, for example.
XMake sure that highway level is
selected 41
(Y page 189).XStop the vehicle as far away as possible
from traffic on solid, non-slippery and level
ground.XSwitch on the hazard warning lamps.XFirmly depress the parking brake.XBring the front wheels into the straight-
ahead position.XMove the DIRECT SELECT lever to P.XSwitch off the engine.41
Vehicles with air suspension.Flat tire311Roadside assistanceBA 164.8 USA, CA Edition B 2011; 1; 2, en-USd2sboikeVersion: 3.0.3.52010-04-21T15:08:44+02:00 - Seite 311Z