2011 MERCEDES-BENZ GL350 BlueTEC torque
[x] Cancel search: torquePage 19 of 376

Unladen weight (definition) ............355
Wear indicator (definition) .............356
Wheel rim (definition) ....................355
Tires and wheels (important safety
information) ....................................... 334
Top Tether ............................................ 62
Towing Important safety guidelines ...........327
Towing a trailer
Driving tips .................................... 209
Towing away
Installing the towing eye ................327
Removing the towing eye ...............328
Trailer
Coupling up ................................... 209
Decoupling ..................................... 211
Display message ............................ 237
Power supply ................................. 212
Towing ........................................... 210
Trailer loads and drawbar
noseweights ...................................... 211
Trailer towing .................................... 155
Blind Spot Assist ............................ 202
ESP ®
................................................ 68
PARKTRONIC ................................. 197
Transfer case ..................................... 157
Shift ranges ................................... 158
Transmission position display ......... 153
Transmission positions .................... 154
Traveling uphill Brow of hill ..................................... 178
Driving downhill ............................. 178
Maximum gradient-climbing
capability ....................................... 178
Trip computer (on-board
computer) .......................................... 227
Trip odometer Calling up ....................................... 218
Resetting (on-board computer) ......227
Trunk
Automatic opening ..................... 82, 83
Turn signal (display message) ......... 237
Turn signals ....................................... 117
TWR (permissible trailer drawbar
noseweight) (definition) ................... 356
Type plate
see Vehicle identification plate U
Unlocking Emergency unlocking .......................80
From inside the vehicle (central
unlocking button) ............................. 79
V
Vanity mirror Sun visor ........................................ 278
Vehicle
Data acquisition ............................... 23
Emergency release ..........................80
Equipment ....................................... 19
Exterior view .................................... 26
Individual settings (on-board
computer) ...................................... 221
Loading .......................................... 344
Lowering ........................................ 320
Maintenance .................................... 20
Parking up ..................................... 166
Raising ........................................... 318
Reporting problems .........................22
Towing away .................................. 327
Tow-starting ................................... 327
Transporting .................................. 329
Vehicle data
see Technical data
Vehicle identification number
see VIN
Vehicle identification plate .............. 363
Vehicle tool kit .................................. 310
Video (DVD) ........................................ 220
Video DVD (on-board computer) ...... 220
VIN ...................................................... 363
W
Warning and indicator lamps Overview .......................................... 29
PASSENGER AIRBAG OFF
indicator lamp (only Canada) ...........48
PASSENGER AIRBAG OFF
indicator lamp (only USA) ................42
Warranty ............................................ 362
Wheel bolt tightening torque ........... 320
Wheel chock ...................................... 317
Index17BA 164.8 USA, CA Edition B 2011; 1; 2, en-USd2sboikeVersion: 3.0.3.52010-04-21T15:08:44+02:00 - Seite 17
Page 20 of 376

WheelsChanging/replacing .......................350
Changing a wheel .......................... 316
Checking ........................................ 335
Cleaning ......................................... 301
Guidelines to be observed .............335
Mounting a wheel .......................... 319
Removing a wheel ..........................319
Tightening torque ........................... 320
Wheel size/tire size .......................357
Window curtain air bag ....................... 42
Windows see Side windows
Windows (cleaning instructions) ..... 302
Windshield Defrosting ...................................... 140
Infrared reflective .......................... 292
Windshield washer fluid (display
message) ............................................ 252
Windshield washer system Adding washer fluid .......................297
Notes ............................................. 370
Windshield wipers
Important safety notes ..................125
Replacing the wiper blades ............126
Switching on/off ........................... 125
Troubleshooting ............................. 127
Winter operation ............................... 173
Radiator cover ............................... 295
Winter tires ........................................ 171
Wiper blades Cleaning ......................................... 30218IndexBA 164.8 USA, CA Edition B 2011; 1; 2, en-USd2sboikeVersion: 3.0.3.52010-04-21T15:08:44+02:00 - Seite 18
Page 69 of 376

slippery roads. ESP®
can also stabilize the
vehicle during braking.
If ESP ®
intervenes, the d warning lamp
flashes in the instrument cluster.GWarning
Never switch off the ESP ®
when you see the
d warning lamp flashing in the instrument
cluster. In this case proceed as follows:
R When driving off, apply as little throttle as
possible.
R While driving, ease up on the accelerator
pedal.
R Adapt your speed and driving style to the
prevailing road conditions.
Failure to observe these guidelines could
cause the vehicle to skid. The ESP ®
cannot
prevent accidents resulting from excessive
speed.
! Only operate the vehicle for a maximum
of ten seconds on a brake test
dynamometer. Switch off the ignition.
Application of the brakes by ESP ®
may
otherwise destroy the brake system.
! Function or performance tests may only
be performed on a 2-axle dynamometer. If
you wish to operate the vehicle on such a
dynamometer, please consult an
authorized Mercedes-Benz Center
beforehand. You could otherwise damage
the drive train or the brake system.
i Only use wheels with the recommended
tire sizes. Only then will ESP ®
function
properly.
4ETS (Electronic Traction System)
GWarning
Observe "Important safety instructions"
( Y page 65).
Traction control is part of ESP ®
.
Traction control brakes the drive wheels
individually if they spin. This enables you to
pull away and accelerate on slippery surfaces,
for example if the road surface is slippery on
one side. In addition, more drive torque is
transferred to the wheel or wheels with
traction.
Traction control remains active, even if you
deactivate ESP ®
.XActivate the off-road drive program
( Y page 204) or engage the LOW RANGE
off-road gear ( Y page 157) if appropriate
for the driving conditions.
Off-road 4ETS (Electronic Traction
System)
A 4ETS system specifically suited to off-road
terrain is activated automatically if the off-
road drive program is activated
( Y page 204) or the LOW RANGE off-road
gear ( Y page 157) is selected.
Deactivating/activating ESP ®
GWarning
The ESP
®
should not be switched off during
normal driving other than in the
circumstances described below. Disabling
the system will reduce vehicle stability in
driving maneuvers.
Do not switch off the ESP ®
when a spare
wheel is mounted.
ESP ®
is activated automatically when the
engine is running.
It may be best to deactivate ESP ®
in the
following situations:
R when using snow chains
R in deep snow
R on sand or gravel
GWarning!
Activate ESP ®
as soon as the situations
described above no longer apply. ESP ®
will
otherwise not be able to stabilize the vehicle
if the vehicle starts to skid or a wheel starts
to spin.
Driving safety systems67SafetyBA 164.8 USA, CA Edition B 2011; 1; 2, en-USd2sboikeVersion: 3.0.3.52010-04-21T15:08:44+02:00 - Seite 67Z
Page 70 of 376

If you deactivate ESP®
:
R ESP ®
no longer improves driving stability.
R the engine's torque is no longer limited and
the drive wheels can spin. The spinning of
the wheels results in a cutting action, which
provides better grip.
R traction control is still activated.
R ESP ®
still provides support when you
brake.
If ESP ®
is deactivated and one or more wheels
start to spin, the d warning lamp in the
instrument cluster flashes. In such situations,
ESP ®
will not stabilize the vehicle.XTo deactivate: press button :.
The d warning lamp in the instrument
cluster lights up.GWarning
When the d ESP®
warning lamp is
illuminated continuously, the ESP ®
is
switched off or is not operational due to a
malfunction. Vehicle stability in standard
driving maneuvers is reduced.
Adapt your speed and driving style to the
prevailing road conditions and to the non-
operating status of the ESP ®
.
! Avoid spinning a drive wheel for an
extended period with ESP switched off. This
could cause serious damage to the drive
train.
XTo activate: press button :.
The d warning lamp in the instrument
cluster goes out.Off-road ESP ®
An ESP
®
system specifically suited to off-road
terrain is activated automatically if the off-
road drive program is activated
( Y page 204)or if the LOW RANGE off-road
gear ( Y page 157) is selected. It intervenes
with a delay if there is oversteering or
understeering, thus improving traction.
ESP ®
trailer stabilization
If your trailer begins to lurch, you can only
stabilize the vehicle/trailer combination by
depressing the brake firmly.
In this situation, ESP ®
assists you and can
detect if the trailer begins to lurch. ESP ®
slows the vehicle down by braking and
limiting the engine output until the vehicle/
trailer combination has stabilized.
Trailer stabilization is active from a speed
above 40 mph (65 km/h).
GWarning!
The system will not be able to assist when the
trailer jackknifes
R if the ESP ®
has switched off due to a
malfunction
R on wet or icy roads
R on roads with slippery surface
R in sand or gravel
Trailers with a high center of gravity may tip
over before the system recognizes swaying of
the trailer.
Trailer stabilization does not work if ESP ®
is
deactivated or disabled because of a
malfunction.
EBD
GWarning
Observe "Important safety instructions"
( Y page 65).
68Driving safety systemsSafety
BA 164.8 USA, CA Edition B 2011; 1; 2, en-USd2sboikeVersion: 3.0.3.52010-04-21T15:08:44+02:00 - Seite 68
Page 160 of 376

Shift ranges
There are two shift ranges.HIGH
RANGEOn-road position for all
normal driving situations
(LOW RANGE off-road gear
off).LOW
RANGEIn comparison with the
HIGH RANGE on-road
position, the gear ratio
between the engine and
wheels is one-third. Drive
torque is thus
proportionately higher.GWarning!
Always wait until the procedure of shifting
from HIGH RANGE to LOW RANGE – and from
LOW RANGE to HIGH RANGE – has been
entirely completed. During this procedure do
not turn off the engine or shift the automatic
transmission into another gear.
If you do not wait until the shifting procedure
has been entirely completed then it might not
be correctly performed. The transfer case
might be in neutral, thus interrupting the
transfer of power between the engine and the
drive axle.
The vehicle is then freely movable, even if a
gear has been selected, and could
unintentionally be set into motion –
particularly on up – or downhill grades. This
could lead to an accident and cause injury to
yourself and others.
Please observe related messages appearing
in the multifunction display.
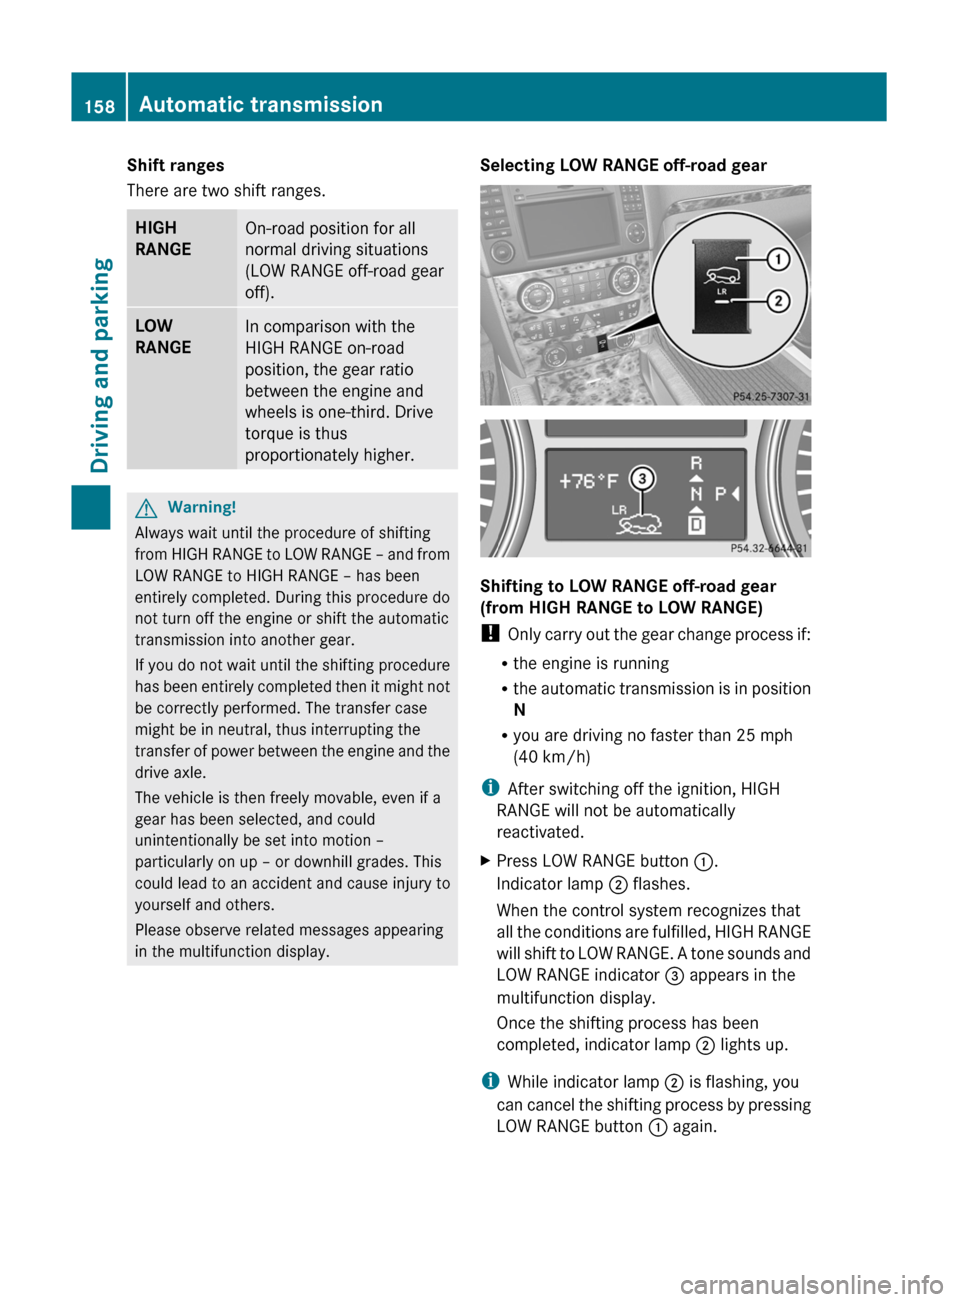
Selecting LOW RANGE off-road gear
Shifting to LOW RANGE off-road gear
(from HIGH RANGE to LOW RANGE)
! Only carry out the gear change process if:
R the engine is running
R the automatic transmission is in position
N
R you are driving no faster than 25 mph
(40 km/h)
i After switching off the ignition, HIGH
RANGE will not be automatically
reactivated.
XPress LOW RANGE button :.
Indicator lamp ; flashes.
When the control system recognizes that
all the conditions are fulfilled, HIGH RANGE
will shift to LOW RANGE. A tone sounds and
LOW RANGE indicator = appears in the
multifunction display.
Once the shifting process has been
completed, indicator lamp ; lights up.
i
While indicator lamp ; is flashing, you
can cancel the shifting process by pressing
LOW RANGE button : again.
158Automatic transmissionDriving and parking
BA 164.8 USA, CA Edition B 2011; 1; 2, en-USd2sboikeVersion: 3.0.3.52010-04-21T15:08:44+02:00 - Seite 158
Page 180 of 376

GWarning!
Never turn the vehicle around on steep inclines. The vehicle might roll over. If the vehicle cannot
complete the attempted climb, back it down in reverse gear.
i Hill start assist will aid you when pulling away on a hill.
For more information, see "Hill start assist" ( Y page 150).
Maximum gradient climbing ability
On good road surfaces, the maximum
gradient climbing capability of your vehicle is
100%, which corresponds to an approach/
departure angle of 45°. Note that the
vehicle's gradient-climbing capability
depends on the off-road conditions.
Accelerate carefully and make sure that the
wheels do not spin when driving on steep
terrain.
i If the load on the front axle is reduced
when pulling away on a steep uphill slope,
the front wheels have a tendency to spin.
4ETS recognizes this and brakes the
wheels accordingly. The rear wheel torque
is increased and it is easier to pull away.
i Vehicles with an Advanced Off-road
package have a differential lock for the
transfer case and a differential lock for the
rear axle to improve vehicle traction.
Hilltops
When driving up an uphill gradient, slightly
reduce pressure on the accelerator
immediately before reaching the brow of the
hill. Make use of the vehicle's own impetus to
travel over the brow.
This style of driving prevents:
R the vehicle from lifting off the ground on the
brow of a hill
R loss of traction
R the vehicle from traveling too quickly down
the other side
Driving downhill
R Drive slowly.
R Do not drive at an angle down steep
inclines. Steer into the line of fall and drive
with the front wheels aligned straight.
Otherwise, the vehicle could slip sideways,
tip and rollover.
R Before tackling steep downhill gradients,
select shift range 1.
R Activate DSR. If this is not sufficient, brake
gently. When doing so, make sure that the
vehicle is facing in the direction of the line
of fall.
R Check that the brakes are working normally
after a long downhill stretch.
i The special off-road ABS setting enables
the front wheels to be locked accurately,
briefly and repeatedly, causing them to dig
into the loose ground. Note that when the
front wheels are fully braked, they slide
easily over the ground surface and
therefore steering is impaired.
Driving abroad
An extensive Mercedes-Benz Service network
is also available in other countries. The
Service Hotline's current telephone numbers
for use when you are abroad are to be found
in the "Service24h" section of the Service
Booklet.
178Driving tipsDriving and parking
BA 164.8 USA, CA Edition B 2011; 1; 2, en-USd2sboikeVersion: 3.0.3.52010-04-21T15:08:44+02:00 - Seite 178
Page 207 of 376

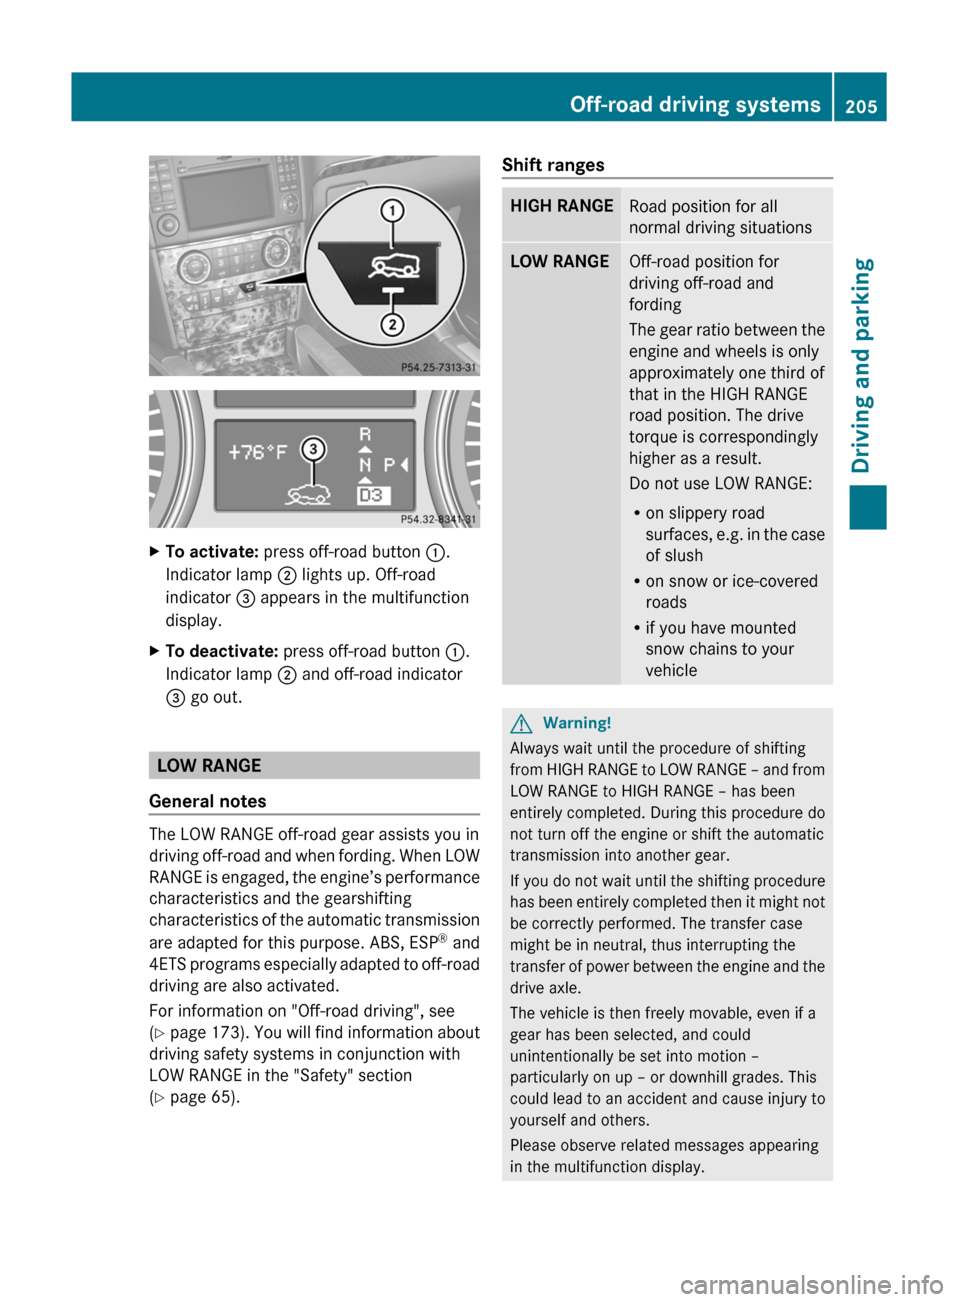
XTo activate: press off-road button :.
Indicator lamp ; lights up. Off-road
indicator = appears in the multifunction
display.XTo deactivate: press off-road button :.
Indicator lamp ; and off-road indicator
= go out.
LOW RANGE
General notes
The LOW RANGE off-road gear assists you in
driving off-road and when fording. When LOW
RANGE is engaged, the engine’s performance
characteristics and the gearshifting
characteristics of the automatic transmission
are adapted for this purpose. ABS, ESP ®
and
4ETS programs especially adapted to off-road
driving are also activated.
For information on "Off-road driving", see
( Y page 173) . You will find information about
driving safety systems in conjunction with
LOW RANGE in the "Safety" section
( Y page 65).
Shift rangesHIGH RANGERoad position for all
normal driving situationsLOW RANGEOff-road position for
driving off-road and
fording
The gear ratio between the
engine and wheels is only
approximately one third of
that in the HIGH RANGE
road position. The drive
torque is correspondingly
higher as a result.
Do not use LOW RANGE:
R on slippery road
surfaces, e.g. in the case
of slush
R on snow or ice-covered
roads
R if you have mounted
snow chains to your
vehicleGWarning!
Always wait until the procedure of shifting
from HIGH RANGE to LOW RANGE – and from
LOW RANGE to HIGH RANGE – has been
entirely completed. During this procedure do
not turn off the engine or shift the automatic
transmission into another gear.
If you do not wait until the shifting procedure
has been entirely completed then it might not
be correctly performed. The transfer case
might be in neutral, thus interrupting the
transfer of power between the engine and the
drive axle.
The vehicle is then freely movable, even if a
gear has been selected, and could
unintentionally be set into motion –
particularly on up – or downhill grades. This
could lead to an accident and cause injury to
yourself and others.
Please observe related messages appearing
in the multifunction display.
Off-road driving systems205Driving and parkingBA 164.8 USA, CA Edition B 2011; 1; 2, en-USd2sboikeVersion: 3.0.3.52010-04-21T15:08:44+02:00 - Seite 205Z
Page 209 of 376

Differential lock
General notes
i Differential locks are available only in
vehicles with the Off-Road Pro engineering
package.
Your vehicle is equipped with the following:
R A differential lock for the transfer box: this
controls the balance between the front and
rear axles.
R A differential lock for the rear axle: this
controls the balance between the wheels
and the rear axle.
Differential locks improve the vehicle's
traction. 4ETS ( Y page 67)controls the
balance between the wheels on the front axle.
Information on "Off-road driving"; see
( Y page 173).
Information about the differential and
differential locks
When the vehicle is driving around a curve,
the wheels on the outside of the curve have
to cover a greater distance and therefore
have to turn faster than the wheels on the
inside. The differential, a transmission in the
drive train, balances these different rotational
speeds out, making cornering possible.
The disadvantage of a differential: the wheels
with the least grip are driven the hardest.
Example: one wheel on a driven axle is on a
snow-covered surface and therefore has no
traction. This wheel has the most driving
force, since the differential distributes most
of the force to the wheel with the least
resistance. The wheel on the opposite side of
this axle, which is on a solid surface and could
therefore enable traction, does not have any
driving force. 4ETS eliminates this
disadvantage and ensures good steerability
by braking the spinning wheel automatically
and thereby directing more force to the wheel
that is on a solid surface and can provide
traction.
ESP ®
and 4ETS are traction systems that are
ideally suited to road driving and driving on
easily negotiable off-road terrain. The LOW
RANGE off-road gear also improves off-road
capability.
Difficult off-road conditions require additional
measures, such as locking one or more
differentials. Your vehicle has two differential
locks: one (central) differential lock for the
transfer case and one differential lock for the
rear axle. Both differential locks can be
activated using the selector wheel on the
center console. When the (central)
differential for the transfer case is locked, the
speed of the front wheels is the same as the
speed of the rear wheels. When the
differential for the rear axle is locked, both of
the rear wheels turn at the same speed,
independent of their individual torques. Note
that activating the differential locks
significantly reduces the steerability of the
vehicle.
For your safety, the safety of others and to
prevent damage to the vehicle, the
differential locks must not be activated on
paved roads. Note that the differential
function is necessary when driving on paved
roads and that the differentials must never be
locked on paved roads. Otherwise, the
vehicle can no longer be steered. The
differential locks must therefore only be
activated when driving off-road, and then only
if activating the other driving systems (4ETS,
ESP ®
and LOW RANGE off-road gear) is no
longer sufficient.
Engaging the differential locks
! Drive off slowly when the differential
locks are engaged.
Function or performance tests may only be
performed on a 2-axle dynamometer. If you
wish to operate the vehicle on such a
dynamometer, please consult an
authorized Mercedes-Benz Center
beforehand. You could otherwise damage
the drive train or the brake system.
Off-road driving systems207Driving and parkingBA 164.8 USA, CA Edition B 2011; 1; 2, en-USd2sboikeVersion: 3.0.3.52010-04-21T15:08:44+02:00 - Seite 207Z