2011 MERCEDES-BENZ GL fog light
[x] Cancel search: fog lightPage 11 of 376

Storing settings (memory
function) ........................................ 110
Storing the parking position ..........109
Exterior view ........................................ 26
F
Filling capacity see Technical data
First-aid kit ......................................... 309
Flat tire Changing a wheel/mounting the
spare wheel ................................... 316
MOExtended run-flat system .........321
Preparing the vehicle .....................311
Raising the vehicle .........................318
TIREFIT kit ...................................... 312
Floormat ............................................. 291
Front fog lamp (display
message) ............................................ 239
Fuel Additives ........................................ 367
Notes ............................................. 366
Premium-grade unleaded gasoline . 366
Refueling ........................................ 159
Specifications ................................ 366
Troubleshooting ............................. 162
Fuel consumption
Current (on-board computer) .........227
Notes ............................................. 167
Fuel filler cap (display message) ..... 243
Fuel filler flap Emergency release ........................161
Opening/closing ............................ 160
Fuel filter (display message) ............ 243
Fuel level Calling up the range (on-board
computer) ...................................... 227
Fuses
Dashboard fuse box .......................330
Engine emergency stop .................331
Fuse allocation chart .....................330
Fuse box in the cargo
compartment ................................. 331
Fuse box in the engine
compartment ................................. 330
Notes ............................................. 329
G
Garage door opener Clearing the memory .....................291
Notes ............................................. 288
Opening/closing the garage door ..291
Programming the remote control ...289
Gear or selector lever (cleaning
guidelines) ......................................... 304
Genuine Mercedes-Benz parts ......... 362
Genuine wood trim and trim strips
(cleaning instructions) ...................... 304
Glove box ........................................... 265
GTW (Gross Trailer Weight)
(definition) ......................................... 355
H
Headlamp cleaning system .............. 117
Adding washer fluid .......................297
Notes ............................................. 370
Headlamp delayed switch-off
see Delayed switch-off, exterior lighting
Headlamp mode (daytime driving)
see Daytime running lamps
Headlamps
Cleaning ......................................... 302
Misting up ...................................... 118
Setting ........................................... 124
Head restraint
Adjusting (electrically) .....................97
Head restraints
Adjusting (manually) ........................97
Adjusting (rear) ................................ 98
Installing/removing (rear) ................99
Luxury .............................................. 97
see NECK-PRO head restraints
Heating
see Climate control
High beam flasher ............................. 117
Hill start assist .................................. 150
Hood Closing ........................................... 295
Opening ......................................... 294
Hydroplaning ..................................... 170
Index9BA 164.8 USA, CA Edition B 2011; 1; 2, en-USd2sboikeVersion: 3.0.3.52010-04-21T15:08:44+02:00 - Seite 9
Page 12 of 376

I
Immobilizer .......................................... 69
Indicator and warning lamps ABS ................................................ 256
Brakes ........................................... 254
DISTRONIC .................................... 260
Engine diagnostics .........................259
ESP ®
.............................................. 257
Fuel tank ........................................ 259
Reserve fuel ................................... 259
Seat belt ........................................ 255
SRS ................................................ 258
Tire pressure monitor ....................260
Insect protection on the radiator .... 295
Instrument cluster Overview .......................................... 28
Selecting the language (on-board
computer) ...................................... 222
Submenu (on-board computer) ......221
Warning and indicator lamps ...........29
Instrument cluster lighting ................ 28
Instrument lighting see Instrument cluster lighting
Interior lighting
Automatic control ..........................119
Delayed switch-off (on-board
computer) ...................................... 224
Emergency lighting ........................119
Manual control ............................... 119
Reading lamp ................................. 118
Setting ambient lighting (on-board
computer) ...................................... 223
ISOFIX (LATCH-type child seat
securing system) ................................. 62
J
Jack Storage location ............................ 310
Using ............................................. 318
Jump-starting ..................................... 325
K
Key Convenience closing feature ............87
Convenience opening feature ..........86
Display message ............................ 252
Starting the engine ........................148
KEYLESS-GO
Button ............................................ 147
Convenience closing feature ............87
Locking ............................................ 73
Starting the engine ........................149
Unlocking ......................................... 73
Key positions
KEYLESS-GO .................................. 147
SmartKey ....................................... 147
Kickdown ........................................... 155
Knee bag .............................................. 40
L
Lane-change assistant see Blind Spot Assist
Language (on-board computer) ........ 222
Level control ...................................... 189
Level control (display message) ...... 244
License plate lamp (display
message) ............................................ 239
Light Setting ambient lighting (on-board
computer) ...................................... 223
Lights
Activating/deactivating the
interior lighting delayed switch-off
(on-board computer) ......................224
Active light function .......................118
Automatic headlamp mode ............115
Daytime running lamps ..................115
Driving abroad ............................... 114
Fog lamps ...................................... 116
Hazard warning lamps ...................117
High-beam headlamps ...................117
Light switch ................................... 114
Low-beam headlamps ....................115
Rear fog lamp ................................ 116
Switching the daytime driving
lights on/off (on-board computer) . 223
Switching the exterior lighting
delayed switch-off on/off (on-
board computer) ............................ 223
Switching the surround lighting
on/off (on-board computer) ..........223
Light sensor (display message) ....... 240
10IndexBA 164.8 USA, CA Edition B 2011; 1; 2, en-USd2sboikeVersion: 3.0.3.52010-04-21T15:08:44+02:00 - Seite 10
Page 116 of 376
Vehicle equipment
i This manual describes all the standard
and optional equipment of your vehicle
which was available at the time of
purchase. Country-specific differences are
possible. Bear in mind that your vehicle
may not feature all functions described
here. This also refers to safety-related
systems and functions.
Exterior lighting
Important safety notes
For reasons of safety, Mercedes-Benz
recommends that you drive with the lights
switched on even during the daytime. In some
countries, operation of the headlamps varies
due to legal requirements and self-imposed
obligations. In these countries, the daytime
running lamps are automatically switched on
when the engine is started.
Notes on driving abroad
Converting to symmetrical low beam
when driving abroad: switch the headlamps
to symmetrical low beam in countries in
which traffic drives on the opposite side of the
road to the country where the vehicle is
registered. This prevents oncoming traffic
from being dazzled. Symmetrical lights do not
illuminate as large an area of the edge of the
carriageway.
Have the headlamps converted at a qualified
specialist workshop, e.g. an authorized
Mercedes-Benz Center, as close to the border
as possible before driving in these countries.
Converting to asymmetrical low beam
after returning: have the headlamps
converted back to asymmetrical low beam at
a qualified specialist workshop, e.g. an
authorized Mercedes-Benz Center, as soon as
possible after crossing the border when
returning.
Light switch
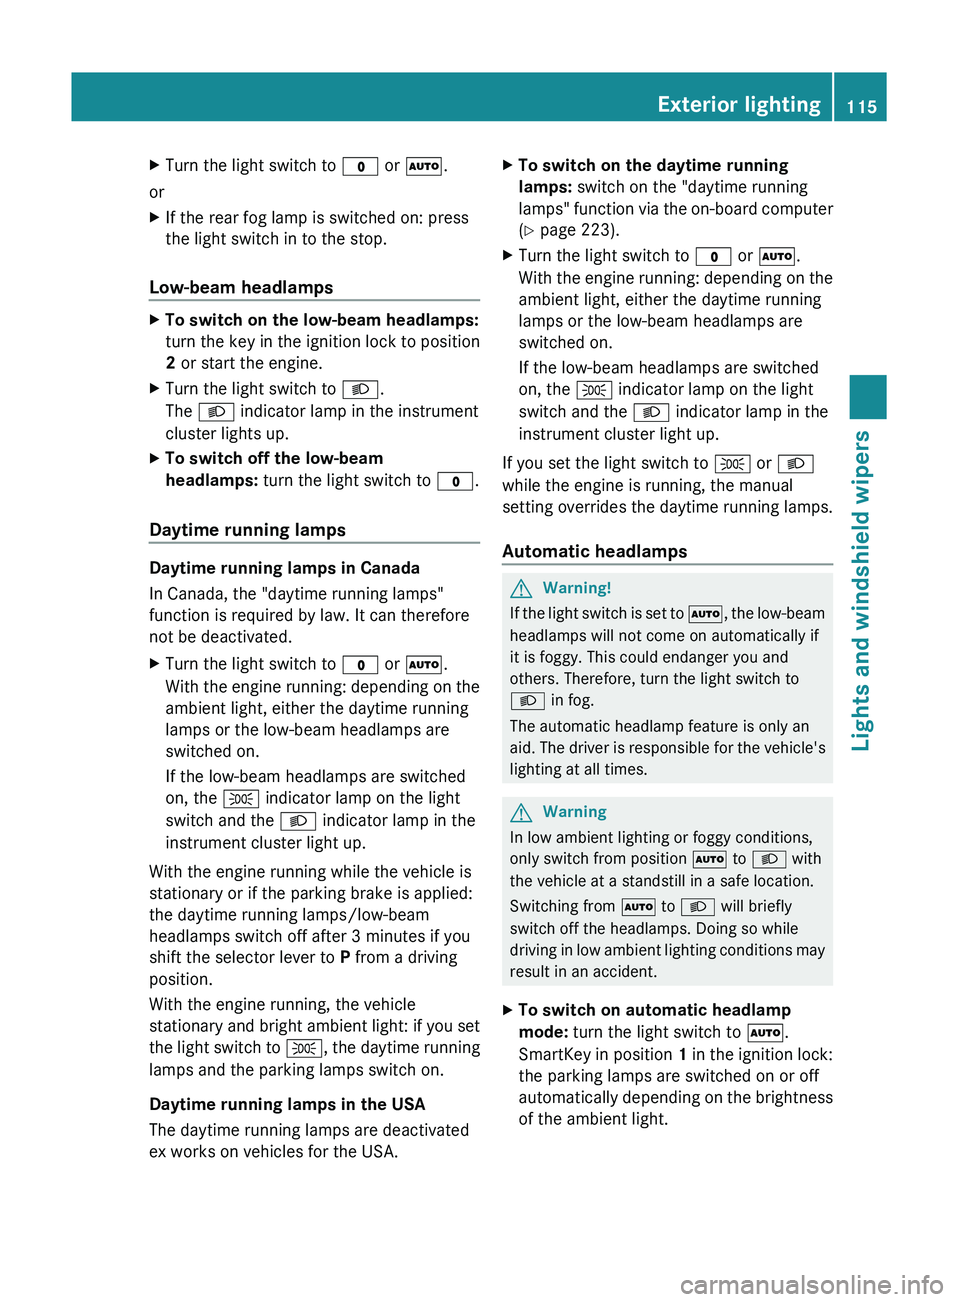
Operation1 WLeft-hand standing lamps2XRight-hand standing lamps3$Lights off/daytime running lamps4ÃAutomatic headlamp mode/daytime
running lamps5 TParking lamps, license plate and
instrument lighting6 LLow-beam/high-beam headlamps7RVehicles without front fog lamps:
rear fog lamp7 NVehicles with fog lamps: front fog
lamp8 RVehicles with fog lamps: rear fog
lamp
The turn signals, high-beam headlamps and
the high beam flasher are operated using the
combination switch ( Y page 117).
! Switch off the parking lamps and standing
lamps when you leave the vehicle. This
prevents the battery from discharging.
The exterior lighting (except the parking
lamps/standing lamps) switches off
automatically if you:
R remove the key from the ignition lock
R open the driver's door with the key in
position 0
If you hear a warning tone when you leave the
vehicle, the lights may still be switched on.
114Exterior lightingLights and windshield wipers
BA 164.8 USA, CA Edition B 2011; 1; 2, en-USd2sboikeVersion: 3.0.3.52010-04-21T15:08:44+02:00 - Seite 114
Page 117 of 376
XTurn the light switch to $ or à .
or
XIf the rear fog lamp is switched on: press
the light switch in to the stop.
Low-beam headlamps
XTo switch on the low-beam headlamps:
turn the key in the ignition lock to position
2 or start the engine.XTurn the light switch to L.
The L indicator lamp in the instrument
cluster lights up.XTo switch off the low-beam
headlamps: turn the light switch to $.
Daytime running lamps
Daytime running lamps in Canada
In Canada, the "daytime running lamps"
function is required by law. It can therefore
not be deactivated.
XTurn the light switch to $ or à .
With the engine running: depending on the
ambient light, either the daytime running
lamps or the low-beam headlamps are
switched on.
If the low-beam headlamps are switched
on, the T indicator lamp on the light
switch and the L indicator lamp in the
instrument cluster light up.
With the engine running while the vehicle is
stationary or if the parking brake is applied:
the daytime running lamps/low-beam
headlamps switch off after 3 minutes if you
shift the selector lever to P from a driving
position.
With the engine running, the vehicle
stationary and bright ambient light: if you set
the light switch to T, the daytime running
lamps and the parking lamps switch on.
Daytime running lamps in the USA
The daytime running lamps are deactivated
ex works on vehicles for the USA.
XTo switch on the daytime running
lamps: switch on the "daytime running
lamps" function via the on-board computer
( Y page 223).XTurn the light switch to $ or à .
With the engine running: depending on the
ambient light, either the daytime running
lamps or the low-beam headlamps are
switched on.
If the low-beam headlamps are switched
on, the T indicator lamp on the light
switch and the L indicator lamp in the
instrument cluster light up.
If you set the light switch to T or
L
while the engine is running, the manual
setting overrides the daytime running lamps.
Automatic headlamps
GWarning!
If the light switch is set to Ã, the low-beam
headlamps will not come on automatically if
it is foggy. This could endanger you and
others. Therefore, turn the light switch to
L in fog.
The automatic headlamp feature is only an
aid. The driver is responsible for the vehicle's
lighting at all times.
GWarning
In low ambient lighting or foggy conditions,
only switch from position à to L with
the vehicle at a standstill in a safe location.
Switching from à to L will briefly
switch off the headlamps. Doing so while
driving in low ambient lighting conditions may
result in an accident.
XTo switch on automatic headlamp
mode: turn the light switch to Ã.
SmartKey in position 1 in the ignition lock:
the parking lamps are switched on or off
automatically depending on the brightness
of the ambient light.Exterior lighting115Lights and windshield wipersBA 164.8 USA, CA Edition B 2011; 1; 2, en-USd2sboikeVersion: 3.0.3.52010-04-21T15:08:44+02:00 - Seite 115Z
Page 118 of 376
With the engine running: depending on the
brightness of the ambient light, the daytime
running lamps 11
or the low-beam
headlamps are switched on or off
automatically.
When the low-beam headlamps are
switched on, the L indicator lamp in the
instrument cluster lights up.
Fog lamps and rear fog lamps
Front fog lamps
Only vehicles with front fog lamps have the
"fog lamps" function.
GWarning!
If you suspect that driving conditions will be
foggy, turn the light switch to L before you
start your journey. Otherwise, your vehicle
may not be visible and you could endanger
yourself and others.
GWarning
In low ambient lighting or foggy conditions,
only switch from position à to L with
the vehicle at a standstill in a safe location.
Switching from à to L will briefly
switch off the headlamps. Doing so while
driving in low ambient lighting conditions may
result in an accident.
XTo switch on the front fog lamps: turn
the key in the ignition lock to position 2 or
start the engine.XTurn the light switch to L or T . If the
light switch is set to Ã, you cannot
switch on the fog lamps.XPull the light switch out to the first detent.
The green N indicator lamp on the light
switch lights up.XTo switch off the front fog lamps: press
the light switch in as far as it will go.
The green N indicator lamp on the light
switch goes out.Rear fog lampXTo switch on (vehicles with front fog
lamps): turn the key in the ignition lock to
position 2 or start the engine.XTurn the light switch to L or T . When
the light switch is set to Ã, you cannot
switch on the rear fog lamp.XPull the light switch out to the second stop.
The yellow R indicator lamp on the light
switch lights up.XTo switch off the rear fog lamp: press the
light switch in as far as it will go.
The yellow R indicator lamp on the light
switch goes out.XTo switch on (vehicles without front fog
lamps): turn the key in the ignition lock to
position 2 or start the engine.XTurn the light switch to L. When the
light switch is set to Ã, you cannot
switch on the rear fog lamp.XPull the light switch out to the stop.
The yellow R indicator lamp on the light
switch lights up.XTo switch off the rear fog lamp: press the
light switch in as far as it will go.
The yellow R indicator lamp on the light
switch goes out.11 Only if daytime running lamps have been activated via the on-board computer.116Exterior lightingLights and windshield wipers
BA 164.8 USA, CA Edition B 2011; 1; 2, en-USd2sboikeVersion: 3.0.3.52010-04-21T15:08:44+02:00 - Seite 116
Page 120 of 376

operated five times while the lights are on and
the engine is running (Y page 125). When you
switch off the ignition, the automatic
headlamp cleaning system is reset and
counting is resumed from 0.
Active light function
The active light function is a system that
moves the headlamps according to the
steering movements of the front wheels. In
this way, relevant areas remain illuminated
while driving. This allows you to recognize
pedestrians, cyclists and animals.
Active: when the lights are switched on.
Headlamps fogged up on the inside
The headlamps may fog up on the inside if
there is high atmospheric humidity.
XDrive with the headlamps switched on.
The headlamps clear up after a short
distance.
If the moisture does not disappear, the
headlamp casing is not sealed correctly and
moisture has been able to enter.
XHave the headlamps checked at a qualified
specialist workshop.Interior lighting
Overview of interior lighting
Overhead control panel
:p To switch the left-hand front reading
lamp on/off;v To switch the rear interior lighting
on/off=| To switch the automatic interior
lighting control on/off?c To switch the front interior lighting
on/offAp To switch the right-hand front
reading lamp on/offBFront interior lightingCFront reading lampsDFront interior lighting118Interior lightingLights and windshield wipers
BA 164.8 USA, CA Edition B 2011; 1; 2, en-USd2sboikeVersion: 3.0.3.52010-04-21T15:08:44+02:00 - Seite 118
Page 123 of 376
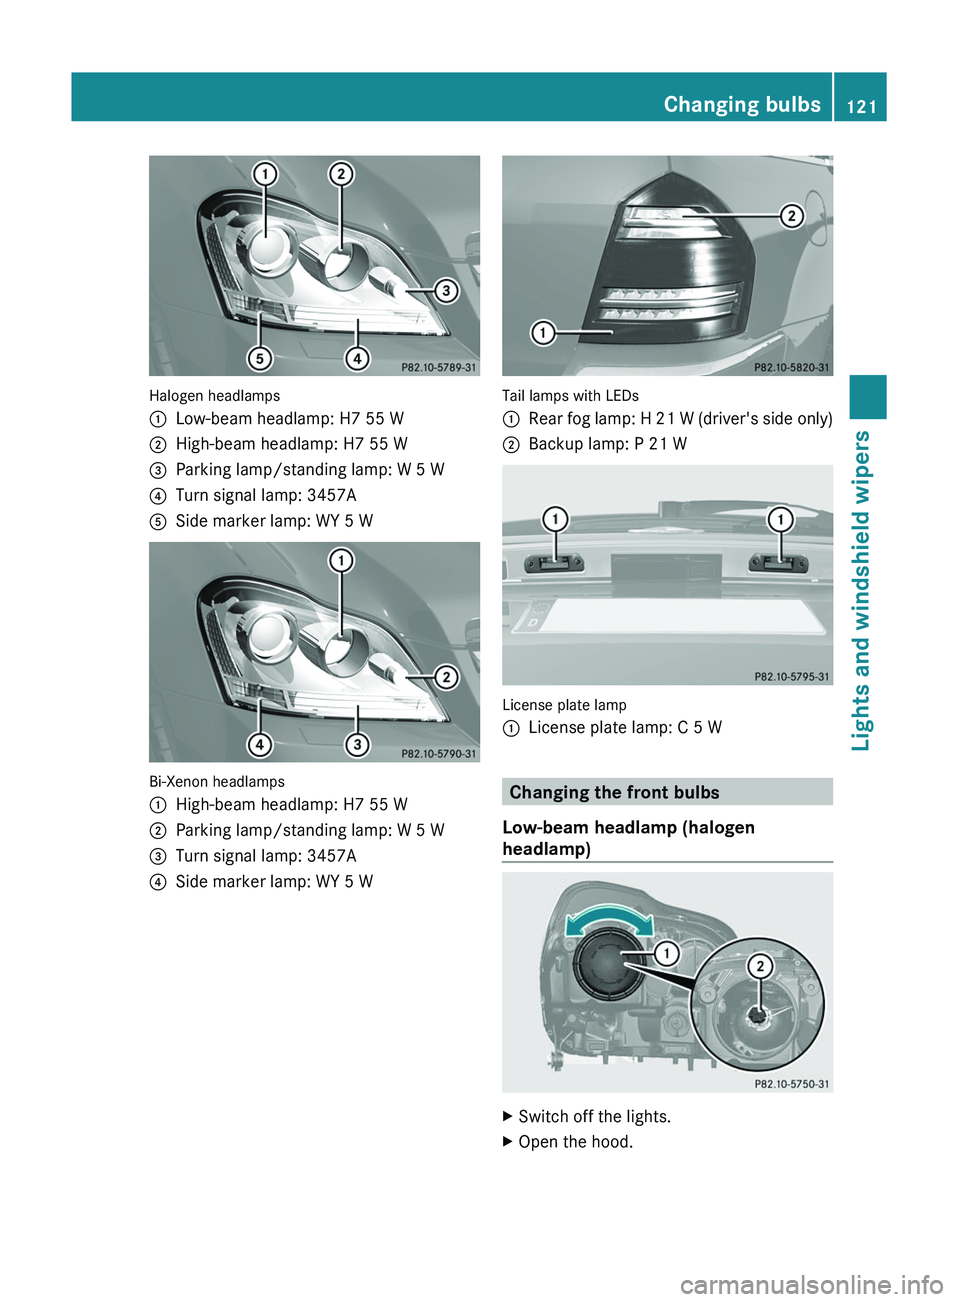
Halogen headlamps
:Low-beam headlamp: H7 55 W;High-beam headlamp: H7 55 W=Parking lamp/standing lamp: W 5 W?Turn signal lamp: 3457AASide marker lamp: WY 5 W
Bi-Xenon headlamps
:High-beam headlamp: H7 55 W;Parking lamp/standing lamp: W 5 W=Turn signal lamp: 3457A?Side marker lamp: WY 5 W
Tail lamps with LEDs
:Rear fog lamp: H 21 W (driver's side only);Backup lamp: P 21 W
License plate lamp
:License plate lamp: C 5 W
Changing the front bulbs
Low-beam headlamp (halogen
headlamp)
XSwitch off the lights.XOpen the hood.Changing bulbs121Lights and windshield wipersBA 164.8 USA, CA Edition B 2011; 1; 2, en-USd2sboikeVersion: 3.0.3.52010-04-21T15:08:44+02:00 - Seite 121Z
Page 125 of 376
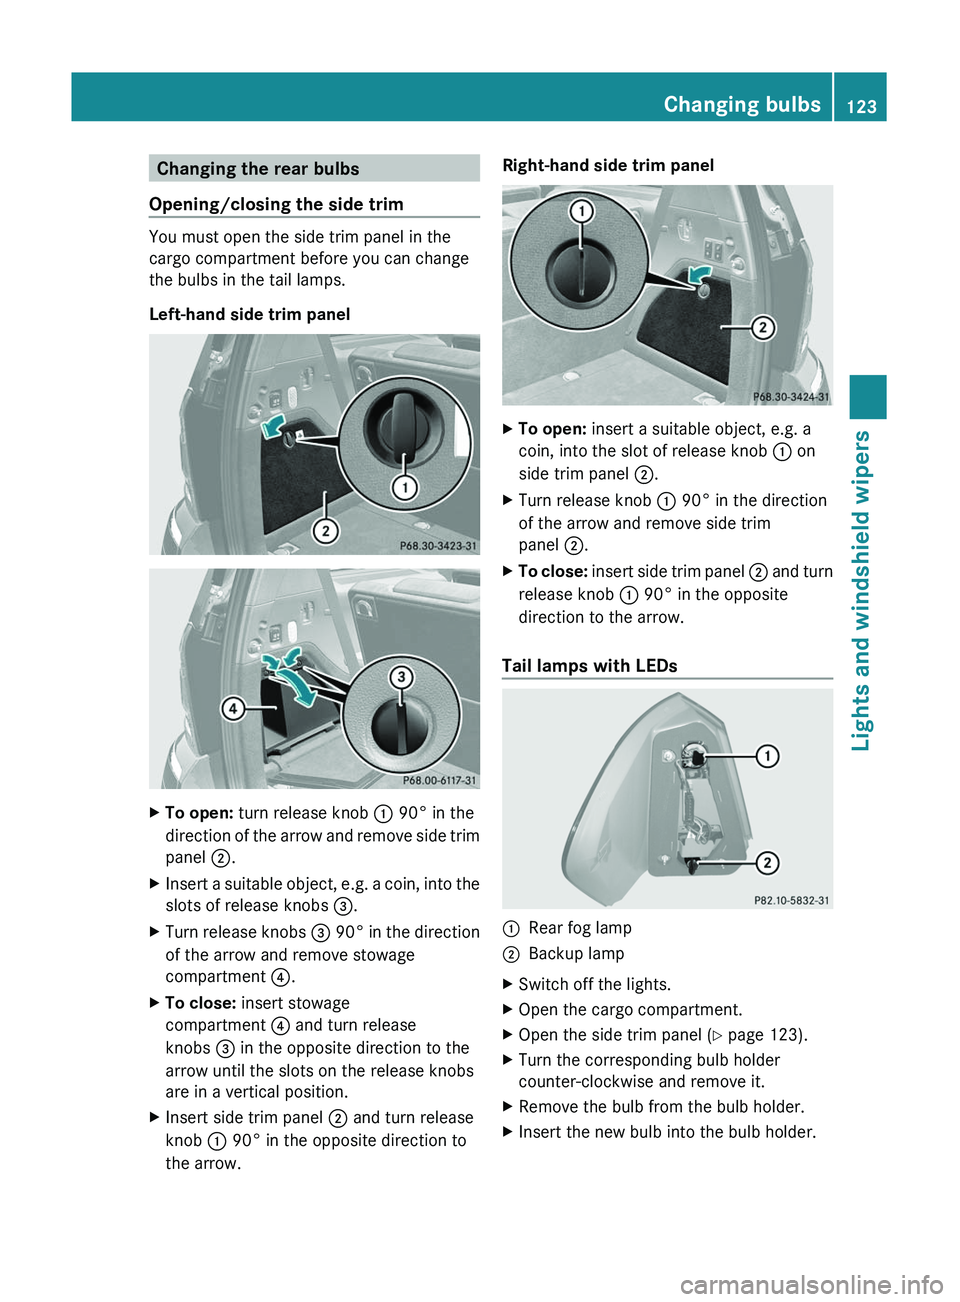
Changing the rear bulbs
Opening/closing the side trim
You must open the side trim panel in the
cargo compartment before you can change
the bulbs in the tail lamps.
Left-hand side trim panel
XTo open: turn release knob : 90° in the
direction of the arrow and remove side trim
panel ;.XInsert a suitable object, e.g. a coin, into the
slots of release knobs =.XTurn release knobs = 90° in the direction
of the arrow and remove stowage
compartment ?.XTo close: insert stowage
compartment ? and turn release
knobs = in the opposite direction to the
arrow until the slots on the release knobs
are in a vertical position.XInsert side trim panel ; and turn release
knob : 90° in the opposite direction to
the arrow.Right-hand side trim panelXTo open: insert a suitable object, e.g. a
coin, into the slot of release knob : on
side trim panel ;.XTurn release knob : 90° in the direction
of the arrow and remove side trim
panel ;.XTo close: insert side trim panel ; and turn
release knob : 90° in the opposite
direction to the arrow.
Tail lamps with LEDs
:Rear fog lamp ;Backup lamp XSwitch off the lights.XOpen the cargo compartment.XOpen the side trim panel ( Y page 123).XTurn the corresponding bulb holder
counter-clockwise and remove it.XRemove the bulb from the bulb holder.XInsert the new bulb into the bulb holder.Changing bulbs123Lights and windshield wipersBA 164.8 USA, CA Edition B 2011; 1; 2, en-USd2sboikeVersion: 3.0.3.52010-04-21T15:08:44+02:00 - Seite 123Z