2011 MERCEDES-BENZ GL dashboard
[x] Cancel search: dashboardPage 9 of 376
D
Dashboard see Cockpit
Date (on-board computer) ................ 222
Daytime driving lights Display message ............................ 240
Switching on/off (on-board
computer) ...................................... 223
Delayed switch-off
Exterior lighting (on-board
computer) ...................................... 223
Interior lighting (on-board
computer) ...................................... 224
Diesel particle filter .......................... 168
Differential locks ............................... 207
Differential locks (display
message) ............................................ 245
Digital speedometer Displaying ...................................... 218
Setting the unit (on-board
computer) ...................................... 222
DIRECT SELECT lever
see Automatic transmission
Display (cleaning instructions) ........ 303
Display messages Brakes ........................................... 235
Calling up (on-board computer) .....229
Clearing (on-board computer) ........229
Engine ............................................ 240
Lamps ............................................ 240
Safety systems .............................. 230
Service interval display ..................298
Tires ............................................... 248
Vehicle ........................................... 250
Distance recorder ............................. 218
Distance warning function
(vehicles with DISTRONIC) ................. 69
Activating/deactivating (on-
board computer) ............................ 226
Distance warning lamp ..................... 260
DISTRONIC ......................................... 181
Display message ............................ 247
Displays in the multifunction
display ........................................... 186
Driving tips .................................... 187Setting the specified minimum
distance ......................................... 185
Warning lamp ................................. 260
Door
Automatic locking ............................ 79
Automatic locking (on-board
computer) ...................................... 224
Display message ............................ 251
Emergency locking ........................... 80
Emergency unlocking .......................80
Opening (from inside) ......................79
Door control panel
Overview .......................................... 34
Doors
Important safety notes ....................78
Drinking and driving ......................... 167
Drinks holder see Cup holder
Driving abroad ................................... 178
Driving in mountainous terrain Approach/departure angle ............177
Driving on flooded roads .................. 170
Driving safety system EBD (Electronic Brake force
Distribution) ..................................... 68
ESP ®
(Electronic Stability
Program) .......................................... 66
Important safety information ...........65
Driving safety systems
4ETS (Electronic Traction System) ...67
ABS (Anti-lock Braking System) .......65
BAS (Brake Assist System) ..............66
Distance warning system
(vehicles with DISTRONIC) ...............69
Overview .......................................... 65
Driving systems
Blind Spot Assist ............................ 200
Cruise control ................................ 179
DISTRONIC .................................... 181
Level control .................................. 189
PARKTRONIC ................................. 195
Rear view camera .......................... 198
Driving tips ........................................ 155
DISTRONIC .................................... 187
Downhill gradients .........................168
Driving on flooded roads ................170
Driving on sand .............................. 176Index7BA 164.8 USA, CA Edition B 2011; 1; 2, en-USd2sboikeVersion: 3.0.3.52010-04-21T15:08:44+02:00 - Seite 7
Page 11 of 376

Storing settings (memory
function) ........................................ 110
Storing the parking position ..........109
Exterior view ........................................ 26
F
Filling capacity see Technical data
First-aid kit ......................................... 309
Flat tire Changing a wheel/mounting the
spare wheel ................................... 316
MOExtended run-flat system .........321
Preparing the vehicle .....................311
Raising the vehicle .........................318
TIREFIT kit ...................................... 312
Floormat ............................................. 291
Front fog lamp (display
message) ............................................ 239
Fuel Additives ........................................ 367
Notes ............................................. 366
Premium-grade unleaded gasoline . 366
Refueling ........................................ 159
Specifications ................................ 366
Troubleshooting ............................. 162
Fuel consumption
Current (on-board computer) .........227
Notes ............................................. 167
Fuel filler cap (display message) ..... 243
Fuel filler flap Emergency release ........................161
Opening/closing ............................ 160
Fuel filter (display message) ............ 243
Fuel level Calling up the range (on-board
computer) ...................................... 227
Fuses
Dashboard fuse box .......................330
Engine emergency stop .................331
Fuse allocation chart .....................330
Fuse box in the cargo
compartment ................................. 331
Fuse box in the engine
compartment ................................. 330
Notes ............................................. 329
G
Garage door opener Clearing the memory .....................291
Notes ............................................. 288
Opening/closing the garage door ..291
Programming the remote control ...289
Gear or selector lever (cleaning
guidelines) ......................................... 304
Genuine Mercedes-Benz parts ......... 362
Genuine wood trim and trim strips
(cleaning instructions) ...................... 304
Glove box ........................................... 265
GTW (Gross Trailer Weight)
(definition) ......................................... 355
H
Headlamp cleaning system .............. 117
Adding washer fluid .......................297
Notes ............................................. 370
Headlamp delayed switch-off
see Delayed switch-off, exterior lighting
Headlamp mode (daytime driving)
see Daytime running lamps
Headlamps
Cleaning ......................................... 302
Misting up ...................................... 118
Setting ........................................... 124
Head restraint
Adjusting (electrically) .....................97
Head restraints
Adjusting (manually) ........................97
Adjusting (rear) ................................ 98
Installing/removing (rear) ................99
Luxury .............................................. 97
see NECK-PRO head restraints
Heating
see Climate control
High beam flasher ............................. 117
Hill start assist .................................. 150
Hood Closing ........................................... 295
Opening ......................................... 294
Hydroplaning ..................................... 170
Index9BA 164.8 USA, CA Edition B 2011; 1; 2, en-USd2sboikeVersion: 3.0.3.52010-04-21T15:08:44+02:00 - Seite 9
Page 16 of 376

Emergency Tensioning Devices ........ 57
Fastening ......................................... 55
Important safety guidelines .............53
Releasing ......................................... 57
Safety guidelines ............................. 37
Switching belt adjustment on/off
(on-board computer) ......................225
Warning lamp ................................. 255
Warning lamp (function) ................... 57
Seat heating
Indicator lamp (Malfunction) ..........105
Seats
Adjusting (electrically) .....................96
Adjusting (second and third rows) . 100
Adjusting the 4-way lumbar
support .......................................... 104
Adjusting the head restraint ............97
Cleaning the cover .........................304
Correct driver's seat position ........... 94
Important safety instructions ...........95
Multicontour seat .......................... 103
Storing settings (memory
function) ........................................ 110
Switching seat heating on/off .......104
Switching the seat ventilation on/
off .................................................. 105
Seat ventilation
Indicator lamp (Malfunction) ..........105
Securing hooks .................................. 268
Sensors (cleaning instructions) ....... 303
Service indicator see Service interval display
Service interval display .................... 298
Displaying a service message (on-
board computer) ............................ 299
Service products
AdBlue ®
special additives ..............367
Brake fluid ..................................... 369
Coolant (engine) ............................ 369
Engine oil ....................................... 368
Filling capacity ............................... 365
Fuel ................................................ 366
Important safety notes ..................364
Notes ............................................. 364
Refrigerant (air-conditioning
system) .......................................... 369
Washer fluid ................................... 370Settings
Factory (on-board computer) .........221
On-board computer .......................221
Shift ranges ....................................... 155
Side impact air bag ............................. 41
Side marker lamp (display
message) ............................................ 239
Side windows Convenience closing feature ............87
Convenience opening feature ..........86
Hinged side windows .......................86
Important safety information ...........84
Opening/closing .............................. 85
Resetting ......................................... 87
Troubleshooting ............................... 88
Sliding sunroof
Important safety information ...........88
Troubleshooting ............................... 90
see Tilt/sliding sunroof
SmartKey
Changing the battery .......................76
Changing the programming .............75
Checking the battery .......................76
Important safety notes ....................72
Malfunction ...................................... 77
Snow chains ...................................... 172
Socket ................................................ 281
Dashboard ..................................... 281
Front-passenger footwell ...............281
Luggage compartment ...................281
Rear compartment .........................281
SOS
see mbrace
Spare wheel
Notes/data .................................... 359
Storage location ............................ 311
see Emergency spare wheel
Speedometer
Additional speedometer (on-
board computer) ............................ 218
Segments ...................................... 215
Setting the unit (on-board
computer) ...................................... 221
SRS (Supplemental Restraint
System) Display message ............................ 231
Introduction ..................................... 3614IndexBA 164.8 USA, CA Edition B 2011; 1; 2, en-USd2sboikeVersion: 3.0.3.52010-04-21T15:08:44+02:00 - Seite 14
Page 40 of 376
RNever place your feet on the instrument
panel, dashboard, or on the seat. Always
keep both feet on the floor in front of the
seat.
R Improper repair work on the SRS creates a
risk of rendering the SRS inoperative or
causing unintended air bag deployment.
Work on the SRS must therefore only be
performed by qualified technicians.
Contact an authorized Mercedes-Benz
Center.
R For your protection and the protection of
others, when scrapping the air bag unit or
ETD, our safety instructions must be
followed. These instructions are available
from any authorized Mercedes-Benz
Center.
R Given the considerable deployment speed,
required inflation volume, and the material
of the air bags, there is the possibility of
abrasions or other, potentially more serious
injuries resulting from air bag deployment.
If you sell your vehicle, Mercedes-Benz
strongly recommends that you inform the
subsequent owner that the vehicle is
equipped with SRS. Also refer them to the
applicable section in the Operator's Manual.
Air bags
Important safety notes
GWarning
Air bags are designed to reduce the incidence
of injuries and fatalities in certain situations:
R frontal impacts (driver's and front-
passenger front air bags and knee bag on
the driver's side)
R side impacts (side impact air bags and
window curtain air bags)
R rollover (window curtain air bags)
However, no system available today can
completely eliminate injuries and fatalities.
When the air bags are deployed, a small
amount of powder is released. The powder
generally does not constitute a health hazard
and does not indicate that there is a fire in the
vehicle. In order to prevent potential
breathing difficulties, you should leave the
vehicle as soon as it is safe to do so. If you
have any breathing difficulty but cannot get
out of the vehicle after the airbag inflates,
then get fresh air by opening a window or
door.GWarning
To reduce the risk of injuries during front air
bag inflation, the driver and front-passenger
must always be seated correctly and have
their seat belts fastened accordingly.
For maximum protection in the event of a
collision, you must always be in the normal
seat position with your back against the
backrest. Fasten your seat belt and make sure
it is properly positioned on your body.
Since the air bag inflates with considerable
speed and force, a proper seating position
and correct positioning of the hands on the
steering wheel will help to keep you at a safe
distance from the air bag. Occupants who are
not wearing their seat belt, are not seated
properly or are too close to the air bag can be
seriously injured or killed by an air bag as it
inflates with great force instantaneously:
R Sit with the seat belt properly fastened in a
position that is as upright as possible with
your back against the seat backrest.
R Move the driver's seat as far back as
possible, still permitting proper operation
of vehicle controls. The distance from the
center of the driver's chest to the center of
the air bag cover on the steering wheel
must be at least 10 inches (25 cm) or more.
You should be able to accomplish this by
adjusting the seat and steering wheel. If
you have any difficulties, please contact an
authorized Mercedes-Benz Center.
R Do not lean your head or chest close to the
steering wheel or dashboard.
38Occupant safetySafety
BA 164.8 USA, CA Edition B 2011; 1; 2, en-USd2sboikeVersion: 3.0.3.52010-04-21T15:08:44+02:00 - Seite 38
Page 41 of 376
RKeep hands on the outside of the steering
wheel rim. Placing hands and arms inside
the rim can increase the risk and potential
severity of hand/arm injury when the driver
front air bag inflates.
R Adjust the front-passenger seat as far back
as possible from the dashboard when the
seat is occupied.
R Occupants, especially children, should
never place their bodies or lean their heads
in the area of the door where the side
impact air bag inflates. This could result in
serious injuries or death should the side
impact air bags be deployed. Always sit as
upright as possible, wear the seat belt
properly and use an appropriately sized
child restraint, infant restraint or booster
seat recommended for the size and weight
of the child.
R Canada only: Children 12 years old and
under must never ride in the front seat,
except in an authorized Mercedes-Benz
child restraint that is compatible with the
BabySmart™ child restraint system. The
BabySmart™ air bag deactivation system
installed in the vehicle will deactivate the
front-passenger front air bag when it is
installed properly. Otherwise, the child
could be struck by the air bag when it
inflates in a crash. This could lead to serious
or fatal injury.
Failure to follow these instructions can result
in severe injuries to you or other occupants.
If you sell your vehicle, it is important that you
make the buyer aware of this safety
information. Be sure to give the buyer this
Operator's Manual.GWarning
Accident research shows that the safest place
for children in an automobile is in a rear seat.
A side impact air bag related injury may occur
if occupants, especially children, are not
properly seated or restrained when next to a
side impact air bag which needs to deploy
rapidly in a side impact in order to do its job.
To help avoid the possibility of injury, please
follow these guidelines:(1)Always sit as upright as possible
and use the seat belts properly.
Make sure that children 12 years
old and under use an appropriately
sized child restraint, infant
restraint, or booster seat
recommended for the size and
weight of the child.(2)Always wear seat belts properly.
The air bags are only deployed if the airbag
control unit detects the need for deployment.
Only in the event of such a situation will they
provide their supplemental protection.
The driver and passenger should always wear
their seat belts. Otherwise, it is not possible
for the air bags to provide their supplemental
protection.
In the event of other types of impacts and
impacts below air bag deployment
thresholds, air bags will not deploy. The driver
and passengers will then be protected to the
extent possible by a properly fastened seat
belt. A properly fastened seat belt is also
needed to provide the best possible
protection in a rollover.
Air bags offer supplemental protection but
are not a substitute for seat belts. All vehicle
occupants must fasten their seat belts
regardless of whether your vehicle is
equipped with airbags or not.
It is important for your safety and that of your
passenger to have deployed air bags replaced
and to have any malfunctioning air bags
repaired. This will help to make sure the air
bags continue to perform their protective
function for the vehicle occupants in the
event of a crash.
Front air bags
GWarning
Observe "Important safety instructions"
( Y page 38).
Occupant safety39SafetyBA 164.8 USA, CA Edition B 2011; 1; 2, en-USd2sboikeVersion: 3.0.3.52010-04-21T15:08:44+02:00 - Seite 39Z
Page 57 of 376
RPosition the lap belt as low as possible on
your hips and not across the abdomen. If
the lap belt is positioned across your
abdomen, it could cause serious injuries in
a crash.
R Never wear seat belts over rigid or
breakable objects in or on your clothing,
such as eyeglasses, pens, keys etc., as
these might cause injuries.
R Make sure the seat belt is always routed
snugly. Take special care of this when
wearing loose clothing.
R Never use a seat belt for more than one
person at a time. Do not fasten a seat belt
around a person and another person or
other objects at the same time.
R Seat belts should not be worn twisted. In a
crash, you would not have the full width of
the seat belt to distribute impact forces.
The twisted seat belt against your body
could cause injuries.
R Pregnant women should also always use a
lap-shoulder belt. The lap belt portion
should be positioned as low as possible on
the hips to avoid any possible pressure on
the abdomen.
R Place the seat backrest in a position that is
as upright as possible.
R Check your seat belt during travel to make
sure it is properly positioned.
R Never place your feet on the instrument
panel, dashboard, or on the seat. Always
keep both feet on the floor in front of the
seat.
R When using a seat belt to secure infant
restraints, toddler restraints, or children in
booster seats, always follow the child seat
manufacturer's instructions.GWarning
Do not pass seat belts over sharp edges. They
could tear.
Do not allow the seat belt to get caught in the
door or in the seat adjustment mechanism.
This could damage the seat belt.
Never attempt to make modifications to seat
belts. This could impair the effectiveness of
the seat belts.
Fastening seat beltsGWarning
According to accident statistics, children are
safer when properly restrained on the rear
seats than on the front-passenger seat. Thus,
we strongly recommend that children be
placed in the rear seat whenever possible.
Regardless of seating position, children 12
years old and under must be seated and
properly secured in an appropriately sized
child restraint system or booster seat
recommended for the size and weight of the
child. For additional information, see the
"Children in the vehicle" section.
A child's risk of serious or fatal injuries is
significantly increased if the child restraints
are not properly secured in the vehicle and/
or the child is not properly secured in the child
restraint.
GWarning
Canada only: children 12 years old and under
may ride on the front seat if a BabySmart™
compatible child restraint system is installed
on the front-passenger seat. Use only
Mercedes-Benz approved BabySmart™
compatible child restraint systems. A
BabySmart™ compatible child restraint
system will deactivate the front-passenger
front air bag when installed properly. The
front-passenger front air bag will not be
deactivated if the child restraint systems that
are installed are not BabySmart™ compatible
or if BabySmart™ compatible child restraint
systems are not installed correctly. If the
front-passenger front air bag is deployed in a
collision, the child could be struck by the air
bag. This could lead to serious or fatal injury.
Occupant safety55SafetyBA 164.8 USA, CA Edition B 2011; 1; 2, en-USd2sboikeVersion: 3.0.3.52010-04-21T15:08:44+02:00 - Seite 55Z
Page 72 of 376

The alarm is not switched off, even if you
close the open door that has triggered it, for
example.
i If the alarm stays on for more than 30
seconds, the emergency call system
mbrace (USA only) or Tele Aid (Canada
only) initiates a call to the Customer
Assistance Center automatically. The
emergency call system initiates the call
provided that:
R you have subscribed to the mbrace/Tele
Aid service
R the mbrace/Tele Aid service has been
activated properly
R the mobile phone, power supply and GPS
necessary are availableXTo arm: lock the vehicle with the SmartKey
or KEYLESS-GO.
The turn signal lamps flash three times to
indicate that the vehicle is locked. Indicator
lamp : flashes to indicate that the alarm
system is armed.
i If the turn signal lamps do not flash three
times, a door or the tailgate may not be
properly closed.
It may be necessary to close the affected
door or the tailgate.
XTo deactivate: unlock the vehicle using the
key or KEYLESS-GO.
The turn signal lamps flash once to indicate
that the anti-theft alarm system is switched
off.i Unless you open a door or the trunk lid
within 40 seconds after unlocking the
vehicle:
R the vehicle will be locked again.
R the anti-theft alarm system will be re-
armed.XTo stop the alarm using the SmartKey:
insert the key into the ignition lock.
The alarm is switched off.
or
XPress the % or & button on the key.
The alarm is switched off.XTo stop the alarm using KEYLESS-GO:
grasp the outside door handle. The key
must be outside the vehicle.
The alarm is switched off.
or
XPress the Start/Stop button on the
dashboard. The key must be inside the
vehicle.
The alarm is switched off.70Anti-theft systemsSafety
BA 164.8 USA, CA Edition B 2011; 1; 2, en-USd2sboikeVersion: 3.0.3.52010-04-21T15:08:44+02:00 - Seite 70
Page 198 of 376
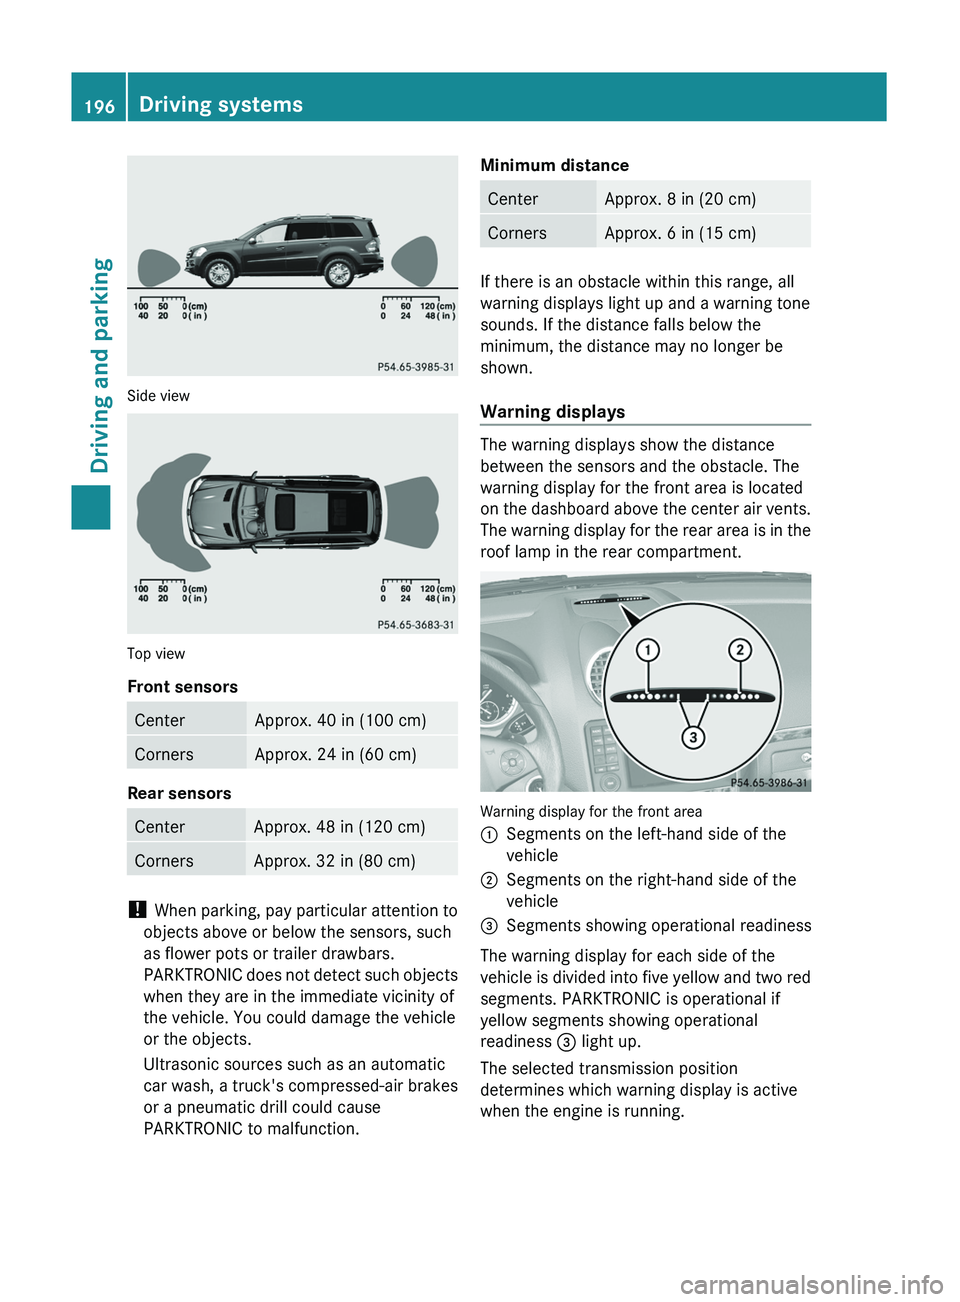
Side view
Top view
Front sensors
CenterApprox. 40 in (100 cm)CornersApprox. 24 in (60 cm)
Rear sensors
CenterApprox. 48 in (120 cm)CornersApprox. 32 in (80 cm)
! When parking, pay particular attention to
objects above or below the sensors, such
as flower pots or trailer drawbars.
PARKTRONIC does not detect such objects
when they are in the immediate vicinity of
the vehicle. You could damage the vehicle
or the objects.
Ultrasonic sources such as an automatic
car wash, a truck's compressed-air brakes
or a pneumatic drill could cause
PARKTRONIC to malfunction.
Minimum distanceCenterApprox. 8 in (20 cm)CornersApprox. 6 in (15 cm)
If there is an obstacle within this range, all
warning displays light up and a warning tone
sounds. If the distance falls below the
minimum, the distance may no longer be
shown.
Warning displays
The warning displays show the distance
between the sensors and the obstacle. The
warning display for the front area is located
on the dashboard above the center air vents.
The warning display for the rear area is in the
roof lamp in the rear compartment.
Warning display for the front area
:Segments on the left-hand side of the
vehicle;Segments on the right-hand side of the
vehicle=Segments showing operational readiness
The warning display for each side of the
vehicle is divided into five yellow and two red
segments. PARKTRONIC is operational if
yellow segments showing operational
readiness = light up.
The selected transmission position
determines which warning display is active
when the engine is running.
196Driving systemsDriving and parking
BA 164.8 USA, CA Edition B 2011; 1; 2, en-USd2sboikeVersion: 3.0.3.52010-04-21T15:08:44+02:00 - Seite 196