2011 MERCEDES-BENZ GL-Class light
[x] Cancel search: lightPage 145 of 214

:
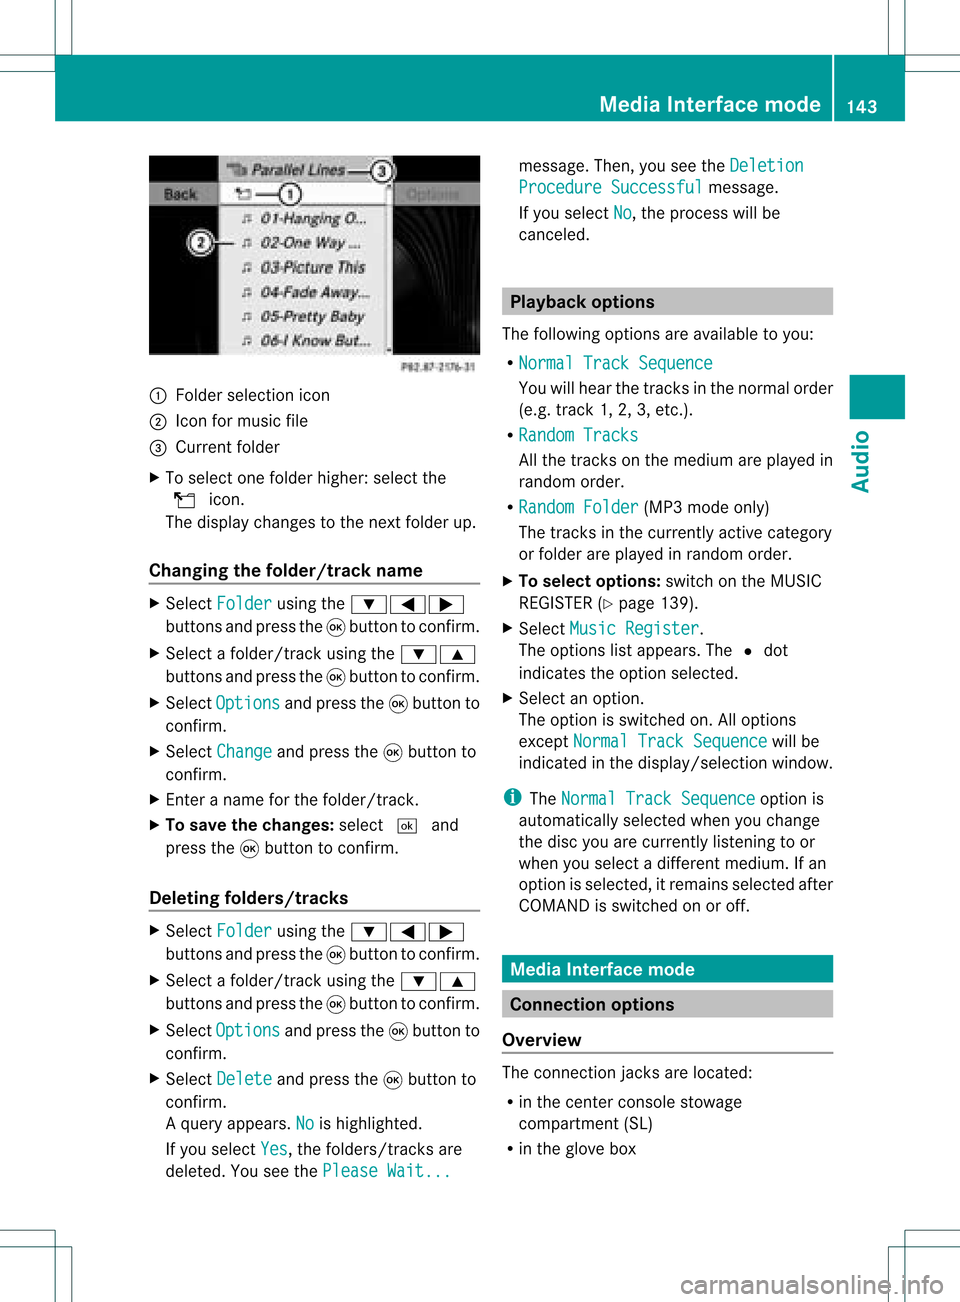
Fold ersel ectio nicon
; Icon formus icfile
= Current folder
X To select one folder higher :select the
U icon.
The display changes tothe nextfolder up.
Changing thefolder/tr ackname X
Select Folder using
the:=;
button sand press the9button toconf irm.
X Select afolder/t rackusing the:9
button sand press the9button toconf irm.
X Select Options and
press the9button to
conf irm.
X Select Change and
press the9button to
conf irm.
X En ter aname forthe folder/t rack.
X To save thechanges: select¬and
press the9button toconf irm.
Dele ting folders/tr acks X
Select Folder using
the:=;
button sand press the9button toconf irm.
X Select afolder/t rackusing the:9
button sand press the9button toconf irm.
X Select Options and
press the9button to
conf irm.
X Select Delete and
press the9button to
conf irm.
Aq uery appear s.No is
high light ed.
If you selectYes ,
th efol der s/track sare
delet ed.You seethePle ase Wait... mes
sage .Then, youseetheDeletion Procedure
Successful message.
If you select No ,
the process willbe
canceled. Playback
options
The following optionsareavaila bletoyou:
R Normal TrackSequence You
willhear thetrack sin the normal order
(e.g. track 1,2,3, etc. ).
R Random Tracks All
the track son the medium areplay edin
random order.
R Random Folder (MP3
mode only)
The track sin the current lyactive category
or folder areplay edinrandom order.
X To selec toptio ns:switch onthe MUSIC
REG ISTER (Ypage 139).
X Sel ect Musi cRegi ster .
The options list appea rs.The #dot
ind icates the optionselected .
X Sel ect anopti on.
The optionisswi tched on.Allopti ons
excep tNorm alTrac kSequ ence wi
llbe
ind icated inthe displ ay/sel ectio nwindow.
i The Norm alTrac kSequ ence opt
ion is
autom atically selec tedwhen youchan ge
the disc youarecurr entlylist enin gto or
when youselec tadifferent medium.Ifan
option isselect ed,itremains selectedafter
COMAND isswitc hedonoroff. Media
Interfacemode Connection
options
Overview The
connection jacksare located:
R in the centercon sole stowage
compart ment(SL)
R in the glove box Media
Interfacemod e
143Audio Z
Page 146 of 214

To
conn ectexter naldevices tothe Media
Int erface, yourequire device-spec ificadapter
cables whichareincluded inthe Media
Int erface scopeofdelivery.
i Stow the individual partsinasecure
location.
Use only genuine Mercedes- Benz
conn ectin gcables.
You canconn ectthe following datacarriers
to COMAND viathe Media Interface:
R iPod ®
R USB devices (USBsticks,USB hard drives)
i iPod ®
is aregistered trademark ofApple
Inc .,Cupertino, California,USA.
Supp orted iPod®
varia nts The
following areexamples ofsupported
iPod ®
variants:
R iPod ®
mini
R iPod ®
nano
R iPod ®
classic
R iPod ®
touch
Supp orted USBdevices The
following USBdevices aresupported:
R USB sticks(flash memory)
R USB hard drives requiring astart up/
permanen tcurren tof max. 800mA(itmay
be necess arytoconn ectaseparate power
supply)
R cert ainMP3 players
i The Media Interface supports USB
storage mediaof"USB Device Subclass 6".
Infor mation concernin gUSB Device
Subclass 6isavail able from theequip ment
manufacturer.
For further detailsandalist ofsupported
devices, pleasecontactanauthorized
Mercedes-Benz Centerorvisit http://
www .mercedes-be nz.com/conne ctand proceed
asdescribed under"Media
Interf ace". Conne
ctinganexternal device
i Donot leave extern aldevices inthe
vehicle, asatextreme temperatures (e.g.in
direct sunlight orextremely lowoutside
temperatures) theycannot beguara nteed
to function correctly(see theoperating
instruct ionsforthe respective device).
Mercedes-Benz doesnottake
responsibili tyfor any damage toextern al
devices.
Never connectmore thanonedevice ata
time. Youwillotherwise notbeable toplay
back fromtheextern aldevice. :
Four-pin socketfor3.5 mm stereo jack,
e.g. forMP3 players(audio and video)
; iPod socket ,to conn ectaniPod ®
= USB socket ,to conn ectaUSBdevice
? Examp leof device (iPod ®
)
X Co nnect theexter naldevice with suita ble
socke t:, ;or=.
CO MAND activate sthe device .
If yo uremo veade vice ,the No Device Connected message
appears.
i Aconn ected iPod®
or MP3 playershould
not besimultaneously operatedviathe
Media Interface andtheremote control
(e.g. Bluetooth ®
remote control)asthis
may produce unpredictable results.144
Media
Interface modeAudio
Page 157 of 214

?
Media selection
A Sound settings Fast
forward /rewind
X Press andhold the= or; button
until thedesired position hasbeen
reached.
or
X Press andhold theE orF button
until thedesired position hasbeen
reached.
You seethenavigation menu. Selec
tingavideo DVD
X Show themen u(Y page 154).
X Selec tMedi a and
press the9butt onto
con firm .
The media listappears. The#dot
indic atesthecurr entmedium beingplayed. Media
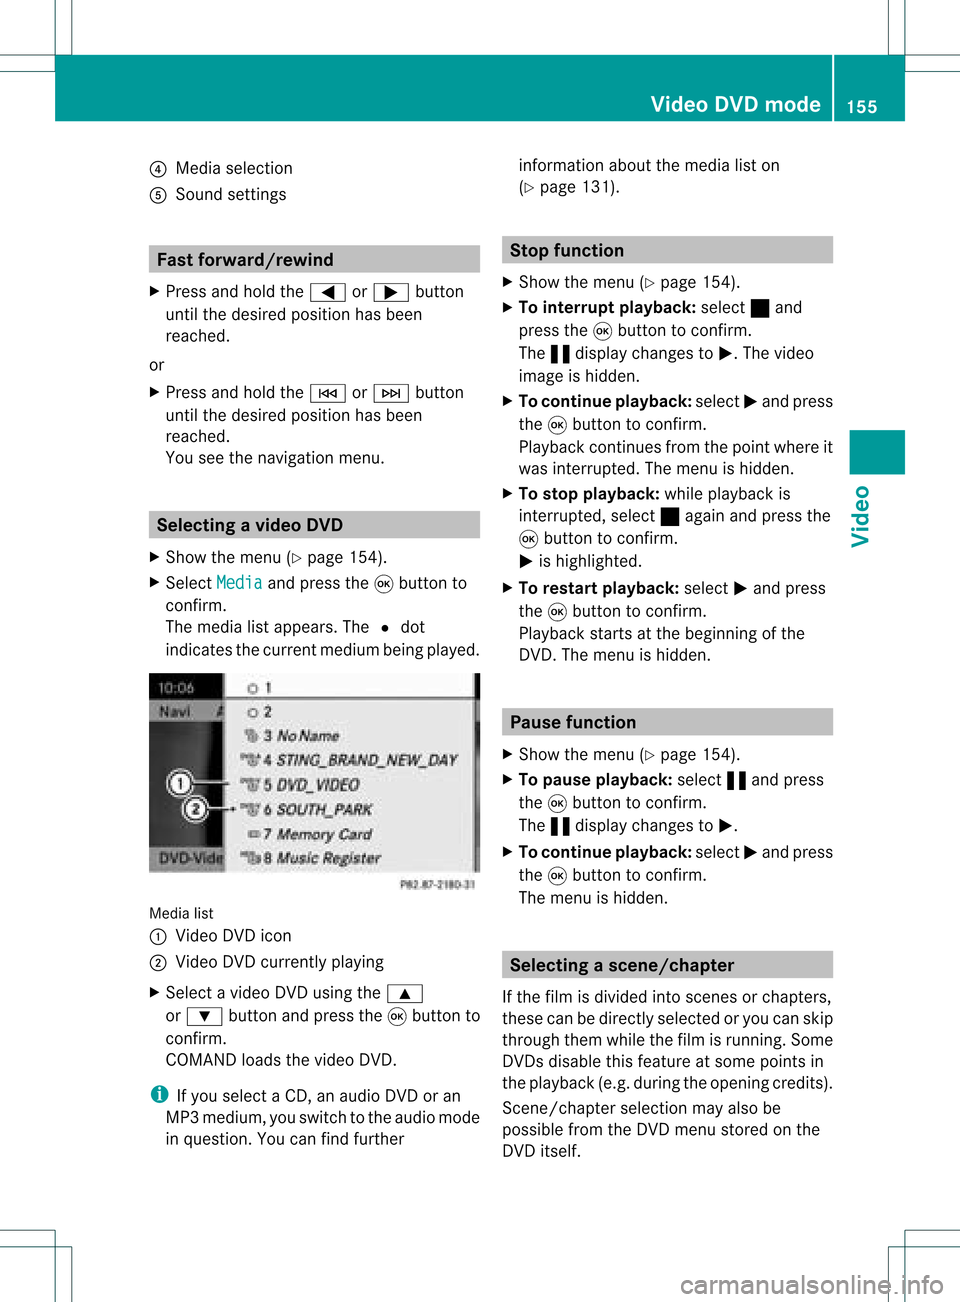
list
: Video DVDicon
; Video DVDcurrentlyplaying
X Selec tavideoDVD using the 9
or : button andpress the9button to
confirm.
COMAND loadsthe vide oDVD.
i Ifyou selectaCD, anaudio DVD oran
MP3 medium,youswitch tothe audio mode
in que stion. Youcanfind further informati
onabo utthe medi alist on
(Y page 131). Stop
function
X Sho wthe men u(Y page 154).
X To inter rupt pla yback :selec t± and
press the9butt ontocon firm .
The «display changestoM.T hevideo
image ishidden.
X To continue playback: selectMand press
the 9button toconfirm .
Play back continues fromthepoint where it
was interrupted. Themenu ishidden.
X To stop playback: whileplayback is
interrupted, select±again andpress the
9 button toconfirm .
M ishighlighted.
X To restar tplayback: selectMand press
the 9button toconfirm .
Play back starts atthe beginning ofthe
DVD .The menu ishidden. Pause
function
X Show themenu (Ypage 154).
X To pause playback: select«and press
the 9button toconfirm .
The «displa ychanges toM.
X To continue playback: selectMand press
the 9button toconfirm .
The menu ishidden. Selec
tingascene/ch apter
If th efilm isdivi ded intosc en es orchapt ers,
th ese can bedire ctly sele cted oryou can skip
th roug hth em while thefilm isrun ning.So me
DV Ds disab lethis feat ure atsom epoin tsin
th eplaybac k(e.g. during theopenin gcredit s).
Scen e/ch apter select ionmay alsobe
possible fromtheDVD menu storedon the
DVD itself. Vid
eoDVD mode
155Vid eo Z
Page 160 of 214

X
Sel ect MenuLan guage or
Aud io Lan
guage and
pressthe 9button to
confi rm.
In both cases, amenu appe ars afte rafew
seconds. The#dot infront ofan entry
indi cates thecurrently selected langua ge.
X Select asetting using the 9:
buttons andpress the9button toconfirm.
X To exitthe menu: pressthe=
or ; button. Subtitle
sand camera angle
These functions arenot available onallDVDs.
The numbe rofsubt itle lang uages andcam era
ang lesavailab ledepe ndson theco nten to f
the DVD. Itis po ssi ble tha tthe settin gsmay
also beaccessed inthe DVD menu
(Y page 156).
X Show themenu (Ypage 154).
X Select DVD-Video in
the menu using
the :=; buttonsandpress the
9 button toconfirm .
X Select DVDFunctions and
press the9
button toconfirm .
X Select Subtitles or
Camera Angle and
press the9button toconfirm .
In both cases, amenu appears.The #dot
in front ofan entr yindicates thecurrent
settin g.
X Select asettin gusing the9:
buttons andpress the9button toconfirm .
X To exit themenu: pressthe=
or ; button. Interactive
content
DVD scan cont aininteract ivecont ent(e.g. a
video game). Inavideo game, forexample,
you may beable toinfluence eventsby
selecting andtriggering actions.Thetype and
number ofactions depend onthe DVD . X
Select anaction usingthe
9:=; buttonsandpress
the 9button toexecute it.
A menu appearsand thefirst entry,
Select ,
is highlighted.
X Press the9button.
or
X Show thenavigation menuwhileinvideo
DVD mode, ifnecessary.
X Select Menu using
the=;
9: buttonsandpress the9button
to confirm .
X Select DVD-Video in
the menu usingthe
=;9: buttonsandpress
the 9button toconfirm .
X Select DVDFunctions and
press the9
button toconfirm .
X Select orexecute anaction usingthearrow
keys. Video
AUXoperation Conne
ctingexternal videosources
If your vehicle isequipp edwith aMedia
Int erface, youcan conn ectanextern alvideo
source.
You require anadditional audio/video cable
set toconn ectanextern alvideo source to
Media Interface.
For details, pleaseconsult anauthorized
Mercedes-Ben zCenter orvisit http://
www .mer<00030005000400050013002500020005000E001D00210003000F000D00220003
000FF nnect.and
proceed asdescribed under"Media
Int erface".
The conn ection jacksarelocated:
R in the cent erconsole stowage
compartmen t(SL)
R in the glove box 158
Video
AUXoperat ionVideo
Page 165 of 214

X
Insert newbatteries. Observethepola rity
marking onthe batteries andinthe battery
compartment whendoing so.
Left-hand battery:thepositive pole(+)
must faceupwards.
Rig ht-hand battery: thepositive pole(+)
must facedownwa rds.
X To clo sethe battery compartment: first
pla cebattery compartment cover=into
the battery compartment withretaining
lug s? and allow lug ;toclip into place.
In the wirel essheadphones The
battery compartment coverislocated on
the left head phone. :
Battery compartment cover
The wirel esshead phones contain 2type AAA
1. 5V bat terie s.
X To ope nth ebat tery com partme nt:fo ld
th ebat tery compar tmentco ver :
upwar ds.Whe ndoing so,hold theleft
headphone asshown toprevent the
insert edbatteries fromfalling out.
X Remove thedischarged batteriesfromthe
compart ment.
X Insert newbatteries. Observethepolarity
marking onthe batteries andinthe battery
compart mentwhen doing so.
Left- hand battery: thepositive pole(+)
must faceupwards. Right-hand
battery:thepositive pole(+)
must facedownwards.
X To close thebatt erycompar tment:
press thebattery compartm entlid
downwards untilitclips intoplace.
If the batteries havebeen insert ed
correc tly,the indicator lampwilllight up
green whentheheadphones areswitched
on. Basic
functions Using
headphones
You canusethewireless headphones
supplied and/oruptotwo sets ofwired
headphones connected tothe correspon ding
jack ofthe rear-com partmentscreen s
(Y page 30).
Infor mation on:
R switching thewireless headphones on/off
R adjusting thevolume ofthe headphones
R selecting ascreen forthe headphones
can befound inthe "Wireless headphones"
section (Ypage 33). Using
themain loudspeaker s
You canusethevehicle loudspeakers to
listen toadisc insert edinthe rear-
compart mentdrive. Todo so, atleast oneof
the rear-com partmentscree nsmus tbeset to
disc mode.
X Sett ingusing COMAND: press,for
example, the$ function button to
switch onanaudio mode.
X Select Audio using
the9 button and
press the9button tocon firm.
The audio menu (Ypage 21)appears.
X Select Rear using
the9: buttons
and press the9button tocon firm.
i The headphones' volumesettingdoes not
affect themain loudspeakers. Ba
sic functions
163RearSeatEntert ainment Z
Page 177 of 214

Setting
theaudio format
This funct ionisnot availa bleonallDVD s.Ifit
is availa ble,youcan setthe audi olanguage
or the audi oformat. Thenumber ofsettin gs
is determined bythe DVD content. Itis
possible thatthesettin gsmay alsobe
accessed inthe DVD menu.
X Show themenu (Ypage 172).
X Select DVD-Video and
press the9button
on the remote controltoconf irm.
X Select DVDFunctions and
press the9
button toconf irm.
X Select Audio Language and
press the9
button toconf irm.
Am enu appears afterashort while. The
# dot infron tof an ent ryindicat esthe
curren tlyselect edlanguage.
X Select alanguage usingthe9:
button sand press the9button tocon firm.
X To exit themenu: pressthe=
or ; button . Subtit
lesand camer aangle
These functionsare not available onallDVD s.
The number ofsubtitle languages andcamera
angles available dependsonthe contentof
the DVD. Itis po ssi ble tha tthe settin gsmay
also beaccessed inthe DVD menu.
X Show themenu (Ypage 172).
X Select DVD-Video and
press the9button
on the remote controltoconfirm .
X Select DVDFunctions and
press the9
button toconfirm .
X Select Subtitles or
Camera Angle and
press the9button toconfirm .
In both cases, amenu appearsafter afew
seconds. The#dot infront ofan entr y
indicates thecurrent setting.
X Select asettin gusing the9:
buttons andpress the9button toconfirm .X
To exit themenu: pressthe=
or ; button. Interactive
content
DVD scan also containinteract ivecont ent
(e.g. avideo game). Inavideo game, youmay
be able toinfluence eventsbyselecting and
triggering actions.Thetype andnumber of
actions depend onthe DVD .
X Select anaction usingthe
9:=; buttonsandpress
the 9button toexecute it.
A menu appearsand thefirst entry,
Select ,
is highlighted.
X Press the9button. AUX
mode Introduction
You canconn ectone extern alvideo source to
each ofthe displa ysofthe Rear Seat
Ent ertainment System(AUXdispla y)and also
one extern alvideo source tothe rear-
compartmen tCD/DV Ddrive (AUX drive) with
a sound andpicture signal.
Please seethecorresponding operating
instruct ionsforinformation onhow to
operate theextern alvideo source.
For further detailsconcerning externalvideo
sources, pleaseconsult anauthorized
Mercedes-Ben zCent er. Connecting
auxiliaryequipme nt
AU Xdrive The
AUX drive jacks arelocate don the CD/
DVD drive next tothe CD/DVD ejectbutton
(Y page 32). AU
Xmode
175Rear Seat Entertain ment Z
Page 188 of 214

focuse
don safe drivingbeha vior,especially
pay attention totraffic andstreet signs,and
shou ldutil ize the system 'sau dio cues while
drivi ng.
The navig ation system doesnotsupplyany
informa tiononstop signs, yield signs, traffic
regu lations ortraffic safetyrul es. Thei r
obse rvance alwaysremai nsinthe drive r's
perso nalrespo nsibility.DVD maps donot
cover allareas norallroutes withinanarea.
Traffic regulationsalways have priority over
any route recommendations given.Bearin
mind thatataspeed ofjust 30mph
(app roximately 50km/h), yourvehicle is
cover ingadistanc eof 44 feet (approximately
14 m)every second.
During routeguidance, youwillnotreceive
infor mation on:
R traff iclights
R stop andyield signs
R parking orstoppin gzon es
R one- way street s
R narrow bridges
R other trafficregulation data
You should thereforealway sstric tlyobserve
traff icregulations whiledriving. Drive
carefully andalway sobey trafficlaws and
road signs, evenifthey contradict navigation
system instruct ions. G
War
ning
Navigation announcementsare inten dedto
direct youwhile driving without divertingyour
atten tionfrom theroad anddriving.
Please alwaysuse this feature instead of
con sulting themap display fordirect ions.
Consultin gthe symbols ormap display for
direct ionsmay cause youtodivert your
atten tionfrom driving andincrease yourrisk
of an acciden t. G
War
ning!
Please donot use theVoice ControlSystem
in an emergen cy,asthe toneof your voice
may change inastres sfulsituation .This could cause
adelay incompleting yourphone call
in atimely manner. Thiscould distract youin
an emergency situationandcause youtobe
involved inan accident. Operat
ion
You canusevoice controlto:
R enter astate
R enter aprovince
R enter acity
R enter adistrict (center)
R enter astreet
R enter anintersec tion
R enter ahouse number
R enter anentire address
R enter azip code
R find address
R enter apoint ofinterest
R select oneofyour previous destinations
R call uproute information
R store adestination
R displa ythe map
R enlarge/reduce thesize ofthe map
R listen tothe destination memory
R start andstop route guidance
R switch theguida nceinstruct ionsonand off
To select thenavigation application:
X Vehicles withVoice Control buttons on
the Multi-fu nctionSteering Wheel:Press
the ? button.
or
X Vehicles withLever forVoice Control:
Pull theVoice Control levertoward you. 186
Navigat
ionVoiceControl