2011 MERCEDES-BENZ G550 glove box
[x] Cancel search: glove boxPage 10 of 288

Exterior viewOverview .......................................... 24
F
First-aid kit ......................................... 229
Flat tire Changing a wheel/mounting the
spare wheel ................................... 232
Preparing the vehicle .....................232
Raising the vehicle .........................233
Floormat ............................................. 211
Front fog lamp (display message) ... 173
Fuel Additives ........................................ 278
Notes ............................................. 277
Premium-grade unleaded gasoline . 278
Refueling ........................................ 131
Specifications ................................ 278
Troubleshooting ............................. 134
Fuel/water separator ....................... 220
Fuel consumption Notes ............................................. 136
Fuel filler cap (display message) ..... 178
Fuel filler flap Emergency release ........................133
Opening/closing ............................ 132
Fuel filter
Display message ............................ 178
Fuel level
Calling up the range (on-board
computer) ...................................... 167
Fuse allocation chart ........................ 243
Fuse box Battery case ................................... 244
Dashboard ..................................... 243
Front-passenger footwell ...............243
Transmission tunnel ....................... 244
Fuse extractor ................................... 243
Fuses Dashboard fuse box .......................243
Fuse allocation chart .....................243
Fuse box in the front-passenger
footwell .......................................... 243
Fuse box in the transmission
tunnel ............................................ 244
In the battery case .........................244
Notes ............................................. 242
G
Garage door opener Clearing the memory .....................211
Notes ............................................. 208
Opening/closing the garage door ..210
Programming the remote control ...209
Gear or selector lever (cleaning
guidelines) ......................................... 225
Genuine Mercedes-Benz parts ......... 274
Genuine wood trim and trim strips
(cleaning instructions) ...................... 225
Glove box ........................................... 193
Gradient-climbing capability
(maximum) ......................................... 146
GTW (Gross Trailer Weight)
(definition) ......................................... 267
H
Hazard warning lamps ........................ 93
Headlamp cleaning system ................ 93
Adding washer fluid .......................218
Notes ............................................. 281
Headlamp delayed switch-off
see Exterior lighting delayed switch-off
Headlamp protection grille .............. 100
Headlamps Cleaning ......................................... 224
Misting up ........................................ 94
Headlamps (automatic) ...................... 91
Head restraints Adjusting (angle) .............................. 79
Adjusting (rear) ................................ 80
Installing/removing (rear) ................80
Luxury .............................................. 80
Resetting (front) ............................... 80
see NECK-PRO head restraints
Heating
see Climate control ........................ 106
High beam flasher ............................... 93
high-mounted brake lamp Display message ............................ 173
Hill start assist .................................. 118
Hood Closing ........................................... 215
Display message ............................ 181
Opening ......................................... 214
8Index
Page 15 of 288
Loss ................................................. 66
Malfunction ...................................... 66
Starting the engine ........................117
Snow chains ...................................... 248
Socket Front-passenger footwell ...............200
Luggage compartment ...................200
Rear compartment .........................200
SOS
see mbrace
Spare fuses ........................................ 243
Spare wheel Exterior spare wheel bracket .........230
Installing ........................................ 232
Notes/data .................................... 272
Speedometer
Additional speedometer (on-
board computer) ............................ 160
Setting the unit (on-board
computer) ...................................... 163
SPEEDTRONIC
Display-Meldung ............................ 178
SRS (Supplemental Restraint
System) Display message ............................ 170
Introduction ..................................... 34
Warning lamp ................................. 187
Warning lamp (function) ................... 34
Standard display (on-board
computer) .......................................... 160
Starting the engine Important safety notes ..................117
Station
see Radio
Status line (on-board computer) ...... 158
Selecting the display ...................... 163
Steering wheel
Adjusting ......................................... 83
Buttons (on-board computer) ......... 157
Cleaning ......................................... 225
Important safety notes ....................83
Steering wheel heating ....................83
Storing settings (memory
function) .......................................... 88
Steering wheel heating
Indicator lamp (Malfunction) ............84Stowage compartments
Armrest (under) ............................. 193
Glove box ....................................... 193
Stowage pockets ........................... 194
Stowage space
Cup holders ................................... 197
Important safety information .........193
Submenu (on-board computer)
Convenience .................................. 165
Vehicle ........................................... 165
Summer opening
see Convenience opening feature
Summer tires ..................................... 248
Sun visor ............................................ 198
Supplemental Restraint System see SRS
Surround lighting
Switching on/off (on-board
computer) ...................................... 164
SUV
(Sport Utility Vehicle) .......................19
Switching air-recirculation mode
on/off ................................................. 111
Switching off the alarm (ATA) ............ 59
T
Tachometer ........................................ 156
Tail lamps Changing ....................................... 100
Tail lamps (Display message) ........... 174
Technical data G 500 ............................................. 281
G 55 AMG ...................................... 282
Tires ............................................... 272
Wheels ........................................... 272
TELEAID
Call priority .................................... 206
Display message ............................ 170
Downloading destinations
(COMAND) ..................................... 206
Emergency call .............................. 203
Important safety notes ..................202
Locating a stolen vehicle ...............207
MB info call button ........................205
Roadside Assistance button ..........204
Self-test ......................................... 202
Index13
Page 27 of 288
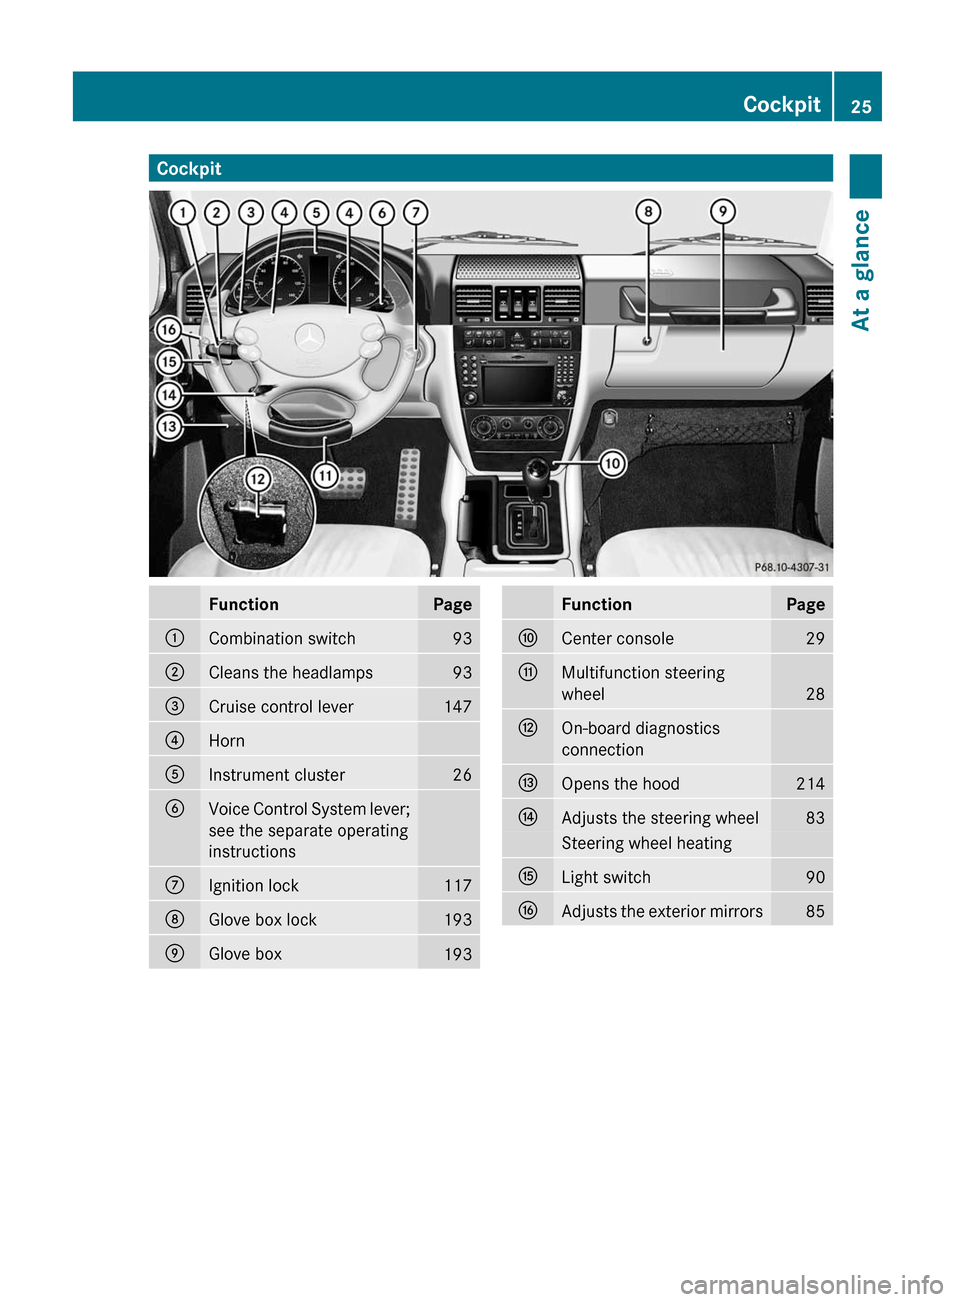
CockpitFunctionPage:Combination switch93;Cleans the headlamps93=Cruise control lever147?HornAInstrument cluster26BVoice Control System lever;
see the separate operating
instructionsCIgnition lock117DGlove box lock193EGlove box193FunctionPageFCenter console29GMultifunction steering
wheel
28
HOn-board diagnostics
connectionIOpens the hood214JAdjusts the steering wheel83Steering wheel heatingKLight switch90LAdjusts the exterior mirrors85Cockpit25At a glance
Page 40 of 288
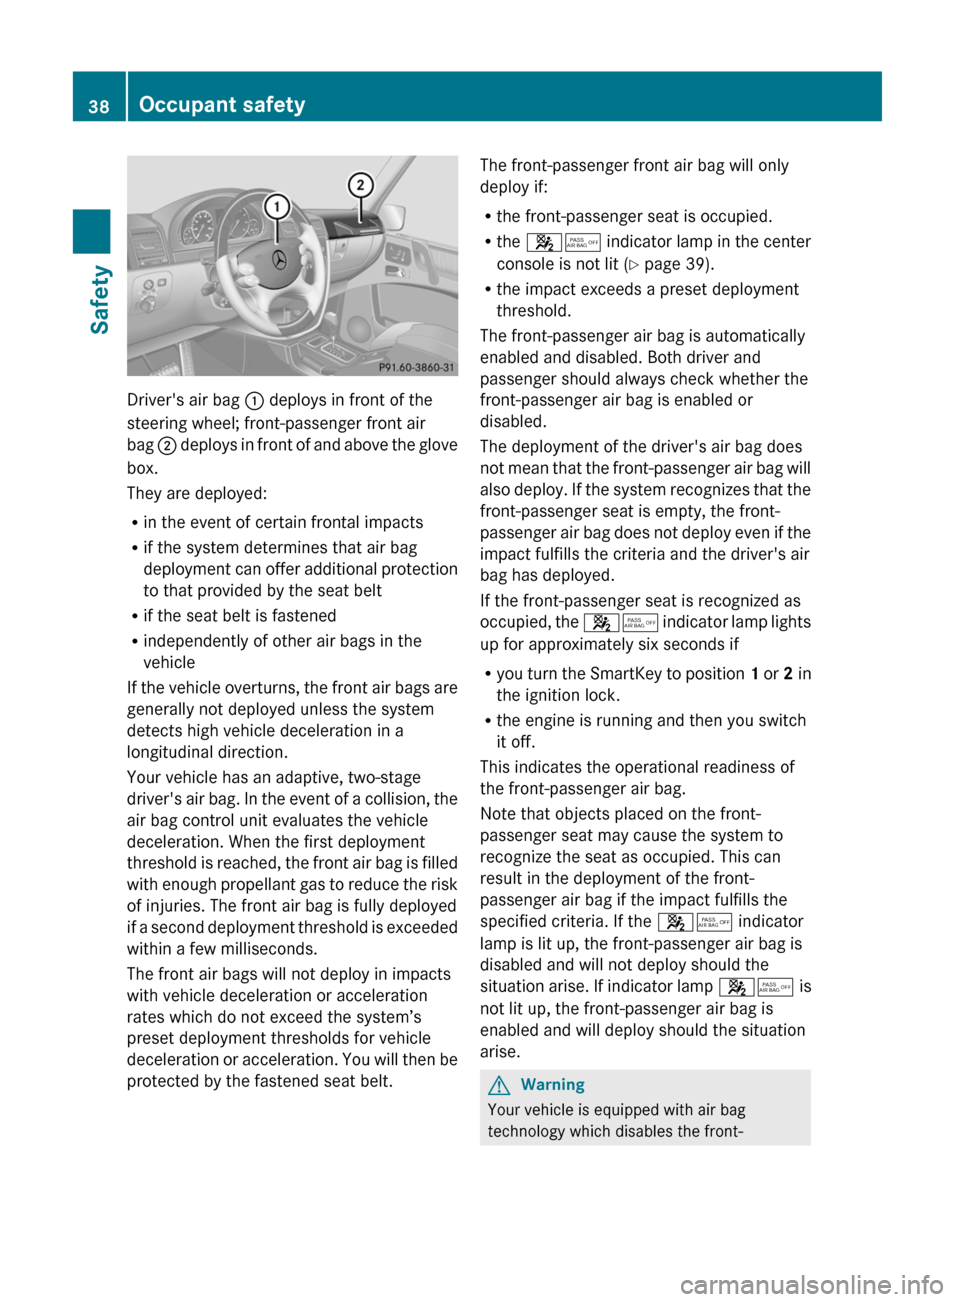
Driver's air bag : deploys in front of the
steering wheel; front-passenger front air
bag ; deploys in front of and above the glove
box.
They are deployed:
R in the event of certain frontal impacts
R if the system determines that air bag
deployment can offer additional protection
to that provided by the seat belt
R if the seat belt is fastened
R independently of other air bags in the
vehicle
If the vehicle overturns, the front air bags are
generally not deployed unless the system
detects high vehicle deceleration in a
longitudinal direction.
Your vehicle has an adaptive, two-stage
driver's air bag. In the event of a collision, the
air bag control unit evaluates the vehicle
deceleration. When the first deployment
threshold is reached, the front air bag is filled
with enough propellant gas to reduce the risk
of injuries. The front air bag is fully deployed
if a second deployment threshold is exceeded
within a few milliseconds.
The front air bags will not deploy in impacts
with vehicle deceleration or acceleration
rates which do not exceed the system’s
preset deployment thresholds for vehicle
deceleration or acceleration. You will then be
protected by the fastened seat belt.
The front-passenger front air bag will only
deploy if:
R the front-passenger seat is occupied.
R the 45 indicator lamp in the center
console is not lit ( Y page 39).
R the impact exceeds a preset deployment
threshold.
The front-passenger air bag is automatically
enabled and disabled. Both driver and
passenger should always check whether the
front-passenger air bag is enabled or
disabled.
The deployment of the driver's air bag does
not mean that the front-passenger air bag will
also deploy. If the system recognizes that the
front-passenger seat is empty, the front-
passenger air bag does not deploy even if the
impact fulfills the criteria and the driver's air
bag has deployed.
If the front-passenger seat is recognized as
occupied, the 45 indicator lamp lights
up for approximately six seconds if
R you turn the SmartKey to position 1 or 2 in
the ignition lock.
R the engine is running and then you switch
it off.
This indicates the operational readiness of
the front-passenger air bag.
Note that objects placed on the front-
passenger seat may cause the system to
recognize the seat as occupied. This can
result in the deployment of the front-
passenger air bag if the impact fulfills the
specified criteria. If the 45 indicator
lamp is lit up, the front-passenger air bag is
disabled and will not deploy should the
situation arise. If indicator lamp 45 is
not lit up, the front-passenger air bag is
enabled and will deploy should the situation
arise.GWarning
Your vehicle is equipped with air bag
technology which disables the front-
38Occupant safetySafety
Page 195 of 288
Rif the rear bench seat is not occupied, insert
the belt tongue on the outer seat belts into
the buckle of opposite seat belt :.
R secure the load with sufficiently strong and
wear-resistant tie down. Pad sharp edges
for protection.
Stowage compartments
Important safety notes
GWarning!
To help avoid personal injury during a collision
or sudden maneuver, exercise care when
storing objects in the vehicle. Put luggage or
cargo in the cargo compartment if possible.
Do not pile luggage or cargo higher than the
seat backrests.
Keep compartment lids closed. This will help
to prevent stored objects from being thrown
about and injuring vehicle occupants during
R braking
R vehicle maneuvers
R an accident
Front stowage compartments
Glove box
i Depending on the vehicle's equipment,
you will find an AUX-IN jack or a Media
Interface installed in the glove box. A Media
Interface is a universal interface for
portable audio equipment, e.g. for an
iPod ®
or USB device (see the separate
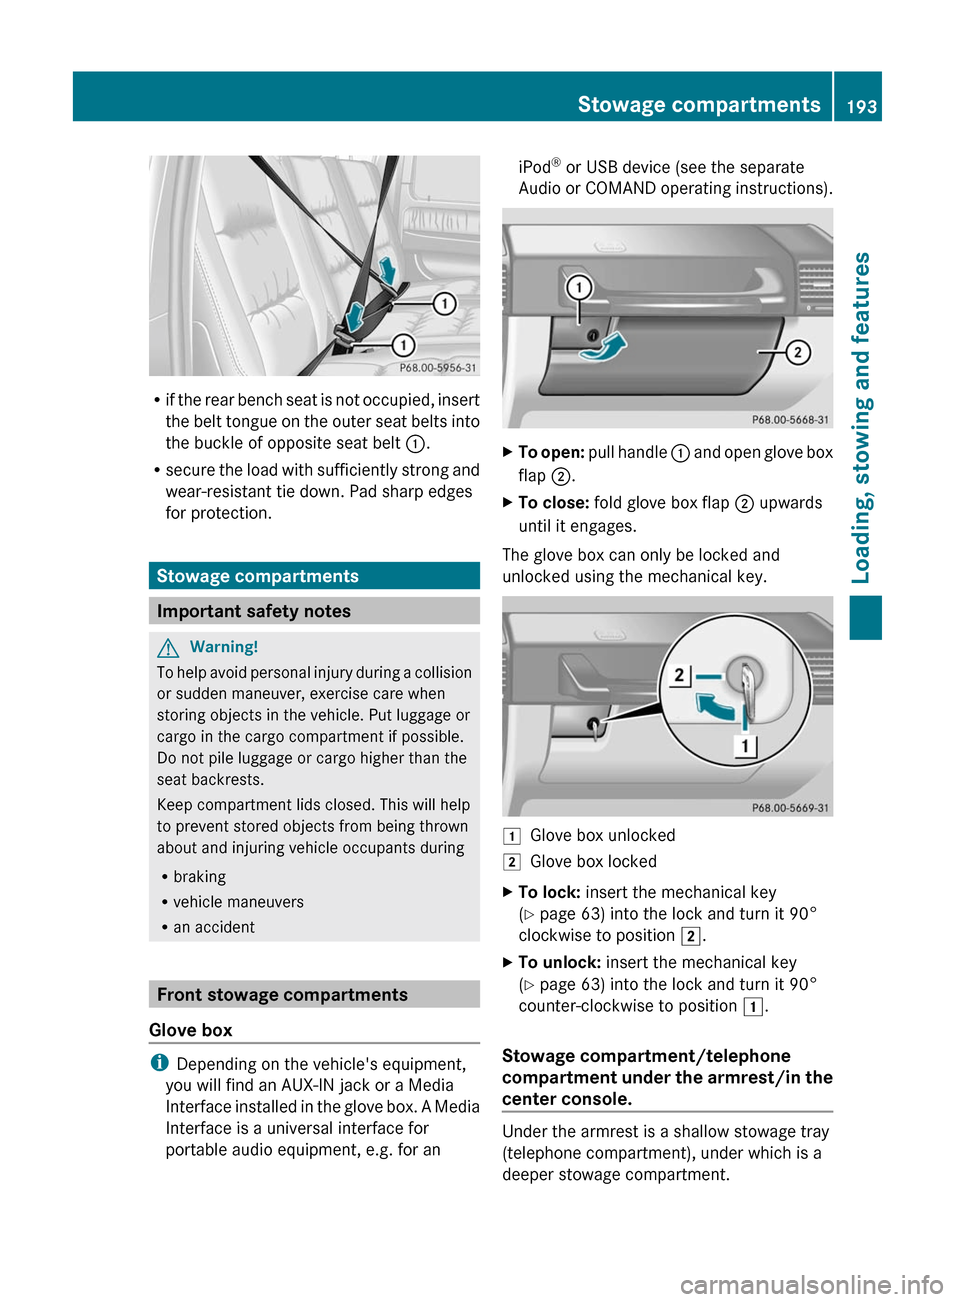
Audio or COMAND operating instructions).XTo open: pull handle : and open glove box
flap ;.XTo close: fold glove box flap ; upwards
until it engages.
The glove box can only be locked and
unlocked using the mechanical key.
1Glove box unlocked2Glove box lockedXTo lock: insert the mechanical key
( Y page 63) into the lock and turn it 90°
clockwise to position 2.XTo unlock: insert the mechanical key
( Y page 63) into the lock and turn it 90°
counter-clockwise to position 1.
Stowage compartment/telephone
compartment under the armrest/in the
center console.
Under the armrest is a shallow stowage tray
(telephone compartment), under which is a
deeper stowage compartment.
Stowage compartments193Loading, stowing and featuresZ
Page 200 of 288
If you do not require the cup holder, it can be
stored in the glove box or in the stowage
compartment in the center console, for
example.
Cup holders in the rear compartment
! Ensure that you remove all containers
from the cup holder in the rear before
folding the seat backrest and the seat
cushion of the rear bench seat forwards.
Sun visors
Overview of sun visors
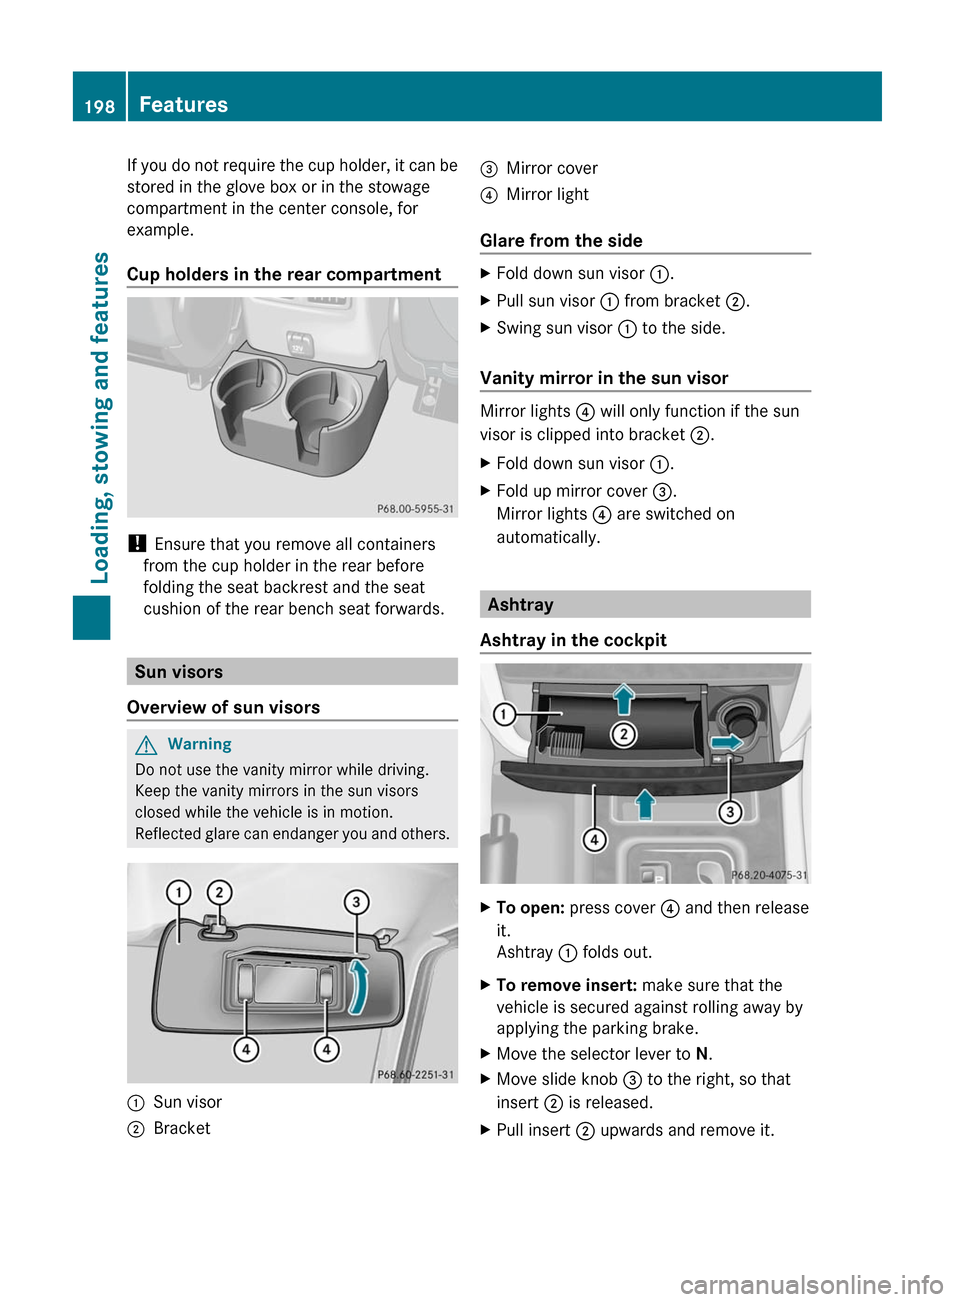
GWarning
Do not use the vanity mirror while driving.
Keep the vanity mirrors in the sun visors
closed while the vehicle is in motion.
Reflected glare can endanger you and others.
:Sun visor;Bracket=Mirror cover?Mirror light
Glare from the side
XFold down sun visor :.XPull sun visor : from bracket ;.XSwing sun visor : to the side.
Vanity mirror in the sun visor
Mirror lights ? will only function if the sun
visor is clipped into bracket ;.
XFold down sun visor :.XFold up mirror cover =.
Mirror lights ? are switched on
automatically.
Ashtray
Ashtray in the cockpit
XTo open: press cover ? and then release
it.
Ashtray : folds out.XTo remove insert: make sure that the
vehicle is secured against rolling away by
applying the parking brake.XMove the selector lever to N.XMove slide knob = to the right, so that
insert ; is released.XPull insert ; upwards and remove it.198FeaturesLoading, stowing and features