2011 MERCEDES-BENZ G550 charging
[x] Cancel search: chargingPage 6 of 288

1, 2, 3 ...
115 V socket ...................................... 201
12 V socket ........................................ 200
4ETS (Electronic Traction System) Function/notes ................................ 58
4MATIC (permanent four-wheel
drive) .................................................. 149
A
ABS (Anti-lock Brake System) Display message ............................ 171
ABS (Anti-lock Braking System)
Function/notes ................................ 56
Warning lamp ................................. 185
Accident (notes) ................................ 229
Active service system see Service interval display
Additives
Engine oil ....................................... 279
Adjusting the seat ............................... 78
Air bag PASSENGER AIR BAG
OFF- indicator lamp .......................... 39
Air bags
Front air bag (driver, front
passenger) ....................................... 37
Important safety notes ....................36
Safety guidelines ............................. 35
Window curtain air bag ....................39
Air-conditioning system
see Climate control
Air pressure
see Tire pressure ........................... 249
Air vents ............................................. 113
Important safety notes ..................112
Rear ............................................... 113
Setting the center air vents ...........113
Setting the side air vents ...............113
see Air outlets
Alarm system
see ATA
Anti-lock Braking System
see ABS
Anti-Theft Alarm system
see ATA
Anti-theft system
ATA (Anti-Theft Alarm system) .........59
Tow-away alarm ............................... 60
Ashtray ............................................... 198
ATA (Anti-Theft Alarm system) Activating/deactivating ...................59
Function ........................................... 59
Switching off the alarm ....................59
AUTO lights
Display message ............................ 172
Automatic car wash .......................... 221
Automatic transmission Driving tips .................................... 123
Emergency running mode ..............126
Important safety notes ..................121
Kickdown ....................................... 123
Malfunction .................................... 126
Pulling away ................................... 118
Releasing the parking lock
manually ........................................ 126
Selector lever ................................ 122
B
backup lamp Display message ............................ 174
BAS (Brake Assist System) ................. 56
Battery Charging ........................................ 236
Checking (SmartKey) .......................64
Display message ............................ 176
Important safety guidelines
(SmartKey) ....................................... 64
Jump-starting ................................. 238
Maintenance (vehicle) .................... 235
Replacing (SmartKey) ......................64
Battery (vehicle)
Important safety notes ..................235
Belt
see Seat belts
Brake fluid
Display message ............................ 171
Notes ............................................. 280
Brake fluid level ................................ 219
Brake lamp (display message) ......... 172
Brakes ABS .................................................. 56
BAS .................................................. 56
4Index
Page 92 of 288
Vehicle equipment
i This manual describes all the standard
and optional equipment of your vehicle
which was available at the time of
purchase. Country-specific differences are
possible. Please note that your vehicle may
not be equipped with all features
described. This also applies to safety-
relevant systems and functions.
Exterior lighting
Important safety notes
For reasons of safety, Mercedes-Benz
recommends that you drive with the lights
switched on even during the daytime. In some
countries, operation of the headlamps varies
due to legal requirements and self-imposed
obligations. In these countries, the daytime
running lamps are automatically switched on
when the engine is started.
Information about driving abroad
Converting to symmetrical low beam
when driving abroad: switch the headlamps
to symmetrical low beam in countries in
which traffic drives on the opposite side of the
road to the country where the vehicle is
registered. This prevents glare to oncoming
traffic. Symmetrical lights do not illuminate
as large an area of the edge of the road.
Have the headlamps converted at a qualified
specialist workshop, e.g. an authorized
Mercedes-Benz Center, as close to the border
as possible before driving in these countries.
Converting to asymmetrical low beam
after returning: have the headlamps
converted back to asymmetrical low beam at
a qualified specialist workshop, e.g. an
authorized Mercedes-Benz Center, as soon as
possible after crossing the border when
returning.
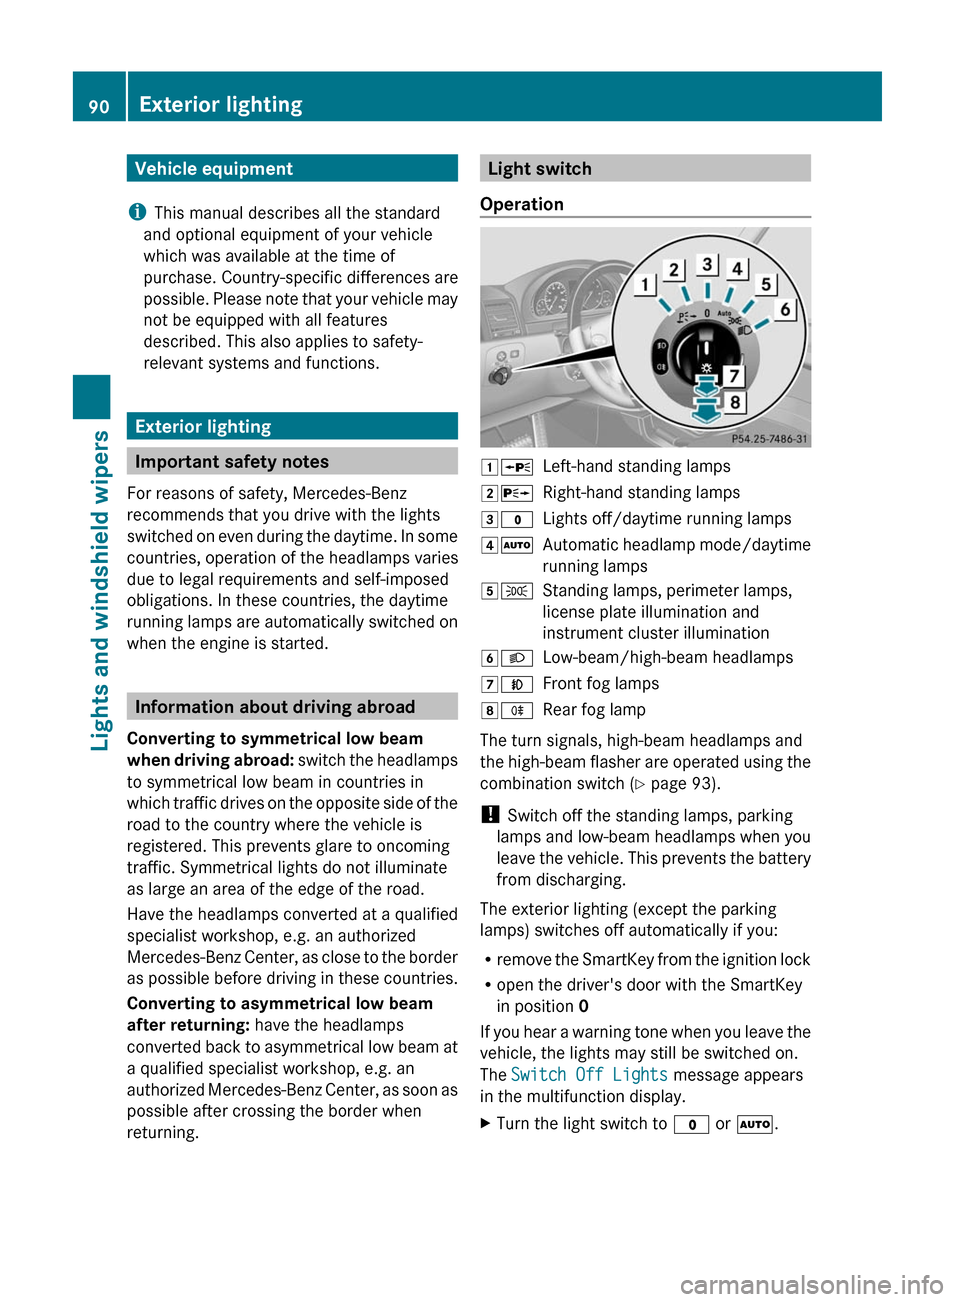
Light switch
Operation1 WLeft-hand standing lamps2XRight-hand standing lamps3$Lights off/daytime running lamps4ÃAutomatic headlamp mode/daytime
running lamps5 TStanding lamps, perimeter lamps,
license plate illumination and
instrument cluster illumination6 LLow-beam/high-beam headlamps7NFront fog lamps8RRear fog lamp
The turn signals, high-beam headlamps and
the high-beam flasher are operated using the
combination switch ( Y page 93).
! Switch off the standing lamps, parking
lamps and low-beam headlamps when you
leave the vehicle. This prevents the battery
from discharging.
The exterior lighting (except the parking
lamps) switches off automatically if you:
R remove the SmartKey from the ignition lock
R open the driver's door with the SmartKey
in position 0
If you hear a warning tone when you leave the
vehicle, the lights may still be switched on.
The Switch Off Lights message appears
in the multifunction display.
XTurn the light switch to $ or à .90Exterior lightingLights and windshield wipers
Page 97 of 288
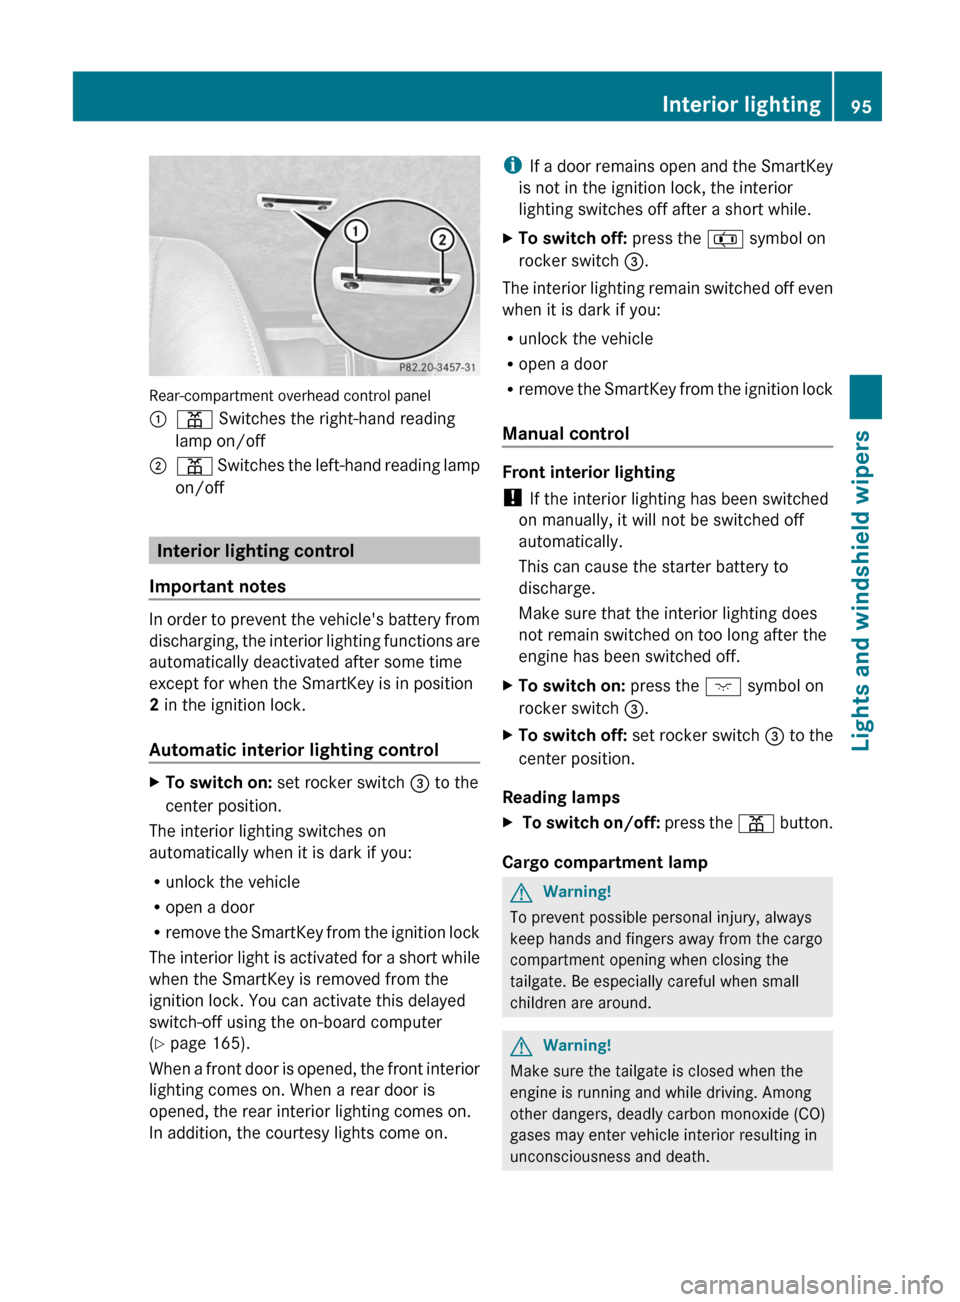
Rear-compartment overhead control panel
:p Switches the right-hand reading
lamp on/off;p Switches the left-hand reading lamp
on/off
Interior lighting control
Important notes
In order to prevent the vehicle's battery from
discharging, the interior lighting functions are
automatically deactivated after some time
except for when the SmartKey is in position
2 in the ignition lock.
Automatic interior lighting control
XTo switch on: set rocker switch = to the
center position.
The interior lighting switches on
automatically when it is dark if you:
R unlock the vehicle
R open a door
R remove the SmartKey from the ignition lock
The interior light is activated for a short while
when the SmartKey is removed from the
ignition lock. You can activate this delayed
switch-off using the on-board computer
( Y page 165).
When a front door is opened, the front interior
lighting comes on. When a rear door is
opened, the rear interior lighting comes on.
In addition, the courtesy lights come on.
i If a door remains open and the SmartKey
is not in the ignition lock, the interior
lighting switches off after a short while.XTo switch off: press the z symbol on
rocker switch =.
The interior lighting remain switched off even
when it is dark if you:
R unlock the vehicle
R open a door
R remove the SmartKey from the ignition lock
Manual control
Front interior lighting
! If the interior lighting has been switched
on manually, it will not be switched off
automatically.
This can cause the starter battery to
discharge.
Make sure that the interior lighting does
not remain switched on too long after the
engine has been switched off.
XTo switch on: press the c symbol on
rocker switch =.XTo switch off: set rocker switch = to the
center position.
Reading lamps
X To switch on/off: press the p button.
Cargo compartment lamp
GWarning!
To prevent possible personal injury, always
keep hands and fingers away from the cargo
compartment opening when closing the
tailgate. Be especially careful when small
children are around.
GWarning!
Make sure the tailgate is closed when the
engine is running and while driving. Among
other dangers, deadly carbon monoxide (CO)
gases may enter vehicle interior resulting in
unconsciousness and death.
Interior lighting95Lights and windshield wipersZ
Page 98 of 288
! Switch off the cargo compartment lamp if
you wish to leave the rear door open for a
longer period. The battery may otherwise
discharge.XTo switch on/off: press the t button.
i
If you open the rear door, the cargo
compartment lamp comes on. Then, you
cannot switch it off using the t button.
Switch off the cargo compartment lamp if
you wish to leave the rear door open for a
longer period. This prevents the battery
from discharging.
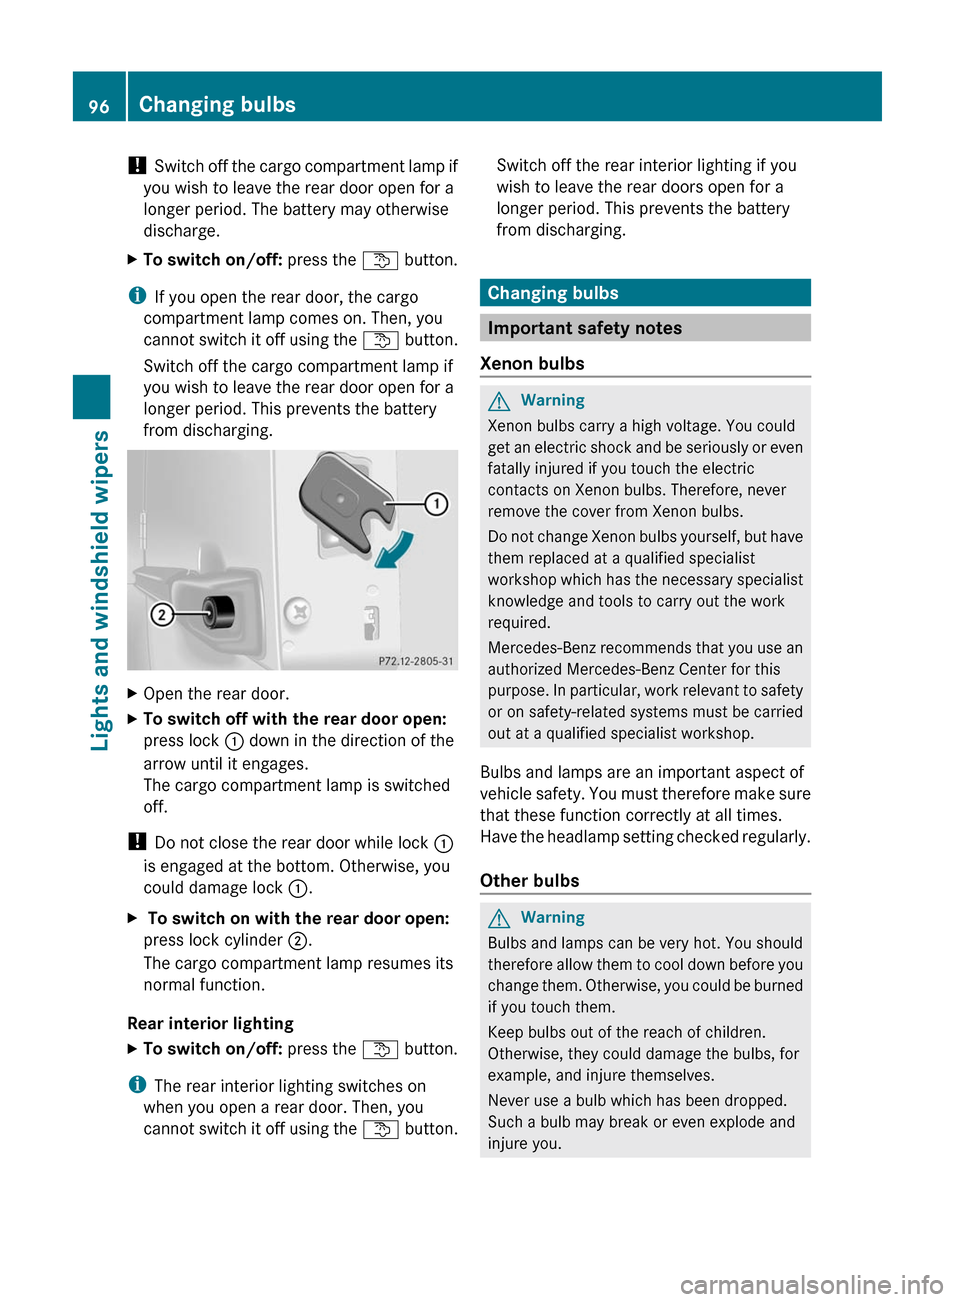
XOpen the rear door.XTo switch off with the rear door open:
press lock : down in the direction of the
arrow until it engages.
The cargo compartment lamp is switched
off.
! Do not close the rear door while lock :
is engaged at the bottom. Otherwise, you
could damage lock :.
X To switch on with the rear door open:
press lock cylinder ;.
The cargo compartment lamp resumes its
normal function.
Rear interior lighting
XTo switch on/off: press the t button.
i
The rear interior lighting switches on
when you open a rear door. Then, you
cannot switch it off using the t button.
Switch off the rear interior lighting if you
wish to leave the rear doors open for a
longer period. This prevents the battery
from discharging.
Changing bulbs
Important safety notes
Xenon bulbs
GWarning
Xenon bulbs carry a high voltage. You could
get an electric shock and be seriously or even
fatally injured if you touch the electric
contacts on Xenon bulbs. Therefore, never
remove the cover from Xenon bulbs.
Do not change Xenon bulbs yourself, but have
them replaced at a qualified specialist
workshop which has the necessary specialist
knowledge and tools to carry out the work
required.
Mercedes-Benz recommends that you use an
authorized Mercedes-Benz Center for this
purpose. In particular, work relevant to safety
or on safety-related systems must be carried
out at a qualified specialist workshop.
Bulbs and lamps are an important aspect of
vehicle safety. You must therefore make sure
that these function correctly at all times.
Have the headlamp setting checked regularly.
Other bulbs
GWarning
Bulbs and lamps can be very hot. You should
therefore allow them to cool down before you
change them. Otherwise, you could be burned
if you touch them.
Keep bulbs out of the reach of children.
Otherwise, they could damage the bulbs, for
example, and injure themselves.
Never use a bulb which has been dropped.
Such a bulb may break or even explode and
injure you.
96Changing bulbsLights and windshield wipers
Page 238 of 288
GWarning
Failure to follow these instructions can result
in severe injury or death.
Never lean over batteries while connecting.
You might get injured.
Battery fluid contains sulfuric acid. Do not
allow this fluid to come in contact with eyes,
skin or clothing. In case it does, immediately
flush affected area with water and seek
medical help if necessary.
A battery will also produce hydrogen gas,
which is flammable and explosive. Keep
flames or sparks away from battery, avoid
improper connection of jumper cables,
smoking etc.
GWarning
Do not place any metal objects on the battery
as this could result in a short circuit.
Use leak-proof batteries only to avoid the risk
of acid burns in the event of an accident.
Take care that you do not become statically
charged, e.g. by wearing synthetic clothing or
rubbing against textiles. For this reason, you
also should not pull or push the battery over
carpets or other synthetic materials.
Never touch the battery first. First, touch the
outside body of the vehicle in order to release
any possible electrostatic charges.
Do not rub the battery with rags or cloths. The
battery could explode if touched due to
electrostatic charge or due to spark
formation.
! Switch off the engine and remove the
SmartKey before disconnecting the
terminal clamps from the battery. You may
otherwise destroy electronic components,
such as the alternator.
! Like other batteries, the vehicle battery
may discharge over time if you do not use
the vehicle. In this case, have the battery
disconnected at a qualified specialist
workshop, e.g. an authorized Mercedes-
Benz Center. You can also charge the
battery with a charger recommended by
Mercedes-Benz. Contact an authorized
Mercedes-Benz Center for further
information.
The battery, breather hose and cover of the
positive terminal clamp must be installed
securely during operation.
i Remove the SmartKey if you park the
vehicle and do not require any electrical
consumers. The vehicle will then use very
little energy, thus conserving battery
power.
Mercedes-Benz recommends that you do not
carry out work on batteries yourself, e.g.
removing, charging or replacing. Always have
this work performed at a qualified specialist
workshop, e.g. an authorized Mercedes-Benz
Center.
i If the power supply has been interrupted,
e.g. if the battery has been reconnected,
you must carry out the following tasks:
R reset the head restraints on the front
seats ( Y page 80).
Charging the battery
GWarning
Never charge a battery while still installed in
the vehicle unless the accessory battery
charge unit approved by Mercedes-Benz is
being used. Gases may escape during
charging and cause explosions that may
result in paint damage, corrosion or personal
injury.
An accessory battery charge unit specially
adapted for Mercedes-Benz vehicles and
tested and approved by Mercedes-Benz is
available. It permits the charging of the
battery in its installed position. Contact an
authorized Mercedes-Benz Center for
information and availability.
Charge the battery in accordance with the
separate instructions for the accessory
battery charger.
236BatteryRoadside Assistance
Page 239 of 288
GWarning
There is a risk of acid burns during the
charging process due to the gases which
escape from the battery. Do not lean over the
battery during the charging process.
GWarning
Battery acid is caustic. Avoid contact with the
skin, eyes or clothing.
! Only charge the installed battery with a
battery charger which has been tested and
approved by Mercedes-Benz. These battery
chargers allow the battery to be charged
while still installed.
! Only use battery chargers with a
maximum charging voltage of 14.8 V.
! Only charge the battery using the jump-
starting connection point.
The jump-starting connection point is in the
engine compartment ( Y page 238).
XOpen the hood ( Y page 214).XConnect the battery charger to the positive
terminal and earth point in the same order
as when connecting the donor battery in
the jump-starting procedure
( Y page 238).XRead the battery charger's operating
instructions before charging the battery.Battery237Roadside AssistanceZ
Page 240 of 288
Jump-startingGWarning
Failure to follow these directions will cause damage to the electronic components, and can lead
to a battery explosion and severe injury or death.
Never lean over batteries while connecting or jump starting. You might get injured.
Battery fluid contains sulfuric acid. Do not allow this fluid to come in contact with eyes, skin or
clothing. In case it does, immediately flush affected area with water, and seek medical help if
necessary.
A battery will also produce hydrogen gas, which is flammable and explosive. Keep flames or
sparks away from battery, avoid improper connection of jumper cables, smoking, etc.
Attempting to jump start a frozen battery can result in it exploding, causing personal injury.
Read all instructions before proceeding.
! Avoid repeated and lengthy starting attempts. Otherwise, non-combusted fuel may
damage the catalytic converter and create a risk of fire.
Do not use a rapid charging device to start the vehicle.
Make sure the jumper cables are not damaged.
Make sure the jumper cables are not touching any other metal objects when they are
connected to the battery.
If your vehicle's battery is discharged, the engine can be jump-started from another vehicle
or from a second battery using jumper cables.
Observe the following points:
XThe battery is not accessible in all vehicles. If the other vehicle's battery is not accessible,
jump-start the vehicle using a second battery or a jump-starting device.XYou may only jump-start the vehicle when the engine and catalytic converter are cold.XDo not start the engine if the battery is frozen. Let the battery thaw first.XJump-starting may only be performed from batteries with a nominal voltage of 12 V.XOnly use jumper cables that have a sufficient cross-section and insulated terminal clamps.XMake sure that the jumper cables cannot come into contact with parts, such as the pulley
or the fan. These parts move when the engine is started and while it is running.XIf the battery is fully discharged, leave the battery that is being used to jump-start connected
for a few minutes before attempting to start. This charges the empty battery a little.
i Jumper cables and further information about jump-starting can be obtained from any
authorized Mercedes-Benz Center.
XMake sure that the two vehicles do not touch.XApply the parking brake.XMove the selector lever to P.XSwitch off all electrical consumers (e.g. radio, blower, etc.).XOpen the hood ( Y page 214).238Jump-startingRoadside Assistance