2011 MERCEDES-BENZ G550 reset
[x] Cancel search: resetPage 82 of 288
Resetting the front seat head restraints
It is necessary to reset the front seat head
restraints after the voltage supply has been
interrupted, e.g. if the battery has been
completely discharged or disconnected.
XMake sure that the cup holder on the center
console is folded down ( Y page 197).XMove the seat as far forward as possible
and the head restraint in as far as possible.
Rear seat head restraints
Important safety notes
GWarning!
For safety reasons, always drive with the rear
head restraints in the upright position when
the rear seats are occupied.
Keep the area around head restraints clear of
articles (e.g. clothing) to not obstruct the
folding operation of the head restraints.
GWarning!
For your protection, drive only with properly
positioned head restraints.
Adjust the head restraint in such a way that it
is as close to the head as possible and the
center of the head restraint supports the back
of the head at eye level. This will reduce the
potential for injury to the head and neck in the
event of an accident or similar situation.
With a rear seat occupied, make sure to move
the respective head restraint up from the
lowest non-use position and have the
occupant adjust the head restraint properly.
Do not drive the vehicle without the seat head
restraints installed when the rear seats are
occupied. Head restraints are intended to
help reduce injuries during an accident.
GWarning!
Make sure the rear seat head restraints
engage when placing them upright manually.
Otherwise their protective function cannot be
ensured.
The back of the head will not be supported in
the event of a collision. That could cause
serious or even fatal injuries. Rear seat
occupants can be seriously injured or killed.
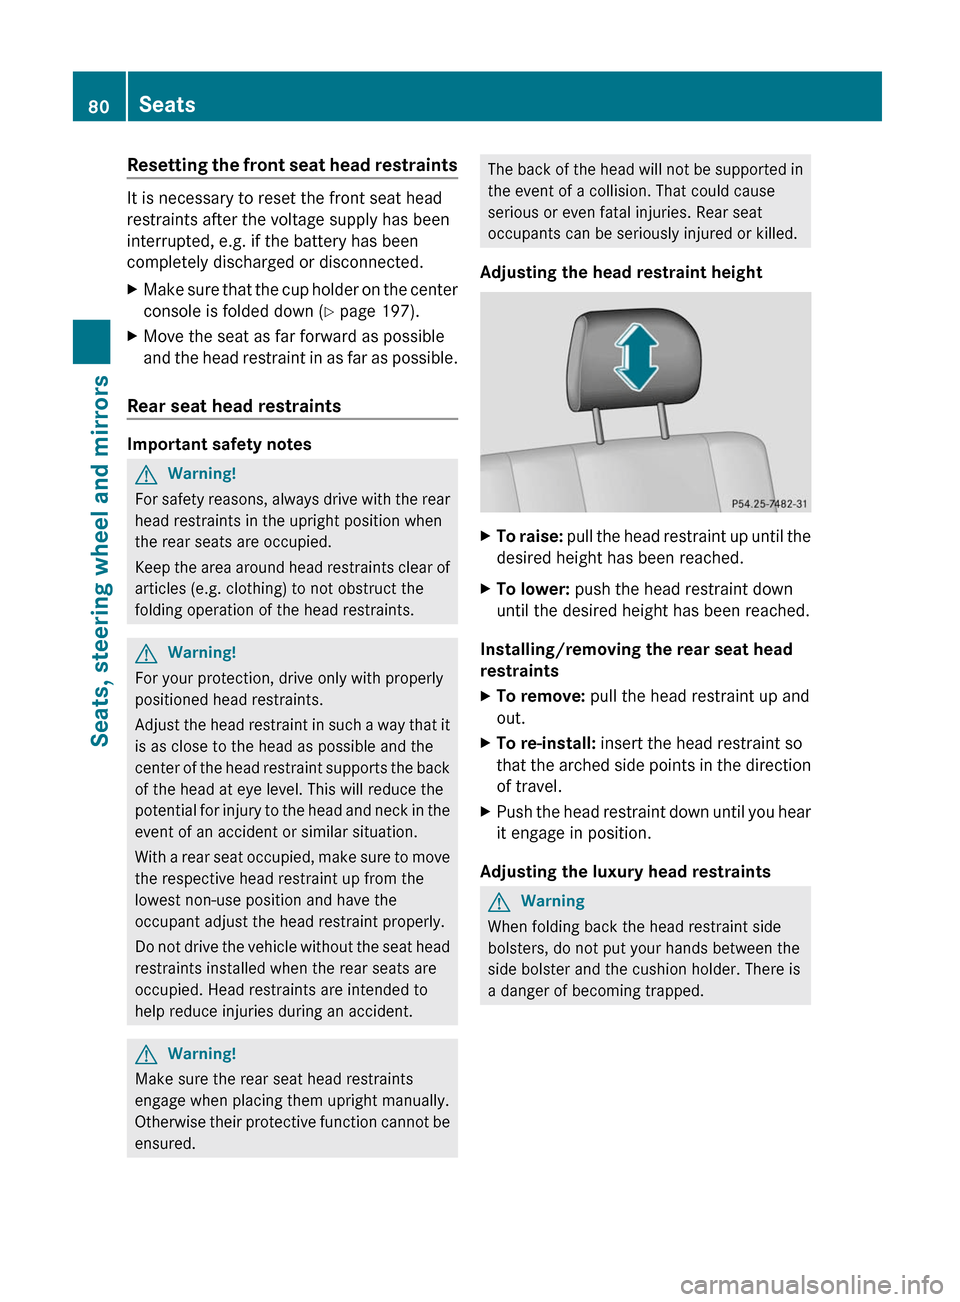
Adjusting the head restraint heightXTo raise: pull the head restraint up until the
desired height has been reached.XTo lower: push the head restraint down
until the desired height has been reached.
Installing/removing the rear seat head
restraints
XTo remove: pull the head restraint up and
out.XTo re-install: insert the head restraint so
that the arched side points in the direction
of travel.XPush the head restraint down until you hear
it engage in position.
Adjusting the luxury head restraints
GWarning
When folding back the head restraint side
bolsters, do not put your hands between the
side bolster and the cushion holder. There is
a danger of becoming trapped.
80SeatsSeats, steering wheel and mirrors
Page 89 of 288
Problems with the exterior mirrorsProblemPossible causes/consequences and M SolutionsAn exterior mirror has
been pushed out of
position.XMove the exterior mirror into the correct position manually.Automatic anti-glare mirrorsGWarning!
The auto-dimming function does not react if
incoming light is not aimed directly at sensors
in the interior rear view mirror.
The interior rear view mirror and the exterior
rear view mirror on the driver’s side do not
react, for example, when transporting cargo
which covers the rear window.
Light hitting the mirror(s) at certain angles
(incident light) could blind you. As a result,
you may not be able to observe traffic
conditions and could cause an accident.
The rear-view mirror and the exterior mirror
on the driver's side automatically go into anti-
glare mode if the ignition is switched on and
incident light from headlamps strikes the
sensor in the rear-view mirror.
The mirrors do not go into anti-glare mode if
reverse gear is engaged or the interior lighting
is switched on.
Parking position for the exterior
mirror on the front-passenger side
General notes
To make it easier to park, you can store the
front-passenger side exterior mirror position
in such a way that you can see the rear wheel
on that side as soon as you engage reverse
gear R.
Using the memory buttons on the driver's
side, you can store three parking positions
per key.
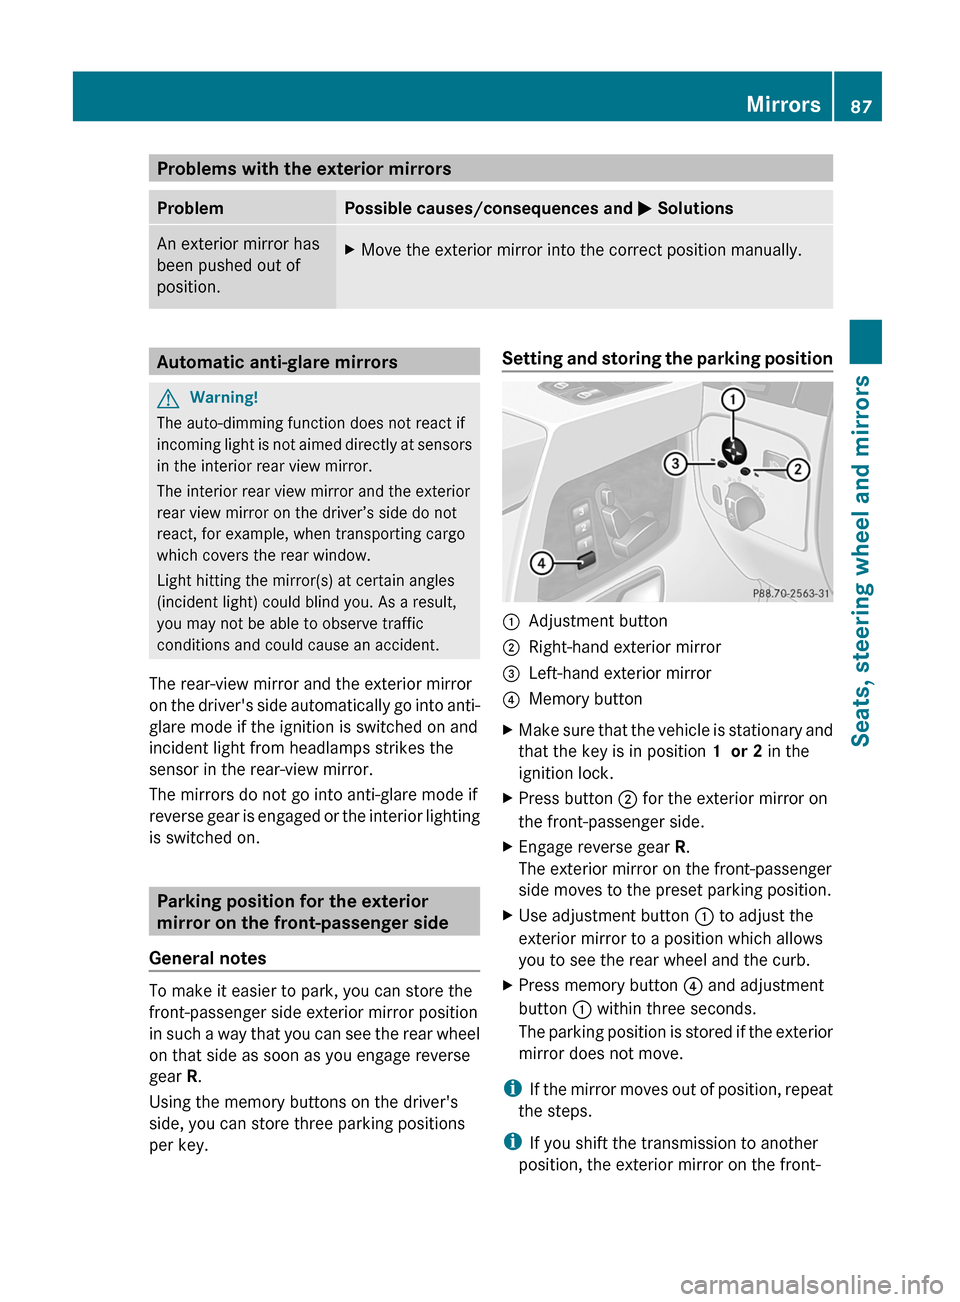
Setting and storing the parking position:Adjustment button;Right-hand exterior mirror=Left-hand exterior mirror?Memory buttonXMake sure that the vehicle is stationary and
that the key is in position 1 or 2 in the
ignition lock.XPress button ; for the exterior mirror on
the front-passenger side.XEngage reverse gear R.
The exterior mirror on the front-passenger
side moves to the preset parking position.XUse adjustment button : to adjust the
exterior mirror to a position which allows
you to see the rear wheel and the curb.XPress memory button ? and adjustment
button : within three seconds.
The parking position is stored if the exterior
mirror does not move.
i If the mirror moves out of position, repeat
the steps.
i If you shift the transmission to another
position, the exterior mirror on the front-
Mirrors87Seats, steering wheel and mirrorsZ
Page 90 of 288
passenger side returns to the driving
position.
Calling up a stored parking position
settingXWith the key in position 2 in the ignition
lock and the exterior mirror on the front-
passenger side activated, engage reverse
gear.
The exterior mirror on the front-passenger
side moves to the stored parking position.
The exterior mirror on the front-passenger
side moves back to its original position:
R as soon as you exceed a speed of
10 km/h
R about ten seconds after you have
disengaged reverse gear R
R if you press button = for the exterior
mirror on the driver's side
Memory functions
Storing settings
With the memory function, you can store up
to three different settings, e.g. for three
different people.
The following settings are stored as a single
memory preset:
R position of the seat, backrest and head
restraint
R driver's side: steering wheel position
R driver's side: position of the exterior
mirrors on the driver's and front-passenger
sides
GWarning
Do not activate the memory function while
driving. Activating the memory function while
driving could cause the driver to lose control
of the vehicle.
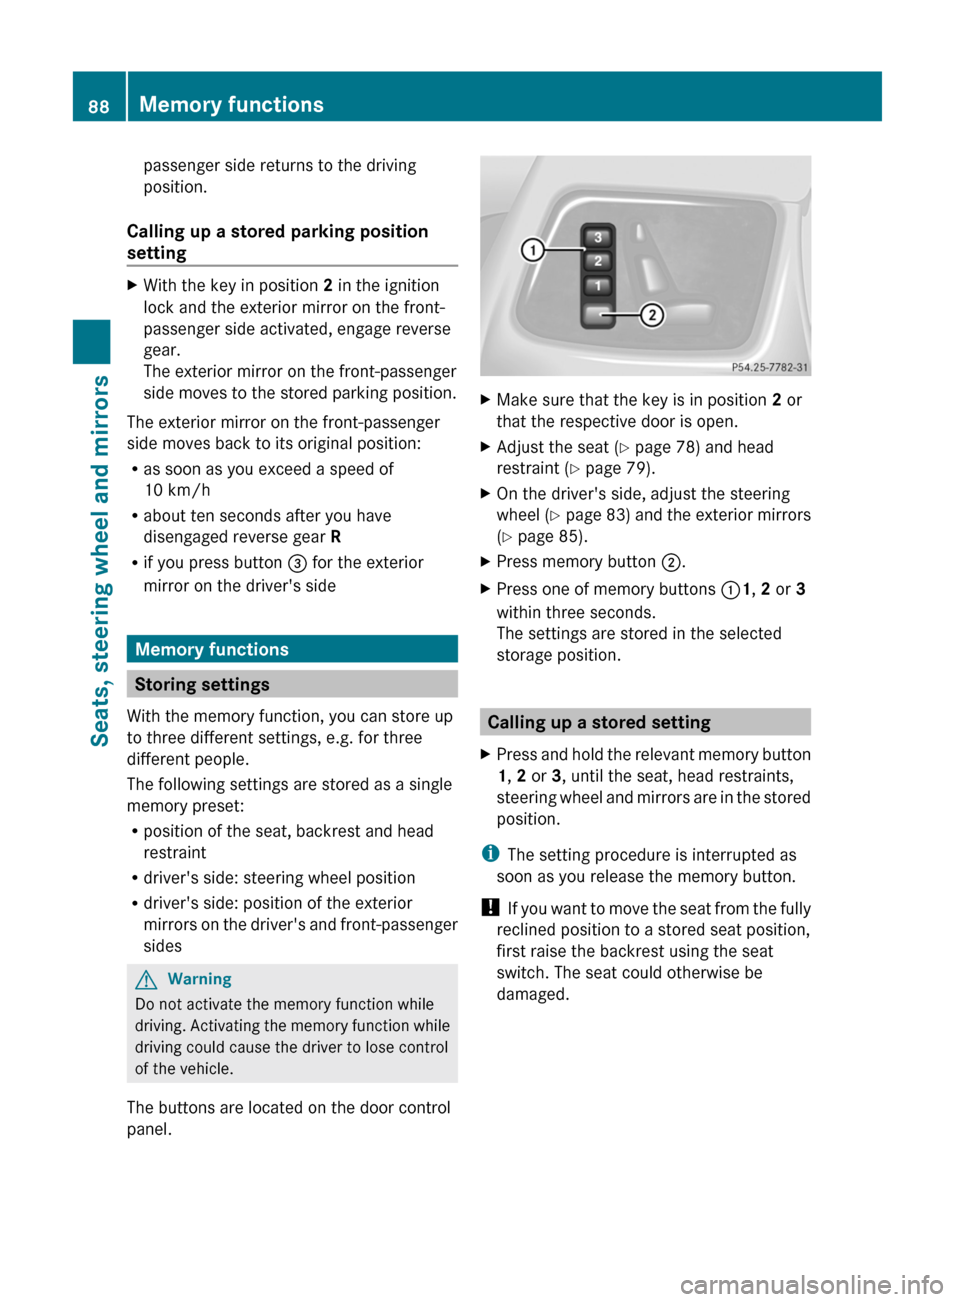
The buttons are located on the door control
panel.
XMake sure that the key is in position 2 or
that the respective door is open.XAdjust the seat ( Y page 78) and head
restraint ( Y page 79).XOn the driver's side, adjust the steering
wheel ( Y page 83) and the exterior mirrors
( Y page 85).XPress memory button ;.XPress one of memory buttons :1, 2 or 3
within three seconds.
The settings are stored in the selected
storage position.
Calling up a stored setting
XPress and hold the relevant memory button
1 , 2 or 3, until the seat, head restraints,
steering wheel and mirrors are in the stored
position.
i The setting procedure is interrupted as
soon as you release the memory button.
! If you want to move the seat from the fully
reclined position to a stored seat position,
first raise the backrest using the seat
switch. The seat could otherwise be
damaged.
88Memory functionsSeats, steering wheel and mirrors
Page 95 of 288
Combination switch
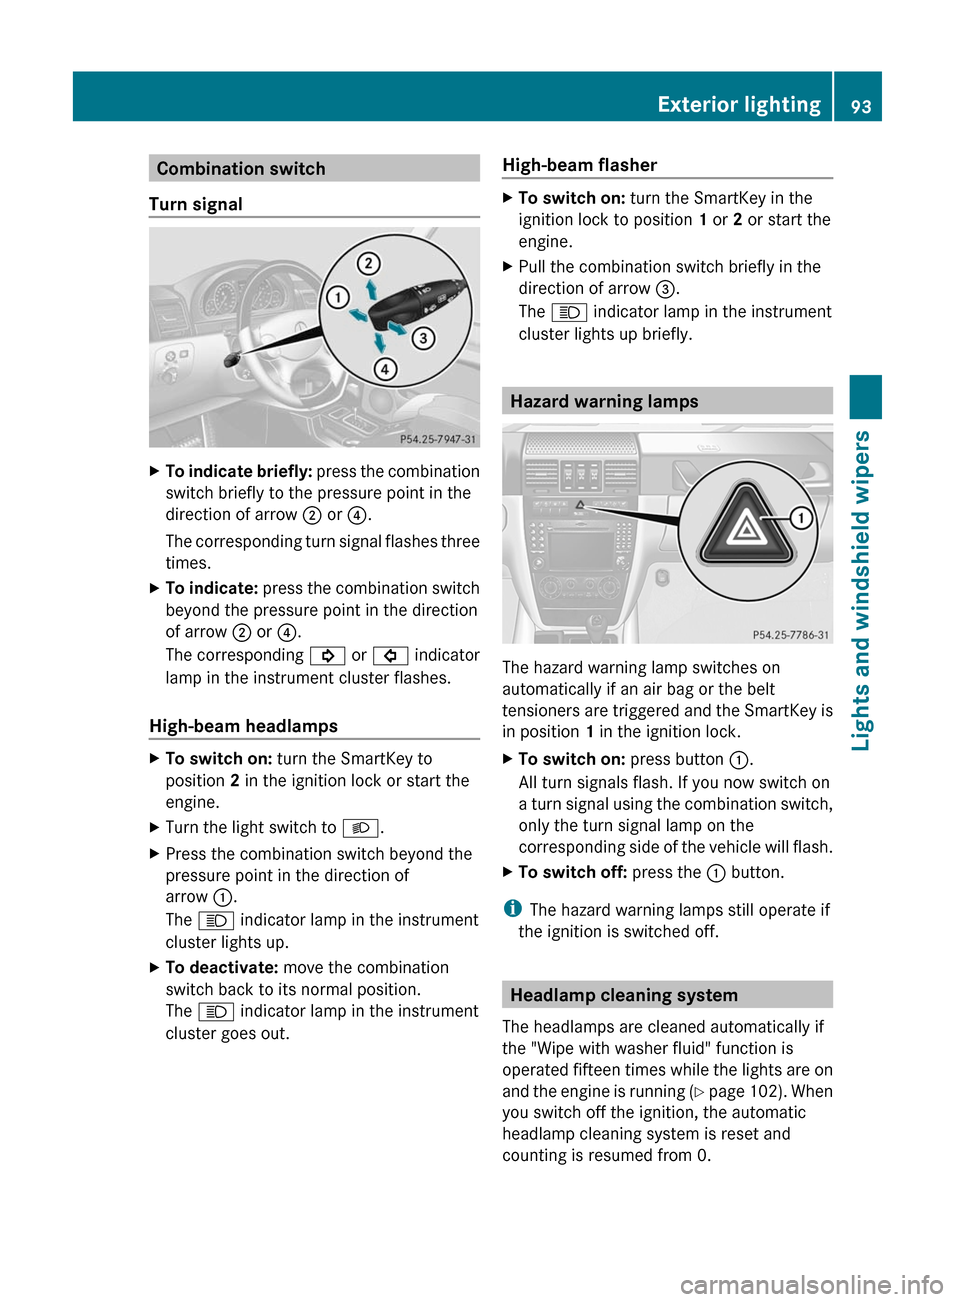
Turn signalXTo indicate briefly: press the combination
switch briefly to the pressure point in the
direction of arrow ; or ?.
The corresponding turn signal flashes three
times.XTo indicate: press the combination switch
beyond the pressure point in the direction
of arrow ; or ?.
The corresponding ! or # indicator
lamp in the instrument cluster flashes.
High-beam headlamps
XTo switch on: turn the SmartKey to
position 2 in the ignition lock or start the
engine.XTurn the light switch to L.XPress the combination switch beyond the
pressure point in the direction of
arrow :.
The K indicator lamp in the instrument
cluster lights up.XTo deactivate: move the combination
switch back to its normal position.
The K indicator lamp in the instrument
cluster goes out.High-beam flasherXTo switch on: turn the SmartKey in the
ignition lock to position 1 or 2 or start the
engine.XPull the combination switch briefly in the
direction of arrow =.
The K indicator lamp in the instrument
cluster lights up briefly.
Hazard warning lamps
The hazard warning lamp switches on
automatically if an air bag or the belt
tensioners are triggered and the SmartKey is
in position 1 in the ignition lock.
XTo switch on: press button :.
All turn signals flash. If you now switch on
a turn signal using the combination switch,
only the turn signal lamp on the
corresponding side of the vehicle will flash.XTo switch off: press the : button.
i
The hazard warning lamps still operate if
the ignition is switched off.
Headlamp cleaning system
The headlamps are cleaned automatically if
the "Wipe with washer fluid" function is
operated fifteen times while the lights are on
and the engine is running (Y page 102). When
you switch off the ignition, the automatic
headlamp cleaning system is reset and
counting is resumed from 0.
Exterior lighting93Lights and windshield wipersZ
Page 149 of 288
Driving systems
Cruise control
Important safety notes
Cruise control maintains a constant road
speed for you. On long and steep downhill
gradients, especially if the vehicle is laden,
you must select shift range 1, 2 or 3 in good
time. By doing so, you will make use of the
braking effect of the engine, which relieves
the load on the brake system and prevents
the brakes from overheating and wearing too
quickly.
Use cruise control only if road and traffic
conditions make it appropriate to maintain a
steady speed for a prolonged period. You can
store any road speed above 20 mph
(30 km/h).
GWarning
The cruise control is a convenience system
designed to assist the driver during vehicle
operation. The driver is and must always
remain responsible for the vehicle's speed
and for safe brake operation.
Only use the cruise control if the road, traffic,
and weather conditions make it advisable to
travel at a constant speed.
R The use of the cruise control can be
dangerous on winding roads or in heavy
traffic because conditions do not allow safe
driving at a constant speed.
R The use of the cruise control can be
dangerous on slippery roads. Rapid
changes in tire traction can result in wheel
spin and loss of control.
R Deactivate the cruise control when driving
in fog.
The "Resume" function should only be
operated if the driver is fully aware of the
previously set speed and wishes to resume
this particular preset speed.
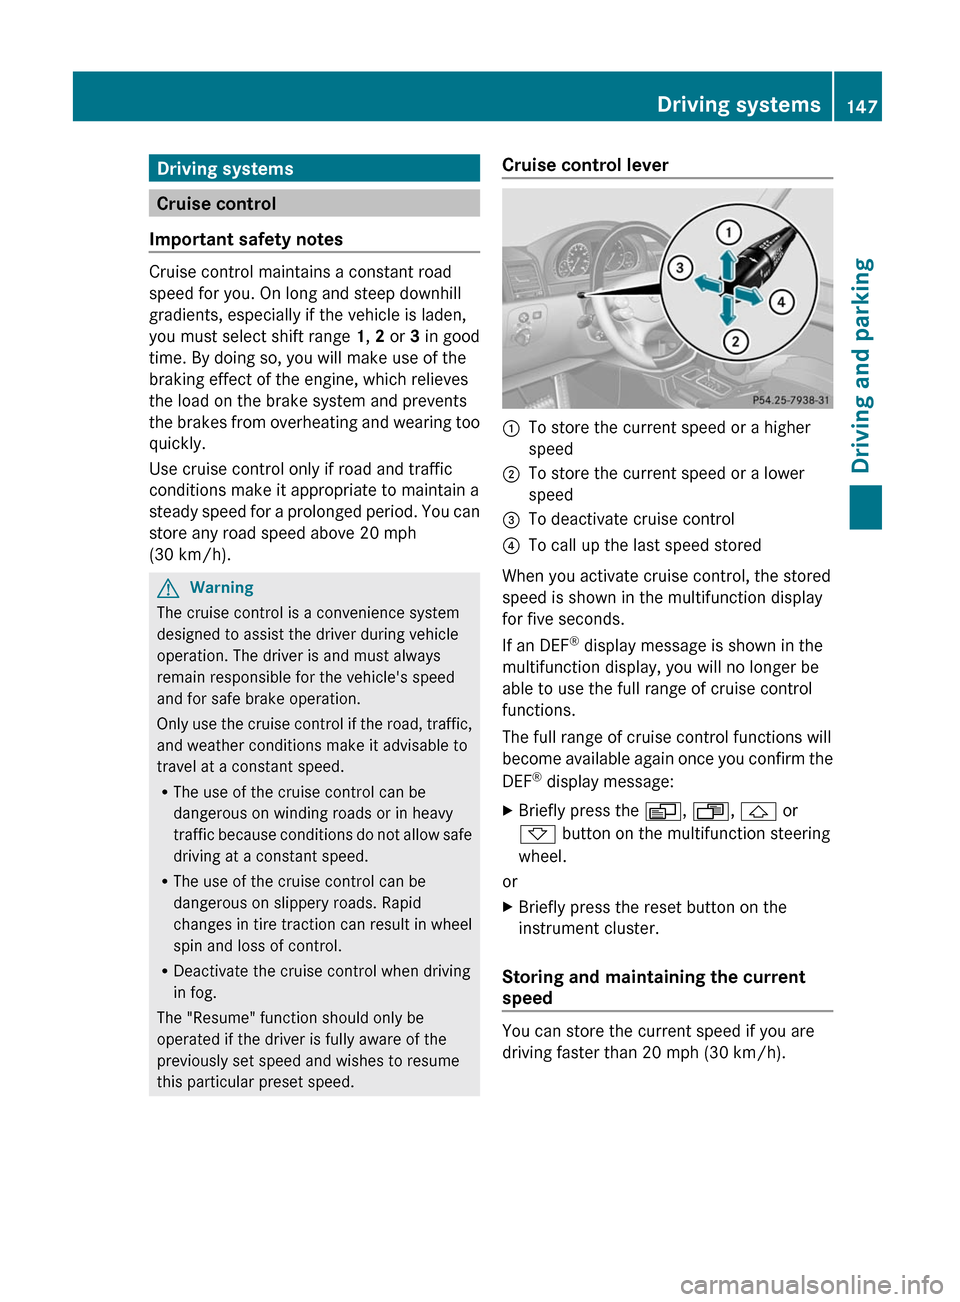
Cruise control lever:To store the current speed or a higher
speed;To store the current speed or a lower
speed=To deactivate cruise control?To call up the last speed stored
When you activate cruise control, the stored
speed is shown in the multifunction display
for five seconds.
If an DEF ®
display message is shown in the
multifunction display, you will no longer be
able to use the full range of cruise control
functions.
The full range of cruise control functions will
become available again once you confirm the
DEF ®
display message:
XBriefly press the V, U , & or
* button on the multifunction steering
wheel.
or
XBriefly press the reset button on the
instrument cluster.
Storing and maintaining the current
speed
You can store the current speed if you are
driving faster than 20 mph (30 km/h).
Driving systems147Driving and parkingZ
Page 150 of 288
XAccelerate the vehicle to the desired
speed.XBriefly press the cruise control lever
up : or down ;.XRemove your foot from the accelerator
pedal.
Cruise control is activated. The vehicle
automatically maintains the stored speed.
i Cruise control may be unable to maintain
the stored speed on uphill and downhill
gradients. The stored speed is resumed
when the gradient levels out.
Calling up the last speed stored
GWarning
The set speed stored in memory should only
be set again if prevailing road conditions and
legal speed limits permit. Possible
acceleration or deceleration differences
arising from returning to the preset speed
could cause an accident and/or serious injury
to you and others.
XBriefly pull the cruise control lever towards
you ?.XRemove your foot from the accelerator
pedal.
Cruise control is activated and adjusts the
vehicle's speed to the last speed stored.
i G 350 CDI: if no speed is stored, cruise
control stores the current speed and
maintains it.
Setting a speed
GWarning
Keep in mind that it may take a brief moment
until the vehicle has made the necessary
adjustments.
Increase or decrease the set vehicle speed to
a value that the prevailing road conditions and
legal speed limits permit. Otherwise, sudden
and unexpected acceleration or deceleration
of the vehicle could cause an accident and/
or serious injury to you and others.XPress the cruise control lever up : for a
higher speed or down ; for a lower speed.XKeep the cruise control lever pressed until
the desired speed is reached.XRelease the cruise control lever.
The new speed is stored.
i Cruise control is not deactivated if you
depress the accelerator pedal. For
example, if you accelerate briefly to
overtake, cruise control adjusts the
vehicle's speed to the last speed stored
after you have finished overtaking.
Setting in 1 mph (Canada: 1 km/h)
increments
XBriefly press the cruise control lever
up : for a higher speed or down ; for a
lower speed.
The last speed stored is increased or
reduced.
Deactivating cruise control
There are several ways to deactivate cruise
control:
XBriefly press the cruise control lever
forwards =.
or
XBrake.
Cruise control is automatically deactivated if:
R you apply the parking brake.
R you are driving below 20 mph (30 km/h).
R ESP ®
intervenes or you deactivate ESP ®
.
R you shift the transmission to position N
while driving.
R G 350 CDI: you engage a differential lock.
i The last speed stored is cleared when you
switch off the engine.
148Driving systemsDriving and parking
Page 160 of 288
A&*
Press briefly:
Scrolls back and forth within a menu
In the Audio menu: selects a stored
station, an audio track or a video
scene
In the Telephone menu: switches to
the phone book and selects a name
or a telephone number&*
Press and hold:
In the Audio menu: selects the
previous/next station or selects an
audio track using rapid scrolling
In the Telephone menu: starts rapid
scrolling through the phone book
Multifunction display
To activate the multifunction display:
R switch on the ignition.
R switch on the lights.
R open the door.
R press the reset button on the instrument
cluster.
The multifunction display shows you values
and settings as well as possible messages.
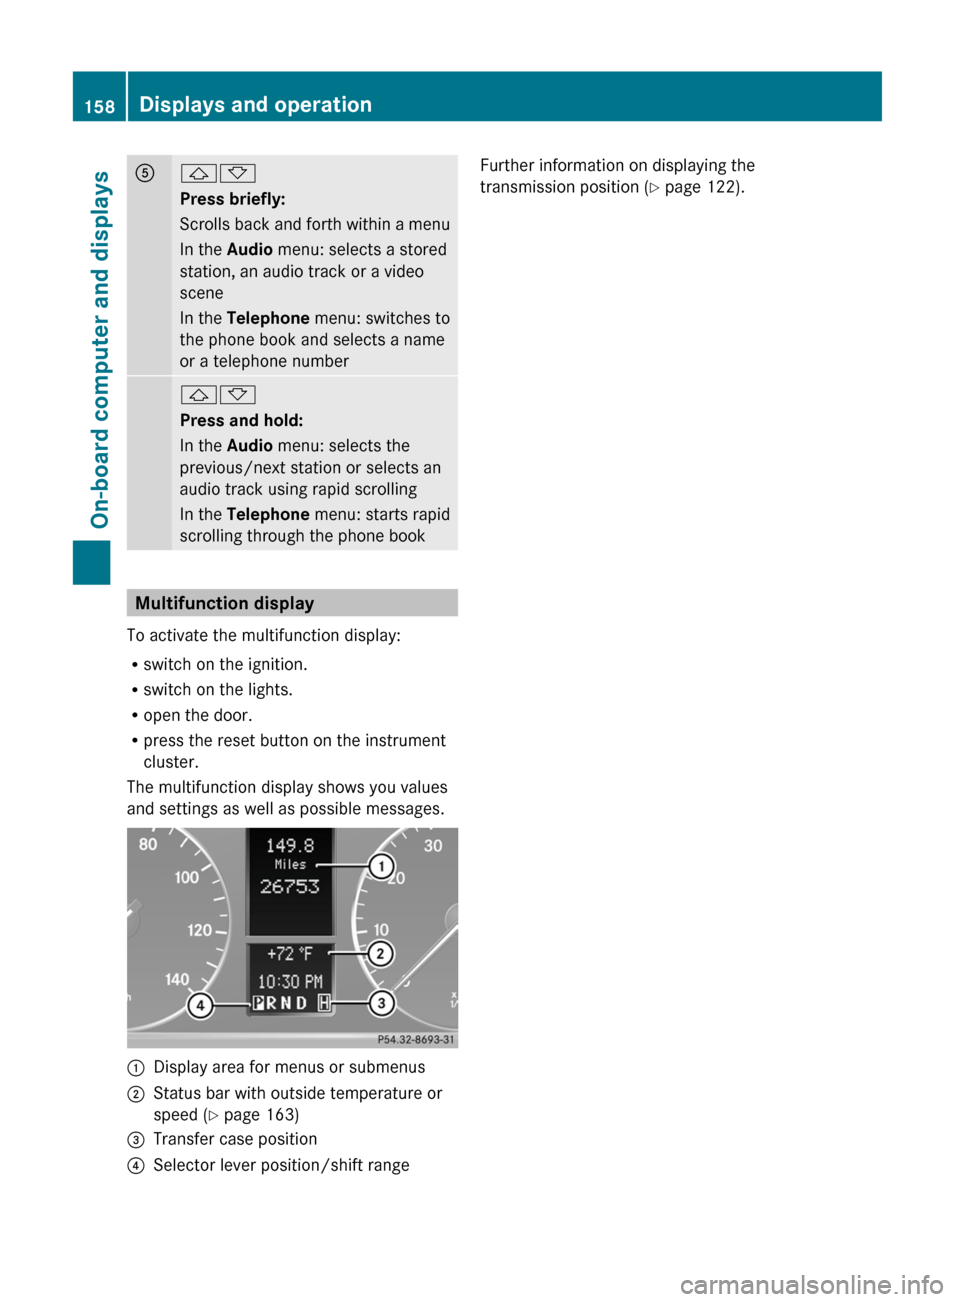
:Display area for menus or submenus;Status bar with outside temperature or
speed ( Y page 163)=Transfer case position?Selector lever position/shift rangeFurther information on displaying the
transmission position ( Y page 122).158Displays and operationOn-board computer and displays
Page 162 of 288
Standard display menu
Standard displayXPress the V or U button on the
steering wheel to select the standard
display.
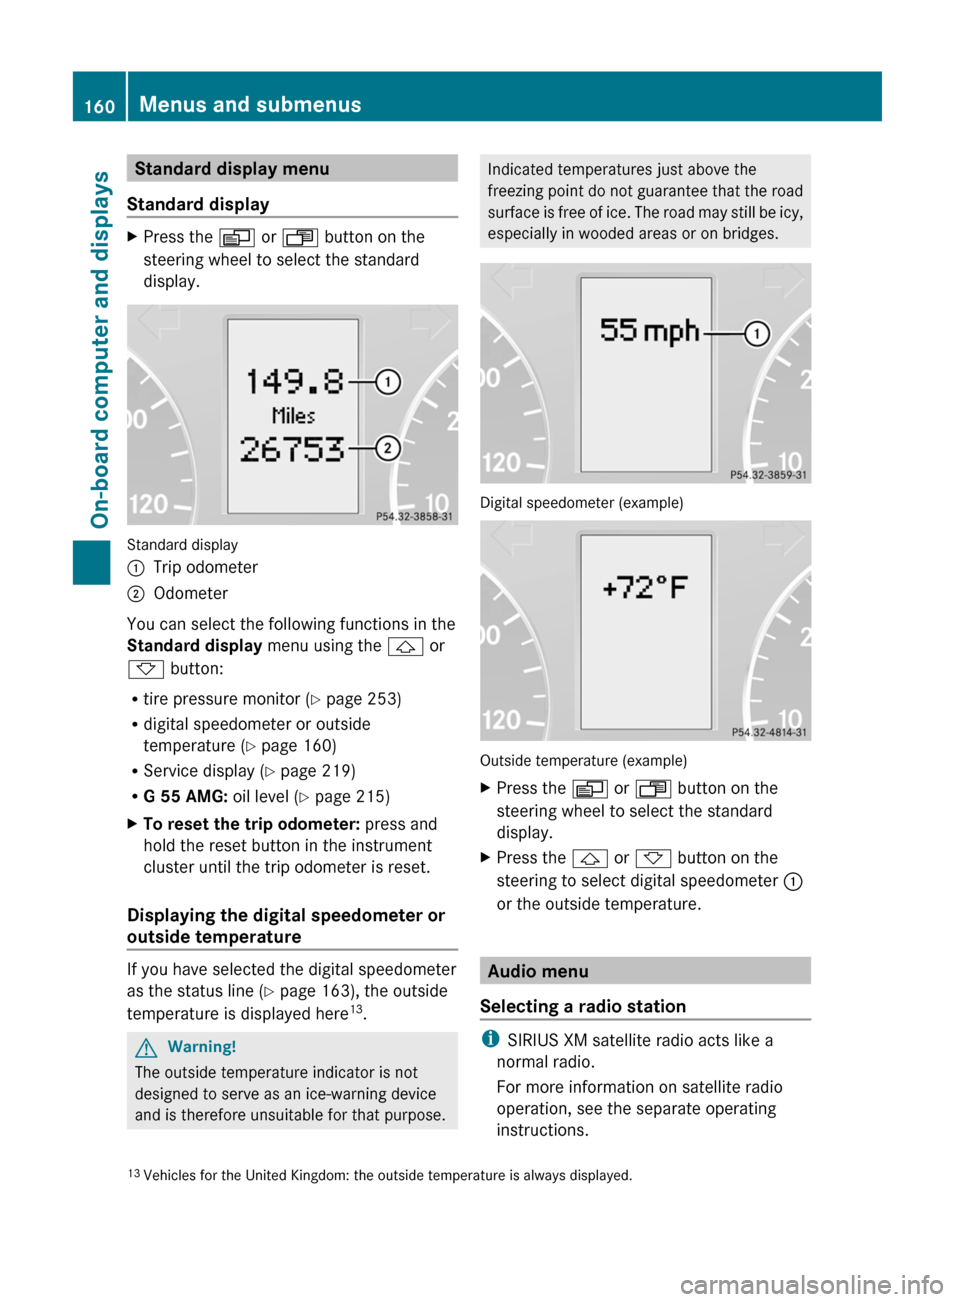
Standard display
:Trip odometer;Odometer
You can select the following functions in the
Standard display menu using the & or
* button:
R tire pressure monitor ( Y page 253)
R digital speedometer or outside
temperature ( Y page 160)
R Service display ( Y page 219)
R G 55 AMG: oil level (Y page 215)
XTo reset the trip odometer: press and
hold the reset button in the instrument
cluster until the trip odometer is reset.
Displaying the digital speedometer or
outside temperature
If you have selected the digital speedometer
as the status line ( Y page 163), the outside
temperature is displayed here 13
.
GWarning!
The outside temperature indicator is not
designed to serve as an ice-warning device
and is therefore unsuitable for that purpose.
Indicated temperatures just above the
freezing point do not guarantee that the road
surface is free of ice. The road may still be icy,
especially in wooded areas or on bridges.
Digital speedometer (example)
Outside temperature (example)
XPress the V or U button on the
steering wheel to select the standard
display.XPress the & or * button on the
steering to select digital speedometer :
or the outside temperature.
Audio menu
Selecting a radio station
i SIRIUS XM satellite radio acts like a
normal radio.
For more information on satellite radio
operation, see the separate operating
instructions.
13 Vehicles for the United Kingdom: the outside temperature is always displayed.160Menus and submenusOn-board computer and displays