2011 MERCEDES-BENZ G-CLASS towing
[x] Cancel search: towingPage 5 of 288
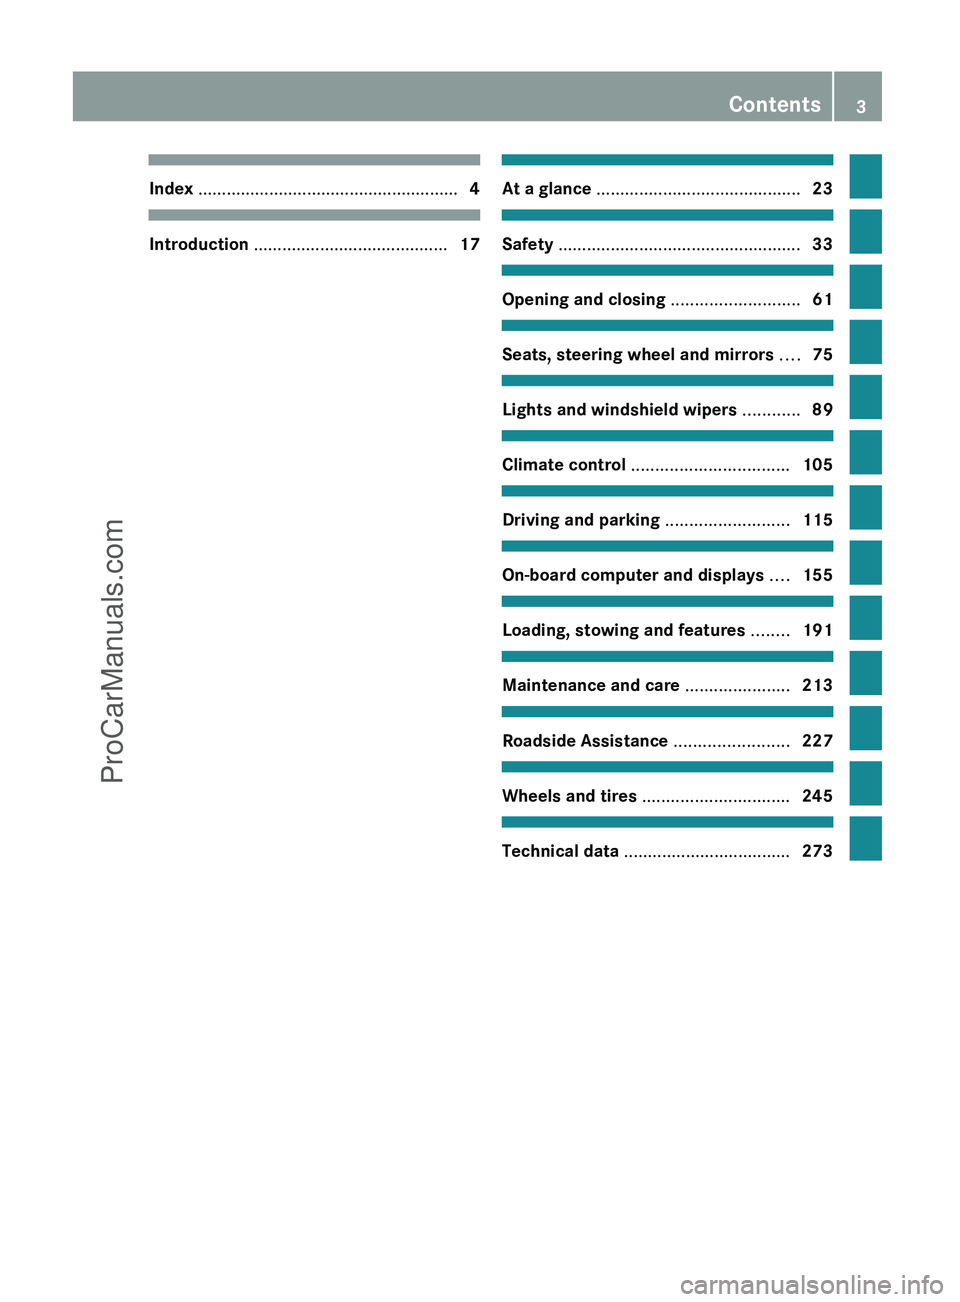
Index ....................................................... 4Introduction ......................................... 17At a glance ........................................... 23Safety ................................................... 33Opening and closing ...........................61Seats, steering wheel and mirrors ....75Lights and windshield wipers ............89Climate control ................................. 105Driving and parking ..........................115On-board computer and displays ....155Loading, stowing and features ........191Maintenance and care ......................213Roadside Assistance ........................227Wheels and tires ............................... 245Technical data ................................... 273
Contents3ProCarManuals.com
Page 17 of 288

Uniform Tire Quality Grading
Standards (definition) ....................267
Unladen weight (definition) ............268
Wear indicator (definition) .............269
Wheel rim (definition) ....................267
Top Tether ............................................ 53
Tow-away alarm .................................. 60
Towing ................................................ 242
Important safety guidelines ...........240
Towing eye
Front .............................................. 240
Rear ............................................... 240
Trailer loads and drawbar
noseweights ...................................... 260
Transfer case Display message ............................ 182
Shift ranges ................................... 126
Transmission position display ......... 122
Transmission positions .................... 122
Transporting the vehicle .................. 241
Traveling uphill Brow of hill ..................................... 146
Trip computer (on-board
computer) .......................................... 166
Trip odometer Calling up ....................................... 160
Turn signal
Display message ............................ 172
Turn signals ......................................... 93
TWR (permissible trailer drawbar
noseweight) (definition) ................... 269
Type identification plate see Vehicle identification plate
U
Ultrasonic backing up aid Function/notes ............................. 149
Malfunction .................................... 152
Range of the sensors .....................150
Warning display ............................. 150
Unlocking
Emergency unlocking .......................68
From inside the vehicle (central
unlocking button) ............................. 67
V
Vanity mirror Sun visor ........................................ 198
Vehicle
Data acquisition ............................... 21
Emergency unlocking .......................68
Equipment ....................................... 17
Individual settings (on-board
computer) ...................................... 162
Loading .......................................... 256
Lowering ........................................ 234
Maintenance .................................... 18
Parking up ..................................... 135
Raising ........................................... 233
Reporting problems .........................20
Towing away .................................. 240
Tow-starting ................................... 240
Transporting .................................. 241
Vehicle dimensions
Technical data ............................... 281
Vehicle identification number
see VIN
Vehicle identification number
(VIN) ................................................... 275
Vehicle identification plate .............. 275
Vehicle tool kit .................................. 229
Vehicle weights Technical data ............................... 281
Ventilation
Setting the air distribution .............109
Setting the airflow .........................110
Video (DVD) ........................................ 161
Video DVD (on-board computer) ...... 161
VIN ...................................................... 275
W
Warning and indicator lamps ABS ................................................ 185
Brakes ........................................... 183
Check Engine ................................. 188
ESP ®
OFF ....................................... 186
Fuel tank ........................................ 188
PASSENGER AIRBAG OFF ................39
Reserve fuel ................................... 188
Seat belt ........................................ 184
Index15ProCarManuals.com
Page 26 of 288
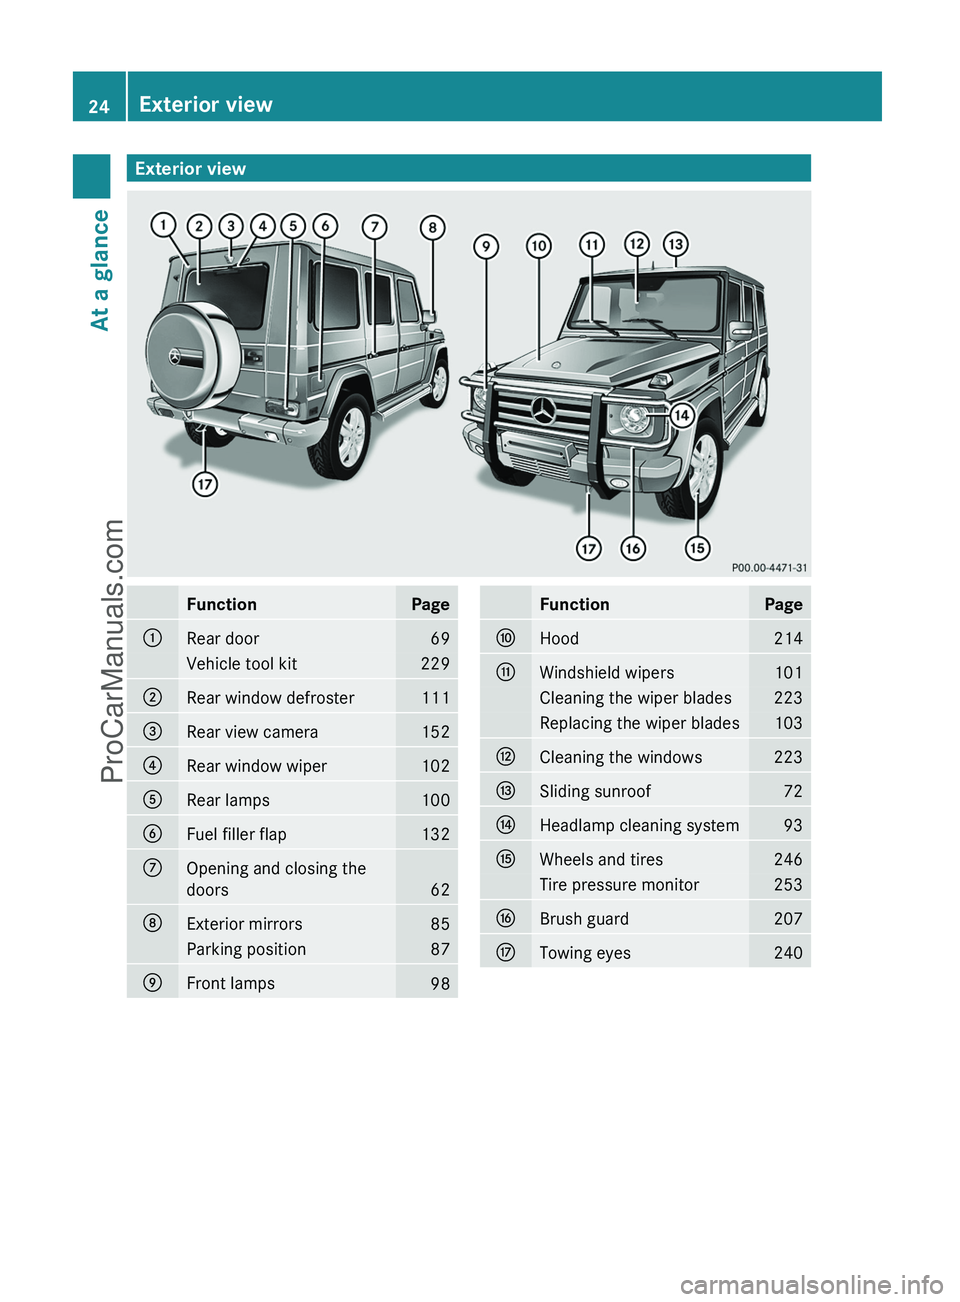
Exterior viewFunctionPage:Rear door69Vehicle tool kit229;Rear window defroster111=Rear view camera152?Rear window wiper102ARear lamps100BFuel filler flap132COpening and closing the
doors
62
DExterior mirrors85Parking position87EFront lamps98FunctionPageFHood214GWindshield wipers101Cleaning the wiper blades223Replacing the wiper blades103HCleaning the windows223ISliding sunroof72JHeadlamp cleaning system93KWheels and tires246Tire pressure monitor253LBrush guard207MTowing eyes24024Exterior viewAt a glance
ProCarManuals.com
Page 129 of 288
Shift rangesHHIGH
Position for all normal on-road
driving conditions.LLOW
Low-range position for driving off-
road.
Also for use on steep uphill or
downhill gradients, especially
when towing a trailer.
! When the transfer case is in the
off-road driving position LOW
range, the automatic
transmission does not shift up,
even when the engine has
reached the overrevving limit.
There is then a risk of engine
damage. Make sure that you do
not exceed the maximum
permissible engine speed.
The vehicle travels around half the
speed of on-road driving range
HIGH . The drive power is
correspondingly higher.NNeutral
Neutral position.
No power is transmitted to the
drive wheels.
Shifting the transfer case
General notes
GWarning!
Always wait until the procedure of shifting
from HIGH to LOW – and from LOW to HIGH
– has been entirely completed. During this
procedure do not turn off the engine or shift
the automatic transmission into another gear.
If you do not wait until the shifting procedure
has been entirely completed then it might not
be correctly performed. The transfer case
might be in neutral, thus interrupting the
transfer of power between the engine and the
drive axle.
The vehicle is then freely movable, even if a
gear has been selected, and could
unintentionally be set into motion –
particularly on up – or downhill grades. This
could lead to an accident and cause injury to
yourself and others.
Please observe related messages appearing
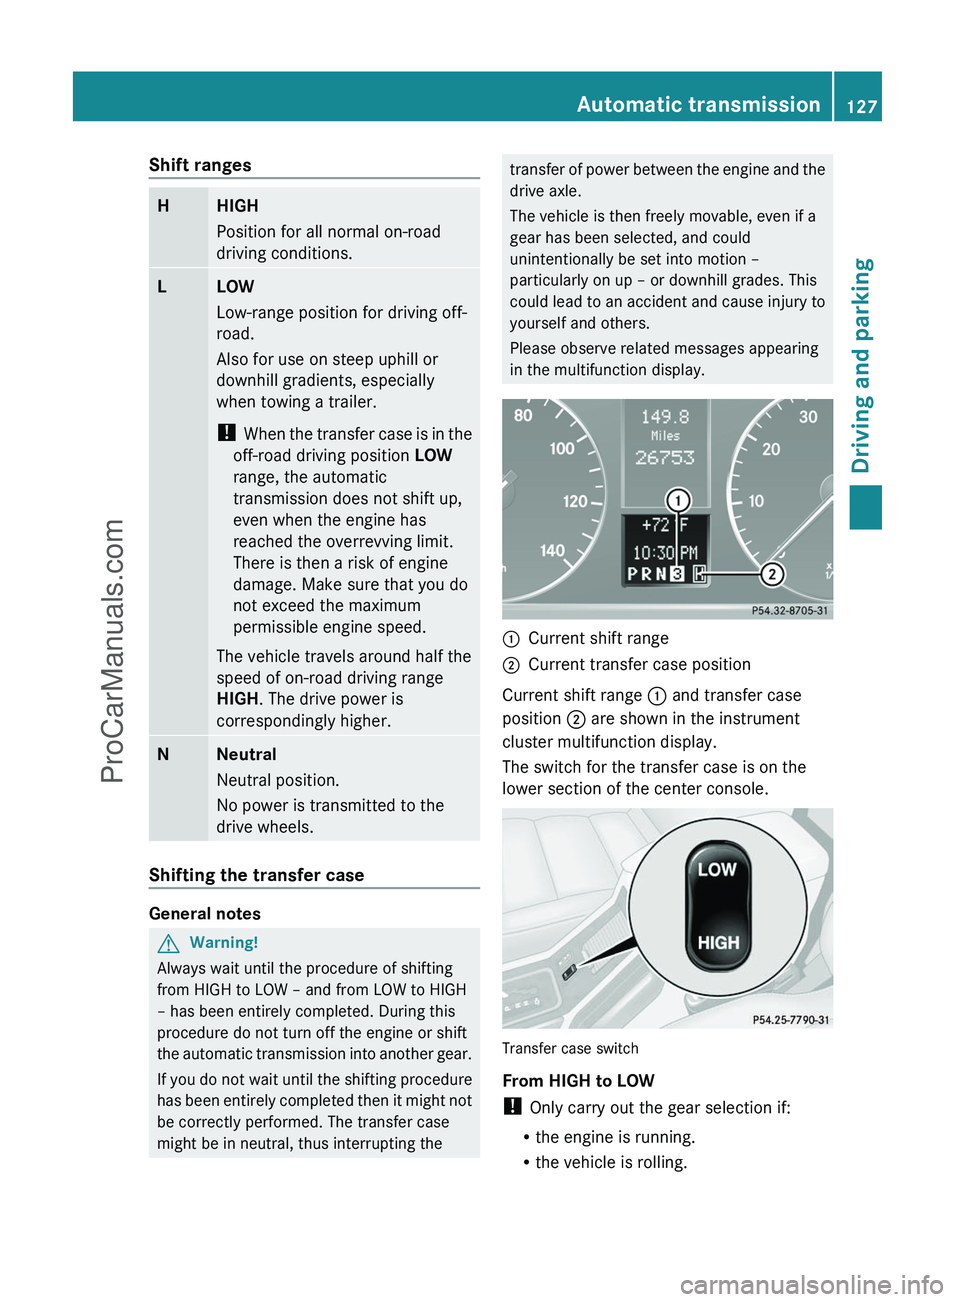
in the multifunction display.:Current shift range;Current transfer case position
Current shift range : and transfer case
position ; are shown in the instrument
cluster multifunction display.
The switch for the transfer case is on the
lower section of the center console.
Transfer case switch
From HIGH to LOW
! Only carry out the gear selection if:
R the engine is running.
R the vehicle is rolling.
Automatic transmission127Driving and parkingZProCarManuals.com
Page 151 of 288

4MATIC (permanent all-wheel drive)
4MATIC ensures that all four wheels are
permanently driven. Together with ESP ®
and
4ETS , it improves the traction of your vehicle
whenever a drive wheel spins due to
insufficient grip.GWarning!
If a drive wheel is spinning due to insufficient
traction:
R While driving off, apply as little throttle as
possible.
R While driving, ease up on the accelerator
pedal.
R Adapt your speed and driving style to the
prevailing road conditions.
Failure to observe these guidelines could
cause the vehicle to skid.
The 4MATIC cannot prevent accidents
resulting from excessive speed.
! Never tow the vehicle with one axle
raised. This may damage the transfer case.
Damage of this sort is not covered by the
Mercedes-Benz Limited Warranty. All
wheels must remain either on the ground
or be fully raised. Observe the instructions
for towing the vehicle with all wheels in full
contact with the ground.
i In wintry driving conditions, the maximum
effect of 4MATIC can only be achieved if
you use winter tires ( M+S tires), with snow
chains if necessary.
! When testing the parking brake, operate
the vehicle only briefly (for a maximum of
ten seconds) on a brake test dynamometer.
When doing this, turn the key to position
0 or 1 in the ignition. Failure to do this can
cause damage to the drive train or the
brake system.
! Function or performance tests may only
be performed on a 2-axle dynamometer. If
you wish to operate the vehicle on such a
dynamometer, please consult an
authorized Mercedes-Benz Center
beforehand. You could otherwise damage
the drive train or the brake system.
For information about driving off-road, see
( Y page 142).
Ultrasonic reversing aid
Important safety notes
GWarning!
Make sure no persons or animals are in or
near the area in which you are parking/
maneuvering. Otherwise, they could be
injured.
GWarning
Rear Parking Assist is a supplemental system.
It is not intended to, nor does it replace, the
need for extreme care. The responsibility
during parking and other critical maneuvers
always remains with the driver.
The ultrasonic backing up aid is an electronic
parking aid. It indicates visually and audibly
the distance between the rear area of your
vehicle and an object.
The ultrasonic backing up aid is activated
automatically when you switch on the ignition
and engage reverse gear.
The ultrasonic backing up aid monitors the
rear area of your vehicle using four sensors in
the rear bumper.
:Sensors in the rear bumperDriving systems149Driving and parkingZProCarManuals.com
Page 193 of 288
Vehicle equipment ............................192
Loading guidelines ............................192
Stowage compartments ...................193
Stowage areas .................................. 194
Features ............................................. 197191Loading, stowing and featuresProCarManuals.com
Page 194 of 288
Vehicle equipment
i This manual describes all the standard
and optional equipment of your vehicle
which was available at the time of
purchase. Country-specific differences are
possible. Please note that your vehicle may
not be equipped with all features
described. This also applies to safety-
relevant systems and functions.
Loading guidelines
GWarning!
Always fasten items being carried as securely
as possible using cargo tie-down rings and
fastening materials appropriate for the weight
and size of the load.
In an accident, during hard braking or sudden
maneuvers, loose items will be thrown around
inside the vehicle. This can cause injury to
vehicle occupants unless the items are
securely fastened in the vehicle.
To help avoid personal injury during a collision
or sudden maneuver, exercise care when
transporting cargo. Do not pile luggage or
cargo higher than the seat backrests.
Never drive a vehicle with the tailgate open.
Deadly carbon monoxide (CO) gases may
enter vehicle interior resulting in
unconsciousness and death.
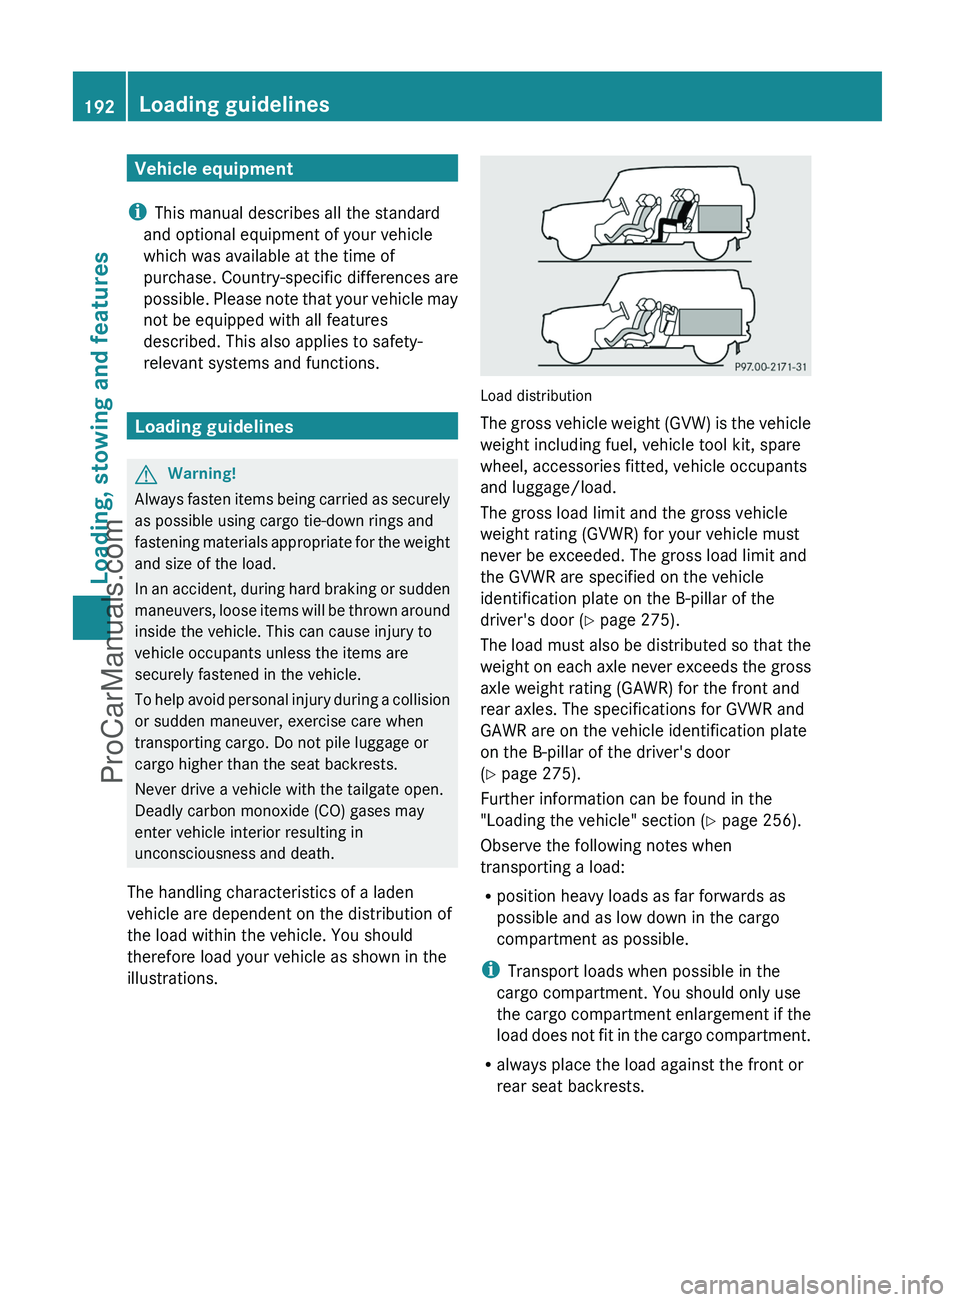
The handling characteristics of a laden
vehicle are dependent on the distribution of
the load within the vehicle. You should
therefore load your vehicle as shown in the
illustrations.
Load distribution
The gross vehicle weight (GVW) is the vehicle
weight including fuel, vehicle tool kit, spare
wheel, accessories fitted, vehicle occupants
and luggage/load.
The gross load limit and the gross vehicle
weight rating (GVWR) for your vehicle must
never be exceeded. The gross load limit and
the GVWR are specified on the vehicle
identification plate on the B-pillar of the
driver's door ( Y page 275).
The load must also be distributed so that the
weight on each axle never exceeds the gross
axle weight rating (GAWR) for the front and
rear axles. The specifications for GVWR and
GAWR are on the vehicle identification plate
on the B-pillar of the driver's door
( Y page 275).
Further information can be found in the
"Loading the vehicle" section ( Y page 256).
Observe the following notes when
transporting a load:
R position heavy loads as far forwards as
possible and as low down in the cargo
compartment as possible.
i Transport loads when possible in the
cargo compartment. You should only use
the cargo compartment enlargement if the
load does not fit in the cargo compartment.
R always place the load against the front or
rear seat backrests.
192Loading guidelinesLoading, stowing and features
ProCarManuals.com
Page 195 of 288
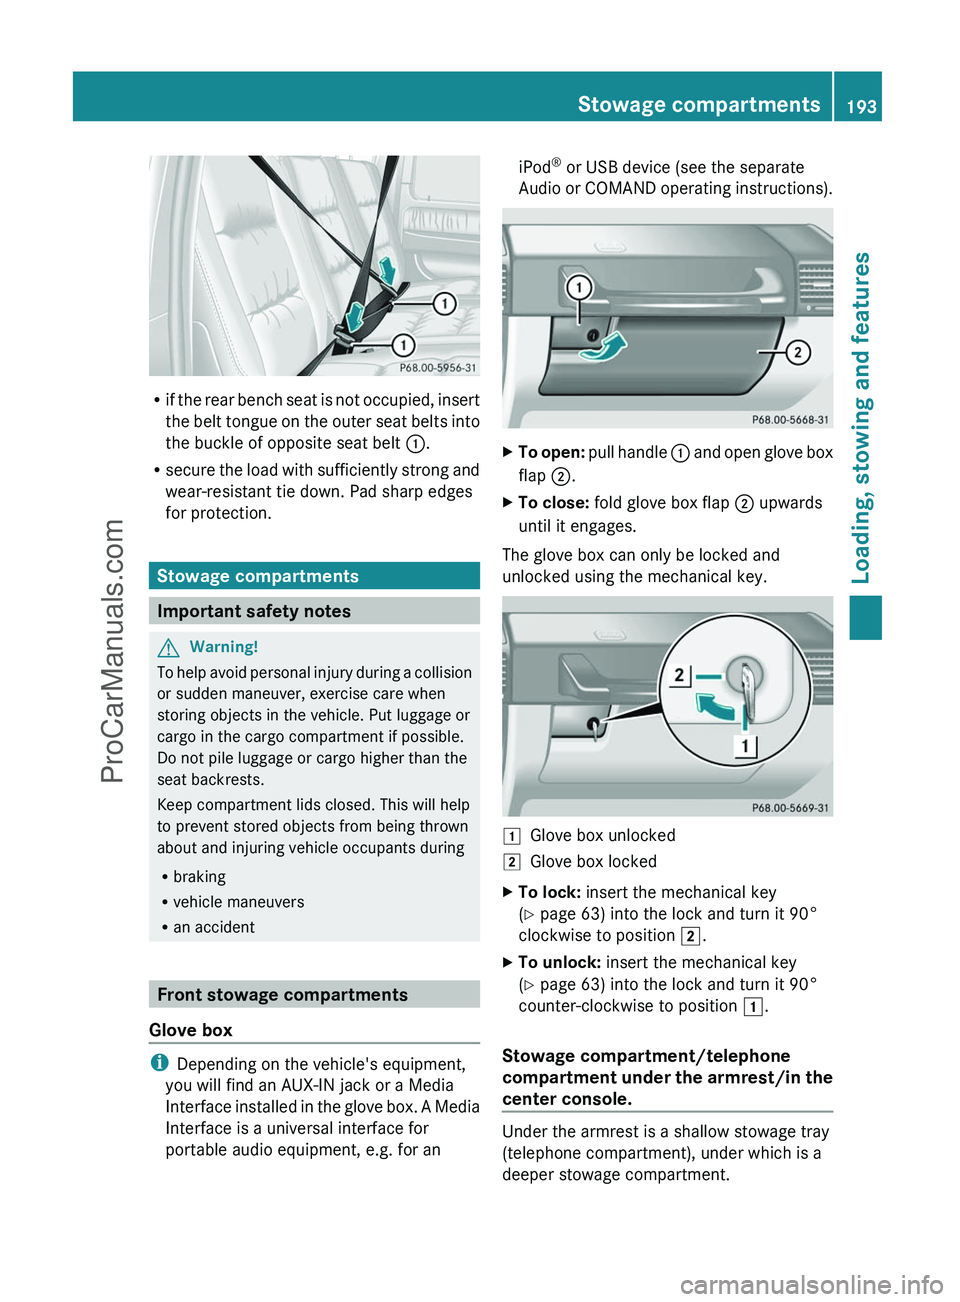
Rif the rear bench seat is not occupied, insert
the belt tongue on the outer seat belts into
the buckle of opposite seat belt :.
R secure the load with sufficiently strong and
wear-resistant tie down. Pad sharp edges
for protection.
Stowage compartments
Important safety notes
GWarning!
To help avoid personal injury during a collision
or sudden maneuver, exercise care when
storing objects in the vehicle. Put luggage or
cargo in the cargo compartment if possible.
Do not pile luggage or cargo higher than the
seat backrests.
Keep compartment lids closed. This will help
to prevent stored objects from being thrown
about and injuring vehicle occupants during
R braking
R vehicle maneuvers
R an accident
Front stowage compartments
Glove box
i Depending on the vehicle's equipment,
you will find an AUX-IN jack or a Media
Interface installed in the glove box. A Media
Interface is a universal interface for
portable audio equipment, e.g. for an
iPod ®
or USB device (see the separate
Audio or COMAND operating instructions).XTo open: pull handle : and open glove box
flap ;.XTo close: fold glove box flap ; upwards
until it engages.
The glove box can only be locked and
unlocked using the mechanical key.
1Glove box unlocked2Glove box lockedXTo lock: insert the mechanical key
( Y page 63) into the lock and turn it 90°
clockwise to position 2.XTo unlock: insert the mechanical key
( Y page 63) into the lock and turn it 90°
counter-clockwise to position 1.
Stowage compartment/telephone
compartment under the armrest/in the
center console.
Under the armrest is a shallow stowage tray
(telephone compartment), under which is a
deeper stowage compartment.
Stowage compartments193Loading, stowing and featuresZProCarManuals.com