2011 MERCEDES-BENZ E63AMG headlamp
[x] Cancel search: headlampPage 152 of 400

KEYLESS-GO
Vehicles with KEYLESS-GO are equipped with
a SmartKey with an integrated KEYLESS-GO
function and a detachable Start/Stop button.
The Start/Stop button must be inserted in the
ignition lock and the SmartKey must be in the
vehicle.
Pressing the Start/Stop button several times
in succession corresponds to the different
key positions in the ignition lock. This is only
the case if you are not depressing the brake
pedal.
If you depress the brake pedal and press the
Start/Stop button, the engine starts
immediately.
The Start/Stop button can be removed from
the ignition lock. Then you can insert the
SmartKey in the ignition lock.
i You do not have to remove the Start/Stop
button from the ignition lock when you
leave the vehicle. However, you should
always take the SmartKey with you when
leaving the vehicle. The vehicle can be
started with the Start/Stop button and the
electrical equipment can be operated while
the SmartKey is in the vehicle.
:Start/Stop button;Ignition lockXInsert Start/Stop button : into ignition
lock ;.
i
When you insert Start/Stop button :
into ignition lock ;, the system requires a
detection time of two seconds before you
can use Start/Stop button :.XShift the transmission to position P.XDo not press the brake pedal.
Start/Stop button
=USA only?Canada onlyXPosition 0: if Start/Stop button : has not
yet been pressed, this corresponds to the
SmartKey being removed from the ignition.XPosition 1: press Start/Stop button :.
You can now activate the windshield
wipers, for example.
i If you then open the driver's door when in
this position, the power supply is
deactivated.
XPosition 2 (ignition): press Start/Stop
button : twice.
i
If you press Start/Stop button : once
when in this position and the driver's door
is open, the power supply is deactivated
again.
As soon as the ignition is switched on, all the
indicator lamps in the instrument cluster light
up. The indicator lamps of the low-beam
headlamps, high-beam headlamps, turn
signal lamps or front fog lamps only light up
if the low-beam headlamps, high-beam
headlamps, turn signal lamps or front fog
lamps are switched on. If an indicator lamp
does not light up when the ignition is switched
on, check it and replace it if necessary. If an
150DrivingDriving and parking
BA 212 USA, CA Edition B 2011; 1; 5, en-USdimargiVersion: 3.0.3.62010-05-20T13:33:46+02:00 - Seite 150
Page 204 of 400

Warning and display messages in the
multifunction display
Example
XActivate ATTENTION ASSIST using the on-
board computer ( Y page 228).
Symbol : appears in the multifunction
display.
If ATTENTION ASSIST is active, it will not warn
you until at least 20 minutes after your
journey has begun. You then hear an
intermittent warning tone twice and the
Attention Assist: Time for a rest?
message appears in the multifunction
display.
XIf necessary, take a break.XPress a to confirm the message.
On long journeys, take regular breaks in good
time to allow yourself to rest properly. If you
do not take a break and ATTENTION ASSIST
still detects fatigue or increasing lapses in
concentration, you will be warned again after
15 minutes at the earliest.
ATTENTION ASSIST is reset when you
continue your journey; it reassesses your
tiredness if:
R you switch off the engine.
R you take off your seat belt and open the
driver's door, e.g. for a change of drivers or
to take a break.
Night View Assist Plus
Important safety notes
In addition to the illumination provided by the
normal headlamps, Night View Assist Plus
uses infrared light to illuminate the road. A
camera at the top of the windshield picks up
the infrared light and displays a black-and-
white image in the COMAND display. The
image displayed in COMAND corresponds to
a road lit up by high-beam headlamps. This
enables you to see the road's course and any
obstacles in good time. If pedestrian
recognition is activated, pedestrians
recognized by the system are highlighted in
the Night View Assist Plus display.GWarning
Night View Assist Plus is only an aid designed
to assist driving. It is not a substitute for
attentive driving. Do not rely solely on the
Night View Assist Plus display. Continue to
look through the windshield. You are
responsible for safety and must drive in
accordance with traffic conditions. You could
otherwise put yourself and others in danger.
The system may be impaired or unavailable if:
R there is poor visibility, e.g. due to snow,
rain, fog or heavy spray.
R the windshield is dirty, fogged up or
covered, for instance by a sticker, in the
vicinity of the camera.
R you are driving on bends, uphill gradients
or downhill gradients.
Light from the headlamps of oncoming
vehicles does not affect the Night View Assist
Plus display in the multifunction display. This
is also the case if you cannot switch on the
high-beam headlamps because of oncoming
traffic.
GWarning!
The Night View Assist Plus cannot record
objects immediately in front of or next to the
vehicle. When maneuvering, continue to look
through the windshield. Make sure no
persons or animals are in the area in which
you are maneuvering. You could otherwise
injure them.
i Infrared light is not visible to the human
eye and therefore does not glare. Night
View Assist Plus can therefore remain
202Driving systemsDriving and parking
BA 212 USA, CA Edition B 2011; 1; 5, en-USdimargiVersion: 3.0.3.62010-05-20T13:33:46+02:00 - Seite 202
Page 205 of 400
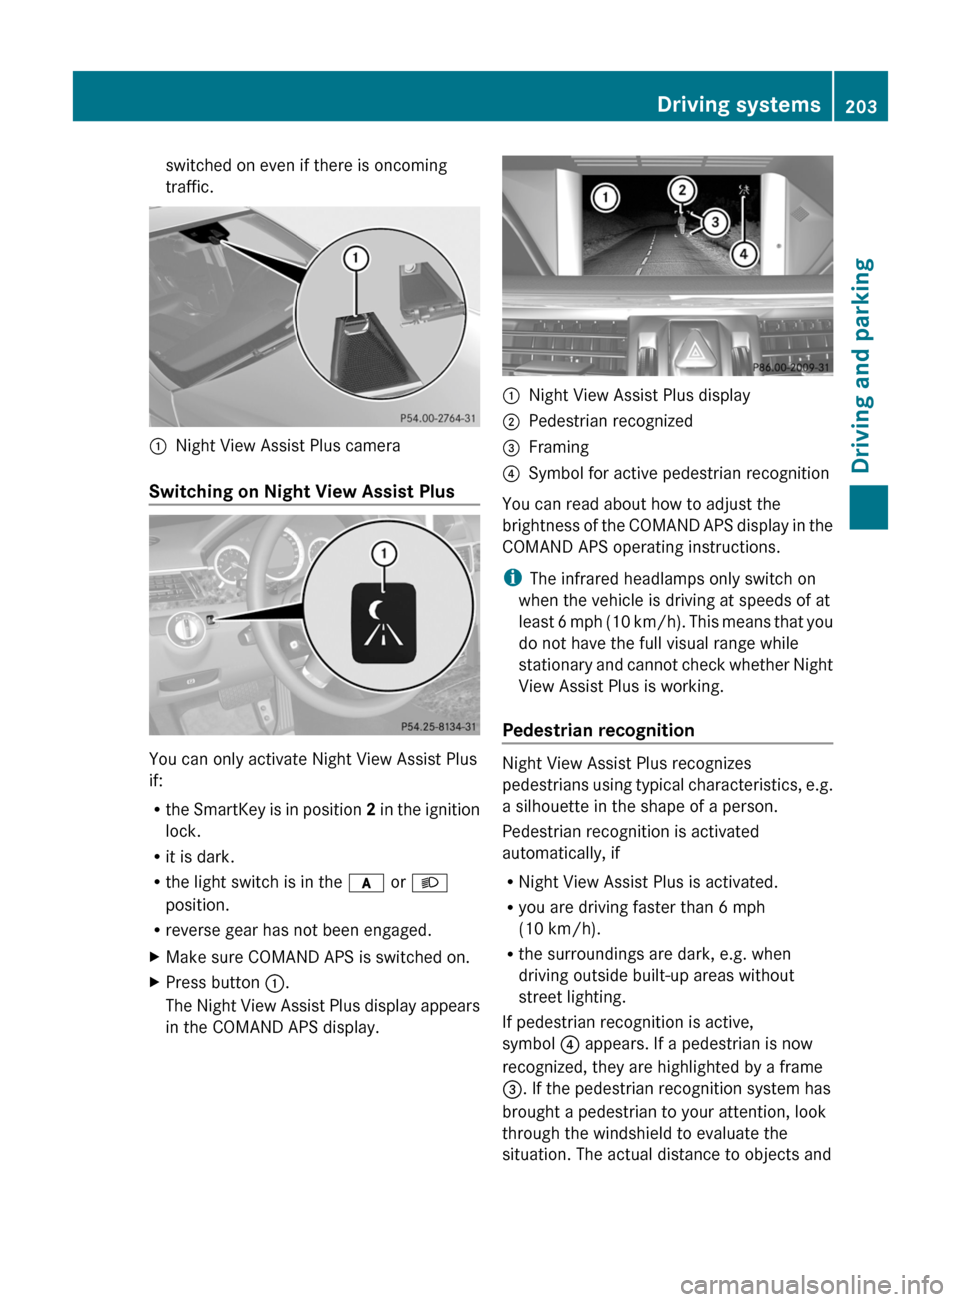
switched on even if there is oncoming
traffic.:Night View Assist Plus camera
Switching on Night View Assist Plus
You can only activate Night View Assist Plus
if:
Rthe SmartKey is in position 2 in the ignition
lock.
Rit is dark.
Rthe light switch is in the c or L
position.
Rreverse gear has not been engaged.
XMake sure COMAND APS is switched on.XPress button :.
The Night View Assist Plus display appears
in the COMAND APS display.
:Night View Assist Plus display;Pedestrian recognized=Framing?Symbol for active pedestrian recognition
You can read about how to adjust the
brightness of the COMAND APS display in the
COMAND APS operating instructions.
iThe infrared headlamps only switch on
when the vehicle is driving at speeds of at
least 6 mph (10 km/h). This means that you
do not have the full visual range while
stationary and cannot check whether Night
View Assist Plus is working.
Pedestrian recognition
Night View Assist Plus recognizes
pedestrians using typical characteristics, e.g.
a silhouette in the shape of a person.
Pedestrian recognition is activated
automatically, if
RNight View Assist Plus is activated.
Ryou are driving faster than 6 mph
(10 km/h).
Rthe surroundings are dark, e.g. when
driving outside built-up areas without
street lighting.
If pedestrian recognition is active,
symbol ? appears. If a pedestrian is now
recognized, they are highlighted by a frame
=. If the pedestrian recognition system has
brought a pedestrian to your attention, look
through the windshield to evaluate the
situation. The actual distance to objects and
Driving systems203Driving and parkingBA 212 USA, CA Edition B 2011; 1; 5, en-USdimargiVersion: 3.0.3.62010-05-20T13:33:46+02:00 - Seite 203Z
Page 232 of 400
XPress the : or 9 button to select the
Display Unit Speed-/Odometer.
function.
You will see the selected setting: km or
miles .XPress the a button to save the setting.
Selecting the permanent display function
The Permanent Display: function allows
you to choose whether the multifunction
display always shows the outside
temperature or the speed in km/h (USA) or
mph (Canada).
XPress the = or ; button on the
steering wheel to select the Settings
menu.XPress the : or 9 button to select the
Instr. Cluster submenu.XPress the a button to confirm.XPress : or 9 to select the
Permanent Display: function.
You will see the selected setting Outside
Temperature or Speedometer [km/h]: .XPress the a button to save the setting.
Lights
Switching the daytime running lamps on/
off
This function is not available in Canada.
If you have activated the Daytime Running
Lights: function and the light switch is in the
c position the daytime running lamps are
switched on automatically when the engine is
running.
In the dark, the following also light up:
R the low-beam headlamps
R the parking lamps
R the tail lamps
R the license plate lamp
R the side marker lamps
XPress the = or ; button on the
steering wheel to select the Settings
menu.XPress the : or 9 button to select the
Lights submenu.XPress the a button to confirm.XPress the : or 9 button to select the
Daytime Running Lights: function.
You will see the selected setting: Enabled
or Disabled .XPress the a button to save the setting.
Switching Adaptive Highbeam Assist on/
off
XPress the = or ; button on the
steering wheel to select the Settings
menu.XPress the : or 9 button to select the
Lights submenu.XPress the a button to confirm.XPress the : or 9 button to select the
Adaptive Highbeam Assist: function.
You will see the selected setting: Enabled
or Disabled .XPress the a button to save the setting.
Setting the brightness of the ambient
lighting
XPress the = or ; button on the
steering wheel to select the Settings
menu.XPress the : or 9 button to select the
Lights submenu.XPress the a button to confirm.XPress the : or 9 button to select the
Ambient Light Brightness: function.
You will see the selected setting.XPress the a button to confirm.XPress the : or 9 button to adjust the
brightness to any level from Disabled to
Level 5 (bright).XPress the a or % button to save the
setting.230Menus and submenusOn-board computer and displays
BA 212 USA, CA Edition B 2011; 1; 5, en-USdimargiVersion: 3.0.3.62010-05-20T13:33:46+02:00 - Seite 230
Page 233 of 400
Activating/deactivating surround
lighting and exterior lighting delayed
switch-off
If you switch on the Locator Lighting:
function and the light switch is set to c,
R the exterior lighting switches on when it is
dark after unlocking the vehicle with the
SmartKey.
The exterior lighting switches off when you
open the driver’s door.
R the exterior lighting remains on for 15
seconds when it is dark after closing the
doors.
If the engine is switched off and then none
of the doors are opened, or if an open door
is not closed, the exterior lighting goes out
after 60 seconds.
If you activate the Locator Lighting:
function, the following light up:
R the parking lamps
R the tail lamps
R the fog lamps 24
R the low-beam headlamps 25
R the license plate lamp
R the side marker lampsXPress the = or ; button on the
steering wheel to select the Settings
menu.XPress the : or 9 button to select the
Lights submenu.XPress the a button to confirm.XPress the : or 9 button to select the
Locator Lighting: function.
You will see the selected setting: Enabled
or Disabled .XPress the a button to save the setting.To deactivate the delayed shut-off
temporarily:XBefore leaving the vehicle, turn the
SmartKey to position 0 in the ignition lock.XTurn the SmartKey to position 2 in the
ignition lock and back to position 0.
The delayed shut-off is deactivated.
The delayed shut-off is reactivated the next
time you start the engine.
Activating/deactivating the interior
lighting delayed switch-off
When you activate the Interior Lighting
Delay: function and remove the SmartKey
from the ignition lock, the interior lighting
remains on for 10 seconds.
XPress the = or ; button on the
steering wheel to select the Settings
menu.XPress the : or 9 button to select the
Lights submenu.XPress the a button to confirm.XPress the : or 9 button to select the
Interior Lighting Delay: function.
You will see the selected setting: Enabled
or Disabled .XPress the a button to save the setting.
Vehicle
Activating/deactivating the automatic
locking feature
If you select the Automatic Door Lock:
function, the vehicle is centrally locked above
a speed of around 9 mph (15 km/h).
i Further information on the automatic
locking feature ( Y page 85).
24
Only for vehicles with front fog lamps.
25 Only for vehicles without front fog lamps.Menus and submenus231On-board computer and displaysBA 212 USA, CA Edition B 2011; 1; 5, en-USdimargiVersion: 3.0.3.62010-05-20T13:33:46+02:00 - Seite 231Z
Page 245 of 400
Lights
i Display messages about LEDs:
This display message will only appear if all LEDs have failed.Display messagesPossible causes/consequences and M Solutionsb
Check Left
Cornering Light
or
Check Right
Cornering LightThe left or right-hand cornering light is faulty. XCheck whether you are permitted to change the bulb yourself
( Y page 124).
or
XVisit a qualified specialist workshop.b
Check Left Low Beam
or
Check Right Low
BeamThe left or right-hand low-beam headlamp is faulty. XCheck whether you are permitted to change the bulb yourself
( Y page 124).
or
XVisit a qualified specialist workshop.b
Check Rear Left
Turn Signal
or
Check Rear Right
Turn SignalThe rear left-hand or rear right-hand turn signal is faulty.XCheck whether you are permitted to change the bulb yourself
( Y page 124).
or
XVisit a qualified specialist workshop.b
Check Front Left
Turn Signal
or
Check Front Right
Turn SignalThe front left-hand or front right-hand turn signal is faulty.XCheck whether you are permitted to change the bulb yourself
( Y page 124).
or
XVisit a qualified specialist workshop.b
Check Left Mirror
Turn Signal
or
Check Right Mirror
Turn SignalThe turn signal in the left-hand and/or right-hand exterior mirror
is faulty.XCheck whether you are permitted to change the bulb yourself
( Y page 124).
or
XVisit a qualified specialist workshop.Display messages243On-board computer and displaysBA 212 USA, CA Edition B 2011; 1; 5, en-USdimargiVersion: 3.0.3.62010-05-20T13:33:46+02:00 - Seite 243Z
Page 247 of 400
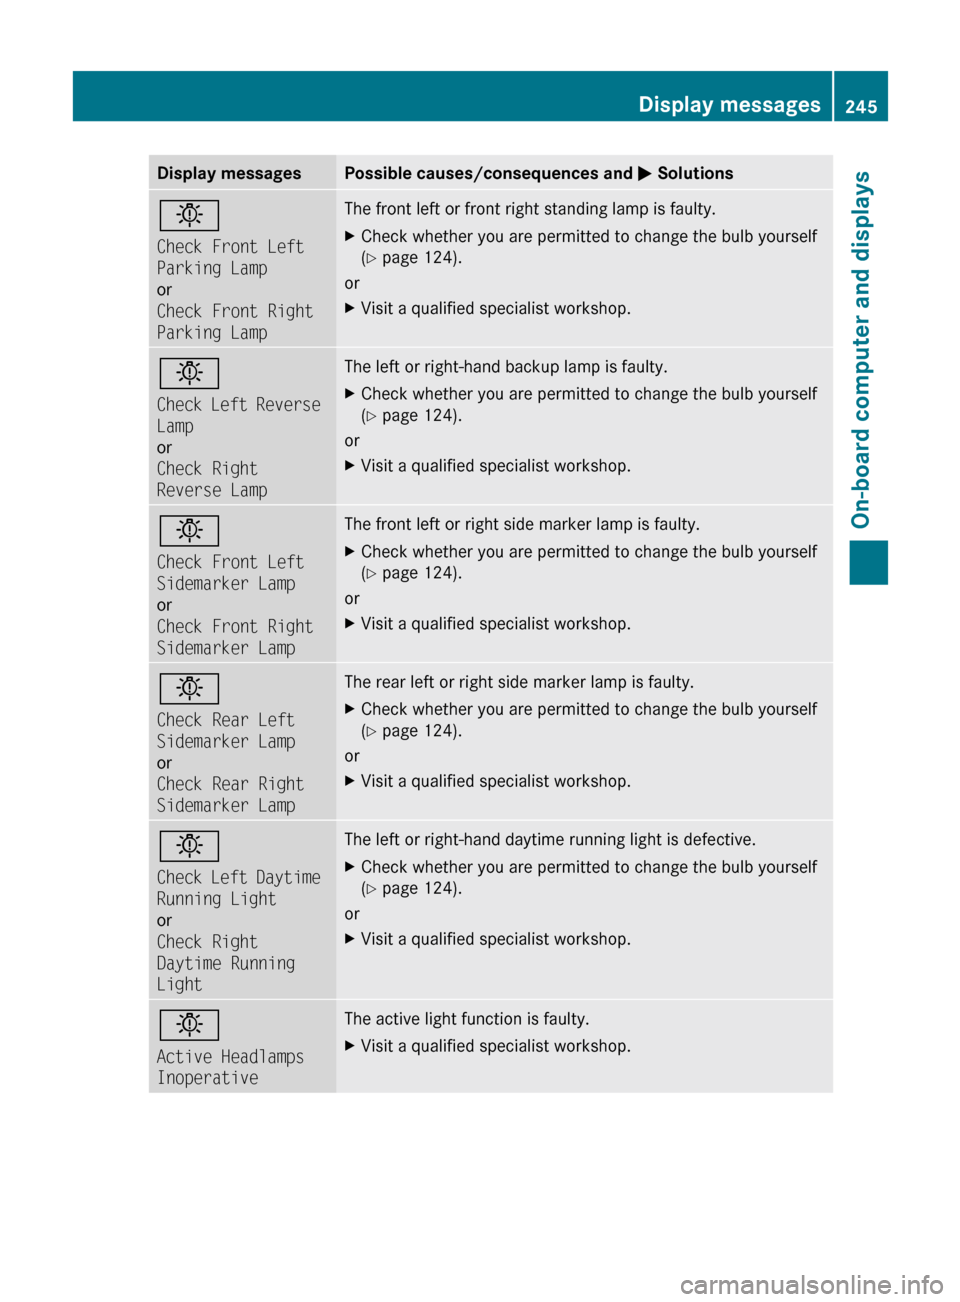
Display messagesPossible causes/consequences and M Solutionsb
Check Front Left
Parking Lamp
or
Check Front Right
Parking LampThe front left or front right standing lamp is faulty. XCheck whether you are permitted to change the bulb yourself
( Y page 124).
or
XVisit a qualified specialist workshop.b
Check Left Reverse
Lamp
or
Check Right
Reverse LampThe left or right-hand backup lamp is faulty. XCheck whether you are permitted to change the bulb yourself
( Y page 124).
or
XVisit a qualified specialist workshop.b
Check Front Left
Sidemarker Lamp
or
Check Front Right
Sidemarker LampThe front left or right side marker lamp is faulty. XCheck whether you are permitted to change the bulb yourself
( Y page 124).
or
XVisit a qualified specialist workshop.b
Check Rear Left
Sidemarker Lamp
or
Check Rear Right
Sidemarker LampThe rear left or right side marker lamp is faulty.XCheck whether you are permitted to change the bulb yourself
( Y page 124).
or
XVisit a qualified specialist workshop.b
Check Left Daytime
Running Light
or
Check Right
Daytime Running
LightThe left or right-hand daytime running light is defective.XCheck whether you are permitted to change the bulb yourself
( Y page 124).
or
XVisit a qualified specialist workshop.b
Active Headlamps
InoperativeThe active light function is faulty.XVisit a qualified specialist workshop.Display messages245On-board computer and displaysBA 212 USA, CA Edition B 2011; 1; 5, en-USdimargiVersion: 3.0.3.62010-05-20T13:33:46+02:00 - Seite 245Z
Page 314 of 400

Windshield washer system/headlamp
cleaning system
The washer fluid reservoir is used for both the
windshield washer system and the headlamp
cleaning system.
GWarning
Washer solvent/antifreeze is highly
flammable. Do not spill washer solvent/
antifreeze on hot engine parts, because it may
ignite and burn. You could be seriously
burned.
! At temperatures below freezing, always
fill the washer fluid container with a mix of
windshield washer concentrate and
antifreeze additive. There is otherwise a
risk of damaging the windshield washer
system/headlamp cleaning system.
! Only use washer fluid concentrate which
is suitable for plastic lenses. Unsuitable
washer fluid concentrate could damage the
plastic lenses of the headlamps.
! Do not add distilled or de-ionized water to
the washer fluid container. Otherwise, the
fluid level measuring gauge could be
damaged.
iAdd windshield washer concentrate, e.g.
MB SummerFit, to the washer fluid all year
round.
Example: washer fluid reservoir
XMix the windshield washer fluid in a
container beforehand.
XAt temperatures above freezing: fill the
washer fluid reservoir with a mix of water
and windshield washer concentrate (e.g.
MB SummerFit).
XAt temperatures below freezing: fill the
washer fluid reservoir with a mix of water
and MB SummerFit windshield washer
concentrate. For information on the mixing
ratio, see (Y page 393) or use the premixed
windshield washer solution with antifreeze
available in specialist stores.
XTo open: pull cap : upwards by the tab.XAdd the premixed washer fluid.XTo close: press cap : onto the filler neck
until it engages.
Brake fluid level
! If you discover that the brake fluid level in
the brake fluid reservoir has fallen to the
MIN mark or below, check the brake
system for leaks immediately. Also check
the brake lining thickness. Contact a
qualified specialist workshop, e.g. an
authorized Mercedes-Benz Center
immediately.
Do not top up the brake fluid. This will not
rectify the malfunction.
Only check the brake fluid level when the
vehicle is stationary and on a level surface.
The brake fluid level is correct if it is between
MIN marking ; and MAX marking : on the
brake fluid reservoir.
312Engine compartmentMaintenance and care
BA 212 USA, CA Edition B 2011; 1; 5, en-USdimargiVersion: 3.0.3.62010-05-20T13:33:46+02:00 - Seite 312