2011 MERCEDES-BENZ E63AMG lock
[x] Cancel search: lockPage 209 of 400

If Blind Spot Assist is switched on, indicator
lamp : in the exterior mirrors lights up in
yellow up to a speed of 20 mph (30 km/h). At
speeds above 20 mph (30 km/h), the
indicator lamp goes out and Blind Spot Assist
is operational.
If a vehicle is detected within the monitoring
range of Blind Spot Assist at speeds above
20 mph (30 km/h), warning lamp : on the
corresponding side lights up in red. This
warning is always emitted when a vehicle
enters the blind spot monitoring range from
behind or from the side. When you overtake
a vehicle, the warning only occurs if the
difference in speed is less than 7 mph
(12 km/h).
The yellow indicator lamp goes out if reverse
gear is engaged. In this event, Blind Spot
Assist is no longer active.
The brightness of the indicator/warning
lamps is adjusted automatically according to
the ambient light.
GWarning
Blind Spot Assist is not active at speeds under
approximately 20 mph (30 km/h). The
indicator lamps in the exterior mirrors are
yellow. Vehicles in the monitoring range are
then not indicated.
Always pay attention to traffic conditions and
your surroundings. Otherwise, you may fail to
recognize dangers in time, cause an accident
and injure yourself and others.
Collision warning
If a vehicle is detected in the monitoring range
of Blind Spot Assist and you switch on the turn
signal, a double warning tone sounds. Red
warning lamp : flashes. If the turn signal
remains on, detected vehicles are indicated
by the flashing of red warning lamp :. There
are no further warning tones.
Switching on Blind Spot Assist
XMake sure that the radar sensor system
(Y page 232) and Blind Spot Assist
(Y page 228) are activated in the on-board
computer.
XTurn the SmartKey to position 2 in the
ignition lock.
Warning lamps : light up in red in the
exterior mirrors for approximately 1.5
seconds and then turn yellow.
Lane Keeping Assist
Important safety notes
Lane Keeping Assist monitors the area in
front of your vehicle by means of a camera at
the top of the windshield. Lane Keeping Assist
detects lane markings on the road and warns
you before you leave your lane
unintentionally.
:Lane Keeping Assist camera
If you select km on the on-board computer in
the Display Unit Speed-/Odometer:
function (Y page 229), Lane Keeping Assist
is activated starting at a speed of 60 km/h.
If the miles display unit is selected, the
assistance range begins at 40 mph.
GWarning
Lane Keeping Assist does not keep your
vehicle in its lane. It is only an aid and may
detect the lane markings on the road
incorrectly or not at all.
Driving systems207Driving and parkingBA 212 USA, CA Edition B 2011; 1; 5, en-USdimargiVersion: 3.0.3.62010-05-20T13:33:46+02:00 - Seite 207Z
Page 213 of 400

Optical and acoustic collision warning
When you switch on the appropriate turn
signals to change lanes and a vehicle is
detected in the side monitoring range of
Active Blind Spot Assist, you receive an
optical and acoustic collision warning. You
then hear a double warning tone and red
warning lamp : flashes. If the turn signal
remains on, detected vehicles are indicated
by the flashing of red warning lamp :. There
are no further warning tones.
Course-correcting brake application
If Active Blind Spot Assist detects a risk of
collision in the monitoring range, under
certain circumstances, it will brake the
vehicle briefly on one side. This is designed to
help you avoid a collision.
This function is available at speeds between
20 mph and 120 mph (30 km/h and
200 km/h).
When a course-correcting brake application
occurs, red warning lamp : flashes in the
exterior mirror and the following is shown in
the multifunction display, for example:GWarning
Active Blind Spot Assist is only an aid
designed to assist driving. It is not a substitute
for attentive driving. In some cases, the
course-correcting brake application is not
sufficient to avoid a collision. In such a case,
you must steer, brake or accelerate.
In very rare cases, the system may
erroneously detect a danger of collision in the
area of crash barriers or similar lane borders
and apply the brakes. Active Blind Spot Assist
does not detect all traffic situations and road
users. Always make sure that there is
sufficient distance to the side for other traffic
or obstacles. An inappropriate brake
application may be interrupted at any time if
you steer slightly in the opposite direction or
accelerate.
You are responsible for the vehicle's speed,
braking in good time, and steering correctly.
Always adapt your driving style to suit the
prevailing road and weather conditions.
Always pay attention to traffic conditions and
your surroundings. Otherwise, you may fail to
recognize dangers in time, cause an accident
and injure yourself and others.
Either a very slight, course-correcting brake
application, or none at all, may occur if:
R other vehicles and/or objects, such as
crash barriers, are detected in the
immediate vicinity of your vehicle.
R a vehicle approaches you too closely at the
side.
R you have adopted a sporty driving style with
high cornering speeds.
R you clearly brake or accelerate.
R a driving safety system intervenes, such as
ESP ®
or PRE-SAFE ®
Brake.
R ESP ®
is deactivated.
R a loss of tire pressure or a defective tire has
been detected and shown in the display.
Activating Active Blind Spot AssistXMake sure that the radar sensor system
( Y page 232) and Active Blind Spot Assist
( Y page 228) are activated in the on-board
computer.XTurn the SmartKey to position 2 in the
ignition lock.
Warning lamps : light up in red in the
exterior mirrors for approximately 1.5
seconds and then turn yellow.
Active Lane Keeping Assist
Important safety notes
Active Lane Keeping Assist monitors the area
in front of your vehicle by means of a camera
at the top of the windshield. Active Lane
Driving systems211Driving and parkingBA 212 USA, CA Edition B 2011; 1; 5, en-USdimargiVersion: 3.0.3.62010-05-20T13:33:46+02:00 - Seite 211Z
Page 219 of 400

If the coolant temperature rises above
248 ‡(120 †), do not drive any further as
this could damage the engine.
Tachometer
The red band in the tachometer indicates the
engine's overrevving range.
! Do not drive in the overrevving range, as
this could damage the engine.
The fuel supply is interrupted to protect the
engine when the red band is reached.
Outside temperature display
The outside temperature display is in the
multifunction display.
GWarning!
The outside temperature indicator is not
designed to serve as an ice-warning device
and is therefore unsuitable for that purpose.
Indicated temperatures just above the
freezing point do not guarantee that the road
surface is free of ice. The road may still be icy,
especially in wooded areas or on bridges.
Changes in the outside temperature are
displayed after a short delay.
Speedometer with segments
The segments in the speedometer indicate
which speed range is available.
Cruise control mode:
The segments light up from the stored speed
to the maximum speed.
DISTRONIC PLUS mode:
One or two segments around the stored
speed light up.
Operating the on-board computer
The on-board computer is activated as soon
as you turn the SmartKey to position 1 in the
ignition lock.
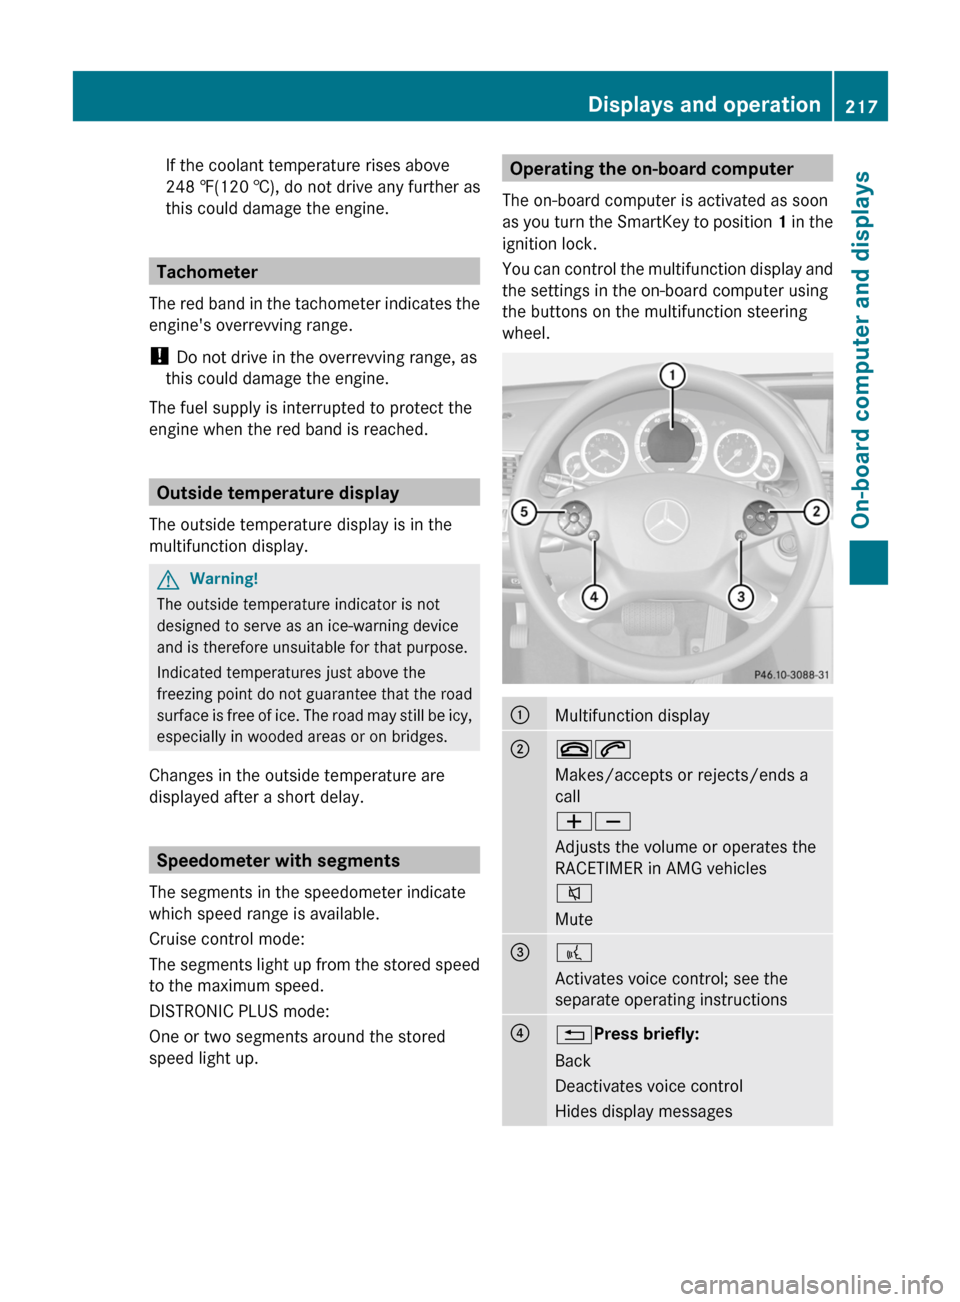
You can control the multifunction display and
the settings in the on-board computer using
the buttons on the multifunction steering
wheel.:Multifunction display;~6
Makes/accepts or rejects/ends a
call
WX
Adjusts the volume or operates the
RACETIMER in AMG vehicles
8
Mute=?
Activates voice control; see the
separate operating instructions?% Press briefly:
Back
Deactivates voice control
Hides display messagesDisplays and operation217On-board computer and displaysBA 212 USA, CA Edition B 2011; 1; 5, en-USdimargiVersion: 3.0.3.62010-05-20T13:33:46+02:00 - Seite 217Z
Page 224 of 400

:Drive program (C/S/S+/M);ESP®
mode ( ON/OFF ) or SPORT handling
mode ( SPORT)3Suspension tuning ( COMFORT/SPORT /
SPORT+ )
RACETIMER
Displaying and starting RACETIMER
GWarning
The RACETIMER feature is only for use on
roads and in conditions where high speed
driving is permitted. Racing on public roads is
prohibited under all circumstances. The driver
is and must always remain responsible for
following posted speed limits.
You can use the RACETIMER to store lap
times.
When RACETIMER is displayed, you cannot
adjust the volume using the W and X
buttons on the steering wheel.
XPress = or ; on the steering wheel
to select the AMG menu.XPress the 9 button repeatedly until the
RACETIMER is shown.:RACETIMER;Lap
You can start the RACETIMER when the
engine is running or if the SmartKey is in
position 2 in the ignition lock.
XTo start: press the W button to start the
RACETIMER.XTo display the intermediate time: press
X to show the intermediate time.
The intermediate time is displayed for five
seconds.XTo stop: press the W button to stop the
RACETIMER.
The RACETIMER interrupts timing when you
stop the vehicle and turn the SmartKey to
position 1 in the ignition lock. When you turn
the SmartKey to position 2 or 3 and then
press the W button, timing is continued.
Storing the lap time and starting a new lap
It is possible to store a maximum of sixteen
laps.
XPress the X button on the steering
wheel to show the intermediate time during
timing.
The intermediate time is displayed for five
seconds.XPress the X button again within five
seconds.
The displayed intermediate time is stored
as a lap time.
Timing starts for a new lap. The new lap is
timed from when the intermediate time is
called up.222Menus and submenusOn-board computer and displays
BA 212 USA, CA Edition B 2011; 1; 5, en-USdimargiVersion: 3.0.3.62010-05-20T13:33:46+02:00 - Seite 222
Page 233 of 400

Activating/deactivating surround
lighting and exterior lighting delayed
switch-off
If you switch on the Locator Lighting:
function and the light switch is set to c,
R the exterior lighting switches on when it is
dark after unlocking the vehicle with the
SmartKey.
The exterior lighting switches off when you
open the driver’s door.
R the exterior lighting remains on for 15
seconds when it is dark after closing the
doors.
If the engine is switched off and then none
of the doors are opened, or if an open door
is not closed, the exterior lighting goes out
after 60 seconds.
If you activate the Locator Lighting:
function, the following light up:
R the parking lamps
R the tail lamps
R the fog lamps 24
R the low-beam headlamps 25
R the license plate lamp
R the side marker lampsXPress the = or ; button on the
steering wheel to select the Settings
menu.XPress the : or 9 button to select the
Lights submenu.XPress the a button to confirm.XPress the : or 9 button to select the
Locator Lighting: function.
You will see the selected setting: Enabled
or Disabled .XPress the a button to save the setting.To deactivate the delayed shut-off
temporarily:XBefore leaving the vehicle, turn the
SmartKey to position 0 in the ignition lock.XTurn the SmartKey to position 2 in the
ignition lock and back to position 0.
The delayed shut-off is deactivated.
The delayed shut-off is reactivated the next
time you start the engine.
Activating/deactivating the interior
lighting delayed switch-off
When you activate the Interior Lighting
Delay: function and remove the SmartKey
from the ignition lock, the interior lighting
remains on for 10 seconds.
XPress the = or ; button on the
steering wheel to select the Settings
menu.XPress the : or 9 button to select the
Lights submenu.XPress the a button to confirm.XPress the : or 9 button to select the
Interior Lighting Delay: function.
You will see the selected setting: Enabled
or Disabled .XPress the a button to save the setting.
Vehicle
Activating/deactivating the automatic
locking feature
If you select the Automatic Door Lock:
function, the vehicle is centrally locked above
a speed of around 9 mph (15 km/h).
i Further information on the automatic
locking feature ( Y page 85).
24
Only for vehicles with front fog lamps.
25 Only for vehicles without front fog lamps.Menus and submenus231On-board computer and displaysBA 212 USA, CA Edition B 2011; 1; 5, en-USdimargiVersion: 3.0.3.62010-05-20T13:33:46+02:00 - Seite 231Z
Page 234 of 400

XPress the = or ; button on the
steering wheel to select the Settings
menu.XPress the : or 9 button to select the
Vehicle submenu.XPress the a button to confirm.XPress the : or 9 button to select the
Automatic Door Lock: function.
You will see the selected setting: Enabled
or Disabled .XPress the a button to save the setting.
Activating/deactivating the acoustic
locking confirmation
If you switch on the Acoustic Lock
Feedback: function, an acoustic signal
sounds when you lock or unlock the vehicle.
When unlocking, the signal sounds once.
When locking, it sounds three times.
XPress the = or ; button on the
steering wheel to select the Settings
menu.XPress the : or 9 button to select the
Vehicle submenu.XPress the a button to confirm.XPress the : or 9 button to select the
Acoustic Lock Feedback: function.
You will see the selected setting: Enabled
or Disabled .XPress the a button to save the setting.
Activating/deactivating the radar sensor
system
The following systems are switched off when
the radar sensor system is deactivated:
R DISTRONIC PLUS ( Y page 179)
R BAS PLUS ( Y page 66)
R PRE-SAFE ®
Brake ( Y page 71)
R Blind Spot Assist ( Y page 205)
R Active Blind Spot Assist ( Y page 209)
i USA only: This device has been approved
by the FCC as a “Vehicular Radar System”.
The radar sensor is intended for use in an
automotive radar system only. Removal,
tampering, or altering of the device will void
any warranties, and is not permitted by the
FCC. Do not tamper with, alter, or use in
any non-approved way.
Any unauthorized modification to this
device could void the user’s authority to
operate the equipment.
i Canada only:
This device complies with RSS-210 of
Industry Canada. Operation is subject to
the following two conditions:
1. This device may not cause interference,
and
2. This device must accept any interference
received, including interference that may
cause undesired operation of the device.
Any unauthorized modification to this
device could void the user’s authority to
operate the equipment.XPress the = or ; button on the
steering wheel to select the Settings
menu.XPress the : or 9 button to select the
Vehicle submenu.XPress the a button to confirm.XPress the 9 or : button to select
Radar Sensor (See Oper. Manual) .
You will see the selected setting: Enabled
or Disabled .XPress the a button to save the setting.
Convenience
Activating/deactivating the EASY-
ENTRY/EXIT feature
You can use the Easy Entry/Exit: function
to activate or deactivate the easy-entry/exit
feature ( Y page 112).
GWarning!
You must make sure no one can become
trapped or injured by the moving steering
232Menus and submenusOn-board computer and displays
BA 212 USA, CA Edition B 2011; 1; 5, en-USdimargiVersion: 3.0.3.62010-05-20T13:33:46+02:00 - Seite 232
Page 235 of 400

wheel when the easy-entry/exit feature is
activated.
To stop steering wheel movement, move
steering wheel adjustment lever or press one
of the memory position buttons.
Do not leave children unattended in the
vehicle, or with access to an unlocked vehicle.
Children could open the driver's door and
unintentionally activate the easy-entry/exit
feature, which could result in an accident
and/or serious personal injury.XPress the = or ; button on the
steering wheel to select the Settings
menu.XPress the : or 9 button to select the
Convenience submenu.XPress the a button to confirm.XPress the : or 9 button to select the
Easy Entry/Exit: feature.
You will see the selected setting: Enabled
or Disabled .XPress the a button to save the setting.
Switching the belt adjustment on/off
Further information on belt adjustment
( Y page 56).
XPress the = or ; button on the
steering wheel to select the Settings
menu.XPress the : or 9 button to select the
Convenience submenu.XPress the a button to confirm.XPress the : or 9 button to select the
Belt Adjustment: function.
You will see the selected setting: Enabled
or Disabled .XPress the a button to save the setting.
Resetting to factory settings
For safety reasons, the Daytime Running
Lights: function in the Lights submenu is
only reset if the vehicle is stationary.
XPress the = or ; button on the
steering wheel to select the Settings
menu.XPress the : or 9 button to select the
Factory Setting submenu.XPress the a button to confirm.
The Reset All Settings? message
appears.XPress the : or 9 button to select
No or Yes .XPress the a button to confirm the
selection.
If you have selected Yes, the multifunction
display shows a confirmation message.Menus and submenus233On-board computer and displaysBA 212 USA, CA Edition B 2011; 1; 5, en-USdimargiVersion: 3.0.3.62010-05-20T13:33:46+02:00 - Seite 233Z
Page 243 of 400

BrakesDisplay messagesPossible causes/consequences and M Solutions$ (USA only)
J (Canada only)
ABS and ESC
Currently
Unavailable See
Operator's ManualGRisk of accident
ABS (Anti-lock Braking System), ESP ®
(Electronic Stability
Program), BAS (Brake Assist), PRE-SAFE ®
, HOLD and hill start
assist are temporarily unavailable. The on-board voltage may be
insufficient, for example. BAS PLUS (Brake Assist PLUS) and PRE-
SAFE ®
Brake may be inoperative as well. In addition, the ä,
å and ! warning lamps light up in the instrument cluster.
ATTENTION ASSIST is deactivated.
The brake system continues to function normally, but without the
functions listed above. The wheels could therefore lock if you
brake hard, for example.
XDrive on carefully.
If the display message disappears, the functions mentioned
above are available again.
If the display message continues to be displayed:
XDrive on carefully.XVisit a qualified specialist workshop.$ (USA only)
J (Canada only)
ABS and ESC
Inoperative See
Operator's ManualGRisk of accident
ABS, ESP ®
, BAS, PRE-SAFE ®
, HOLD and hill start assist are
unavailable due to a malfunction. BAS PLUS and PRE-SAFE ®
Brake
may also have failed. In addition, the ä, å and !
warning lamps light up in the instrument cluster.
ATTENTION ASSIST is deactivated.
The brake system continues to function normally, but without the
functions listed above. The wheels could therefore lock if you
brake hard, for example.
XDrive on carefully.XVisit a qualified specialist workshop.Display messages241On-board computer and displaysBA 212 USA, CA Edition B 2011; 1; 5, en-USdimargiVersion: 3.0.3.62010-05-20T13:33:46+02:00 - Seite 241Z