Page 287 of 400

XTo remove: press release button = on
respective bracket A and remove luggage
holder ; by pulling upwards and out.
Telescopic rod
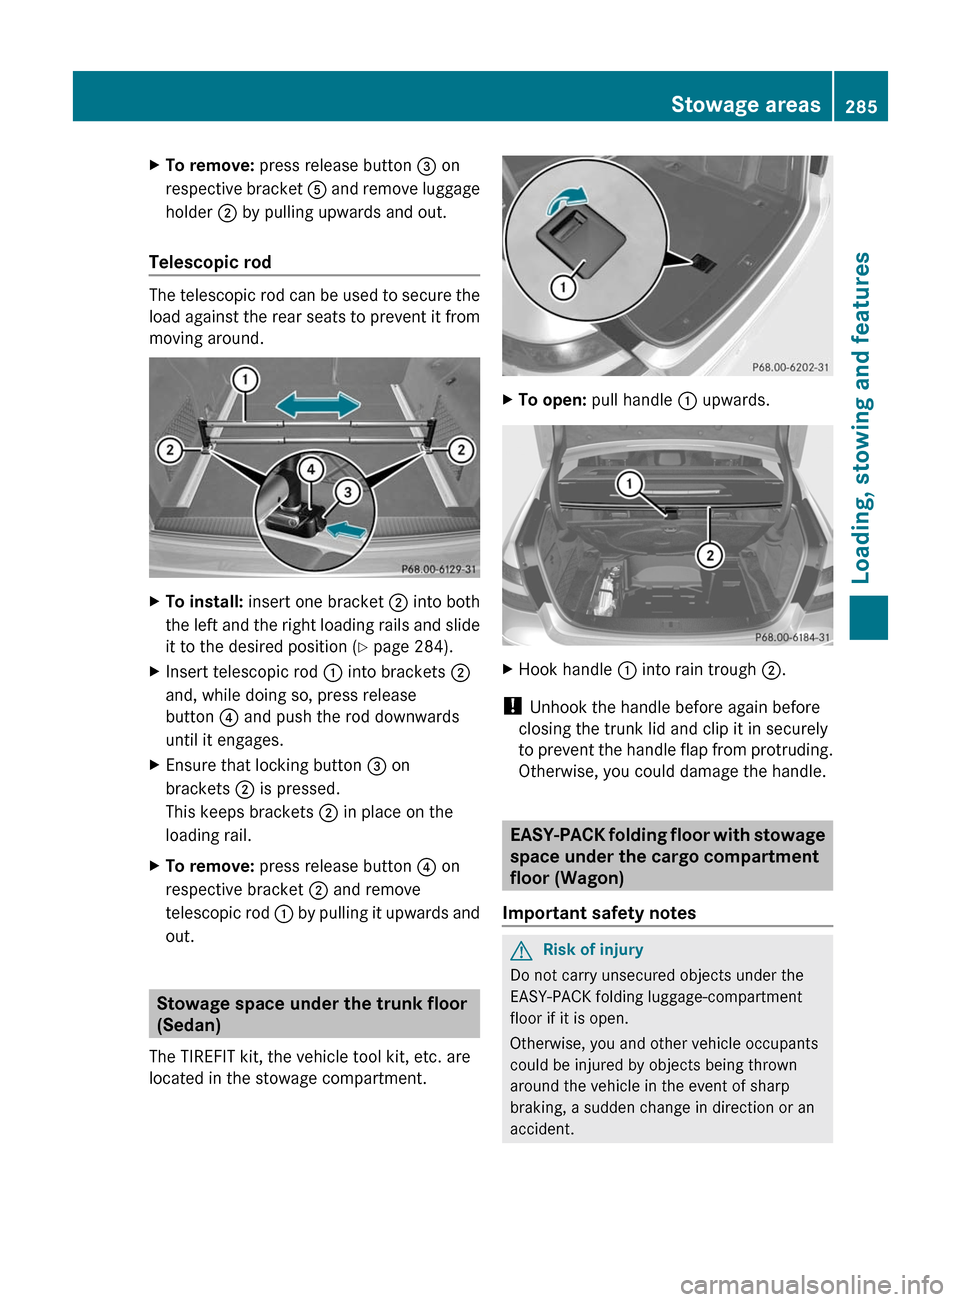
The telescopic rod can be used to secure the
load against the rear seats to prevent it from
moving around.
XTo install: insert one bracket ; into both
the left and the right loading rails and slide
it to the desired position (Y page 284).
XInsert telescopic rod : into brackets ;
and, while doing so, press release
button ? and push the rod downwards
until it engages.
XEnsure that locking button = on
brackets ; is pressed.
This keeps brackets ; in place on the
loading rail.
XTo remove: press release button ? on
respective bracket ; and remove
telescopic rod : by pulling it upwards and
out.
Stowage space under the trunk floor
(Sedan)
The TIREFIT kit, the vehicle tool kit, etc. are
located in the stowage compartment.
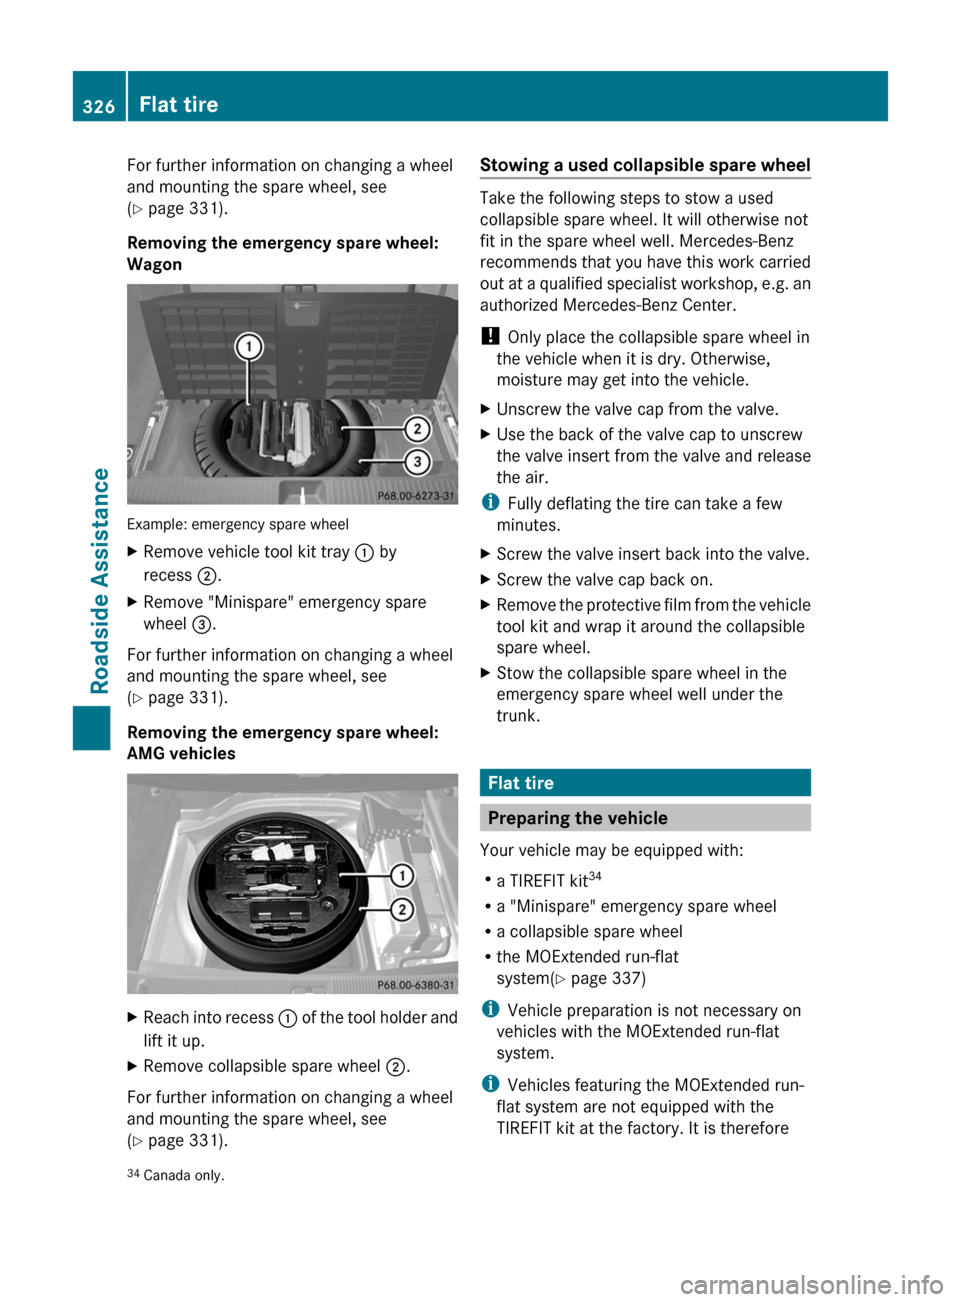
XTo open: pull handle : upwards.XHook handle : into rain trough ;.
! Unhook the handle before again before
closing the trunk lid and clip it in securely
to prevent the handle flap from protruding.
Otherwise, you could damage the handle.
EASY-PACK folding floor with stowage
space under the cargo compartment
floor (Wagon)
Important safety notes
GRisk of injury
Do not carry unsecured objects under the
EASY-PACK folding luggage-compartment
floor if it is open.
Otherwise, you and other vehicle occupants
could be injured by objects being thrown
around the vehicle in the event of sharp
braking, a sudden change in direction or an
accident.
Stowage areas285Loading, stowing and featuresBA 212 USA, CA Edition B 2011; 1; 5, en-USdimargiVersion: 3.0.3.62010-05-20T13:33:46+02:00 - Seite 285Z
Page 325 of 400

After an accidentProblemPossible causes/consequences and M SolutionsFuel is leaking from the
vehicle.GRisk of explosion or fire
The fuel line or the fuel tank is faulty.
XImmediately turn the key to position 0(Y page 149)in the ignition
lock and remove it.XDo not restart the engine under any circumstances.XConsult a qualified specialist workshop.You are unable to
determine the extent of
the damage.XConsult a qualified specialist workshop.You cannot detect any
damage.XStart the engine as normal.The NECK-PRO head
restraints on the
driver's and front-
passenger seats have
been triggered.Your vehicle has been involved in a rear-end collision.XReset the triggered NECK-PRO head restraints ( Y page 53).Where will I find...?
First-aid kit
Sedan: the first-aid kit is in the right-hand
stowage compartment in the trunk.
XOpen the trunk lid.XSlide down the parcel net.XOpen the stowage compartment.XRelease strap :.XRemove first-aid kit ;.
Wagon: depending on the vehicle's
equipment, the first-aid kit is in the parcel net
or behind the side trim panel.
XOpen the tailgate.
In the parcel net
Where will I find...?323Roadside AssistanceBA 212 USA, CA Edition B 2011; 1; 5, en-USdimargiVersion: 3.0.3.62010-05-20T13:33:46+02:00 - Seite 323Z
Page 327 of 400

The vehicle tool kit contains:
RFoldable wheel chock
RFuse allocation chart
RJack
RAlignment bolt
ROne pair of gloves
RLug wrench
RTowing eye
XVehicles with "Minispare" emergency
spare wheel33: swing the trunk floor
upwards (Y page 285).
:Towing eye;One pair of gloves=Jack?Folding wheel chockAAlignment boltBSheet for faulty wheelCElectric air pumpDLug wrenchEFuse allocation chart
"Minispare" emergency spare tire/
collapsible emergency spare tire
Removing the "Minispare" emergency
spare wheel/collapsible spare wheel
Opening the stowage well
Sedan: the emergency spare wheel can be
found in the stowage well under the trunk
floor.
XLift the trunk floor upwards (Y page 285).
Example: well insert
XRelease tabs : on the right of well
insert ;.
XReach into recess = of well insert ;,
swing the insert up and remove it.
Wagon: the emergency spare wheel is
located in the stowage well under the cargo
compartment floor.
XRemove the seat cushions of the folding
bench seat (Y page 108).
XLift the cargo compartment floor up.
Removing the emergency spare wheel:
Sedan
Example: Sedan
XRemove vehicle tool kit tray :.XTurn stowage well ; counter-clockwise
and remove it.
XRemove "Minispare" emergency spare
wheel =.33AMG vehicles only.Where will I find...?325Roadside AssistanceBA 212 USA, CA Edition B 2011; 1; 5, en-USdimargiVersion: 3.0.3.62010-05-20T13:33:46+02:00 - Seite 325Z
Page 328 of 400

For further information on changing a wheel
and mounting the spare wheel, see
( Y page 331).
Removing the emergency spare wheel:
Wagon
Example: emergency spare wheel
XRemove vehicle tool kit tray : by
recess ;.XRemove "Minispare" emergency spare
wheel =.
For further information on changing a wheel
and mounting the spare wheel, see
( Y page 331).
Removing the emergency spare wheel:
AMG vehicles
XReach into recess : of the tool holder and
lift it up.XRemove collapsible spare wheel ;.
For further information on changing a wheel
and mounting the spare wheel, see
( Y page 331).
Stowing a used collapsible spare wheel
Take the following steps to stow a used
collapsible spare wheel. It will otherwise not
fit in the spare wheel well. Mercedes-Benz
recommends that you have this work carried
out at a qualified specialist workshop, e.g. an
authorized Mercedes-Benz Center.
! Only place the collapsible spare wheel in
the vehicle when it is dry. Otherwise,
moisture may get into the vehicle.
XUnscrew the valve cap from the valve.XUse the back of the valve cap to unscrew
the valve insert from the valve and release
the air.
i Fully deflating the tire can take a few
minutes.
XScrew the valve insert back into the valve.XScrew the valve cap back on.XRemove the protective film from the vehicle
tool kit and wrap it around the collapsible
spare wheel.XStow the collapsible spare wheel in the
emergency spare wheel well under the
trunk.
Flat tire
Preparing the vehicle
Your vehicle may be equipped with:
R a TIREFIT kit 34
R a "Minispare" emergency spare wheel
R a collapsible spare wheel
R the MOExtended run-flat
system( Y page 337)
i Vehicle preparation is not necessary on
vehicles with the MOExtended run-flat
system.
i Vehicles featuring the MOExtended run-
flat system are not equipped with the
TIREFIT kit at the factory. It is therefore
34 Canada only.326Flat tireRoadside Assistance
BA 212 USA, CA Edition B 2011; 1; 5, en-USdimargiVersion: 3.0.3.62010-05-20T13:33:46+02:00 - Seite 326
Page 348 of 400

The fuses are located in various fuse boxes:
Rfuse box in the engine compartment on the
left-hand side of the vehicle, when viewed
in the direction of travel
Rfuse box in the trunk/cargo compartment
on the right-hand side of the vehicle, when
viewed in the direction of travel
The fuse allocation chart is located in the
vehicle tool kit (Y page 324) in the stowage
compartment under the trunk/trunk floor.
Fuse box in the engine compartment
XMake sure that the windshield wipers are
turned off.
GRisk of injury
Make sure that the windshield wipers are
turned off and the key is pulled out of the
ignition lock before you open the cover of the
fuse box. Otherwise, the windshield wipers
and the wiper rods above the cover could be
set in motion. This could lead to you or others
being injured by the wiper rods.
XOpen the hood (Y page 308).XRemove any existing moisture from the
fuse box using a dry cloth.
XTake lines ; from the guides.XMove aside lines ;. Route the lines behind
connection = to do this.
XTo open: open clamps :.XRemove the fuse box cover forwards.XTo close: check whether the rubber seal is
lying correctly in the cover.
XInsert the cover at the rear of the fuse box
into the retainer.
XFold down the cover and close clamps :.XSecure lines ; in the guides.
! The cover must be seated properly,
otherwise moisture or dirt could impair the
function of the fuses.
XClose the hood (Y page 309).
Fuse box in the trunk
XOpen the trunk lid.XTo open: release cover : at the top right
and left-hand sides with a flat object.
XOpen cover : downwards in the direction
of the arrow.
Fuse box in the cargo compartment
XOpen the tailgate.346FusesRoadside Assistance
BA 212 USA, CA Edition B 2011; 1; 5, en-USdimargiVersion: 3.0.3.62010-05-20T13:33:46+02:00 - Seite 346
Page:
< prev 1-8 9-16 17-24