2011 MERCEDES-BENZ E350 4MATIC Front axle
[x] Cancel search: Front axlePage 15 of 400

P
Paint code number ............................ 385
Paintwork (cleaning instructions) ... 316
Panic alarm .......................................... 64
Panorama roof with power tilt/
sliding panel Opening/closing .............................. 97
Resetting ......................................... 98
Parking ............................................... 169
Parking aid Parking Guidance ........................... 197
PARKTRONIC ................................. 194
Rear view camera .......................... 200
Parking brake .................................... 170
Parking Guidance .............................. 197
Display message ............................ 252
Parking lamp (display message) ...... 245
Parking position Exterior mirror on the front-
passenger side ............................... 114
PARKTRONIC
Activating/deactivating .................196
Function/notes ............................. 194
Malfunction .................................... 197
Problem ......................................... 197
Range of the sensors .....................194
Warning display ............................. 195
PASSENGER AIRBAG OFF indicator
lamp (only Canada) ............................. 48
PASSENGER AIRBAG OFF indicator
lamp (only USA) ................................... 43
Pedals ................................................. 172
Permanent display (on-board
computer) .......................................... 230
Permanent four-wheel drive see 4MATIC
Plastic hooks ..................................... 280
Plastic trim (cleaning instructions) . 319
Power washers .................................. 315
Power windows see Side windows
Pre-emptive occupant safety
system
see PRE-SAFE ®
system PRE-SAFE ®
Brake (vehicles with
DISTRONIC PLUS) Activating/deactivating (on-
board computer) ............................ 228
Function/notes ................................ 71
PRE-SAFE ®
Brake (vehicles with
DISTRONIC PLUS) Display message ............................ 236
Warning lamp ................................. 270
PRE-SAFE ®
system
Display message ............................ 235
Operation ......................................... 51
Product information ............................ 20
Program selector ............................... 158
Program selector button .................. 158
Pulling away Automatic transmission .................151
R
RACE START (AMG vehicles) ............. 190
RACETIMER (on-board computer) .... 222
Radar sensor system Display message ............................ 251
Radar sensor system (on-board
computer) .......................................... 232
Radiator cover ................................... 309
Radio Changing stations (on-board
computer) ...................................... 225
see separate operating instructions
Range (on-board computer) ............. 220
Rear axle level control ...................... 192
Rear compartment Setting the airflow .........................141
Setting the air vents ......................145
Setting the temperature ................140
Rear fog lamp (display message) ..... 244
Rear seat backrest Display message ............................ 259
Folding forwards/back ..................278
Rear seat backrest (display
message) ............................................ 259
Rear sill protector ............................. 286
Rear view camera Function/notes ............................. 200
Rear view camera (cleaning
instructions) ...................................... 318
Index13BA 212 USA, CA Edition B 2011; 1; 5, en-USdimargiVersion: 3.0.3.62010-05-20T13:33:46+02:00 - Seite 13
Page 70 of 400

GWarning!
Never switch off the ESP when you see the
ESP warning lamp ä flashing in the
instrument cluster. In this case proceed as
follows:
R When driving off, apply as little throttle as
possible.
R While driving, ease up on the accelerator
pedal.
R Adapt your speed and driving style to the
prevailing road conditions.
Failure to observe these guidelines could
cause the vehicle to skid. The ESP cannot
prevent accidents resulting from excessive
speed.
! Vehicles without 4MATIC: switch the
ignition off when:
R the parking brake is being tested using a
dynamometer
R the vehicle is being towed with the front/
rear axle raised
Application of the brakes by ESP ®
may
otherwise destroy the brake system.
! Vehicles with 4MATIC: switch off the
ignition when the parking brake is being
tested on a brake dynamometer.
Application of the brakes by ESP ®
may
otherwise destroy the brake system.
i Only use wheels with the recommended
tire sizes. Only then will ESP ®
function
properly.
ETS/4ETS (Electronic Traction System)
GWarning
Observe "Important safety notes"
( Y page 65).
Traction control is part of ESP ®
.
Traction control brakes the drive wheels
individually if they spin. This enables you to
pull away and accelerate on slippery surfaces,
for example if the road surface is slippery on
one side. On vehicles with 4MATIC, more
drive torque is also transferred to the wheel
or wheels with traction.
Traction control remains active if you
deactivate ESP ®
.
Deactivating/activating ESP ®
(except
AMG vehicles)GWarning!
The ESP should not be switched off during
normal driving other than in the
circumstances described below. Disabling
the system will reduce vehicle stability in
driving maneuvers.
Do not switch off the ESP when a spare wheel
is mounted.
ESP ®
is activated automatically when the
engine is running.
It may be best to deactivate ESP ®
in the
following situations:
R when using snow chains
R in deep snow
R on sand or gravel
GWarning!
Switch on the ESP immediately if the
aforementioned circumstances do not apply
anymore. Otherwise the ESP will not stabilize
the vehicle when it is starting to skid or a
wheel is spinning.
If you deactivate ESP ®
:
R ESP ®
no longer improves driving stability.
R the engine's torque is no longer limited and
the drive wheels can spin. The spinning of
the wheels results in a cutting action, which
provides better grip.
R traction control is still activated.
R ESP ®
still provides support when you
brake.
If ESP ®
is deactivated and one or more wheels
start to spin, the ä warning lamp in the
68Driving safety systemsSafety
BA 212 USA, CA Edition B 2011; 1; 5, en-USdimargiVersion: 3.0.3.62010-05-20T13:33:46+02:00 - Seite 68
Page 110 of 400

Adjusting the four-way lumbar
support
You can adjust the contour of the front seat
backrests individually to provide optimum
support for your back.
:To raise the backrest contour;To soften the backrest contour=To lower the backrest contour?To harden the backrest contour
Folding bench seat in the cargo
compartment (Wagon)
The folding bench seat in the luggage
compartment is only suitable for persons no
more than 4.6 ft (1.40 m) tall and weighing a
maximum of 110 lb (50 kg).
Maximum permissible passenger weight may
be reduced by extensive optional extras and
vehicle load. Observe the maximum gross
vehicle weight and the gross axle weight
rating, which can be found on the vehicle
identification plate (Y page 385).
The combined cargo cover and net must be
installed if you are using the folding bench
seat (Y page 282).
GRisk of injury
The rear seat backrests must be locked in the
upright position if you are using the folding
bench seat in the cargo compartment.
Do not pull away unless the head restraint in
the folding bench seat is installed correctly.
Make sure that the center of the head
restraint supports the seat occupant's head
at about eye level. This can reduce the risk of
injury to a child in the event of an accident.
Ensure that the seat belt is routed correctly
across the body and the seat belt buckle is
engaged.
Never leave children unsupervised in the
vehicle. This applies even if they are secured
in a child restraint system.
Secure children as recommended; see the
"Children in the vehicle" section.
GRisk of injury
Only replace damaged covers with genuine
covers.
Make sure that items of luggage and other
objects in the cargo compartment are well
secured.
Otherwise, the load could cause injury in the
event of sharp braking, a sudden change in
direction or an accident.
Folding out the folding bench seat
XMake sure that the backrests of the rear
bench seat are locked in the upright
position.
XMove the handle for the combined cargo
cover and net upwards (Y page 282).
XPull release handle : and fold the
backrest of the folding bench seat
upwards.
108SeatsSeats, steering wheel and mirrors
BA 212 USA, CA Edition B 2011; 1; 5, en-USdimargiVersion: 3.0.3.62010-05-20T13:33:46+02:00 - Seite 108
Page 196 of 400

GWarning!
If a drive wheel is spinning due to insufficient
traction:
R While driving off, apply as little throttle as
possible.
R While driving, ease up on the accelerator
pedal.
R Adapt your speed and driving style to the
prevailing road conditions.
Failure to observe these guidelines could
cause the vehicle to skid.
The 4MATIC cannot prevent accidents
resulting from excessive speed.
! Never tow the vehicle with one axle
raised. This may damage the transfer case.
Damage of this sort is not covered by the
Mercedes-Benz Limited Warranty. All
wheels must remain either on the ground
or be fully raised. Observe the instructions
for towing the vehicle with all wheels in full
contact with the ground.
i In wintry driving conditions, the maximum
effect of 4MATIC can only be achieved if
you use winter tires ( M+S tires), with snow
chains if necessary.
PARKTRONIC
Important safety notes
GWarning!
The PARKTRONIC is a supplemental system.
It is not intended to, nor does it replace, the
need for extreme care. The responsibility
during parking and other critical maneuvers
always remains with the driver.
GWarning!
Make sure no persons or animals are in or
near the area in which you are parking/
maneuvering. Otherwise, they could be
injured.
PARKTRONIC is an electronic parking aid with
ultrasonic sensors. It indicates visually and
audibly the distance between your vehicle
and an object.
PARKTRONIC is activated automatically when
you:
R switch on the ignition.
R shift the transmission to position D, R or
N .
R release the parking brake.
PARKTRONIC is deactivated at speeds above
11 mph (18 km/h). It is reactivated at lower
speeds.
PARKTRONIC monitors the area around your
vehicle using six sensors in the front bumper
and four sensors in the rear bumper.:Sensors in the front bumper, left-hand
side (example)
Range of the sensors
The sensors must be free of dirt, ice and
slush; otherwise they may not function
correctly. Clean the sensors regularly, taking
care not to scratch or damage them
( Y page 317).
194Driving systemsDriving and parking
BA 212 USA, CA Edition B 2011; 1; 5, en-USdimargiVersion: 3.0.3.62010-05-20T13:33:46+02:00 - Seite 194
Page 276 of 400

Vehicle equipment
i This manual describes all the standard
and optional equipment of your vehicle
which was available at the time of
purchase. Country-specific differences are
possible. Bear in mind that your vehicle
may not feature all functions described
here. This also refers to safety-related
systems and functions.
Loading guidelines
GWarning!
Always fasten items being carried as securely
as possible. Use cargo tie-down rings and
fastening materials appropriate for the weight
and size of the load.
In an accident, during hard braking or sudden
maneuvers, loose items will be thrown around
inside the vehicle. This can cause injury to
vehicle occupants unless the items are
securely fastened in the vehicle.
To help avoid personal injury during a collision
or sudden maneuver, exercise care when
transporting cargo. Do not pile luggage or
cargo higher than the seat backrests.
The trunk is the preferred place to carry
objects.
Never drive a vehicle with the trunk open.
Deadly carbon monoxide (CO) gases may
enter vehicle interior resulting in
unconsciousness and death.
The handling characteristics of a laden
vehicle are dependent on the distribution of
the load within the vehicle. For this reason,
you should observe the following notes when
transporting a load:
R When transporting a load, never exceed the
maximum permissible gross vehicle weight
or the permissible axle loads for the vehicle
(including occupants). The values are
stated on the vehicle identification plate on
the B-pillar on the driver's side.
R Position heavy loads as far forwards as
possible and as low down in the trunk/
cargo compartment as possible.
R The load must not protrude above the
upper edge of the seat backrests.
R always place the load against the rear or
front seat backrests. Make sure that the
seat backrests are securely locked into
place.
R Always place the load behind unoccupied
seats if possible.
R Secure the load with sufficiently strong and
wear-resistant tie down. Pad sharp edges
for protection.
Stowage compartments
Important safety notes
GWarning!
To help avoid personal injury during a collision
or sudden maneuver, exercise care when
storing objects in the vehicle. Put luggage or
cargo in the trunk if possible.
Do not pile luggage or cargo higher than the
seat backrests.
Keep compartment lids closed. This will help
to prevent stored objects from being thrown
about and injuring vehicle occupants during
R braking
R vehicle maneuvers
R an accident
Stowage compartments in the front
Glove box
i Depending on the vehicle equipment,
there is an AUX-IN connection or a Media
Interface installed in the glove box. Media
Interface is a universal interface for mobile
audio equipment, e.g. for an iPod ®
or USB
274Stowage compartmentsLoading, stowing and features
BA 212 USA, CA Edition B 2011; 1; 5, en-USdimargiVersion: 3.0.3.62010-05-20T13:33:46+02:00 - Seite 274
Page 335 of 400
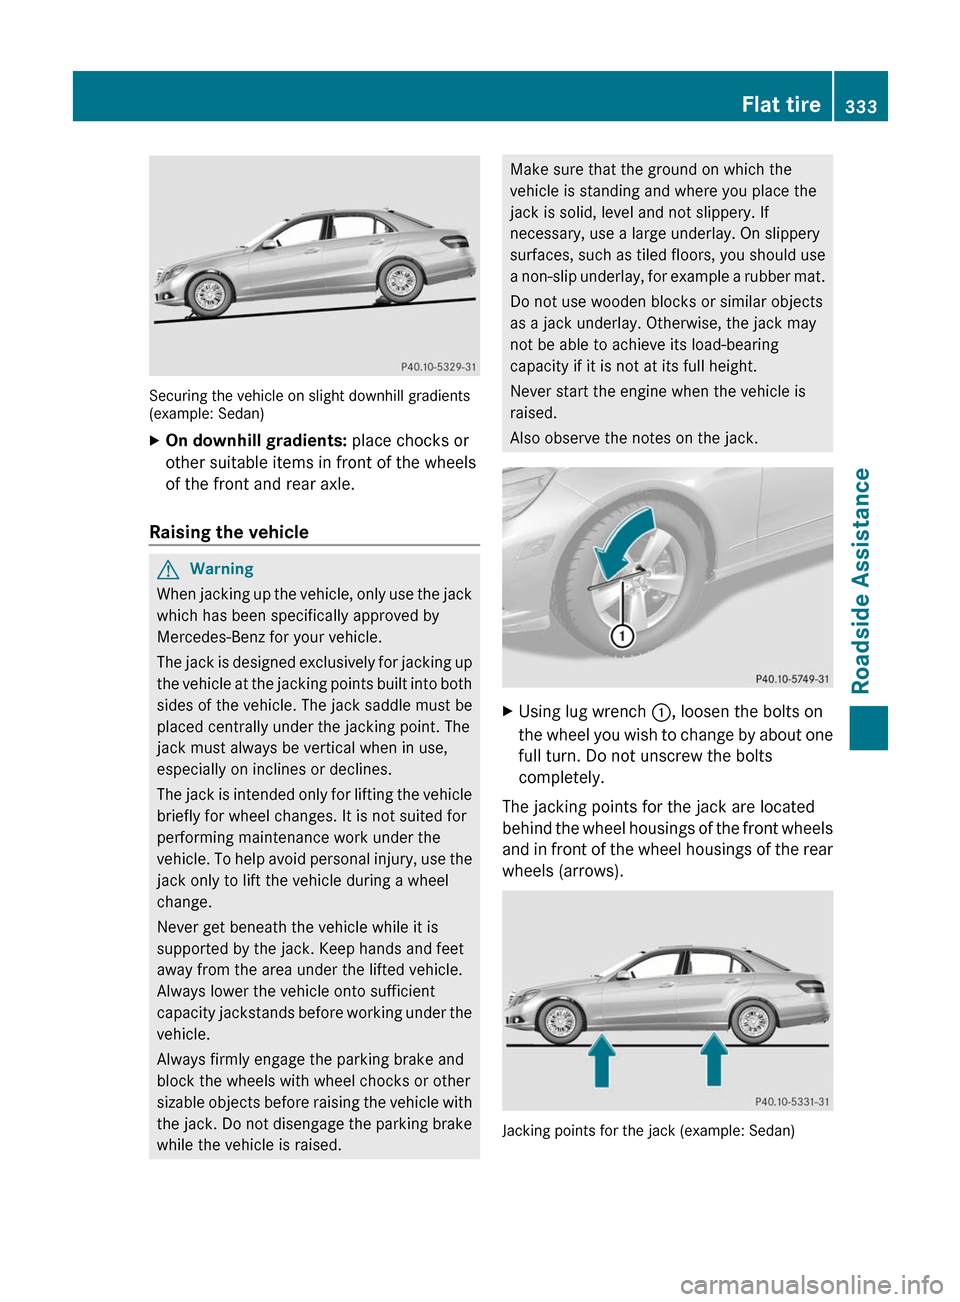
Securing the vehicle on slight downhill gradients(example: Sedan)
XOn downhill gradients: place chocks or
other suitable items in front of the wheels
of the front and rear axle.
Raising the vehicle
GWarning
When jacking up the vehicle, only use the jack
which has been specifically approved by
Mercedes-Benz for your vehicle.
The jack is designed exclusively for jacking up
the vehicle at the jacking points built into both
sides of the vehicle. The jack saddle must be
placed centrally under the jacking point. The
jack must always be vertical when in use,
especially on inclines or declines.
The jack is intended only for lifting the vehicle
briefly for wheel changes. It is not suited for
performing maintenance work under the
vehicle. To help avoid personal injury, use the
jack only to lift the vehicle during a wheel
change.
Never get beneath the vehicle while it is
supported by the jack. Keep hands and feet
away from the area under the lifted vehicle.
Always lower the vehicle onto sufficient
capacity jackstands before working under the
vehicle.
Always firmly engage the parking brake and
block the wheels with wheel chocks or other
sizable objects before raising the vehicle with
the jack. Do not disengage the parking brake
while the vehicle is raised.
Make sure that the ground on which the
vehicle is standing and where you place the
jack is solid, level and not slippery. If
necessary, use a large underlay. On slippery
surfaces, such as tiled floors, you should use
a non-slip underlay, for example a rubber mat.
Do not use wooden blocks or similar objects
as a jack underlay. Otherwise, the jack may
not be able to achieve its load-bearing
capacity if it is not at its full height.
Never start the engine when the vehicle is
raised.
Also observe the notes on the jack.
XUsing lug wrench :, loosen the bolts on
the wheel you wish to change by about one
full turn. Do not unscrew the bolts
completely.
The jacking points for the jack are located
behind the wheel housings of the front wheels
and in front of the wheel housings of the rear
wheels (arrows).
Jacking points for the jack (example: Sedan)
Flat tire333Roadside AssistanceBA 212 USA, CA Edition B 2011; 1; 5, en-USdimargiVersion: 3.0.3.62010-05-20T13:33:46+02:00 - Seite 333Z
Page 345 of 400
Towing and tow-starting
Important safety notes
GWarning
If you tow the vehicle, you must use a rigid
towing bar if:
R the engine will not run.
R there is a malfunction in the brake system.
R there is a malfunction in the power supply
or the vehicle's electrical system.
With the engine not running, there is no power
assistance for the brake and steering
systems. You will then need considerably
more force to steer and to brake and the
brake pedal travel will be longer. If necessary,
depress the brake pedal with maximum force.
Before towing away, make sure that the
steering can be moved and is not locked.
If you tow or tow-start another vehicle, its
weight must not exceed the maximum
permissible gross vehicle weight of your
vehicle.
GWarning
The vehicle is braked when the HOLD function
or DISTRONIC PLUS is activated. Therefore,
deactivate HOLD and DISTRONIC PLUS if the
vehicle is to be towed.
It is better to have the vehicle transported
than to have it towed.
! You may only tow the vehicle a maximum
distance of 30 miles (50 km). A towing
speed of 30 mph (50 km/h) must not be
exceeded.
For towing distances over 30 miles
(50 km), the vehicle must loaded onto a
transporter.
! Only secure the tow rope or tow bar at the
towing eyes. Otherwise, the vehicle could
be damaged.
! Do not use the towing eye for recovery,
as this could damage the vehicle. If in
doubt, recover the vehicle with a crane.
! Drive slowly and smoothly when towing.
Excessive tractive power could otherwise
damage the vehicles.
! Do not tow with sling-type equipment.
This could damage the vehicle.
! When towing vehicles with KEYLESS-GO,
use the key instead of the Start/Stop
button. Otherwise, the automatic
transmission may shift to position P when
the driver's or front-passenger door are
opened, which could lead to damage to the
transmission.
! Vehicles with automatic transmission
must not be started by tow-starting. This
could otherwise damage the transmission.
! Vehicles with 4MATIC must not be towed
with the front or rear axle raised. This could
otherwise damage the transmission.
The automatic transmission must be in
position N when the vehicle is being towed.
The battery must be connected and charged.
You will otherwise be unable to:
R turn the SmartKey to position 2 in the
ignition lock
R shift the automatic transmission to
position N
i Deactivate the automatic locking feature
( Y page 85) before towing. You could
otherwise lock yourself out of the vehicle
when pushing or towing the vehicle.
Deactivate tow-away protection before
towing.
Installing/removing the towing eye
Installing the towing eye
XRemove the towing eye from the vehicle
tool kit ( Y page 324).GWarning
The exhaust tail pipe may be hot. You could
burn yourself if you touch the tail pipe. Be
Towing and tow-starting343Roadside AssistanceBA 212 USA, CA Edition B 2011; 1; 5, en-USdimargiVersion: 3.0.3.62010-05-20T13:33:46+02:00 - Seite 343Z
Page 346 of 400
particularly careful when removing the rear
cover.
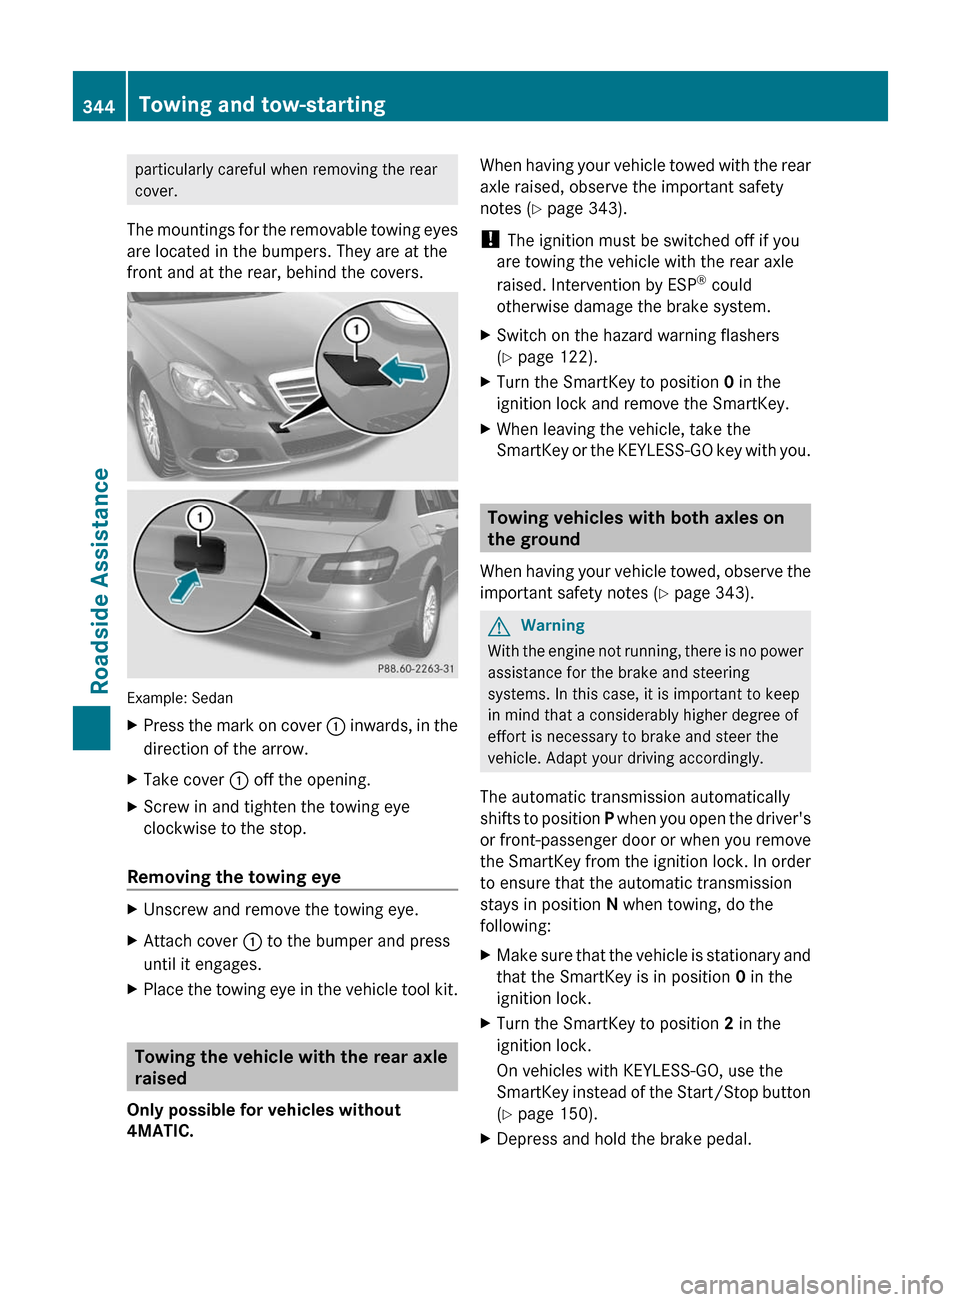
The mountings for the removable towing eyes
are located in the bumpers. They are at the
front and at the rear, behind the covers.
Example: Sedan
XPress the mark on cover : inwards, in the
direction of the arrow.
XTake cover : off the opening.XScrew in and tighten the towing eye
clockwise to the stop.
Removing the towing eye
XUnscrew and remove the towing eye.XAttach cover : to the bumper and press
until it engages.
XPlace the towing eye in the vehicle tool kit.
Towing the vehicle with the rear axle
raised
Only possible for vehicles without
4MATIC.
When having your vehicle towed with the rear
axle raised, observe the important safety
notes (Y page 343).
! The ignition must be switched off if you
are towing the vehicle with the rear axle
raised. Intervention by ESP® could
otherwise damage the brake system.
XSwitch on the hazard warning flashers
(Y page 122).
XTurn the SmartKey to position 0 in the
ignition lock and remove the SmartKey.
XWhen leaving the vehicle, take the
SmartKey or the KEYLESS-GO key with you.
Towing vehicles with both axles on
the ground
When having your vehicle towed, observe the
important safety notes (Y page 343).
GWarning
With the engine not running, there is no power
assistance for the brake and steering
systems. In this case, it is important to keep
in mind that a considerably higher degree of
effort is necessary to brake and steer the
vehicle. Adapt your driving accordingly.
The automatic transmission automatically
shifts to position P when you open the driver's
or front-passenger door or when you remove
the SmartKey from the ignition lock. In order
to ensure that the automatic transmission
stays in position N when towing, do the
following:
XMake sure that the vehicle is stationary and
that the SmartKey is in position 0 in the
ignition lock.
XTurn the SmartKey to position 2 in the
ignition lock.
On vehicles with KEYLESS-GO, use the
SmartKey instead of the Start/Stop button
(Y page 150).
XDepress and hold the brake pedal.344Towing and tow-startingRoadside Assistance
BA 212 USA, CA Edition B 2011; 1; 5, en-USdimargiVersion: 3.0.3.62010-05-20T13:33:46+02:00 - Seite 344