2011 MERCEDES-BENZ E350 4MATIC weight
[x] Cancel search: weightPage 241 of 400

Display messagesPossible causes/consequences and M SolutionsFront Passenger
Airbag Enabled
See Operator's
ManualThe front-passenger air bag is enabled during the journey,
although:
R there is a child, a small adult or an object weighing less than the
system's weight threshold on the front-passenger seat.
R the front-passenger seat is unoccupied.
The system may detect the additional weight of objects on the
seat or forces acting on the seat.XPull over and stop the vehicle safely as soon as possible, paying
attention to road and traffic conditions.XEngage the parking brake.XSwitch off the ignition.XOpen the front-passenger door.XRemove the child and the child restraint system from the front-
passenger seat.XIf necessary, secure the child in a child restraint system on a
suitable rear seat.XMake sure that there are no objects adding to the weight applied
to the seat. The system may otherwise detect the additional
weight and interpret the seat occupant's weight as greater than
it actually is.XMake sure that the seat is unoccupied and has no objects placed
on it, close the front-passenger door, and switch on the ignition.
Observe the 45(Y page 43) indicator lamps and the
multifunction display and check the following:
Seat unoccupied and ignition switched on:
R the 45 indicator lamp must light up and remain lit. When
the indicator lamp is on, OCS ( Y page 43) has deactivated the
front-passenger air bag.
R The Front Passenger Airbag Enabled See Operator's
Manual or Front Passenger Airbag Disabled See
Operator's Manual display messages must not appear. Wait
for at least 60 seconds until the necessary system checks have
been completed and to make sure that the display messages do
not appear in the multifunction display.
If these conditions are met, the front-passenger seat can be
occupied again. Whether the 45 indicator lamp remains lit
or goes out depends on how OCS classifies the occupant.
If the conditions are not met, the system is not operating correctly.
XVisit a qualified specialist workshop immediately.Display messages239On-board computer and displaysBA 212 USA, CA Edition B 2011; 1; 5, en-USdimargiVersion: 3.0.3.62010-05-20T13:33:46+02:00 - Seite 239Z
Page 242 of 400

GWarning
If the 45 indicator lamp remains off even after performing the above corrective steps, do
not have any children 12 years old and under and other small individuals use the front-passenger
seat until the system has been repaired.
Display messagesPossible causes/consequences and M SolutionsFront Passenger
Airbag Disabled
See Operator's
ManualThe front-passenger air bag is deactivated during the journey even
though an adult or a person larger than a certain size is occupying
the front-passenger seat. If additional forces are applied to the
seat, the system may interpret the occupant's weight as lower
than it actually is.XPull over and stop the vehicle safely as soon as possible, paying
attention to road and traffic conditions.XEngage the parking brake.XSwitch off the ignition.XHave the occupant get out of the vehicle.XMake sure that the seat is unoccupied and has no objects placed
on it, close the front-passenger door, and switch on the ignition.
Observe the 45(Y page 43) indicator lamps and the
multifunction display and check the following:
Seat unoccupied and ignition switched on:
R the 45 indicator lamp must light up and remain lit. When
the indicator lamp is on, OCS ( Y page 43) has deactivated the
front-passenger air bag.
R The Front Passenger Airbag Enabled See Operator's
Manual or Front Passenger Airbag Disabled See
Operator's Manual display messages must not appear. Wait
for at least 60 seconds until the necessary system checks have
been completed and to make sure that the display messages do
not appear in the multifunction display.
If these conditions are met, the front-passenger seat can be
occupied again. Whether the 45 indicator lamp remains lit
or goes out depends on how OCS classifies the occupant.
If the conditions are not met, the system is not operating correctly.
XVisit a qualified specialist workshop immediately.GWarning
If the 45 indicator lamp remains lit with an adult occupant on the front-passenger seat
even after performing the above corrective steps, do not have any passenger use the front-
passenger seat until the system has been repaired.
240Display messagesOn-board computer and displays
BA 212 USA, CA Edition B 2011; 1; 5, en-USdimargiVersion: 3.0.3.62010-05-20T13:33:46+02:00 - Seite 240
Page 276 of 400

Vehicle equipment
i This manual describes all the standard
and optional equipment of your vehicle
which was available at the time of
purchase. Country-specific differences are
possible. Bear in mind that your vehicle
may not feature all functions described
here. This also refers to safety-related
systems and functions.
Loading guidelines
GWarning!
Always fasten items being carried as securely
as possible. Use cargo tie-down rings and
fastening materials appropriate for the weight
and size of the load.
In an accident, during hard braking or sudden
maneuvers, loose items will be thrown around
inside the vehicle. This can cause injury to
vehicle occupants unless the items are
securely fastened in the vehicle.
To help avoid personal injury during a collision
or sudden maneuver, exercise care when
transporting cargo. Do not pile luggage or
cargo higher than the seat backrests.
The trunk is the preferred place to carry
objects.
Never drive a vehicle with the trunk open.
Deadly carbon monoxide (CO) gases may
enter vehicle interior resulting in
unconsciousness and death.
The handling characteristics of a laden
vehicle are dependent on the distribution of
the load within the vehicle. For this reason,
you should observe the following notes when
transporting a load:
R When transporting a load, never exceed the
maximum permissible gross vehicle weight
or the permissible axle loads for the vehicle
(including occupants). The values are
stated on the vehicle identification plate on
the B-pillar on the driver's side.
R Position heavy loads as far forwards as
possible and as low down in the trunk/
cargo compartment as possible.
R The load must not protrude above the
upper edge of the seat backrests.
R always place the load against the rear or
front seat backrests. Make sure that the
seat backrests are securely locked into
place.
R Always place the load behind unoccupied
seats if possible.
R Secure the load with sufficiently strong and
wear-resistant tie down. Pad sharp edges
for protection.
Stowage compartments
Important safety notes
GWarning!
To help avoid personal injury during a collision
or sudden maneuver, exercise care when
storing objects in the vehicle. Put luggage or
cargo in the trunk if possible.
Do not pile luggage or cargo higher than the
seat backrests.
Keep compartment lids closed. This will help
to prevent stored objects from being thrown
about and injuring vehicle occupants during
R braking
R vehicle maneuvers
R an accident
Stowage compartments in the front
Glove box
i Depending on the vehicle equipment,
there is an AUX-IN connection or a Media
Interface installed in the glove box. Media
Interface is a universal interface for mobile
audio equipment, e.g. for an iPod ®
or USB
274Stowage compartmentsLoading, stowing and features
BA 212 USA, CA Edition B 2011; 1; 5, en-USdimargiVersion: 3.0.3.62010-05-20T13:33:46+02:00 - Seite 274
Page 278 of 400

XTo open: press left-hand button ; or right-
hand button :.
The stowage compartment opens.
Stowage compartments in the rear
Stowage pockets
GWarning!
Storage bags are intended for storing light-
weight items only.
Heavy objects, objects with sharp edges or
fragile objects may not be transported in the
storage bag. In an accident, during hard
braking, or sudden maneuvers, they could be
thrown around inside the vehicle and cause
injury to vehicle occupants.
Storage bags cannot protect transported
goods in the event of an accident.
Storage bags are located in the rear
compartment on the driver's and front-
passenger seat backrests.
Stowage areas
Parcel nets
GWarning
Parcel nets are intended for storing light-
weight items only, such as road maps, mail,
etc.
Heavy objects, objects with sharp edges, or
fragile objects may not be transported in the
parcel nets. In an accident, during hard
braking, or sudden maneuvers, they could be
thrown around inside the vehicle and cause
injury to vehicle occupants.
Parcel nets cannot protect transported goods
in the event of an accident.
Parcel nets are located in the front-passenger
footwell and on the left and right-hand sides
of the trunk/cargo compartment.
Skibag
Unfolding the skibag and loading the
skis
GWarning
The skibag is designed for up to four pairs of
skis. Do not load the skibag with any other
objects.
Always fasten the skibag securely. In an
accident, an unfastened ski bag can cause
injury to vehicle occupants.
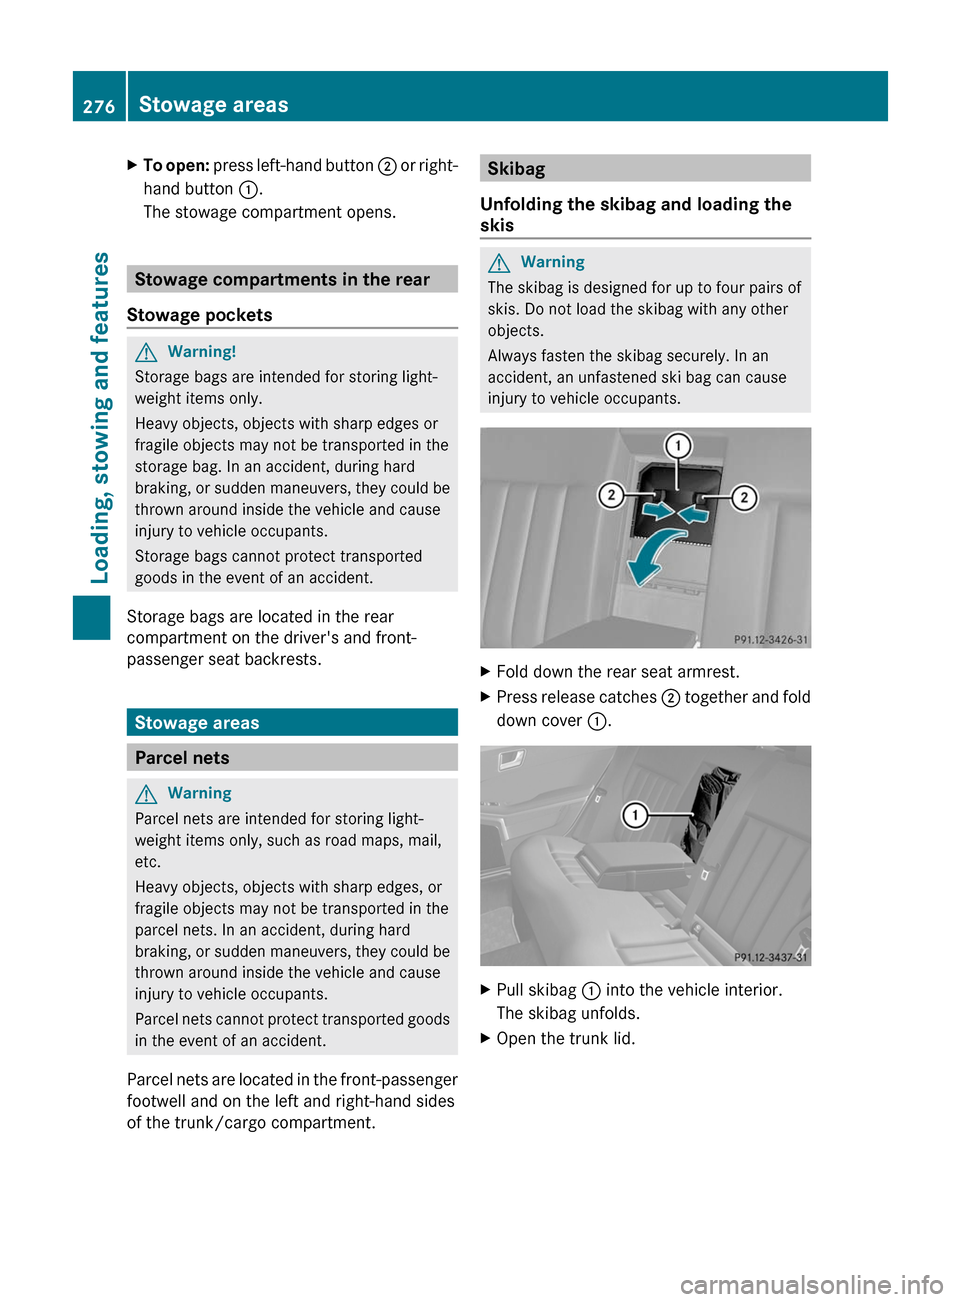
XFold down the rear seat armrest.XPress release catches ; together and fold
down cover :.
XPull skibag : into the vehicle interior.
The skibag unfolds.
XOpen the trunk lid.276Stowage areasLoading, stowing and features
BA 212 USA, CA Edition B 2011; 1; 5, en-USdimargiVersion: 3.0.3.62010-05-20T13:33:46+02:00 - Seite 276
Page 286 of 400

You and/or others could be trapped and
injured.
Only use the coat hooks for light clothing.
:Coat hooks
EASY-PACK cargo securing kit
(Wagon)
Components and stowage
The EASY-PACK load-securing kit allows you
to use your cargo compartment for a variety
of purposes. The accessory parts are located
under the trunk floor.
XOpen the EASY-PACK folding luggage-
compartment floor (Y page 285).
EASY-PACK load-securing kit accessory parts
:Telescopic rod;Bag containing the brackets and luggage
holder
=Folding boxLuggage holder
The luggage holder can be used to secure
light loads against the side wall of the cargo
compartment to prevent them from moving
around.
! Only use the luggage holder to secure
cargo with a maximum weight of 15.4 lb
(7 kg) and with dimensions that the luggage
holder can safely and securely contain.
XTo install: insert two brackets A into the
left or right loading rail (Y page 284).
XPress release button : of the luggage
holder and pull the belt out slightly.
XInsert luggage holder ; into brackets A
and, while doing so, press release button
= and push the luggage holder downwards
until it engages.
XPress release button : of the luggage
holder and pull the belt out slightly in the
direction of the arrow.
XPlace the load between the belt and the
cargo compartment side wall.
XUsing one hand, press locking button : of
the luggage holder.
XWith your other hand, slowly extend the
belt around the load until it is secure.
XMake sure that locking button ? on
brackets A is pressed.
This keeps brackets A in place on the
loading rail.
284Stowage areasLoading, stowing and features
BA 212 USA, CA Edition B 2011; 1; 5, en-USdimargiVersion: 3.0.3.62010-05-20T13:33:46+02:00 - Seite 284
Page 290 of 400

XOpen covers : carefully in the direction of
the arrow.XFold covers : upwards.XOnly secure the roof carrier to the
anchorage points under covers :.XObserve the manufacturer's installation
instructions.
Attaching the roof carrier (Wagon)
XSecure the roof carrier to the roof rails.XObserve the manufacturer's installation
instructions.
Features
Cup holder
Points to observe before use
GWarning
In order to help prevent spilling liquids on
vehicle occupants and/or vehicle equipment,
only use containers that fit into the cup
holder. Use lids on open containers and do
not fill containers to a height where the
contents, especially hot liquids, could spill
during braking, vehicle maneuvers, or in an
accident. Liquids spilled on vehicle occupants
may cause serious personal injury. Liquids
spilled on vehicle equipment may cause
damage not covered by the Mercedes-Benz
Limited Warranty.
When not in use, keep the cup holder closed.
An open cup holder may cause injury to you
or others when contacted during braking,
vehicle maneuvers, or in an accident.
Keep in mind that objects placed in the cup
holder may come loose during braking,
vehicle maneuvers, or in an accident and be
thrown around in the vehicle interior. Objects
thrown around in the vehicle interior may
cause an accident and/or serious personal
injury.
Cup holder in the center console
All vehicles except E 63 AMG
XTo open: slide cover = forwards until it
engages.XTo remove: slide catch ; forwards and
pull out cup holder :.XTo insert: insert cup holder : and slide
back catch ;.XTo close: press cover = briefly at the
front.
Cover = moves back.
E 63 AMG
XTo open: slide cover : back.
Cup holder in the rear seat armrest
!
Do not sit or lean your bodyweight on the
armrests when they are folded out as you
could damage them.
! Only fold the armrests up when the cup
holder is closed. The cup holder may
otherwise be damaged.
288FeaturesLoading, stowing and features
BA 212 USA, CA Edition B 2011; 1; 5, en-USdimargiVersion: 3.0.3.62010-05-20T13:33:46+02:00 - Seite 288
Page 345 of 400

Towing and tow-starting
Important safety notes
GWarning
If you tow the vehicle, you must use a rigid
towing bar if:
R the engine will not run.
R there is a malfunction in the brake system.
R there is a malfunction in the power supply
or the vehicle's electrical system.
With the engine not running, there is no power
assistance for the brake and steering
systems. You will then need considerably
more force to steer and to brake and the
brake pedal travel will be longer. If necessary,
depress the brake pedal with maximum force.
Before towing away, make sure that the
steering can be moved and is not locked.
If you tow or tow-start another vehicle, its
weight must not exceed the maximum
permissible gross vehicle weight of your
vehicle.
GWarning
The vehicle is braked when the HOLD function
or DISTRONIC PLUS is activated. Therefore,
deactivate HOLD and DISTRONIC PLUS if the
vehicle is to be towed.
It is better to have the vehicle transported
than to have it towed.
! You may only tow the vehicle a maximum
distance of 30 miles (50 km). A towing
speed of 30 mph (50 km/h) must not be
exceeded.
For towing distances over 30 miles
(50 km), the vehicle must loaded onto a
transporter.
! Only secure the tow rope or tow bar at the
towing eyes. Otherwise, the vehicle could
be damaged.
! Do not use the towing eye for recovery,
as this could damage the vehicle. If in
doubt, recover the vehicle with a crane.
! Drive slowly and smoothly when towing.
Excessive tractive power could otherwise
damage the vehicles.
! Do not tow with sling-type equipment.
This could damage the vehicle.
! When towing vehicles with KEYLESS-GO,
use the key instead of the Start/Stop
button. Otherwise, the automatic
transmission may shift to position P when
the driver's or front-passenger door are
opened, which could lead to damage to the
transmission.
! Vehicles with automatic transmission
must not be started by tow-starting. This
could otherwise damage the transmission.
! Vehicles with 4MATIC must not be towed
with the front or rear axle raised. This could
otherwise damage the transmission.
The automatic transmission must be in
position N when the vehicle is being towed.
The battery must be connected and charged.
You will otherwise be unable to:
R turn the SmartKey to position 2 in the
ignition lock
R shift the automatic transmission to
position N
i Deactivate the automatic locking feature
( Y page 85) before towing. You could
otherwise lock yourself out of the vehicle
when pushing or towing the vehicle.
Deactivate tow-away protection before
towing.
Installing/removing the towing eye
Installing the towing eye
XRemove the towing eye from the vehicle
tool kit ( Y page 324).GWarning
The exhaust tail pipe may be hot. You could
burn yourself if you touch the tail pipe. Be
Towing and tow-starting343Roadside AssistanceBA 212 USA, CA Edition B 2011; 1; 5, en-USdimargiVersion: 3.0.3.62010-05-20T13:33:46+02:00 - Seite 343Z
Page 363 of 400

tire sizes and corresponding pressures
for tires mounted at the factory.(2)The vehicle identification plate is on the
B-pillar on the driver's side. The vehicle
identification plate informs you of the
gross vehicle weight rating. It is made up
of the vehicle weight, all vehicle
occupants, the fuel and the cargo. You
can also find information about the
maximum gross axle weight rating on the
front and rear axle.
The maximum gross axle weight rating is
the maximum weight that can be carried
by one axle (front or rear axle). Never
exceed the maximum load or the
maximum gross axle weight rating for the
front or rear axle.
B-pillar (example: Sedan)
:B-pillar, driver's side
Maximum permissible gross vehicle
weight rating
i The data in the illustration of the Tire and
Loading Information placard is an example.
The maximum permissible gross vehicle
weight rating is vehicle-specific and may
differ from that which is illustrated. You can
find the valid maximum permissible gross
vehicle weight rating for your vehicle on the
Tire and Loading Information placard.
XThe Tire and Loading Information placard
gives you details on maximum permissible
gross vehicle weight rating :: "The gross
weight of occupants and luggage must
never exceed XXX kilograms or XXX
pounds."
The gross weight of all vehicle occupants,
cargo, luggage and trailer load/noseweight (if
applicable) must not exceed the specified
value.
Number of seats
i The data in the illustration of the Tire and
Loading Information placard is an example.
The number of seats is vehicle-specific and
can differ from the details shown. The
number of seats in your vehicle can be
found on the Tire and Loading Information
placard.
Maximum number of seats : determines the
maximum number of occupants allowed to
travel in the vehicle. This information can be
Loading the vehicle361Tires and wheelsBA 212 USA, CA Edition B 2011; 1; 5, en-USdimargiVersion: 3.0.3.62010-05-20T13:33:46+02:00 - Seite 361Z