2011 MERCEDES-BENZ E300 BLUETEC lights
[x] Cancel search: lightsPage 212 of 400

If the lanes are very wide, it may not be
possible to monitor the complete width of the
neighboring lane. For this reason, vehicles in
the next lane may not be detected, especially
if they are driving in a staggered formation.
This may be the case if vehicles are driving at
the edge of their lane that is furthest away
from your vehicle.
Always pay attention to traffic conditions and
your surroundings. Otherwise, you may fail to
recognize dangers in time, cause an accident
and injure yourself and others.
If the lanes are narrow, the system may be
unable to distinguish the neighboring lane
from the one beyond it. For this reason, the
system may indicate vehicles in the farther
lane, especially if the vehicles are driving in a
staggered formation in different lanes. In
particular, this may be the case if the vehicles
are driving at that edge of their lane which is
nearest your vehicle. Due to the nature of the
system, warnings may be issued
unnecessarily when driving close to crash
barriers or similar solid lane borders.
Two Active Blind Spot Assist sensors are
integrated into the front and rear bumpers
respectively. An additional sensor is located
behind the cover in the radiator grill. Make
sure that the bumpers are free of dirt, ice or
slush around the sensors. The rear radar
sensors must not be covered, for example by
bicycle racks or overhanging loads. In the
event of a severe impact or damage to the
bumpers, have the function of the radar
sensors checked at a qualified specialist
workshop, e.g. an authorized Mercedes-Benz
Center. Active Blind Spot Assist may
otherwise fail to work correctly.
Indicator and warning display:Yellow indicator lamp/red warning lamp
If Active Blind Spot Assist is switched on,
indicator lamp : in the exterior mirrors lights
up in yellow up to a speed of 20 mph
(30 km/h). At speeds above 20 mph
(30 km/h), the indicator lamp goes out and
Active Blind Spot Assist is operational.
If a vehicle is detected within the monitoring
range of Blind Spot Assist at speeds above
20 mph (30 km/h), warning lamp : on the
corresponding side lights up in red. This
warning is always emitted when a vehicle
enters the blind spot monitoring range from
behind or from the side. When you overtake
a vehicle, the warning only occurs if the
difference in speed is less than 7 mph
(12 km/h).
The yellow indicator lamp goes out if reverse
gear is engaged. Active Blind Spot Assist is
then no longer active.
The brightness of the indicator/warning
lamps is adjusted automatically according to
the ambient light.
GWarning
Active Blind Spot Assist is not active at speeds
lower than 20 mph (30 km/h). The indicator
lamps in the exterior mirrors are yellow.
Vehicles in the monitoring range are then not
indicated.
Always pay attention to traffic conditions and
your surroundings. Otherwise, you may fail to
recognize dangers in time, cause an accident
and injure yourself and others.
210Driving systemsDriving and parking
BA 212 USA, CA Edition B 2011; 1; 5, en-USdimargiVersion: 3.0.3.62010-05-20T13:33:46+02:00 - Seite 210
Page 220 of 400

%Press and hold:
Selects the standard displayA=;
Calls up the menu and menu bar9: Press briefly:
Selects the submenu or scrolls
through lists
In the Audio menu: selects a stored
station, an audio track or a video
scene
In the Tel (telephone) menu:
switches to the phone book and
selects a name or telephone number9: Press and hold:
In the Audio menu: selects the
previous/next station or selects an
audio track or a video scene using
rapid scrolling
In the Tel (telephone) menu: starts
rapid scrolling through the phone
booka
Confirms selections and hides
display messages
In the Tel (telephone) menu:
switches to the phone book and
starts dialing
Multifunction display
To activate the multifunction display:
R switch on the ignition
R switch on the lights
R open the driver's door
Values and settings as well as display
messages are shown in the multifunction
display.
:Text field;Menu bar=Drive program indicator?Gear indicatorAOutside temperature or speedXTo display menu bar ;: press the =
or ; button on the steering wheel.
i
In AMG vehicles, the status indicator
differs from the display shown here
( Y page 155).
Further information on the gear indicator
( Y page 155).
218Displays and operationOn-board computer and displays
BA 212 USA, CA Edition B 2011; 1; 5, en-USdimargiVersion: 3.0.3.62010-05-20T13:33:46+02:00 - Seite 218
Page 230 of 400

Deactivating/activating ESP®GWarning!
Never switch off the ESP when you see the
ESP warning lamp ä flashing in the
instrument cluster. In this case proceed as
follows:
R When driving off, apply as little throttle as
possible.
R While driving, ease up on the accelerator
pedal.
R Adapt your speed and driving style to the
prevailing road conditions.
Failure to observe these guidelines could
cause the vehicle to skid. The ESP cannot
prevent accidents resulting from excessive
speed.
Further information about ESP ®
(Y page 67).
This function is not available in AMG vehicles.
XStart the engine.XPress the = or ; button on the
steering wheel to select the DriveAssist
menu.XPress 9 or : to select ESP.XPress a.XTo deactivate: press a again.
The å warning lamp in the instrument
cluster comes on.GWarning
When the å ESP OFF warning lamp lights
up, ESP is switched off.
When the ä ESP warning lamp and the
å ESP OFF warning lamp are on
continuously, ESP is not operational due to a
malfunction.
When ESP is switched off or not operational,
the vehicle's stability during standard driving
maneuvers is reduced.
Adapt your driving style to suit the prevailing
road conditions/weather conditions and to
the non-operating status of ESP.
XTo activate: press a again.
The å warning lamp in the instrument
cluster goes out.
Activating/deactivating PRE-SAFE ®
Brake
This function is only available with
DISTRONIC PLUS.
XPress the = or ; button on the
steering wheel to select the DriveAssist
menu.XPress 9 or : to select PRE-SAFE
Brake .XPress a.
The current selection is displayed.XTo activate/deactivate: press a
again.
When PRE-SAFE ®
Brake ( Y page 71) is
activated, the multifunction display shows
the Ä symbol.
Activating/deactivating ATTENTION
ASSIST
XPress the = or ; button on the
steering wheel to select the DriveAssist
menu.XPress the 9 or : button to select
Attention Asst.XPress a.
The current selection is displayed.XTo activate/deactivate: press a
again.
When ATTENTION ASSIST ( Y page 201) is
activated, the À symbol appears in the
multifunction display when the ignition is on.
Activating/deactivating Blind Spot
Assist
You can use the Blind Spot Asst. function
to activate or deactivate Blind Spot Assist
( Y page 205) or Active Blind Spot Assist
( Y page 209).
228Menus and submenusOn-board computer and displays
BA 212 USA, CA Edition B 2011; 1; 5, en-USdimargiVersion: 3.0.3.62010-05-20T13:33:46+02:00 - Seite 228
Page 232 of 400

XPress the : or 9 button to select the
Display Unit Speed-/Odometer.
function.
You will see the selected setting: km or
miles .XPress the a button to save the setting.
Selecting the permanent display function
The Permanent Display: function allows
you to choose whether the multifunction
display always shows the outside
temperature or the speed in km/h (USA) or
mph (Canada).
XPress the = or ; button on the
steering wheel to select the Settings
menu.XPress the : or 9 button to select the
Instr. Cluster submenu.XPress the a button to confirm.XPress : or 9 to select the
Permanent Display: function.
You will see the selected setting Outside
Temperature or Speedometer [km/h]: .XPress the a button to save the setting.
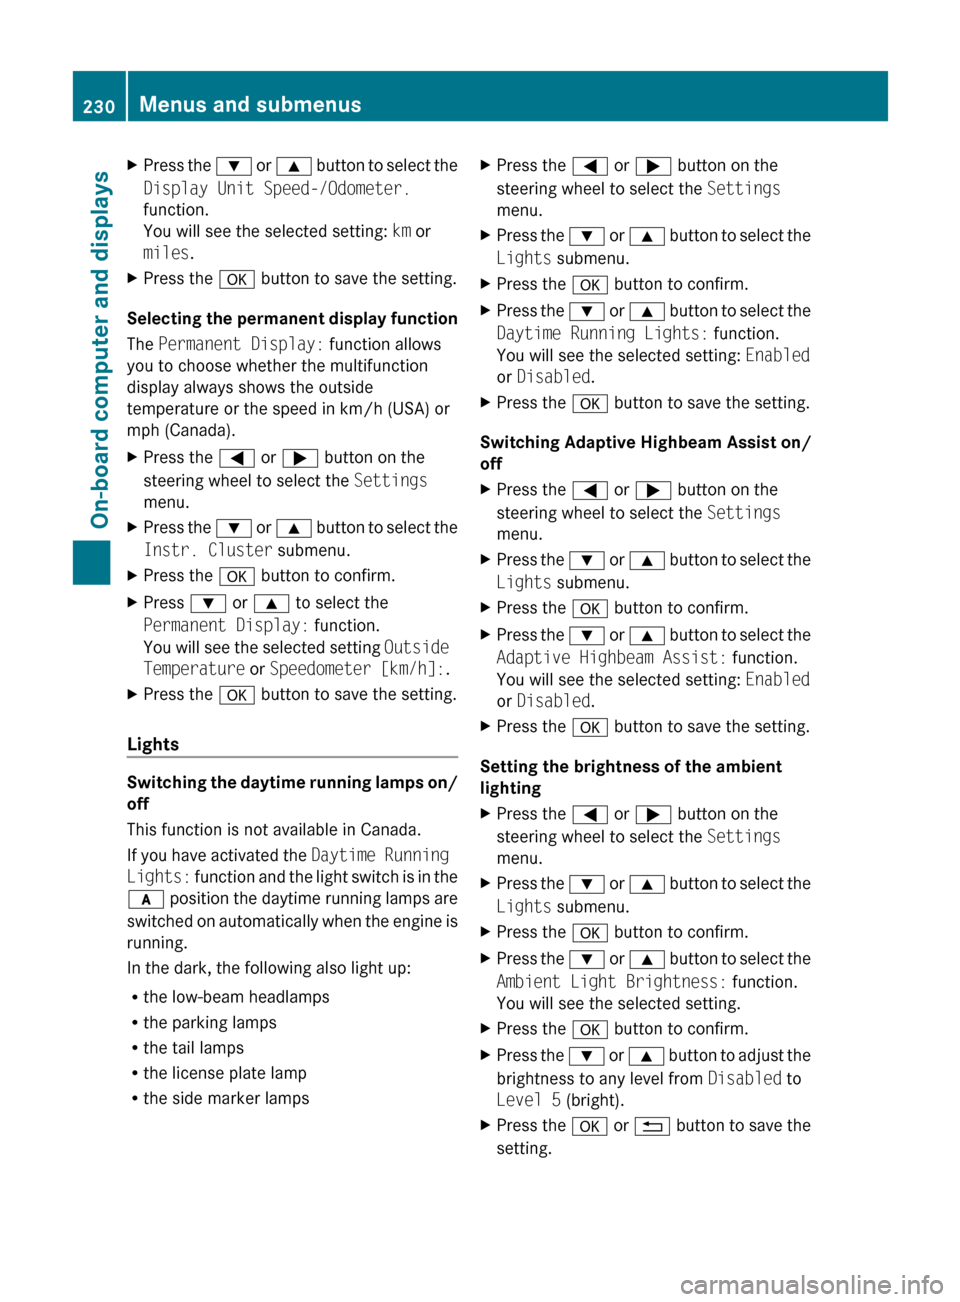
Lights
Switching the daytime running lamps on/
off
This function is not available in Canada.
If you have activated the Daytime Running
Lights: function and the light switch is in the
c position the daytime running lamps are
switched on automatically when the engine is
running.
In the dark, the following also light up:
R the low-beam headlamps
R the parking lamps
R the tail lamps
R the license plate lamp
R the side marker lamps
XPress the = or ; button on the
steering wheel to select the Settings
menu.XPress the : or 9 button to select the
Lights submenu.XPress the a button to confirm.XPress the : or 9 button to select the
Daytime Running Lights: function.
You will see the selected setting: Enabled
or Disabled .XPress the a button to save the setting.
Switching Adaptive Highbeam Assist on/
off
XPress the = or ; button on the
steering wheel to select the Settings
menu.XPress the : or 9 button to select the
Lights submenu.XPress the a button to confirm.XPress the : or 9 button to select the
Adaptive Highbeam Assist: function.
You will see the selected setting: Enabled
or Disabled .XPress the a button to save the setting.
Setting the brightness of the ambient
lighting
XPress the = or ; button on the
steering wheel to select the Settings
menu.XPress the : or 9 button to select the
Lights submenu.XPress the a button to confirm.XPress the : or 9 button to select the
Ambient Light Brightness: function.
You will see the selected setting.XPress the a button to confirm.XPress the : or 9 button to adjust the
brightness to any level from Disabled to
Level 5 (bright).XPress the a or % button to save the
setting.230Menus and submenusOn-board computer and displays
BA 212 USA, CA Edition B 2011; 1; 5, en-USdimargiVersion: 3.0.3.62010-05-20T13:33:46+02:00 - Seite 230
Page 233 of 400

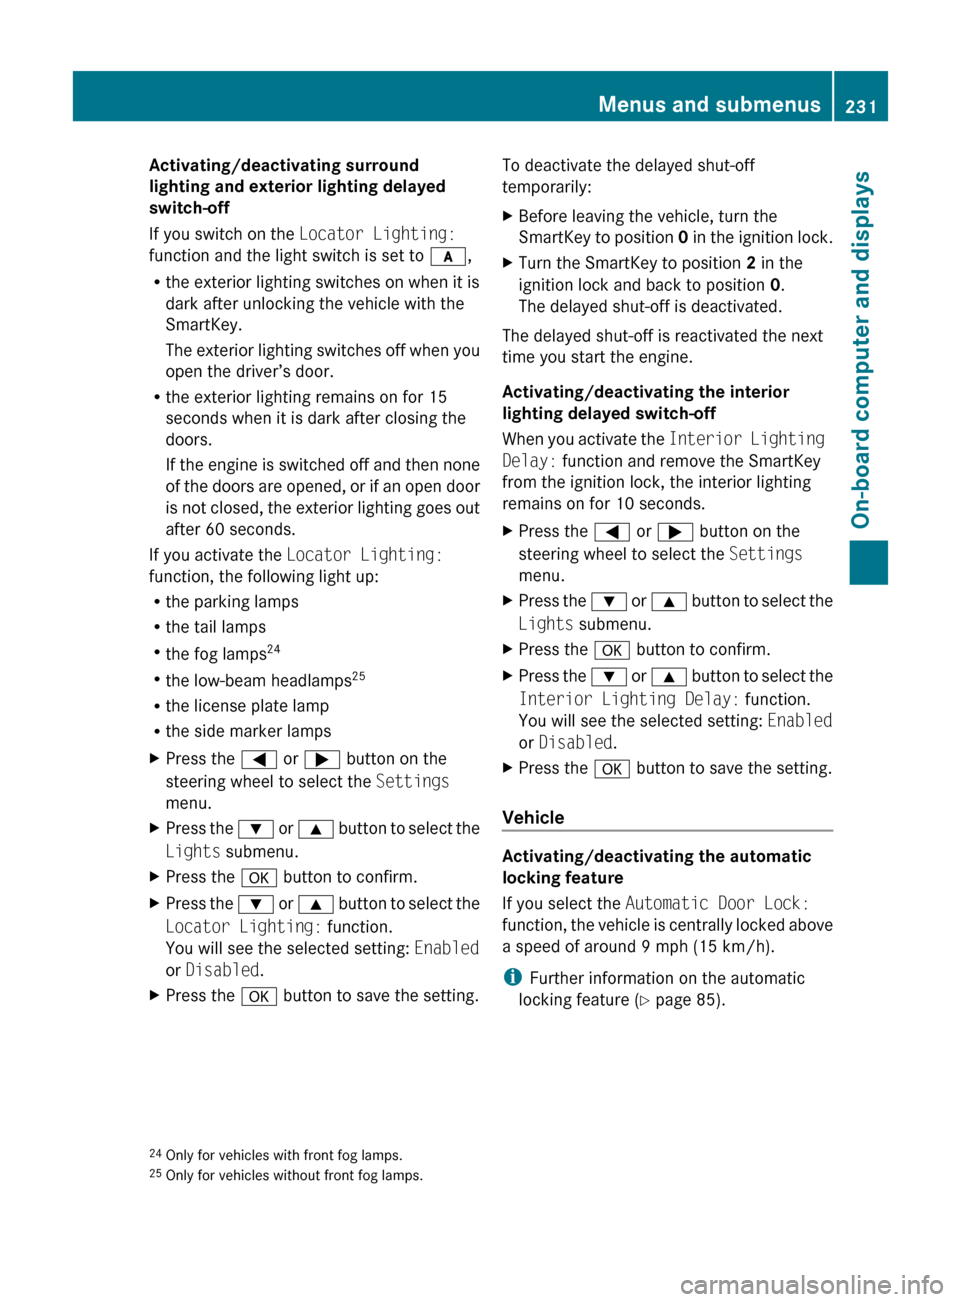
Activating/deactivating surround
lighting and exterior lighting delayed
switch-off
If you switch on the Locator Lighting:
function and the light switch is set to c,
R the exterior lighting switches on when it is
dark after unlocking the vehicle with the
SmartKey.
The exterior lighting switches off when you
open the driver’s door.
R the exterior lighting remains on for 15
seconds when it is dark after closing the
doors.
If the engine is switched off and then none
of the doors are opened, or if an open door
is not closed, the exterior lighting goes out
after 60 seconds.
If you activate the Locator Lighting:
function, the following light up:
R the parking lamps
R the tail lamps
R the fog lamps 24
R the low-beam headlamps 25
R the license plate lamp
R the side marker lampsXPress the = or ; button on the
steering wheel to select the Settings
menu.XPress the : or 9 button to select the
Lights submenu.XPress the a button to confirm.XPress the : or 9 button to select the
Locator Lighting: function.
You will see the selected setting: Enabled
or Disabled .XPress the a button to save the setting.To deactivate the delayed shut-off
temporarily:XBefore leaving the vehicle, turn the
SmartKey to position 0 in the ignition lock.XTurn the SmartKey to position 2 in the
ignition lock and back to position 0.
The delayed shut-off is deactivated.
The delayed shut-off is reactivated the next
time you start the engine.
Activating/deactivating the interior
lighting delayed switch-off
When you activate the Interior Lighting
Delay: function and remove the SmartKey
from the ignition lock, the interior lighting
remains on for 10 seconds.
XPress the = or ; button on the
steering wheel to select the Settings
menu.XPress the : or 9 button to select the
Lights submenu.XPress the a button to confirm.XPress the : or 9 button to select the
Interior Lighting Delay: function.
You will see the selected setting: Enabled
or Disabled .XPress the a button to save the setting.
Vehicle
Activating/deactivating the automatic
locking feature
If you select the Automatic Door Lock:
function, the vehicle is centrally locked above
a speed of around 9 mph (15 km/h).
i Further information on the automatic
locking feature ( Y page 85).
24
Only for vehicles with front fog lamps.
25 Only for vehicles without front fog lamps.Menus and submenus231On-board computer and displaysBA 212 USA, CA Edition B 2011; 1; 5, en-USdimargiVersion: 3.0.3.62010-05-20T13:33:46+02:00 - Seite 231Z
Page 235 of 400

wheel when the easy-entry/exit feature is
activated.
To stop steering wheel movement, move
steering wheel adjustment lever or press one
of the memory position buttons.
Do not leave children unattended in the
vehicle, or with access to an unlocked vehicle.
Children could open the driver's door and
unintentionally activate the easy-entry/exit
feature, which could result in an accident
and/or serious personal injury.XPress the = or ; button on the
steering wheel to select the Settings
menu.XPress the : or 9 button to select the
Convenience submenu.XPress the a button to confirm.XPress the : or 9 button to select the
Easy Entry/Exit: feature.
You will see the selected setting: Enabled
or Disabled .XPress the a button to save the setting.
Switching the belt adjustment on/off
Further information on belt adjustment
( Y page 56).
XPress the = or ; button on the
steering wheel to select the Settings
menu.XPress the : or 9 button to select the
Convenience submenu.XPress the a button to confirm.XPress the : or 9 button to select the
Belt Adjustment: function.
You will see the selected setting: Enabled
or Disabled .XPress the a button to save the setting.
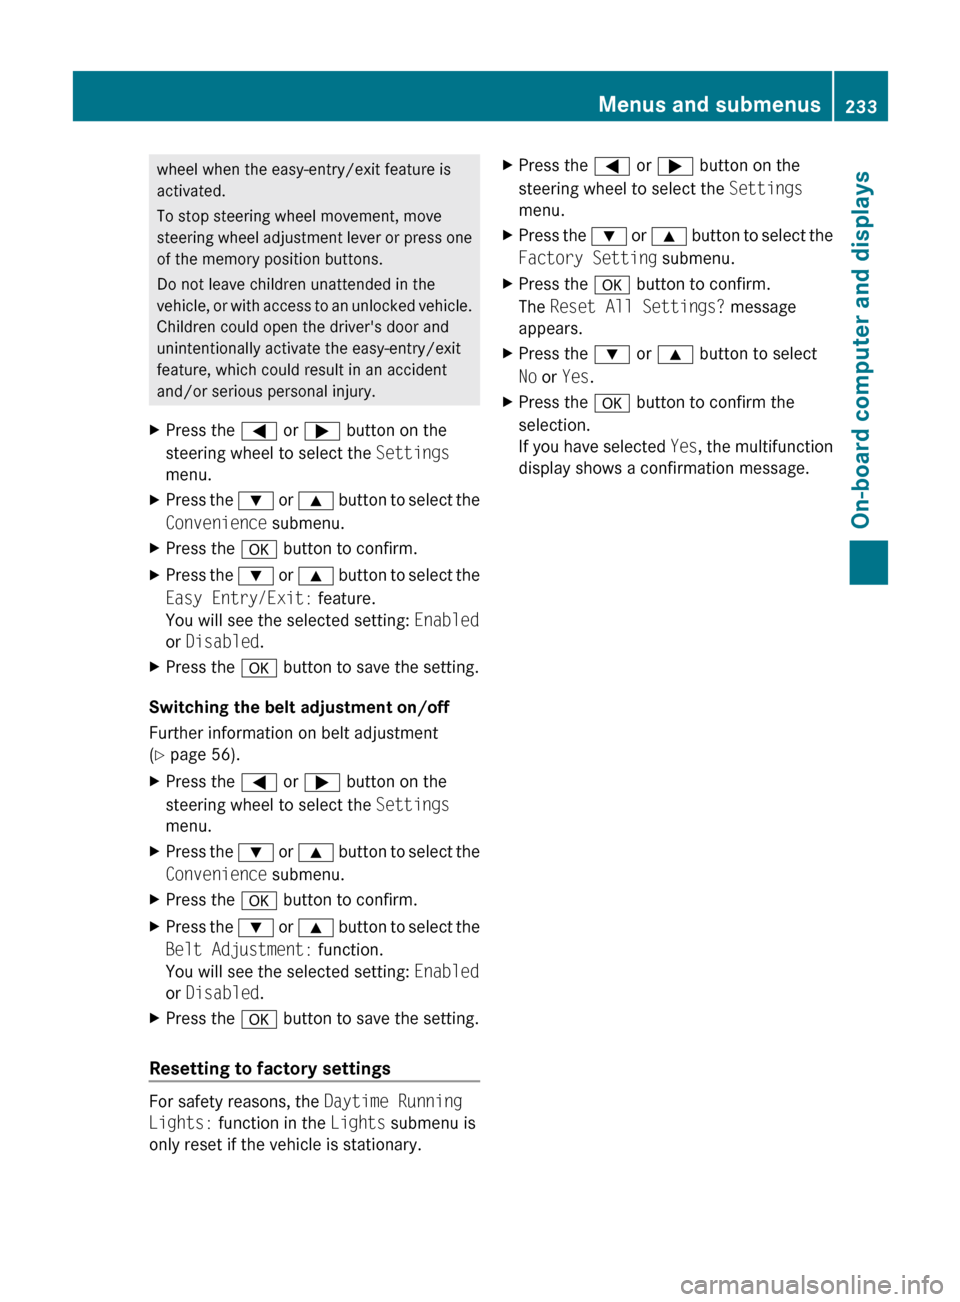
Resetting to factory settings
For safety reasons, the Daytime Running
Lights: function in the Lights submenu is
only reset if the vehicle is stationary.
XPress the = or ; button on the
steering wheel to select the Settings
menu.XPress the : or 9 button to select the
Factory Setting submenu.XPress the a button to confirm.
The Reset All Settings? message
appears.XPress the : or 9 button to select
No or Yes .XPress the a button to confirm the
selection.
If you have selected Yes, the multifunction
display shows a confirmation message.Menus and submenus233On-board computer and displaysBA 212 USA, CA Edition B 2011; 1; 5, en-USdimargiVersion: 3.0.3.62010-05-20T13:33:46+02:00 - Seite 233Z
Page 239 of 400

Display messagesPossible causes/consequences and M Solutions6
SRS Malfunction
Service RequiredGRisk of injury
There is a malfunction in the SRS (Supplemental Restraint
System). The 6 warning lamp also lights up in the instrument
cluster.
XVisit a qualified specialist workshop.6
Front Left SRS
Malfunction
Service Required
or
Front Right SRS
Malfunction
Service RequiredGRisk of injury
SRS has malfunctioned at the front on the left or right. The 6
warning lamp also lights up in the instrument cluster.
XVisit a qualified specialist workshop.6
Rear Left SRS
Malfunction
Service Required
or
Rear Right SRS
Malfunction
Service RequiredGRisk of injury
SRS has malfunctioned at the rear on the left or right. The 6
warning lamp also lights up in the instrument cluster.
XVisit a qualified specialist workshop.6
Rear Center SRS
Malfunction
Service RequiredGRisk of injury
SRS has malfunctioned at the rear center. The 6 warning lamp
also lights up in the instrument cluster.
XVisit a qualified specialist workshop.6
Left Side Curtain
Airbag Malfunction
Service Required
or
Right Side Curtain
Airbag Malfunction
Service RequiredGRisk of injury
There is a malfunction in the left-hand and/or right-hand window
curtain air bag. The 6 warning lamp also lights up in the
instrument cluster.
XVisit a qualified specialist workshop.GWarning
In the event a malfunction of the SRS is indicated as outlined above, the SRS may not be
operational.
Display messages237On-board computer and displaysBA 212 USA, CA Edition B 2011; 1; 5, en-USdimargiVersion: 3.0.3.62010-05-20T13:33:46+02:00 - Seite 237Z
Page 244 of 400

Display messagesPossible causes/consequences and M Solutions$ (USA only)
J (Canada only)
EBD, ABS, and ESC
Inoperative See
Operator's ManualGRisk of accident
EBD (Electronic Brake force Distribution), ABS, ESP ®
, BAS, PRE-
SAFE ®
, HOLD and hill start assist are unavailable due to a
malfunction. BAS PLUS and PRE-SAFE ®
Brake may also have
failed. In addition, the ä, å and ! warning lamps in the
instrument cluster light up and a warning tone sounds.
ATTENTION ASSIST is deactivated.
The brake system continues to function normally, but without the
functions listed above. The wheels could therefore lock if you
brake hard, for example.
XDrive on carefully.XVisit a qualified specialist workshop immediately.#
Check Brake Pad
WearThe brake pads/linings have reached their wear limit.XVisit a qualified specialist workshop.$ (USA only)
J (Canada only)
Release Park. BrakeYou are driving with the parking brake engaged. A warning tone
also sounds.XRelease the parking brake.$ (USA only)
J (Canada only)
Check Brake Fluid
LevelGRisk of accident
There is insufficient brake fluid in the brake fluid reservoir.
Additionally, the red $ (USA only)/ J (Canada only)
warning lamp lights up in the instrument cluster and a warning
tone sounds.
XPull over and stop the vehicle safely as soon as possible, paying
attention to road and traffic conditions. Do not continue driving
under any circumstances.XEngage the parking brake.XConsult a qualified specialist workshop.XDo not add brake fluid. This will not rectify the malfunction.GWarning
Driving with the message Check Brake Fluid Level displayed can result in an accident. Have
your brake system checked immediately.
Do not add brake fluid before checking the brake system. Overfilling the brake fluid reservoir can
result in spilling brake fluid on hot engine parts and the brake fluid catching fire. You can be
seriously burned.
242Display messagesOn-board computer and displays
BA 212 USA, CA Edition B 2011; 1; 5, en-USdimargiVersion: 3.0.3.62010-05-20T13:33:46+02:00 - Seite 242