2011 MERCEDES-BENZ E-CLASS ESTATE dimensions
[x] Cancel search: dimensionsPage 307 of 409
Otherwise, vehicle occupants could be
injured by objects being thrown around if you:
R
brake sharply
R change direction suddenly
R are involved in an accident
Please observe the loading guidelines.
Luggage holder The luggage holder can be used to secure
light loads against the side wall of the luggage
compartment to prevent them from moving
around.
!
Only use the luggage holder to secure
loads with a maximum weight of 7kg and
with dimensions that allow the loads to be
safely and securely retained by the luggage
holder. X
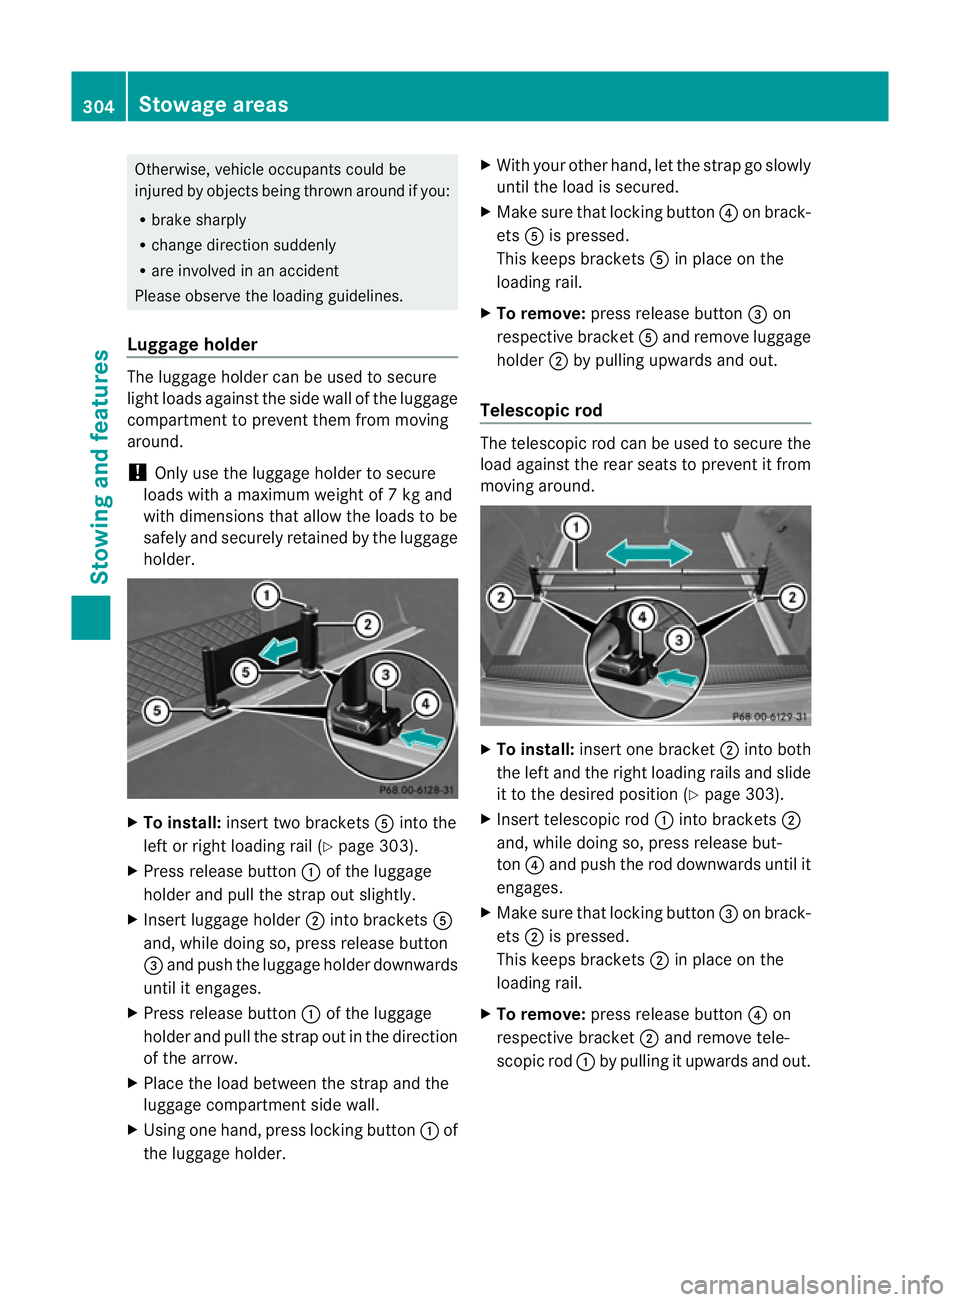
To install: insert two brackets Ainto the
left or right loading rail (Y page 303).
X Press release button :of the luggage
holder and pull the strap out slightly.
X Insert luggage holder ;into brackets A
and, while doing so, press release button
= and push the luggage holder downwards
until it engages.
X Press release button :of the luggage
holder and pull the strap out in the direction
of the arrow.
X Place the load between the strap and the
luggage compartment side wall.
X Using one hand, press locking button :of
the luggage holder. X
With your other hand, let the strap go slowly
until the load is secured.
X Make sure that locking button ?on brack-
ets Ais pressed.
This keeps brackets Ain place on the
loading rail.
X To remove: press release button =on
respective bracket Aand remove luggage
holder ;by pulling upwards and out.
Telescopic rod The telescopic rod can be used to secure the
load against the rear seats to prevent it from
moving around.
X
To install: insert one bracket ;into both
the left and the right loading rails and slide
it to the desired position (Y page 303).
X Insert telescopic rod :into brackets ;
and, while doing so, press release but-
ton ?and push the rod downwards until it
engages.
X Make sure that locking button =on brack-
ets ;is pressed.
This keeps brackets ;in place on the
loading rail.
X To remove: press release button ?on
respective bracket ;and remove tele-
scopic rod :by pulling it upwards and out. 304
Stowage areasStowing and features
Page 347 of 409
X
To reduce the tyre pressure: press pres-
sure release button Enext to pressure
gauge F.
X Stow the tyre sealant bottle, the tyre infla-
tio nc ompressor and the warning triangle.
X Drive to the nearest specialist qualified
workshop and have the tyre changed there.
X Have the tyre sealant bottle replaced as
soon as possible at a qualified specialist
workshop. H
Environmental note
Have the used tyre sealant bottle disposed of
professionally, e.g. at aqualified specialist
workshop.
X Have the tyre sealan tbottle replaced every
four years at a qualified specialist work-
shop. Changing
awheel and fitting the spare
wheel
Preparing the vehicle When using an emergency spare wheel or
spare wheel of a different size, you must not
exceed the maximum speed of 80 km/h.
G
WARNING
The wheel/tyre dimensions and the tyre type
of the spare wheel/emergency spare wheel
and the wheel to be replaced may differ. Fit-
ting a spare wheel/emergency spare wheel
may severely impair the driving characteris-
tics. There is a risk of accident.
To prevent hazardous situations:
R Adap tyour driving style accordingly and
drive carefully.
R Never fit more than one spare wheel/emer-
gency spare wheel if the dimesions are dif-
ferent to those of the wheel being replaced.
R Only use a spare wheel/emergency spare
wheel briefly if the dimesions are different
to those of the wheel being replaced. R
Do not switch off ESP ®
.
R Have the spare wheel/emergency spare
wheel in question replaced at the nearest
qualified specialist workshop. Make sure
that the wheel/tyre dimensions and tyre
type are correct.
i Vehicles without an emergency spare
wheel/spare wheel are not equipped with
wheel-changing tools at the factory. For
more information on which tools are
required to perform a wheel change on your
vehicle, e.g. wheel chock, wheel wrench or
centring pin, consult a Mercedes-Benz
Service Centre.
X Prepare the vehicle as described
(Y page 340).
X If a trailer is coupled to the vehicle, uncou-
ple it.
X Remove the following items (depending on
the vehicle's equipment) from the stowage
well under the boot/luggage compartment
floor:
R
the emergency spare wheel
R the wheel wrench
R the folding wheel chock
R the jack
R the centring pin
R the tyre inflation compressor
X Secure the vehicle to prevent it from rolling
away.
Securing the vehicle to prevent it from
rolling away If your vehicle is equipped with a wheel chock,
it can be found in the vehicle tool kit
(Y
page 337).
The folding wheel chock is an additional
securing measure to prevent the vehicle from
rolling away, for example when changing a
wheel. 344
Flat tyreBreakdown assistance
Page 365 of 409
Useful information
i This Owner's Manual describes all models
and all standard and optional equipment
available to your vehicle at the time of pub-
lication of the Owner's Manual. Country-
specific deviations are possible. Please
note that your vehicle may not be equipped
with all features described. This also
applies to safety-relevan tsystems and
functions.
i Please read the information on qualified
specialist workshops (Y page 25).Important safety notes
G
WARNING
If wheels and tyres of the wrong size are used,
the wheel brakes or suspensio ncomponents
may be damaged. There is arisk of accident.
Always replace wheels and tyres with those
that fulfil the specifications of the original part
(designation, manufacturer, model). G
WARNING
Af lat tyre severely impairs the driving, steer-
ing and braking characteristics of the vehicle.
There is a risk of accident.
Tyres without run-flat characteristics:
R do not drive with aflat tyre.
R immediately replace the flat tyre with your
emergency spare wheel or spare wheel, or
consult a qualified specialist workshop.
Tyres with run-flat characteristics:
R pay attention to the information and warn-
ing notices on MOExtended tyres (tyres
with run-flat characteristics).
Accessories that are not approved for your
vehicle by Mercedes-Ben zorare not being
used correctly can impair the operating
safety. Before purchasing and using non-approved
accessories, visit a qualified specialist work-
shop and enquire about:
R suitability
R legal stipulations
R factory recommendations
Information on the dimensions and types of
wheels and tyres for yourv ehicle can be
found in the "Wheel/tyre combinations" sec-
tion (Y page 371).
Information on air pressure for the tyres on
your vehicle can be found:
R on the tyre pressure label on the fuel filler
flap
R in the "Tyre pressure" section
Modification work on the brake system and
wheels is not permitted, nor is the use of
spacer plates or brake dust shields. This inva-
lidates the general operating permit for the
vehicle.
Pay special attention to the country-specific
requirements for tyre approval. These
requirements can stipulate aspecific tyre
type for your vehicle. Furthermore, the use of
certain tyre types in certain regions and areas
of operation can be highly beneficial. You can
find further information regarding tyres at
specialist tyre retailers, at qualified specialist
workshops or at every Mercedes-Benz
Service Centre.
i Further information on wheels and tyres
can be obtained at any qualified specialist
workshop. Operation
Notes on driving
R While driving, pay attention to vibrations,
noises and unusual handling characteris-
tics, e.g. pulling to one side. This may indi-
cate that the wheels or tyres are damaged.
If you suspect that a tyre is defective,
reduce your speed immediately. Stop the
vehicle as soon as possible to chec kthe 362
OperationWheels and tyres
Page 368 of 409
When you have fitted M+S tyres:
X
Check the tyre pressures (Y page 365).
X Restart the tyre pressure loss warning sys-
tem (Y page 367).
X Restart the tyre pressure monitor
(Y page 369).
After fitting a spare wheel or an emergency
spare wheel, do not drive faster than
80 km/h. G
WARNING
The wheel/tyre dimensions and the tyre type
of the spare wheel/emergency spare wheel
and the wheel to be replaced may differ. Fit-
ting a spare wheel/emergency spare wheel
may severely impair the driving characteris-
tics. There is a risk of accident.
To preven thazardous situations:
R Adap tyour driving style accordingly and
drive carefully.
R Never fit more than one spare wheel/emer-
gency spare wheel if the dimesions are dif-
ferent to those of the wheel being replaced.
R Only use a spare wheel/emergency spare
wheel briefly if the dimesions are different
to those of the wheel being replaced.
R Do not switch off ESP ®
.
R Have the spare wheel/emergency spare
wheel in question replaced at the nearest
qualified specialist workshop. Make sure
that the wheel/tyre dimensions and tyre
type are correct. Snow chains
For safety reasons, Mercedes-Benz recom-
mends that you only use snow chains that
have been specially approved for your vehicle
by Mercedes-Benz, or that are of a corre-
sponding standard of quality. If you intend to fit snow chains, please bear
the following points in mind:
R
snow chains cannot be fitted to all wheel-
tyre combinations. Permissible wheel-tyre
combinations (Y page 371).
R snow chains must not be fitted to the emer-
gency spare wheel, e.g. a “Minispare” or
collapsible emergency spare wheel.
R only fit snow chains in pairs and to the rear
wheels, even on vehicles with 4MATIC.
Observe the manufacturer' sinstallation
instructions.
! Vehicles with steel wheels: if you wish
to fit snow chains to steel wheels, make
sure tha tyou remove the respective
wheels' hubcaps first. The hubcaps may
otherwise be damaged.
On vehicles with AIRMATIC, you must drive at
raised vehicle level if snow chains have been
fitted (Y page 197).
Do not exceed the maximum permissible
speed of 50 km/h.
i You may wish to deactivate
ESP ®
(Y page 72) when pulling away with
snow chains fitted. This way you can allow
the wheels to spin in a controlled manner,
achieving an increased driving force (cut-
ting action). Tyre pressure
Tyre pressure specifications
G
WARNING
Tyres with too low or too high tyre pressure
contain the following hazards:
R they can burst, in particular if the vehicle is
heavily laden or when driven at high
speeds.
R the tyres can wear excessively and/or
unevenly, which can severely impair tyre
traction.
R the driving, steering and braking character-
istics may be severely impaired. Tyre pressure
365Wheels and tyres
Z
Page 373 of 409
Also observe the notes in the sectio
non
tyre pressures (Y page 365).
X Make sure tha tthe key is in position 2in
the ignition lock.
X Press the =or; button on the steer-
ing wheel to select the Serv. menu.
X Press the 9or: button to select
Tyre pressure .
X Press the abutton.
The multifunction display shows the cur-
rent tyre pressure of the individual tyres or
the Tyre pressures displayed after
a few minutes of driving message.
X Press the :button.
The Use current pressures as new reference values message appears in
the multifunction display.
If you wish to confirm the restart:
X Press the abutton.
The Tyre press. monitor restarted message appears in the multifunction dis-
play.
After you have driven for a few minutes, the
system checks whether the current tyre
pressures are within the specified range.
The new tyre pressures are then accepted
as reference values and monitored.
If you wish to cancel the restart:
X Press the %button.
The tyre pressure values stored at the last
restart will continue to be monitored.
Radio type approval for the tyre pres-
sure monitor In certain countries, a radio type approval for
the tyre pressure monitor may be required.
The radio type approval number for the tyre
pressure monitor can be found online at:
http://www.mercedes-benz.de/
betriebsanleitung. Changing
awheel Flat tyre
The "Breakdown assistance" section
(Y page 340) contains information and notes
on how to deal with a fla ttyre. It also provides
instructions on changing a wheel or fitting the
spare wheel/emergency spare wheel. Interchanging the wheels
G
WARNING
Interchanging the front and rear wheels may
severely impair the drivin gcharacteristics if
the wheels or tyres have different dimensions.
The wheel brakes or suspension components
may also be damaged. There is a risk of acci-
dent.
Interchange front and rear wheels only if the
wheels and tyres are of the same dimensions.
Interchanging the front and rear wheels of
differing dimensions can render the general
operating permit invalid.
Always pay attention to the instructions and
safety notices in the section on "Wheel
changing and spare wheel fitting"
(Y page 344).
The wear patterns on the front and rear tyres
differ, depending on the operating conditions.
Interchange the wheels before a clear wear
pattern has formed on the tyres. Front tyres
typically wear more on the shoulders and the
rear tyres in the centre.
On vehicles that have the same size front and
rear wheels, you can interchange the wheels
every 5,000km to 10,000 km depending on
the degree of tyre wear. Maintain the direc-
tion of tyre rotation.
Cleant he contact surfaces of the wheel and
the brake disc thoroughly every time a wheel
is interchanged. Check the tyre pressure and,
if necessary, restart the tyre pressure loss
warning system or the tyre pressure monitor. 370
Changing
awheelWheels and tyres
Page 382 of 409
Useful information
............................380
Notes on the technical data .............380
Genuine Mercedes-Benz parts .........380
Vehicle electronics ...........................381
Vehicle identification plates ............382
Service products and capacities .....383
Vehicle data ...................................... 392
Boot lid and tailgate opening
dimensions ........................................ 394
Trailer tow hitch ................................ 395
24 GHz radar sensor system (coun-
tryo verview) ..................................... 398 379Technical data
Page 397 of 409
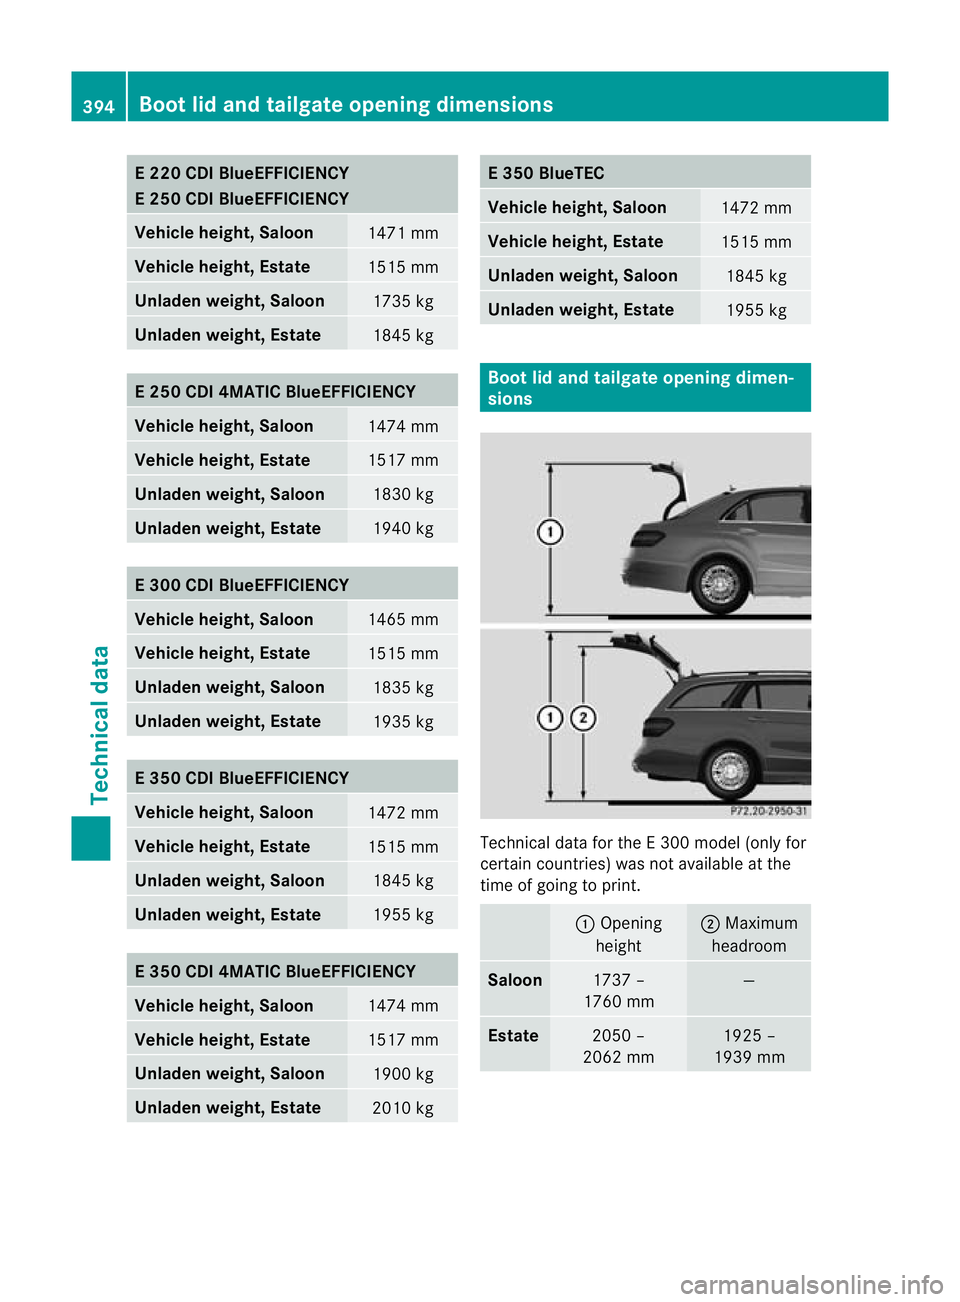
E 220 CDI BlueEFFICIENCY
E 250 CDI BlueEFFICIENCY
Vehicle height, Saloon
1471 mm
Vehicle height, Estate
1515 mm
Unladen weight
,Saloon 1735 kg
Unladen weight, Estate
1845 kg
E 250 CDI 4MATIC BlueEFFICIENCY
Vehicle height, Saloon
1474 mm
Vehicle height, Estate
1517 mm
Unladen weight, Saloon
1830 kg
Unladen weight, Estate
1940 kg
E 300 CDI BlueEFFICIENCY
Vehicle height, Saloon
1465 mm
Vehicle height, Estate
1515 mm
Unladen weight, Saloon
1835 kg
Unladen weight, Estate
1935 kg
E 350 CDI BlueEFFICIENCY
Vehicle height, Saloon
1472 mm
Vehicle height, Estate
1515 mm
Unladen weight, Saloon
1845 kg
Unladen weight, Estate
1955 kg
E 350 CDI 4MATIC BlueEFFICIENCY
Vehicle height, Saloon
1474 mm
Vehicle height, Estate
1517 mm
Unladen weight, Saloon
1900 kg
Unladen weight, Estate
2010 kg E 350 BlueTEC
Vehicle height, Saloon
1472 mm
Vehicle height, Estate
1515 mm
Unladen weight, Saloon
1845 kg
Unladen weight, Estate
1955 kg
Boot lid and tailgate opening dimen-
sions
Technical data for the E 300 model (only for
certai
ncountries) was not available at the
time of going to print. :
Opening
height ;
Maximum
headroom Saloon
1737 –
1760 mm —
Estate
2050 –
2062 mm 1925 –
1939 mm 394
Boot lid and tailgate opening dimensionsTechnical data
Page 398 of 409
Trailer tow hitch
Mounting dimensions
G
WARNING
Only have a trailer tow hitch retrofitted at a
qualified specialis tworkshop which has the
necessary specialist knowledge and tools to
carry out the work required. Mercedes-Benz
recommends that you use aMercedes-Benz
Service Centre for this purpose. In particular,
work relevant to safety or on safety-related
systems must be carried out at a qualified
specialist workshop.
! If you have a trailer tow hitch retrofitted,
changes to the cooling system may be nec-
essary, depending on the vehicle type.
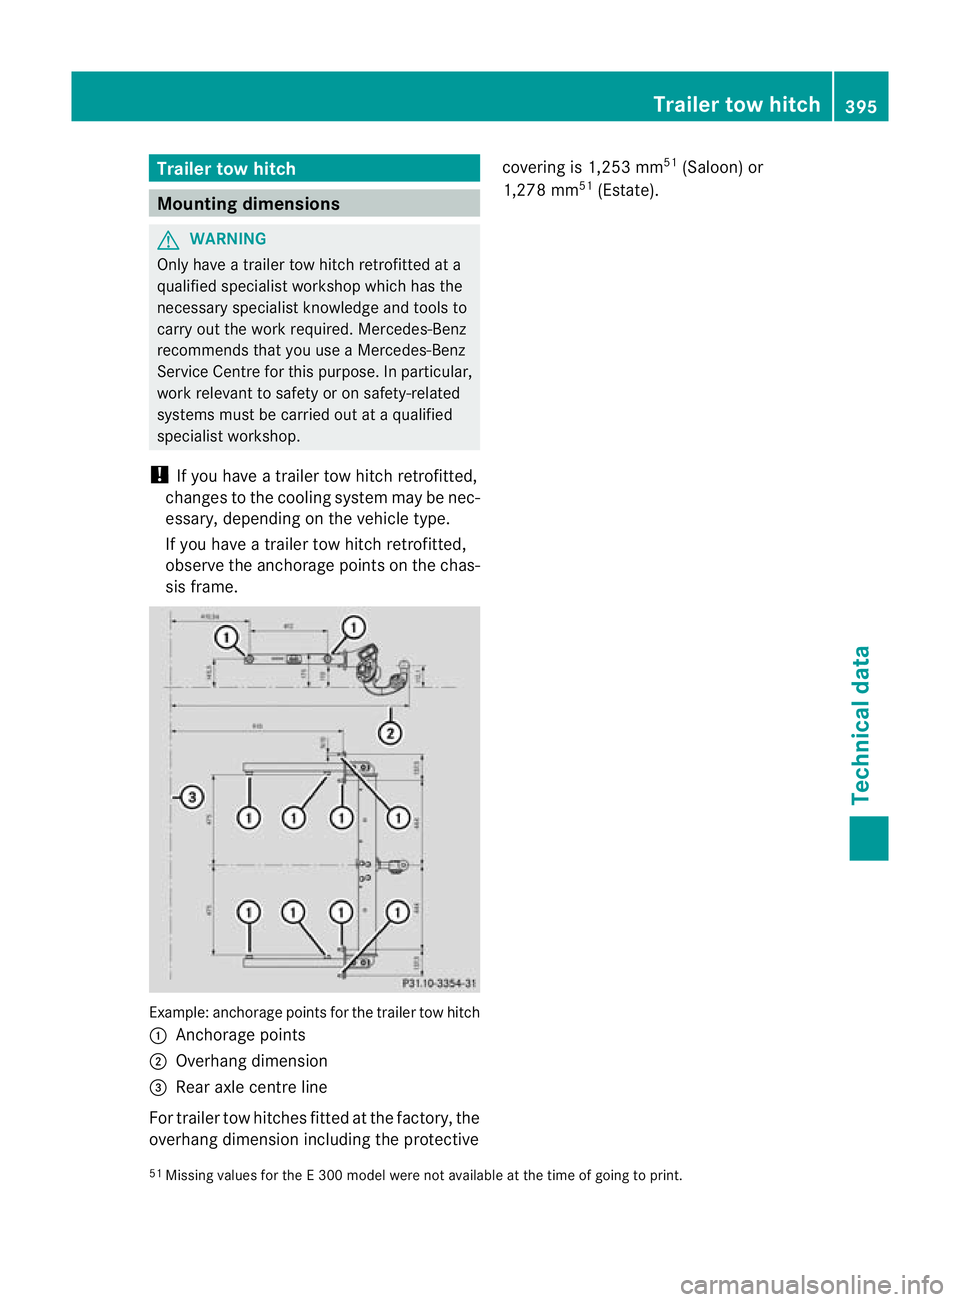
If you have a trailer tow hitch retrofitted,
observe the anchorage point sonthe chas-
sis frame. Example: anchorage points for the trailer tow hitch
: Anchorage points
; Overhang dimension
= Rear axle centre line
For trailer tow hitches fitted at the factory, the
overhang dimension including the protective covering is 1,253 mm
51
(Saloon) or
1,278 mm 51
(Estate).
51 Missing values for the E300 model were not available at the time of going to print. Trailer tow hitch
395Technical data Z