2011 MERCEDES-BENZ E-CLASS ESTATE buttons
[x] Cancel search: buttonsPage 142 of 409
N
Reduces the airflow ( Ypage 142)
O Reduces the temperature ( Ypage 141) Notes on using THERMOTRONIC auto-
matic climate control
The following contains instructions and rec-
ommendations to enable you to get the most
out of your THERMOTRONIC automati ccli-
mate control.
R Activate climate control using the Ãand
¿ buttons .The indicator lamps above
the à and¿ buttons light up. You
can also set the airflow and air distribution
of the automatic climate control to one of
three levels (FOCUS/MEDIUM/DIFFUSE).
You can set the desired level using button
G.T he MEDIUM level is recommended.
R Set the temperature to 22 †.
R Only use the demisting function briefly,
until the windscreen is clear again.
R Only use the air-recirculation mode briefly,
e.g. if there are unpleasant outside odours
or when in a tunnel. The windows could
otherwise mist up as no fresh air is drawn
into the vehicle in air-recirculation mode.
R Use the ZONE function to adopt the tem-
perature settings on the driver's side for
the front-passenger side and the rear com-
partment as well. The indicator lamp above
the á button goes out.
R Use the residual heat function if you want
to heat or ventilate the vehicle interior
when the ignition is switched off. The resid-
ual heat function can only be activated or
deactivated with the ignition switched off. Operating the climate control system
Switching climate control on/off
Important information i
When climate control is switched off, the
air supply and air circulation are also
switched off. Only select this setting briefly. Otherwise, the windows may mist
up.
i Switch on climate control primarily using
the à button (Y page 140).
Activating/deactivating X
Turn the key to position 2in the ignition
lock.
X To switch on: press theÃbutton.
The indicator lamp above the Ãbutton
lights up. Airflow and air distribution are set
to automatic mode.
or
X Press button ^.
The indicator lamp above the ^button
goes out. The previously selected settings
come into effect again.
X To switch off: press the^button.
The indicator lamp above the ^button
lights up. Activating/deactivating the cooling
with air dehumidification function
Important information The cooling with air dehumidification function
is only available when the engine is running.
The air inside the vehicle is cooled and dehu-
midified according to the temperature selec-
ted.
G
WARNING
If the "cooling with air dehumidification" func-
tion is deactivated, the air inside the vehicle
will not be cooled (during warm weather) or
dehumidified. The windows could mist up
more quickly. This may prevent you from
observing the traffic conditions, thereby caus-
ing an accident. Operating the climate control system
139Climate control Z
Page 145 of 409
THERMATIC automatic climate control
X
Turn the key to position 2in the ignition
lock.
X Press switch Fup or down repeatedly until
the desired symbol appears in the display
(Y page 137).
THERMOTRONIC automatic climate
control X
Turn the key to position 2in the ignition
lock.
X Press switch Iup or down repeatedly until
the desired symbol appears in the display
(Y page 138). Setting the airflow
THERMATIC automatic climate control X
Turn the key to position 2in the ignition
lock.
X To increase/reduce: press buttonGup
or down (Y page 137).
THERMOTRONIC automatic climate
control X
Turn the key to position 2in the ignition
lock.
X To increase/reduce front-compart-
men tairflow: press button Hup or down
(Y page 138).
X To increase/reduce the rear airflow:
press button MorN(Y page 138). Switching the ZONE function on/off
X To switch on: press theábutton.
The indicator lamp above the ábutton
lights up. THERMATIC automatic climate control: the
temperature setting for the driver's side is
not adopted for the front-passenger side.
THERMOTRONIC automatic climate con-
trol: the temperature setting for the driver's
side is not adopted for the front-passenger
side and the rear compartment.
When the buttons for temperature, airflow or
air distribution are activated, the temperature
setting for the driver's side is not adopted for
the other climate control zones.
X To switch off: press theábutton.
The indicator lamp above the ábutton
goes out.
THERMATIC automatic climate control: the
temperature setting for the driver's side is
adopted for the front-passenger side.
THERMOTRONIC automatic climate con-
trol: the temperature setting for the driver's
side is adopted for the front-passenger side
and the rear compartment. Demisting the windscreen
You can use this function to defrost the wind-
screen or to demist the inside of the wind-
screen and the side windows.
i You should only select the demisting
function until the windscreen is clear again.
X Turn the key to position 2in the ignition
lock.
X To activate: press the¬button.
The indicator lamp above the ¬button
lights up.
The climate control syste mswitches to the
following functions:
R cooling with air dehumidificatio non
R high airflow 19
R high temperature 19
R air distribution to the windscreen and
front side windows
R air-recirculation mode off
19 Depending on the outside temperature. 142
Operating the climate control systemClimate control
Page 150 of 409
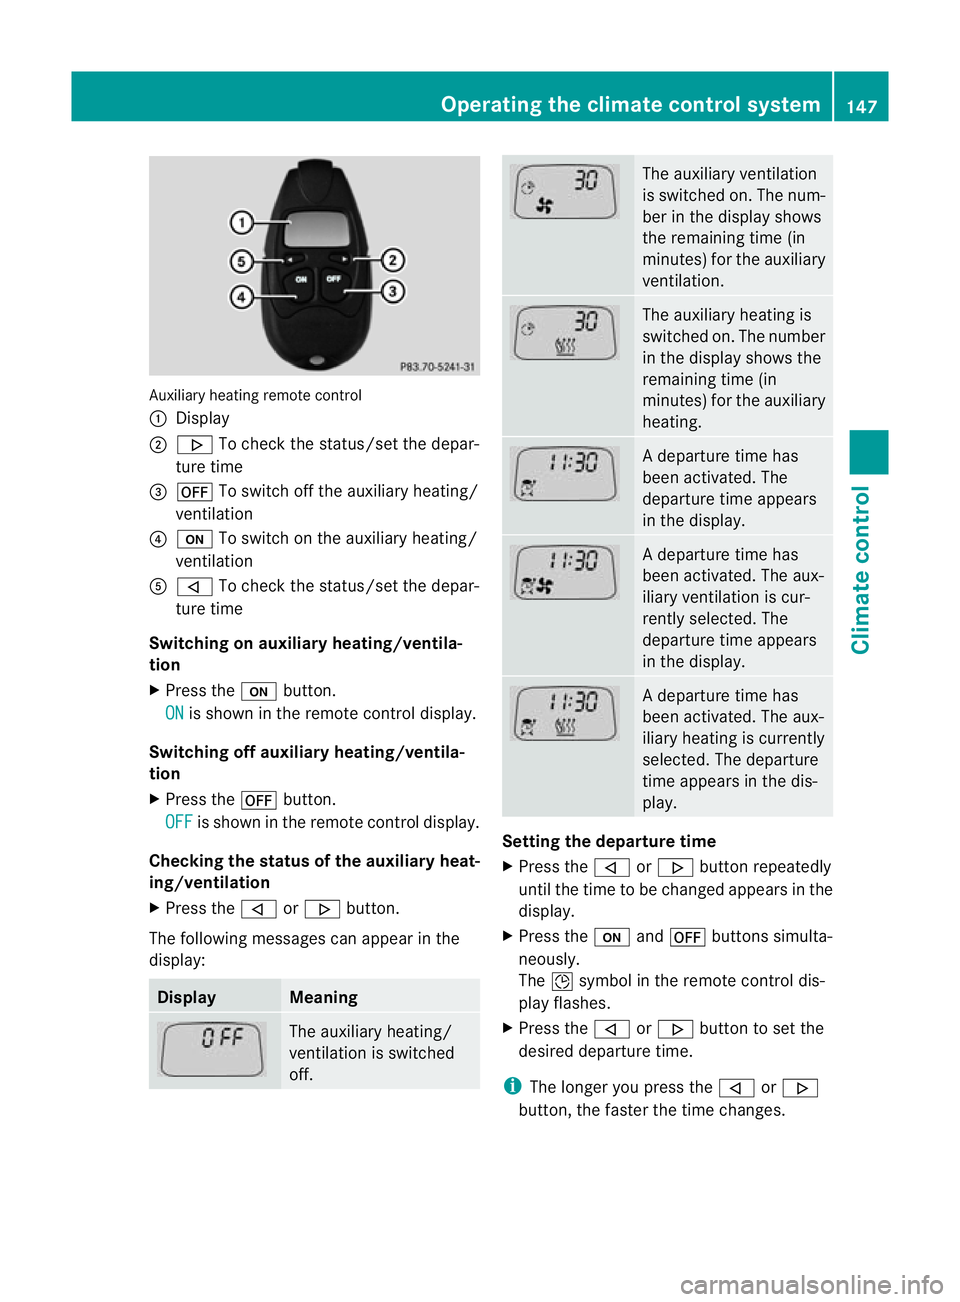
Auxiliary heating remote control
:
Display
; . To chec kthe status/set the depar-
ture time
= ^ To switch off the auxiliary heating/
ventilation
? u To switch on the auxiliary heating/
ventilation
A , To check the status/set the depar-
ture time
Switching on auxiliary heating/ventila-
tion
X Press the ubutton.
ON is shown in the remote control display.
Switching off auxiliary heating/ventila-
tion
X Press the ^button.
OFF is shown in the remote control display.
Checking the status of the auxiliary heat-
ing/ventilation
X Press the ,or. button.
The following messages can appearint he
display: Display Meaning
The auxiliary heating/
ventilation is switched
off. The auxiliary ventilation
is switched on. The num-
ber in the display shows
the remaining time (in
minutes) for the auxiliary
ventilation.
The auxiliary heating is
switched on. The number
in the display shows the
remaining time (in
minutes) for the auxiliary
heating.
Ad
eparture time has
been activated. The
departure time appears
in the display. Ad
eparture time has
been activated. The aux-
iliary ventilation is cur-
rently selected. The
departure time appears
in the display. Ad
eparture time has
been activated. The aux-
iliary heating is currently
selected. The departure
time appears in the dis-
play. Setting the departure time
X
Press the ,or. button repeatedly
until the time to be changed appears in the
display.
X Press the uand^ buttons simulta-
neously.
The Îsymbol in the remote control dis-
play flashes.
X Press the ,or. button to set the
desired departure time.
i The longer you press the ,or.
button, the faster the time changes. Operating the climate control system
147Climate control Z
Page 151 of 409
X
Press the uand^ buttons simulta-
neously.
The new departure time is stored.
Activating the set departure time
X Press the ,or. button repeatedly
until the desired departure time appears in
the display.
X Press the ubutton.
The Ísymbol and the departure time
appear in the display.
Deactivating a set departure time
X Press the ,or. button.
The status of the auxiliary heating is shown
in the display.
X Press the .button.
The first departure time stored appears in
the display.
X Press the ^button.
The display message OFF appears in the
display.
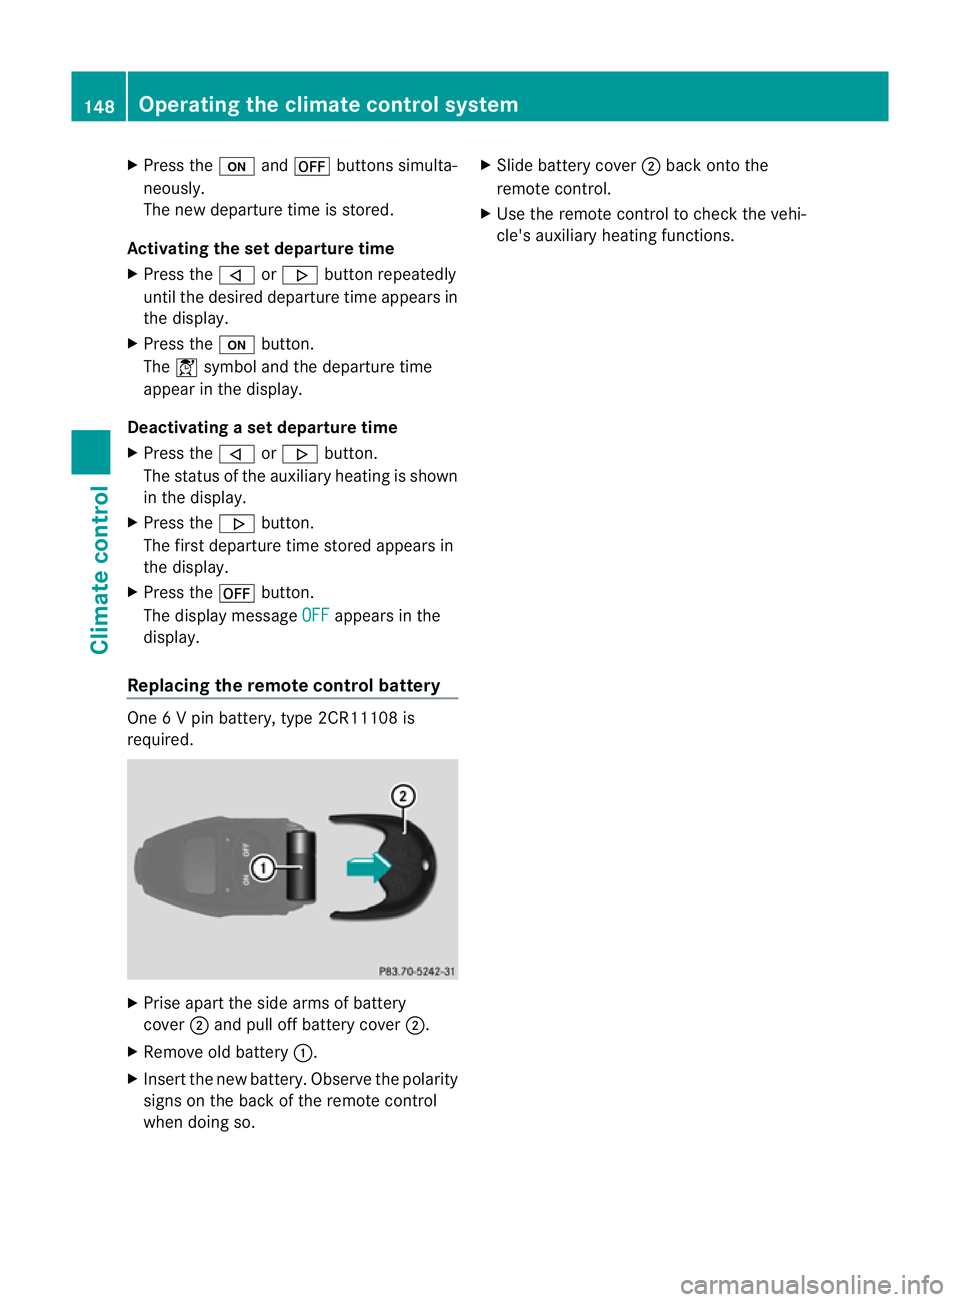
Replacing the remote control battery One 6 V pin battery, type 2CR11108 is
required.
X
Prise apart the side arms of battery
cover ;and pull off battery cover ;.
X Remove old battery :.
X Inser tthe new battery. Observe the polarity
signs on the back of the remote control
when doing so. X
Slide battery cover ;back onto the
remote control.
X Use the remote control to check the vehi-
cle's auxiliary heating functions. 148
Operating the climate control systemClimate control
Page 234 of 409
or on bridges. If you do not adapt your driving
style to the conditions, the vehicle could skid.
For this reason, adapt your driving style and
speed to the weather conditions.
Changes in the outside temperature are dis-
played after a short delay. Speedometer with segments
The segments in the speedometer indicate
which speed range is available.
Cruise control (Y page 181) activated:
The segments light up from the stored speed
to the maximum speed.
Variable SPEEDTRONIC (Y page 183) activa-
ted:
The segments light up from the start of the
scale to the selected limit speed.
DISTRONIC PLUS (Y page 185) activated:
One or two segments in the set speed range
light up.
DISTRONIC PLUS detects a vehicle in front:
The segments between the speed of the vehi-
cle in front and the stored speed light up. Operating the on-board computer
Overview The on-board computer is activated as soon
as you turn the key to position 1in the ignition
lock.
You can control the multifunction display and
the settings in the on-board computer using
the buttons on the multifunction steering
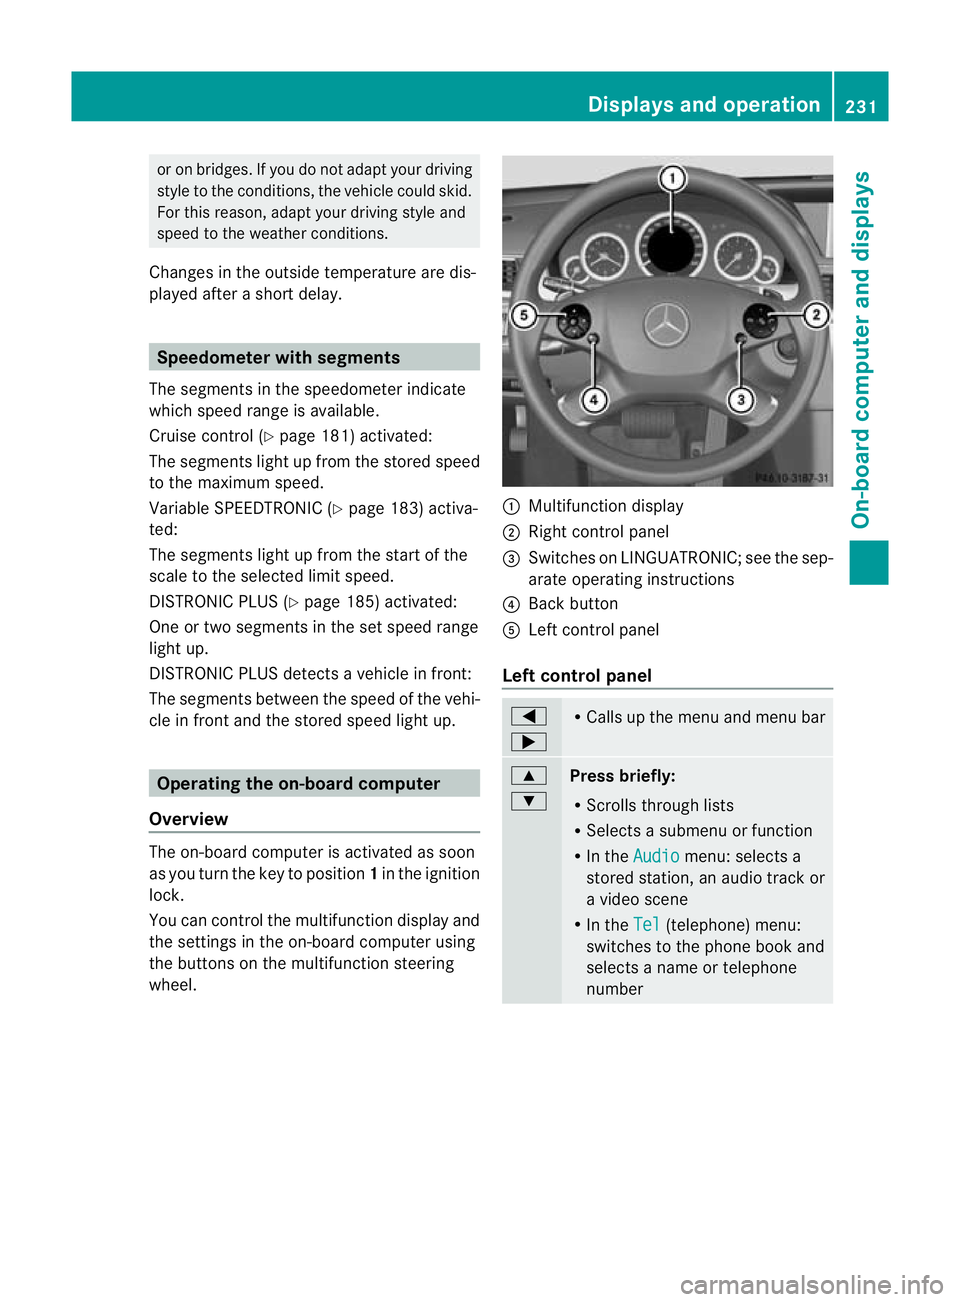
wheel. :
Multifunction display
; Right control panel
= Switches on LINGUATRONIC; see the sep-
arate operating instructions
? Back button
A Left control panel
Left control panel =
; R
Calls up the menu and menu bar 9
:
Press briefly:
R
Scrolls through lists
R Selects a submenu or function
R In the Audio menu: selects a
stored station, an audio track or
a video scene
R In the Tel (telephone) menu:
switches to the phone book and
selects a name or telephone
number Displays and operation
231On-board computer and displays Z
Page 253 of 409
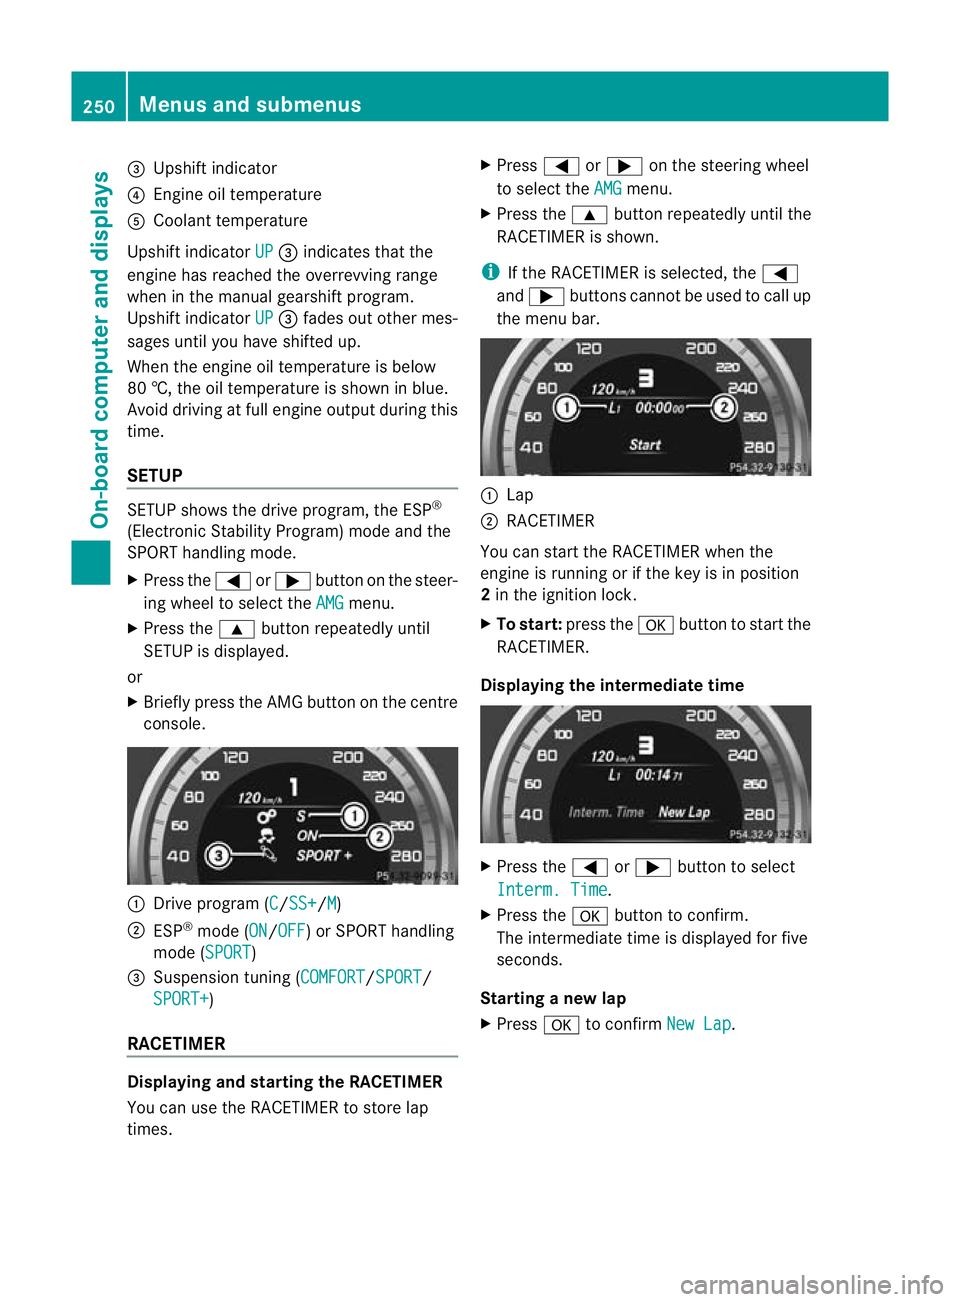
=
Upshift indicator
? Engine oil temperature
A Coolant temperature
Upshift indicator UP =
indicates that the
engine has reached the overrevving range
when in the manual gearshift program.
Upshift indicator UP =
fades out other mes-
sages until you have shifted up.
When the engine oil temperature is below
80 †, the oil temperature is shown in blue.
Avoid driving at full engine output during this
time.
SETUP SETUP shows the drive program, the ESP
®
(Electronic Stability Program) mode and the
SPORT handling mode.
X Press the =or; button on the steer-
ing wheel to select the AMG menu.
X Press the 9button repeatedly until
SETUP is displayed.
or
X Briefly press the AMG button on the centre
console. :
Drive program (C /SS+ /M )
; ESP ®
mode (ON /OFF ) or SPORT handling
mode (SPORT )
3 Suspension tuning (COMFORT /SPORT /
SPORT+ )
RACETIMER Displaying and starting the RACETIMER
You can use the RACETIMER to store lap
times. X
Press =or; on the steering wheel
to select the AMG menu.
X Press the 9button repeatedly until the
RACETIMER is shown.
i If the RACETIMER is selected, the =
and ; buttons cannot be used to call up
the menu bar. :
Lap
; RACETIMER
You can start the RACETIMER when the
engine is running or if the key is in position
2 in the ignition lock.
X To start: press the abutton to start the
RACETIMER.
Displaying the intermediate time X
Press the =or; button to select
Interm. Time .
X Press the abutton to confirm.
The intermediate time is displayed for five
seconds.
Starting a new lap
X Press ato confirm New Lap .250
Menus and submenusOn-board computer and displays
Page 316 of 409
Mercedes-Ben
zrecommends the use of an
approved exterior aerial. This ensures:
R optimal mobile phone reception quality in
the vehicle
R mutual influences between the vehicle
electronics and mobile phones are mini-
mised
An exterior aerial has the following advan-
tages:
R it conducts the electromagnetic fields gen-
erated by a wireless device to the exterior.
R the field strength in the vehicle interior is
lower than in a vehicle that does not have
an exterior aerial.
i There are various mobile phone brackets
that may be fitted in your vehicle; in some
cases, these are country-specific.
i You can connect a Bluetooth ®
-capable
mobile phone with Audio 20 or COMAND
APS via the Bluetooth ®
interface. This is
also the case if your vehicle is equipped
with convenience telephony.
More information on suitable mobile phones,
mobile phone brackets and on connecting
Bluetooth ®
-capable mobile phones with
Audio 20 or COMAND APS can be obtained:
R at your Mercedes-Benz Service Centre
R on the Internet at http://www.mercedes-
benz.com/connect
i The functions and services available when
you use the phone depend on your mobile
phone model and service provider.
Inserting the mobile phone X
Open the telephone compartment
(Y page 292).
X Vehicles with automatic transmission
without the DIRECT SELECT lever: con-
nectt he mobile phone bracket to the pre-
installed bracket (see the separate mobile
phone bracket fitting instructions).
Vehicles with automatic transmission
with the DIRECTS ELECT lever:install the sliding adapter depending on the model of
the mobile phone bracket (Y
page 314).
X Inser tthe mobile phone into the mobile
phone bracket (see the separate installa-
tion instructions for the mobile phone fit-
ting).
If the mobile phone is inserted in the mobile
phone bracket, you can speak to the person
you are calling using the hands-free system.
i On some mobile phone brackets, you first
have to connect the mobile phone via Blue-
tooth ®
to the mobile phone bracket (see
the separate operating instructions for the
mobile phone bracket).
If this is the case, the mobile phone does
not have to be inserted into the bracket for
you to be able to use the telephone func-
tions. However, the charging function and
aerial function are not available.
Operating the mobile phone You can operate the telephone using the
6
and~ buttons on the multifunction
steering wheel. You can operate other mobile
phone functions via the on-board computer
(Y page 239).
When you remove the key from the ignition
lock, the mobile phone stays switched on.
However, you can no longer use the hands-
free system.
If you have an active call and would like to
take the key out of the ignition lock, first
remove the mobile phone from the bracket.
Otherwise, the call is ended.
i When using a bracket connected to the
mobile phone via Bluetooth ®
:ify ou wish to
continue a call in private mode, you will
need to perform the necessary steps on the
mobile phone. Information can be found in
the separate mobile phone operating
instructions. Features
313Stowing and features Z
Page 317 of 409
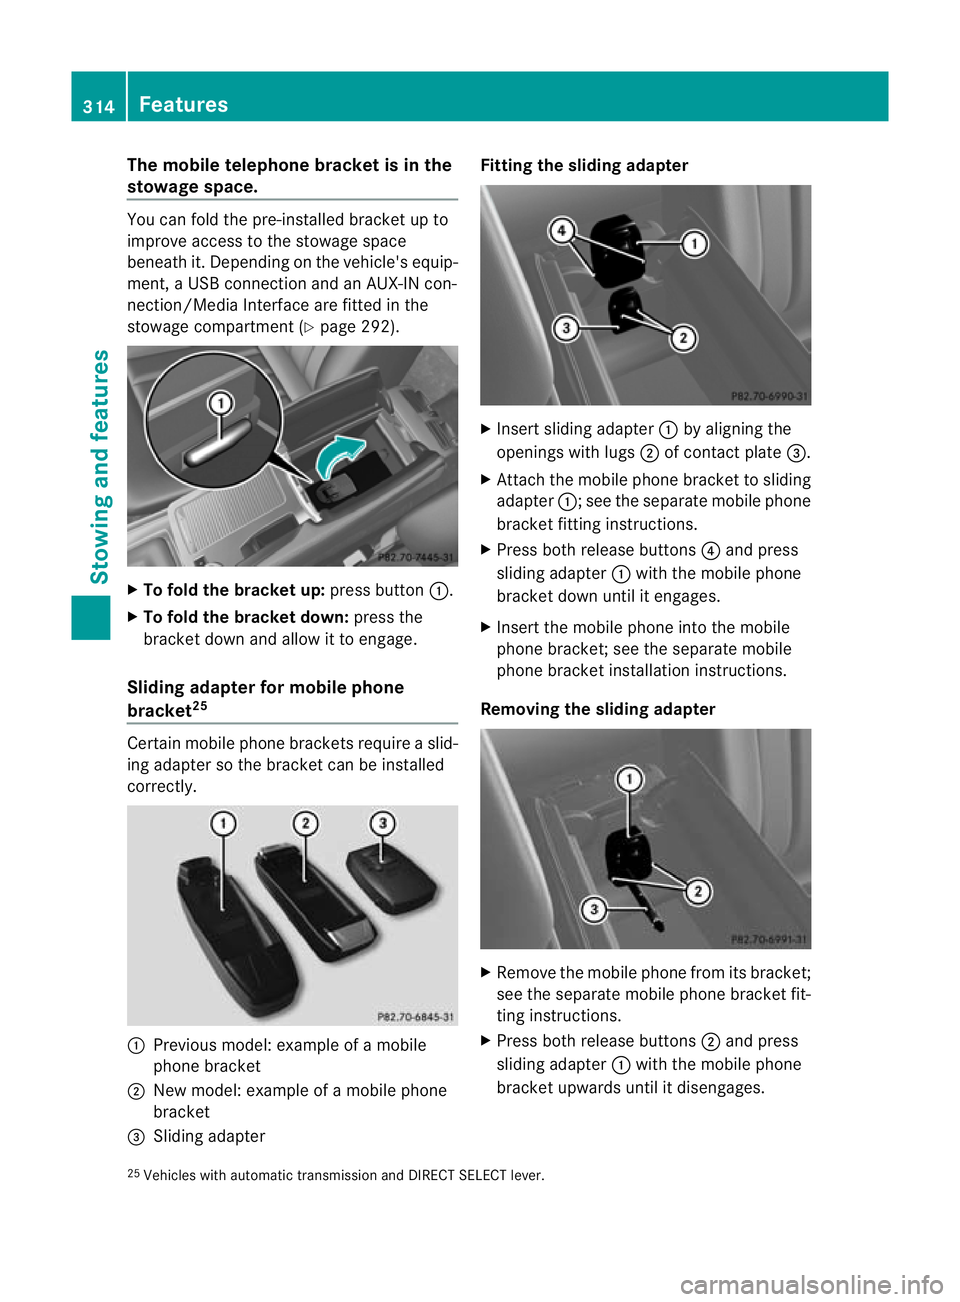
The mobile telephone bracke
tis in the
stowage space. You can fold the pre-installed bracket up to
improve access to the stowage space
beneath it. Depending on the vehicle's equip-
ment, a USB connection and an AUX-IN con-
nection/Media Interface are fitted in the
stowage compartment (Y
page 292).X
To fold the bracket up: press button:.
X To fold the bracket down: press the
bracket down and allow it to engage.
Sliding adapter for mobile phone
bracket 25 Certain mobile phone brackets require a slid-
ing adapter so the bracket can be installed
correctly.
:
Previous model: example of a mobile
phone bracket
; New model: example of a mobile phone
bracket
= Sliding adapter Fitting the sliding adapter
X
Inser tsliding adapter :by aligning the
openings with lugs ;of contact plate =.
X Attach the mobile phone bracket to sliding
adapter :; see the separate mobile phone
bracket fitting instructions.
X Press both release buttons ?and press
sliding adapter :with the mobile phone
bracket down until it engages.
X Insert the mobile phone into the mobile
phone bracket; see the separate mobile
phone bracket installation instructions.
Removing the sliding adapter X
Remove the mobile phone fro mits bracket;
see the separate mobile phone bracket fit-
ting instructions.
X Press both release buttons ;and press
sliding adapter :with the mobile phone
bracket upwards until it disengages.
25 Vehicles with automatic transmission and DIRECT SELECT lever. 314
FeaturesSto
wing an d features