2011 MERCEDES-BENZ E-CLASS ESTATE key
[x] Cancel search: keyPage 217 of 409
The yellow indicator lamp goes out if reverse
gear is engaged. Blind Spot Assist is then
deactivated.
The brightness of the indicator/warning
lamps is adjusted automatically according to
the ambient light.
G
WARNING
Blind Spot Assist is not active at speeds below
30 km/h. The indicator lamps in the exterior
mirrors are yellow. Vehicles in the monitoring
range are then not indicated.
Always pay attention to traffic conditions and
your surroundings. Otherwise, you may fail to
recognise dangers in time, cause an accident
and injure yourself and others.
Collision warning
If a vehicle is detected in the monitoring range
of Blind Spot Assist and you switch on the
corresponding turn signal, a double warning
tone sounds. Red warning lamp :flashes. If
the turn signal remains on, detected vehicles
are indicated by the flashing of red warning
lamp :.There are no further warning tones.
Switching on Blind Spot Assist
X Make sure that the radar sensor system
(Y page 247) and Blind Spot Assist
(Y page 242) are activated in the on-board
computer.
X Turn the key to position 2in the ignition
lock.
Warning lamps :light up red in the exte-
rior mirrors for approximately 1.5 seconds
and then turn yellow.
Trailer towing
If you attach a trailer, make sure that you have
correctly established the electrical connec-
tion. This can be accomplished by checking
the trailer lighting. Blind Spot Assist is then
deactivated. The indicator lamp in the exte-
rior mirrors lights up yellow, and the BlindSpot Assist currently unavailable
See Owner's Manual message appears in
the multifunction display. i
You can deactivate the indicator lamps in
the exterior mirrors.
To do so, switch off Blind Spot Assist if:
R the key is in position 2in the ignition
lock.
R the engine is not running.
R the electrical connection to the trailer
has been established.
Lane Keeping Assist Important safety notes
Lane Keeping Assist monitors the area in
front of your vehicle by means of a camera at
the top of the windscreen. Lane Keeping
Assist detects lane markings on the road and
warns you before you leave your lane unin-
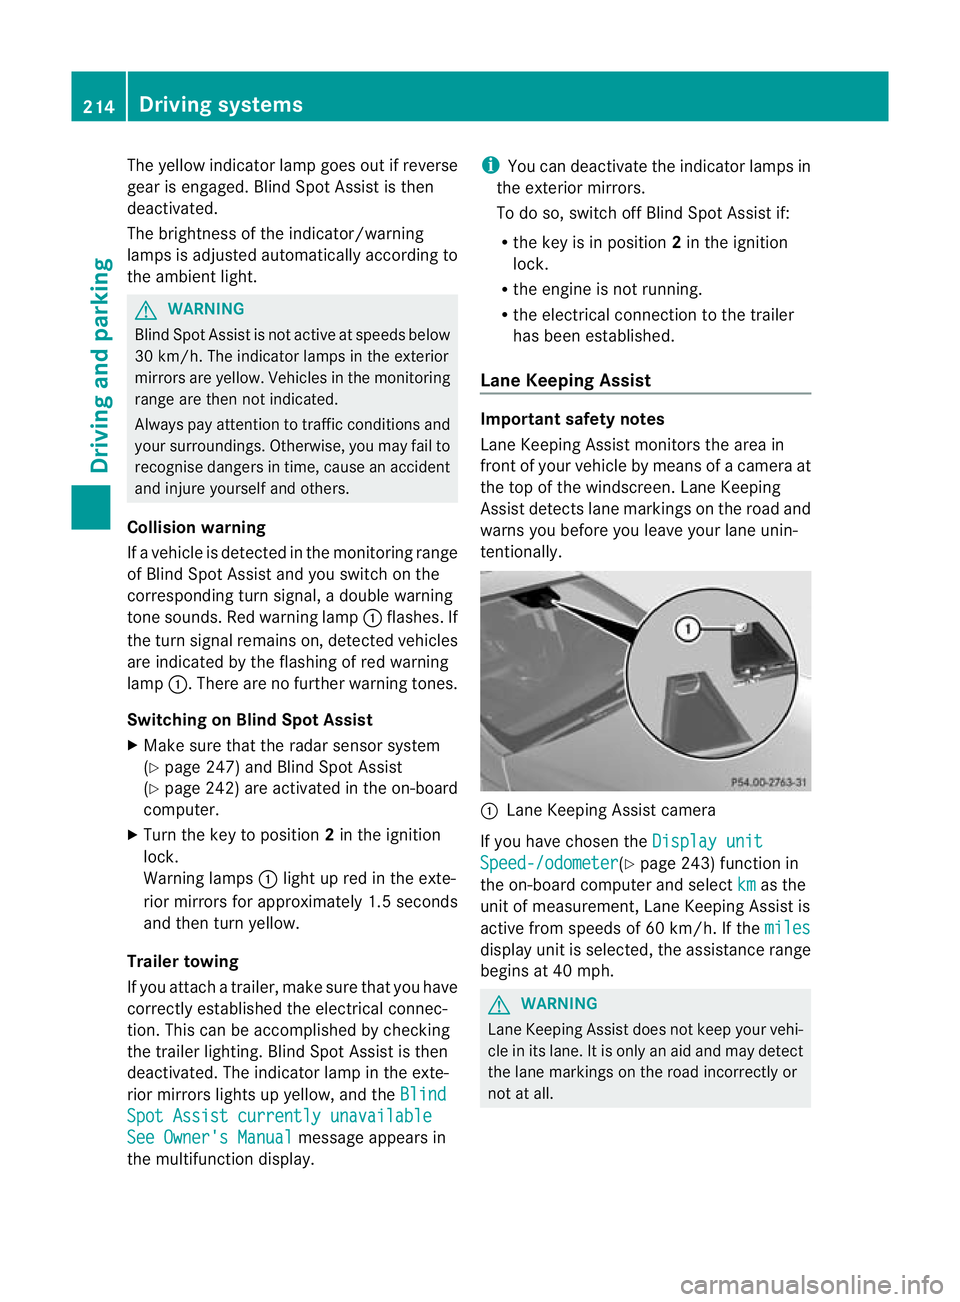
tentionally. :
Lane Keeping Assist camera
If you have chosen the Display unit Speed-/odometer (Y
page 243) function in
the on-board computer and select km as the
unit of measurement, Lane Keeping Assist is
active from speeds of 60 km/h. If the miles display unit is selected, the assistance range
begins at 40 mph.
G
WARNING
Lane Keeping Assist does not keep your vehi-
cle in its lane. It is only an aid and may detect
the lane markings on the road incorrectly or
not at all. 214
Driving systemsDriving and parking
Page 221 of 409
The course-correcting brake application is
available in the range between 30 km/ha nd
200 km/h.
If a course-correcting brake application
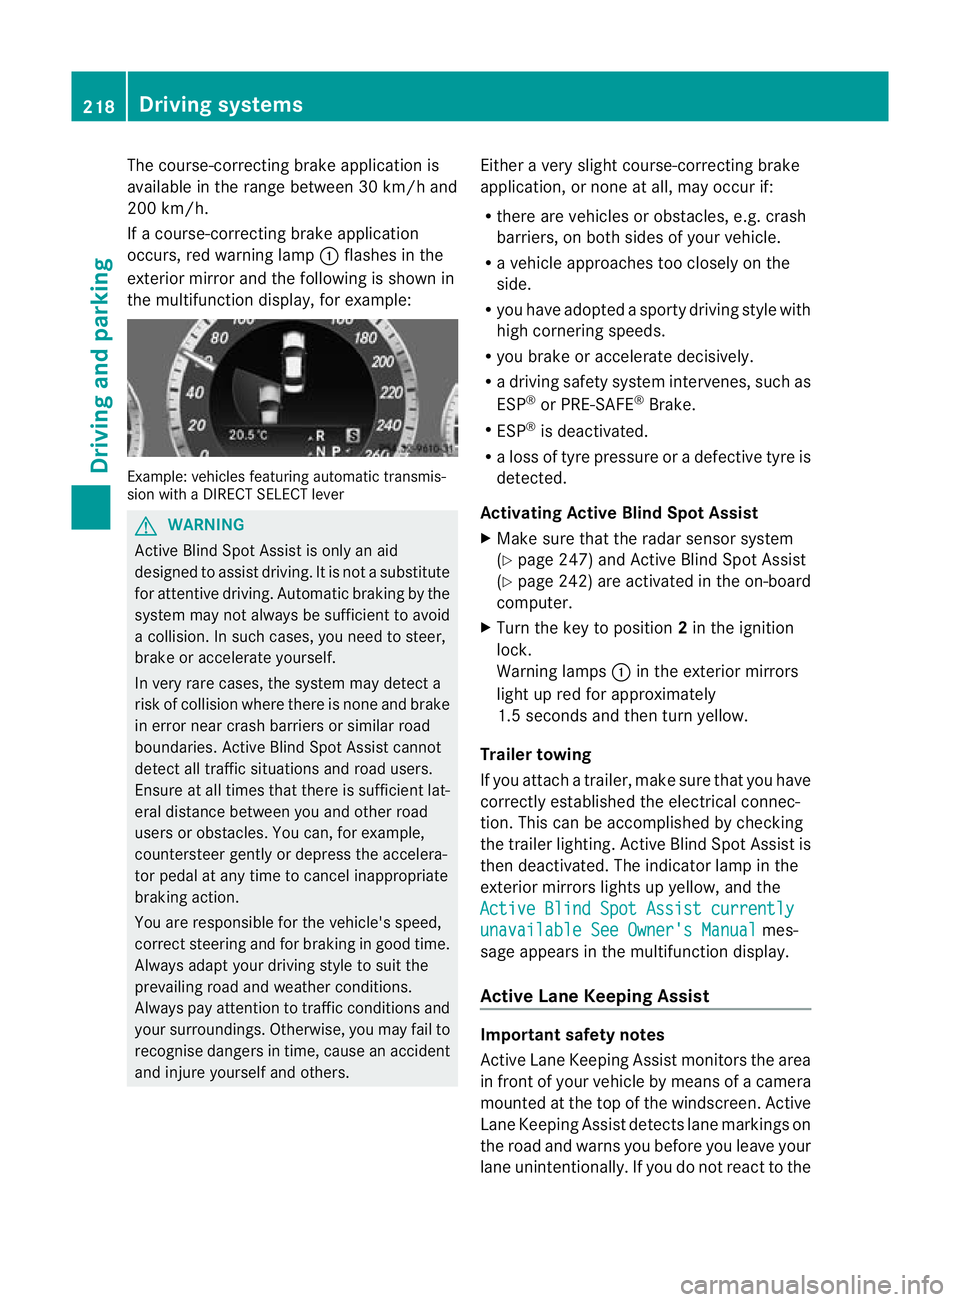
occurs, red warning lamp :flashes in the
exterio rmirro rand the following is shown in
the multifunctio ndisplay, for example: Example: vehicles featuring automatic transmis-
sion with a DIRECT SELECT lever G
WARNING
Active Blind Spot Assist is only an aid
designed to assist driving. It is not a substitute
for attentive driving. Automatic braking by the
system may not always be sufficien tto avoid
a collision. In such cases, you need to steer,
brake or accelerate yourself.
In very rare cases, the system may detect a
risk of collision where there is none and brake
in error near crash barriers or similar road
boundaries. Active Blind Spot Assist cannot
detect all traffic situations and road users.
Ensure at all times that there is sufficient lat-
eral distance between you and other road
users or obstacles. You can, for example,
countersteer gently or depress the accelera-
tor pedal at any time to cancel inappropriate
braking action.
You are responsible for the vehicle's speed,
correc tsteering and for braking in good time.
Always adap tyour driving style to suit the
prevailing road and weather conditions.
Always pay attention to traffic conditions and
your surroundings. Otherwise, you may fail to
recognise dangers in time, cause an accident
and injure yourself and others. Either a very slight course-correcting brake
application, or none at all, may occur if:
R
there are vehicles or obstacles, e.g. crash
barriers, on both sides of your vehicle.
R a vehicle approaches too closely on the
side.
R you have adopted a sporty driving style with
high cornering speeds.
R you brake or accelerate decisively.
R a driving safety system intervenes, such as
ESP ®
or PRE-SAFE ®
Brake.
R ESP ®
is deactivated.
R a loss of tyre pressure or a defective tyre is
detected.
Activating Active Blind Spot Assist
X Make sure that the radar sensor system
(Y page 247) and Active Blind Spot Assist
(Y page 242) are activated in the on-board
computer.
X Turn the key to position 2in the ignition
lock.
Warning lamps :in the exterior mirrors
light up red for approximately
1.5 seconds and then turn yellow.
Trailer towing
If you attach a trailer, make sure that you have
correctly established the electrical connec-
tion. This can be accomplished by checking
the trailer lighting. Active Blind Spot Assist is
then deactivated. The indicator lamp in the
exterior mirrors lights up yellow, and the
Active Blind Spot Assist currently unavailable See Owner's Manual mes-
sage appears in the multifunction display.
Active Lane Keeping Assist Important safety notes
Active Lane Keeping Assist monitors the area
in front of your vehicle by means of a camera
mounted at the top of the windscreen. Active
Lane Keeping Assist detect slane markings on
the road and warns you before you leave your
lane unintentionally. If you do no treact to the 218
Driving systemsDriving and parking
Page 229 of 409
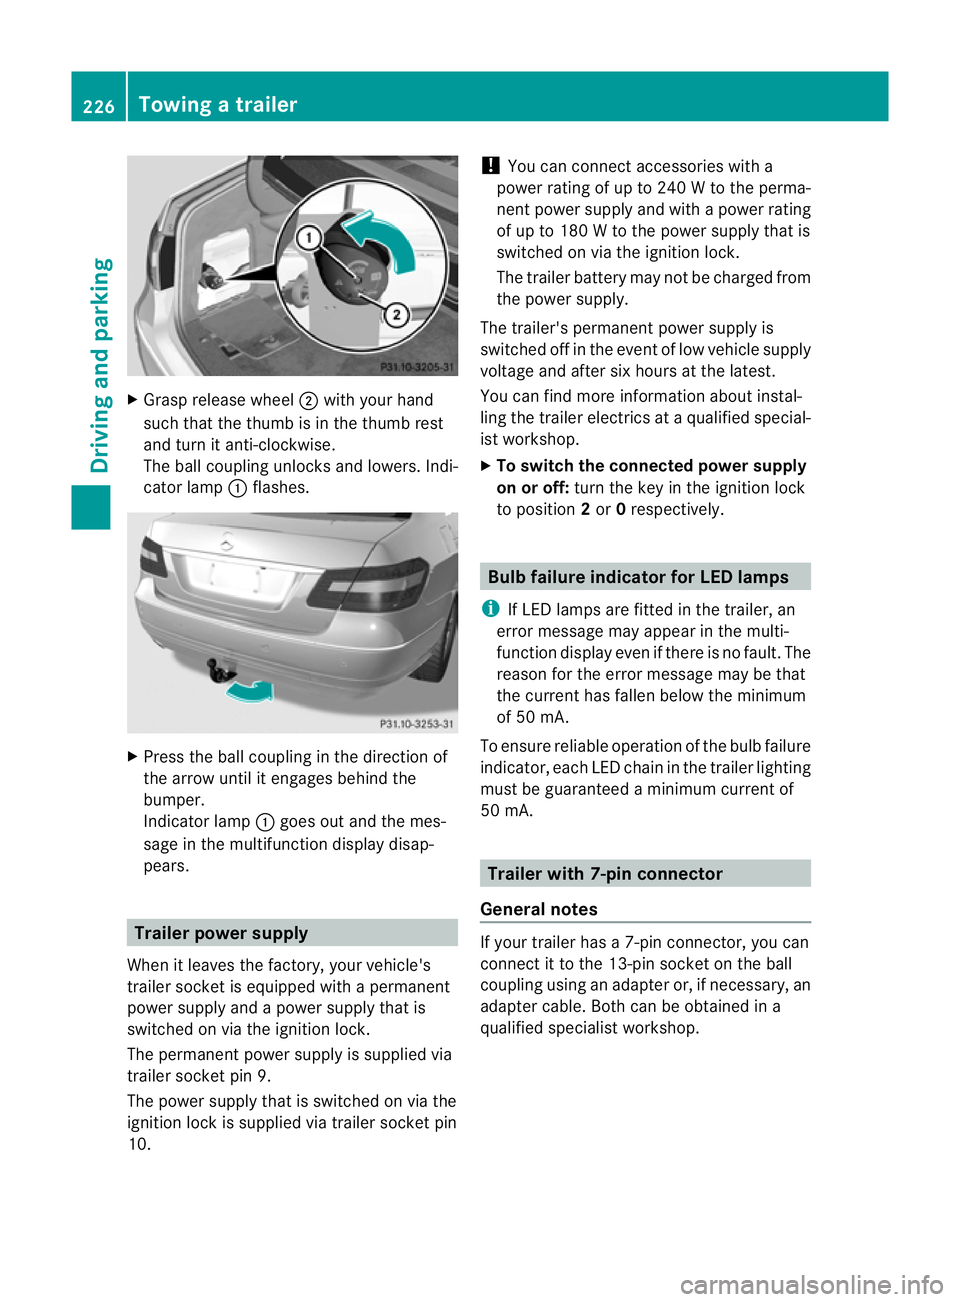
X
Grasp release wheel ;with your hand
such that the thumb is in the thumb rest
and turn it anti-clockwise.
The ball coupling unlocks and lowers. Indi-
cator lamp :flashes. X
Press the ball coupling in the direction of
the arrow until it engages behind the
bumper.
Indicato rlamp :goes out and the mes-
sage in the multifunction display disap-
pears. Trailer power supply
When it leaves the factory, your vehicle's
trailer socke tis equipped with a permanent
power supply and a power supply that is
switched on via the ignition lock.
The permanent power supply is supplied via
trailer socket pin 9.
The power supply that is switched on via the
ignition lock is supplied via trailer socket pin
10. !
You can connect accessories with a
power rating of up to 240 W to the perma-
nent power supply and with a power rating
of up to 180 W to the power supply that is
switched on via the ignition lock.
The trailer battery may not be charged from
the power supply.
The trailer's permanent power supply is
switched off in the event of low vehicle supply
voltage and after six hours at the latest.
You can find more information abouti nstal-
ling the trailer electrics at a qualified special-
is tw orkshop.
X To switch the connected power supply
on or off: turn the key in the ignition lock
to position 2or 0respectively. Bulb failure indicator for LED lamps
i If LED lamps are fitted in the trailer, an
error message may appear in the multi-
function display even if there is no fault. The
reason for the error message may be that
the current has fallen below the minimum
of 50 mA.
To ensure reliable operation of the bulb failure
indicator, each LED chain in the trailer lighting
must be guaranteed a minimum current of
50 mA. Trailer with 7-pin connector
General notes If your trailer has a 7-pin connector, you can
connect it to the 13-pin socket on the ball
coupling using an adapter or, if necessary, an
adapter cable. Both can be obtained in a
qualified specialist workshop.226
Towing
atrailerDriving an d parking
Page 234 of 409
or on bridges. If you do not adapt your driving
style to the conditions, the vehicle could skid.
For this reason, adapt your driving style and
speed to the weather conditions.
Changes in the outside temperature are dis-
played after a short delay. Speedometer with segments
The segments in the speedometer indicate
which speed range is available.
Cruise control (Y page 181) activated:
The segments light up from the stored speed
to the maximum speed.
Variable SPEEDTRONIC (Y page 183) activa-
ted:
The segments light up from the start of the
scale to the selected limit speed.
DISTRONIC PLUS (Y page 185) activated:
One or two segments in the set speed range
light up.
DISTRONIC PLUS detects a vehicle in front:
The segments between the speed of the vehi-
cle in front and the stored speed light up. Operating the on-board computer
Overview The on-board computer is activated as soon
as you turn the key to position 1in the ignition
lock.
You can control the multifunction display and
the settings in the on-board computer using
the buttons on the multifunction steering
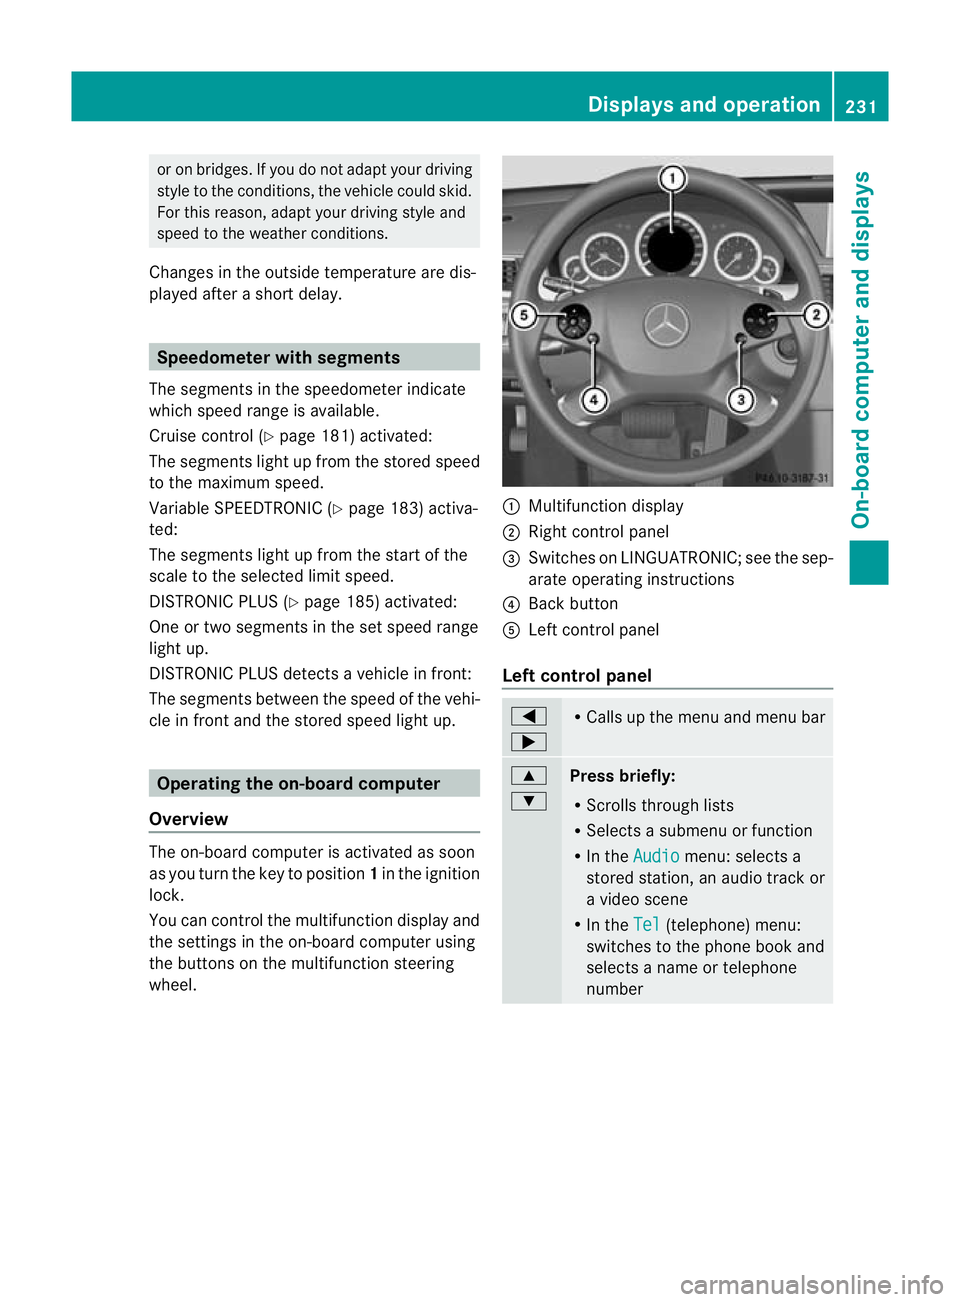
wheel. :
Multifunction display
; Right control panel
= Switches on LINGUATRONIC; see the sep-
arate operating instructions
? Back button
A Left control panel
Left control panel =
; R
Calls up the menu and menu bar 9
:
Press briefly:
R
Scrolls through lists
R Selects a submenu or function
R In the Audio menu: selects a
stored station, an audio track or
a video scene
R In the Tel (telephone) menu:
switches to the phone book and
selects a name or telephone
number Displays and operation
231On-board computer and displays Z
Page 249 of 409
with the key. The exterior lighting switches
off when you open the driver's door.
R Exterior lighting delayed switch-off: the
exterior lighting remains lit for 60seconds
after the engine is switched off .Ifyou close
all the doors, the exterior lighting goes off
after 15 seconds.
If you activate the Surround lighting func-
tion, the following light up depending on the
vehicle's equipment:
R side lamps
R foglamps
R daytime driving lights
R surround lighting in the exterior mirrors
X Press the =or; button on the steer-
ing wheel to select the Settings menu.
X Press the :or9 button to select the
Light submenu.
X Press the abutton to confirm.
X Press the :or9 button to select the
Surround lighting function.
When the Surround lighting function is
activated, the light cone and the area
around the vehicle are displayed in red in
the multifunction display.
X Press the abutton to save the setting.
Deactivating delayed switch-off of the exte-
rior lighting temporarily:
X Before leaving the vehicle, turn the key to
position 0in the ignition lock.
X Turn the key to position 2in the ignition
lock and back to position 0.
The exterior lighting delayed switch-off is
deactivated.
Delayed switch-off of the exterior lighting is
reactivated the next time you start the
engine.
Activating/deactivating the interior light-
ing delayed switch-off
If you activate the Light. delay function,
the interior lighting remains on for 20seconds
after you remove the key from the ignition
lock. X
Press the =or; button on the steer-
ing wheel to select the Settings menu.
X Press the :or9 button to select the
Light submenu.
X Press the abutton to confirm.
X Press the :or9 button to select the
Interior lighting delay sw. off: function.
When the
Light. delay function is acti-
vated, the vehicle interior is displayed in
red in the multifunction display.
X Press the abutton to save the setting.
Vehicle Setting permanent SPEEDTRONIC
You can set permanent SPEEDTRONIC
(Y
page 185) using the Limit speed (win‐ ter tyres) function.
X Press the =or; button on the steer-
ing wheel to select the Settings menu.
X Press the :or9 button to select the
Vehicle submenu.
X Press the abutton to confirm.
X Press the :or9 button to select the
Limit speed (winter tyres): function.
You will see the current setting.
X Press the abutton to confirm.
X Press :or9 to adjust permanent
SPEEDTRONIC in increments of 10 km/h
(240 km/h to
160 km/h ). The
Off setting
switches permanent SPEEDTRONIC off.
X Press the abutton to store the entry.
Switching the automatic locking feature
on/off
If you select the Auto. door locks function,
the vehicle is centrally locked above a speed
of around 15 km/h.
i For further information on the automatic
locking feature, see (Y page 89).246
Menus and submenusOn-board computer and displays
Page 252 of 409
X
Press the abutton to confirm.
X Press the :or9 button to select the
Easy Entry/Exit function.
If the Easy Entry/Exit function is activa-
ted, the vehicle steering wheel is displayed
in red in the multifunction display.
X Press the abutton to save the setting.
Switching the belt adjustment on/off
For further information on belt adjustment,
see (Y page 51).
X Press the =or; button on the steer-
ing wheel to select the Settings menu.
X Press the :or9 button to select the
Convenience submenu.
X Press the abutton to confirm.
X Press the :or9 button to select the
Belt adjustment function.
When the Belt adjustment function is
activated, the vehicle seat belt is displayed
in red in the multifunction display.
X Press the abutton to save the setting.
Switching the fold in mirrors when lock-
ing function on/off
If you switch on the Auto. fold in function,
the exterior mirrors fold in when you lock the
vehicle. When you unlock the vehicle and then
open the driver's or front-passenger door, the
exterior mirrors fold out again.
If you have switched the function on and you
fold the exterior mirrors in using the button
on the door (Y page 117), they will not fold
out automatically. The exterior mirrors can
then only be folded out using the button on
the door.
X Press the =or; button on the steer-
ing wheel to select the Settings menu.
X Press the :or9 button to select the
Convenience submenu.
X Press the abutton to confirm. X
Press the :or9 button to select the
Auto. fold in function.
If the Auto. fold in function is activated,
the vehicle's exterior mirror is displayed in
red in the multifunction display.
X Press the abutton to save the setting.
Resetting to factor ysettings For safety reasons, no
tall functions are reset:
the Limit speed (winter tyres) function
in permanent SPEEDTRONIC can only be set
in the Vehicle submenu. If you want to reset
the Day lights function in the
Light sub-
menu, you must tur nthe key in the ignition
lock to position 1.
X Press the =or; button on the steer-
ing wheel to select the Settings menu.
X Press the :or9 button to select the
Factory setting submenu.
X Press the abutton to confirm.
The Reset all settings? message
appears.
X Press the :or9 button to select
No or
Yes .
X Press the abutton to confirm the selec-
tion.
If you have selected Yes , the multifunction
display shows a confirmation message. AMG menu in AMG vehicles
AMG displays X
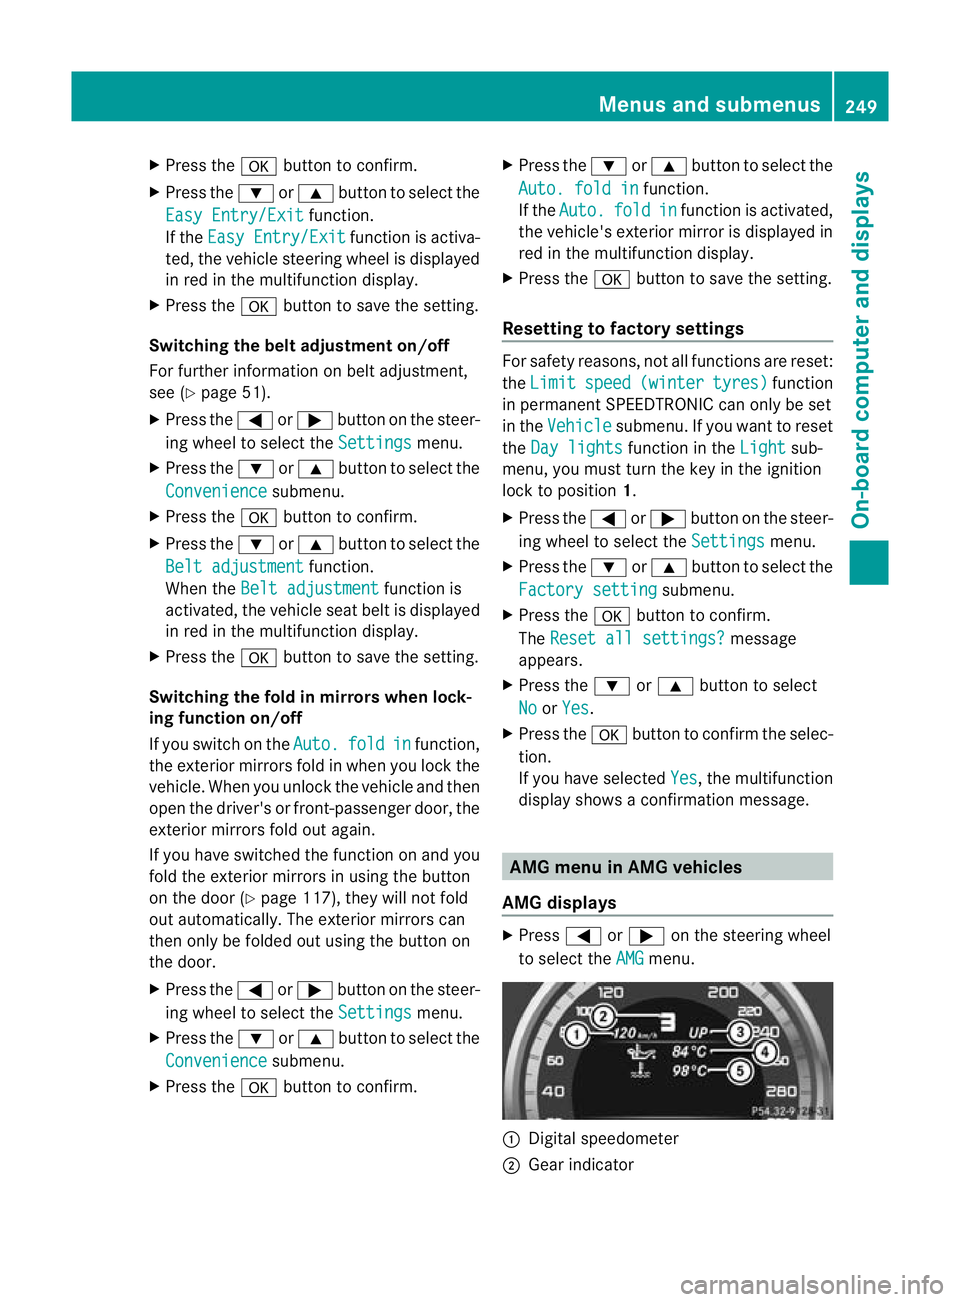
Press =or; on the steering wheel
to select the AMG menu.
:
Digital speedometer
; Gear indicator Menus and submenus
249On-board computer and displays Z
Page 253 of 409
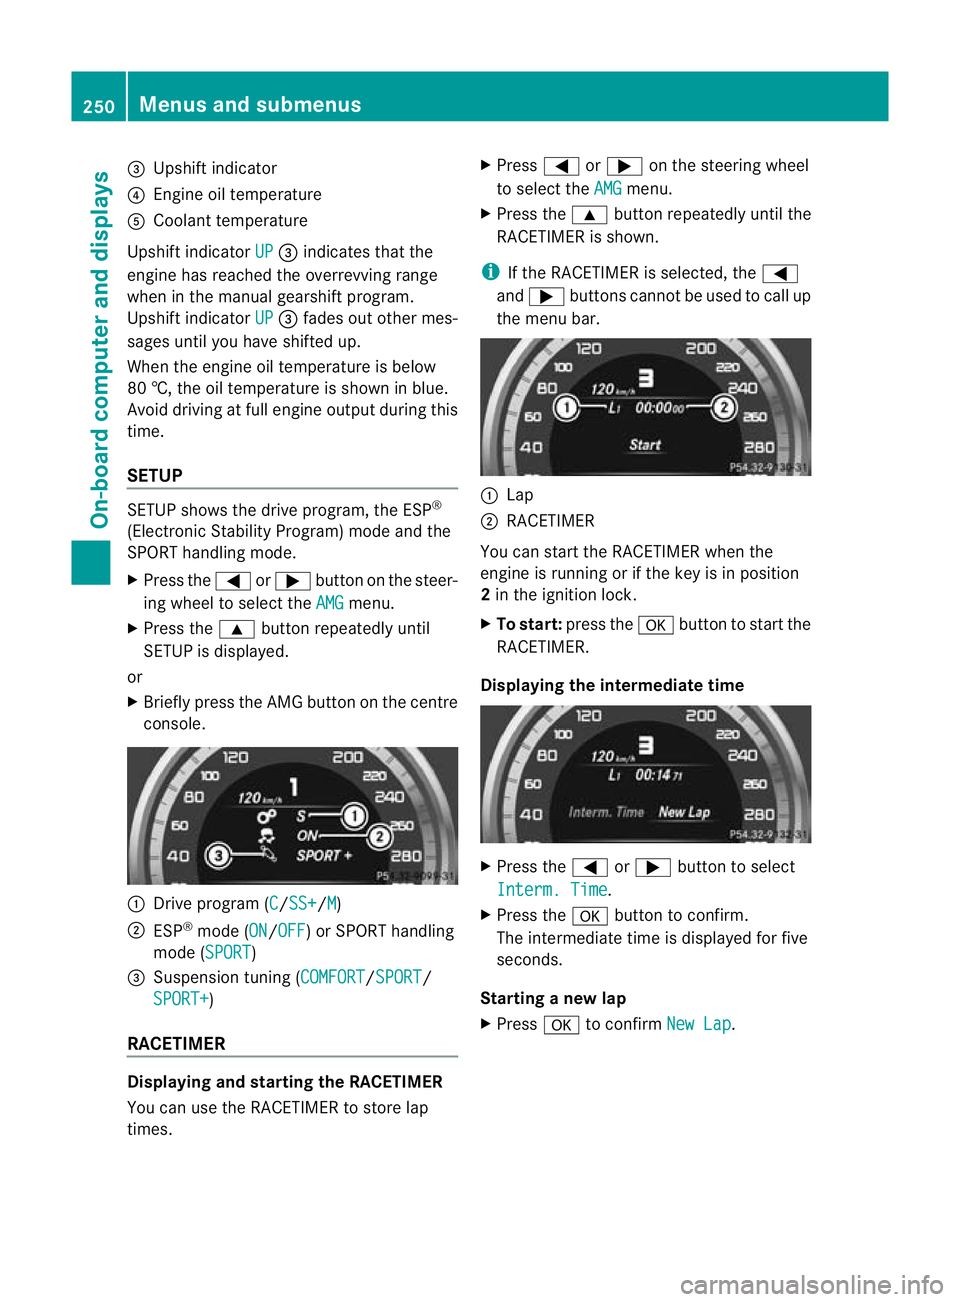
=
Upshift indicator
? Engine oil temperature
A Coolant temperature
Upshift indicator UP =
indicates that the
engine has reached the overrevving range
when in the manual gearshift program.
Upshift indicator UP =
fades out other mes-
sages until you have shifted up.
When the engine oil temperature is below
80 †, the oil temperature is shown in blue.
Avoid driving at full engine output during this
time.
SETUP SETUP shows the drive program, the ESP
®
(Electronic Stability Program) mode and the
SPORT handling mode.
X Press the =or; button on the steer-
ing wheel to select the AMG menu.
X Press the 9button repeatedly until
SETUP is displayed.
or
X Briefly press the AMG button on the centre
console. :
Drive program (C /SS+ /M )
; ESP ®
mode (ON /OFF ) or SPORT handling
mode (SPORT )
3 Suspension tuning (COMFORT /SPORT /
SPORT+ )
RACETIMER Displaying and starting the RACETIMER
You can use the RACETIMER to store lap
times. X
Press =or; on the steering wheel
to select the AMG menu.
X Press the 9button repeatedly until the
RACETIMER is shown.
i If the RACETIMER is selected, the =
and ; buttons cannot be used to call up
the menu bar. :
Lap
; RACETIMER
You can start the RACETIMER when the
engine is running or if the key is in position
2 in the ignition lock.
X To start: press the abutton to start the
RACETIMER.
Displaying the intermediate time X
Press the =or; button to select
Interm. Time .
X Press the abutton to confirm.
The intermediate time is displayed for five
seconds.
Starting a new lap
X Press ato confirm New Lap .250
Menus and submenusOn-board computer and displays
Page 254 of 409
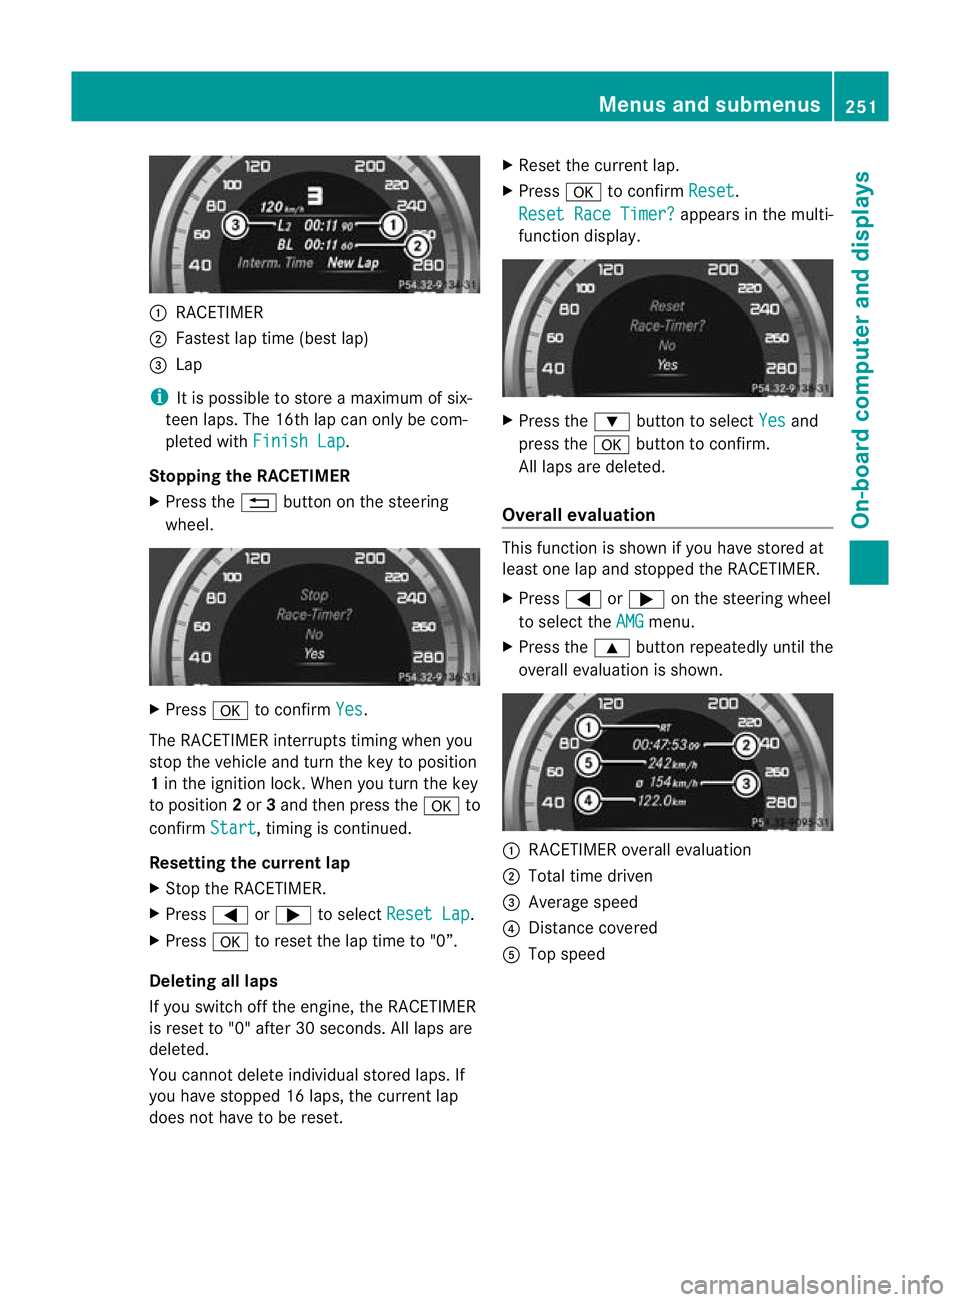
:
RACETIMER
; Fastest lap time (bes tlap)
= Lap
i It is possible to store a maximum of six-
teen laps. The 16th lap can only be com-
pleted with Finish Lap .
Stopping the RACETIMER
X Press the %button on the steering
wheel. X
Press ato confirm Yes .
The RACETIMER interrupts timing when you
stop the vehicle and tur nthe key to position
1 in the ignition lock. When you turn the key
to position 2or 3and then press the ato
confirm Start , timing is continued.
Resetting the current lap
X Stop the RACETIMER.
X Press =or; to select Reset Lap .
X Press ato reset the lap time to "0”.
Deleting all laps
If you switch off the engine, the RACETIMER
is reset to "0" after 30 seconds. All laps are
deleted.
You cannot delete individual stored laps. If
you have stopped 16 laps, the current lap
does not have to be reset. X
Reset the current lap.
X Press ato confirm Reset .
Reset Race Timer? appears in the multi-
function display. X
Press the :button to select Yes and
press the abutton to confirm.
All laps are deleted.
Overall evaluation This function is shown if you have stored at
least one lap and stopped the RACETIMER.
X
Press =or; on the steering wheel
to select the AMG menu.
X Press the 9button repeatedly until the
overall evaluation is shown. :
RACETIMER overall evaluation
; Total time driven
= Average speed
? Distance covered
A Top speed Menus and submenus
251On-board computer and displays Z