2011 MERCEDES-BENZ E-CLASS ESTATE parking brake
[x] Cancel search: parking brakePage 288 of 409
Engine
Problem Possible causes/consequences and
M Solutions
;
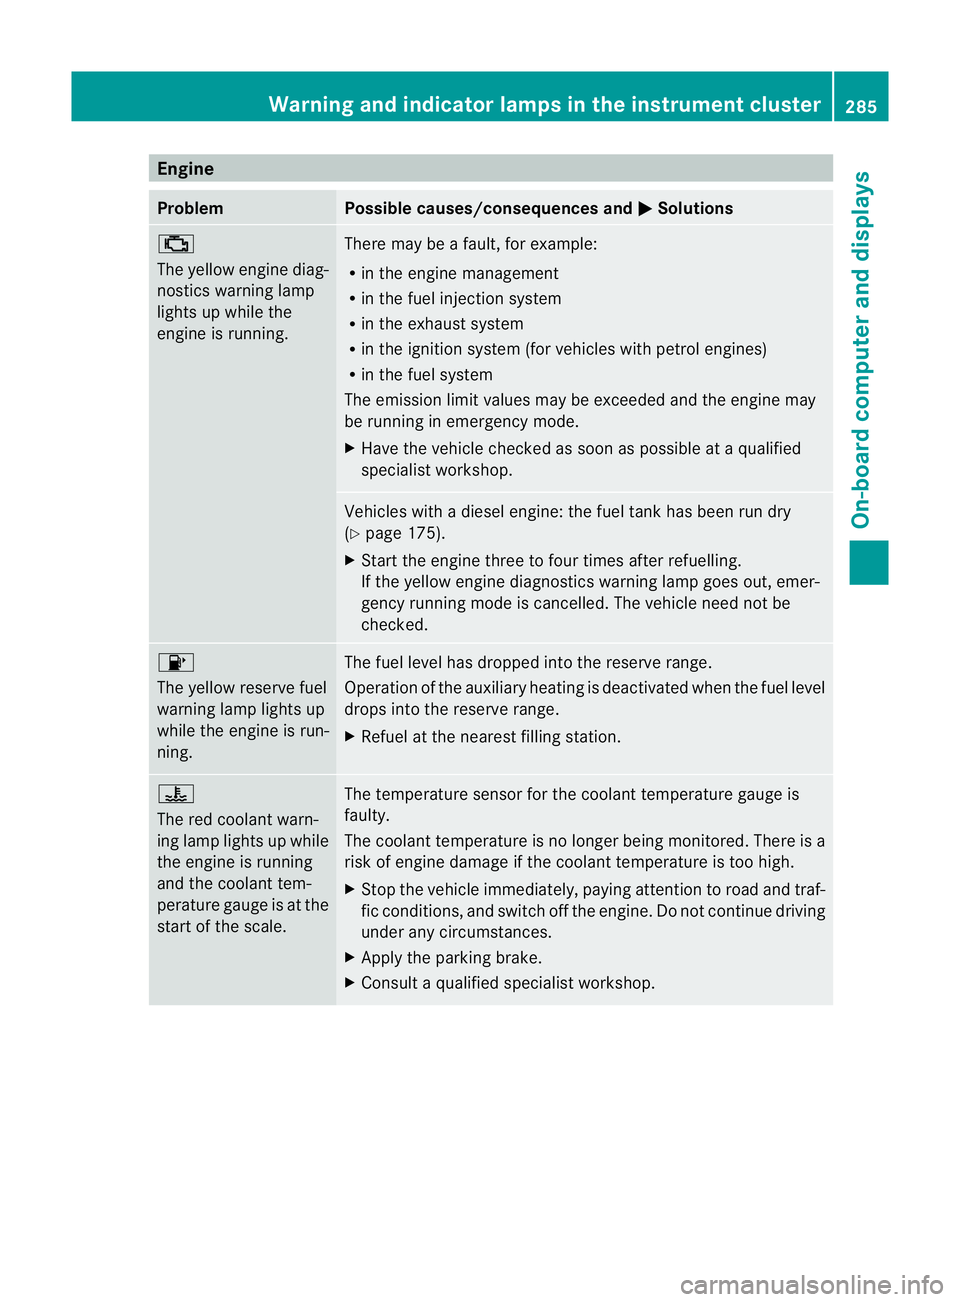
The yellow engine diag-
nostics warning lamp
lights up while the
engine is running.
There may be a fault, for example:
R in the engine management
R in the fuel injection system
R in the exhaust system
R in the ignition system (for vehicles with petrol engines)
R in the fuel system
The emission limit values may be exceeded and the engin emay
be running in emergency mode.
X Have the vehicle checked as soon as possible at a qualified
specialist workshop. Vehicles with a diesel engine: the fuel tan
khas been run dry
(Y page 175).
X Start the engine three to four times after refuelling.
If the yellow engine diagnostics warning lamp goes out, emer-
gency running mode is cancelled. The vehicle need no tbe
checked. 8
The yellow reserve fuel
warning lamp lights up
while the engine is run-
ning.
The fuel level has dropped into the reserve range.
Operation of the auxiliary heating is deactivated when the fuel level
drops into the reserve range.
X
Refuel at the nearest filling station. ?
The red coolant warn-
ing lamp lights up while
the engine is running
and the coolant tem-
perature gauge is at the
star toft he scale. The temperature sensor for the coolant temperature gauge is
faulty.
The coolant temperature is no longer being monitored. There is a
risk of engine damage if the coolant temperature is too high.
X Stop the vehicle immediately, paying attention to road and traf-
fic conditions, and switch off the engine. Do not continue driving
under any circumstances.
X Apply the parking brake.
X Consult a qualified specialist workshop. Warning and indicator lamps in the instrument cluster
285On-board computer and displays Z
Page 330 of 409
Care of the exterior
Automatic car wash G
WARNING
Braking efficiency is reduced after washing
the vehicle .This could cause an accident. For
this reason, following a car wash, drive with
particular care until the brakes are dry. G
WARNING
The vehicle is braked when the HOLD function
or DISTRONIC PLUS is activated. Therefore,
deactivate the HOLD function and DISTRONIC
PLUS before the vehicle is washed in an auto-
matic car wash.
You can wash the vehicle in an automatic car
wash from the very start.
Wash off excess dirt before cleaning the vehi-
cle in an automatic car wash.
! In car washes with a towing mechanism,
make sure that the automatic transmission
is in transmission position N; otherwise,
the vehicle could be damaged.
R Vehicles with DIRECT SELECT lever and
key:
do not remove the key from the ignition
lock. Do not open the driver's door or
front-passenger door when the engine is
switched off. Otherwise, the automatic
transmission selects park position P
automatically and locks the wheels. You
can prevent this by shifting the auto-
matic transmission to Nbeforehand.
R Vehicles with DIRECT SELECT lever and
KEYLESS-GO:
do not open the driver's door or front-
passenger door when the engine is
switched off. Otherwise, the automatic
transmission selects park position P
automatically and locks the wheels.
Observe the following to make sure that the
automatic transmission on vehicles with
DIRECT SELECT stays in position N:X
Make sure the vehicle is stationary and the
ignition is switched off.
X Turn the key to position 2(Ypage 155) in
the ignition lock.
Use the key instead of the Start/Stop but-
ton on vehicles with KEYLESS-GO.
X Depress and hold the brake pedal.
X Shift the automatic transmission to posi-
tion N.
X Release the brake pedal.
X Release the parking brake.
X Switch off the ignition and leave the key in
the ignition lock.
! Make sure that:
R the side windows and sliding sunroof are
closed completely.
R the blower for the ventilation/heating is
switched off (OFF button is depressed).
R the windscreen wiper switch is at posi-
tion 0.
The vehicle could otherwise be damaged.
After using an automatic car wash, wipe off
wax from the windscreen and the wiper
blades. This will prevent smears and reduce
wiping noises caused by residue on the wind-
screen.
Washing by hand In some countries, washing by hand is only
allowed at specially equipped washing bays.
Observe the legal requirements for each indi-
vidual country.
X
Do not use hot water and do not wash the
vehicle in direct sunlight.
X Use a soft sponge to clean.
X Use a mild cleaning agent, such as a car
shampoo approved by Mercedes-Benz.
X Thoroughly hose down the vehicle with a
gentle jet of water.
X Do not point the water jet directly towards
the air inlet.
X Use plenty of water and rinse out the
sponge frequently. Care
327Maintenance and care Z
Page 343 of 409
Removing an emergenc
yspare wheel:
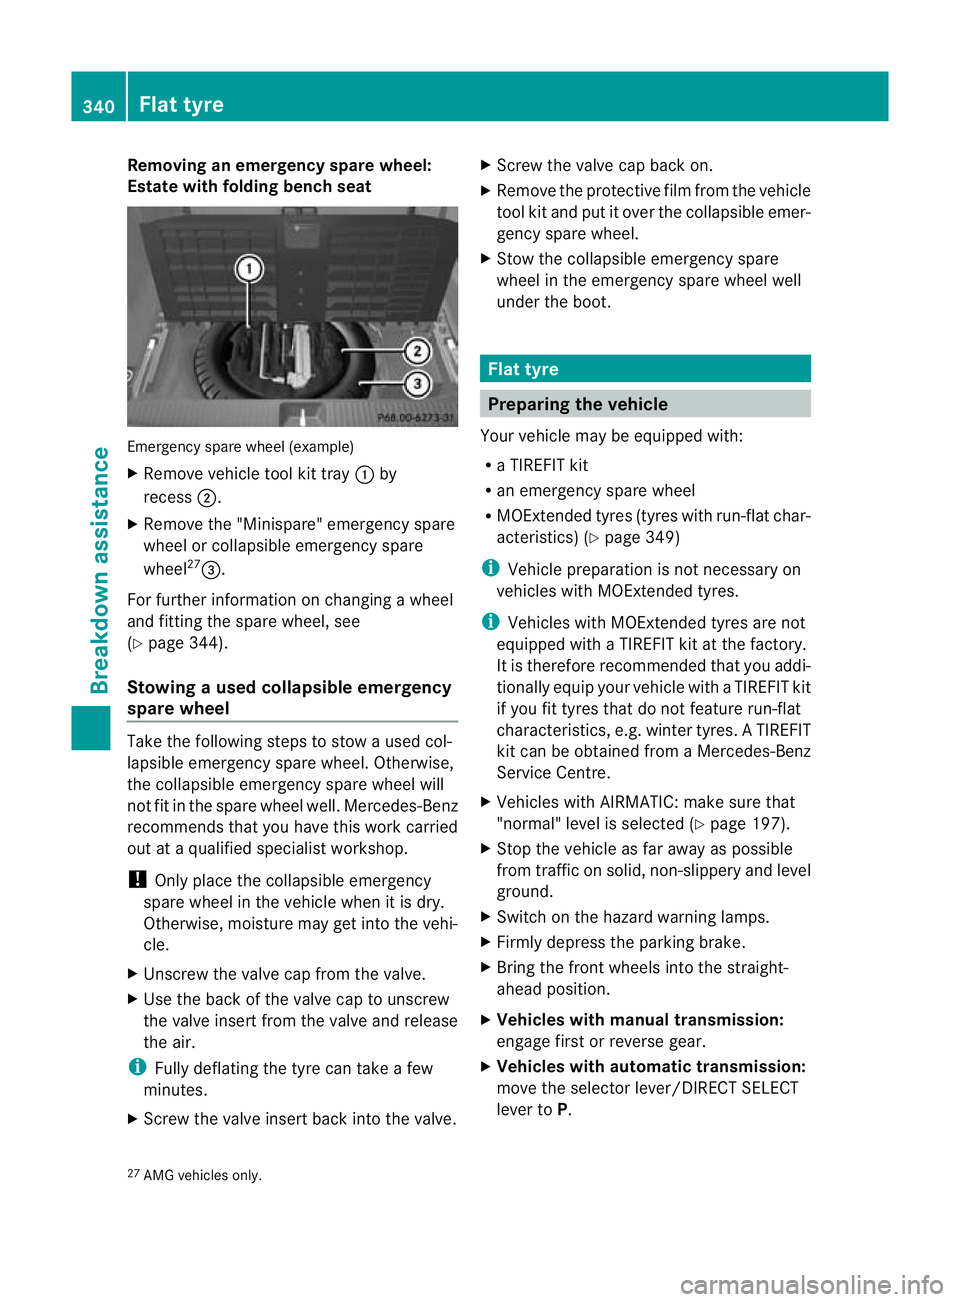
Estate with folding benc hseat Emergency spare wheel (example)
X Remove vehicle tool kit tray :by
recess ;.
X Remove the "Minispare" emergency spare
wheel or collapsible emergency spare
wheel 27
=.
For further information on changing a wheel
and fitting the spare wheel, see
(Y page 344).
Stowing aused collapsible emergency
spare wheel Take the following steps to stow a used col-
lapsible emergency spare wheel. Otherwise,
the collapsible emergency spare wheel will
not fit in the spare wheel well. Mercedes-Benz
recommends that you have this work carried
out at a qualified specialist workshop.
! Only place the collapsible emergency
spare wheel in the vehicle when it is dry.
Otherwise, moisture may get into the vehi-
cle.
X Unscrew the valve cap from the valve.
X Use the back of the valve cap to unscrew
the valve insert from the valve and release
the air.
i Fully deflating the tyre can take a few
minutes.
X Screw the valve insert back into the valve. X
Screw the valve cap back on.
X Remove the protective film from the vehicle
tool kit and put it over the collapsible emer-
gency spare wheel.
X Stow the collapsible emergency spare
wheel in the emergency spare wheel well
under the boot. Flat tyre
Preparing the vehicle
Your vehicle may be equipped with:
R a TIREFIT kit
R an emergency spare wheel
R MOExtended tyres (tyres with run-flat char-
acteristics) (Y page 349)
i Vehicle preparation is not necessary on
vehicles with MOExtended tyres.
i Vehicles with MOExtended tyres are not
equipped with a TIREFIT kit at the factory.
It is therefore recommended that you addi-
tionally equip your vehicle with a TIREFIT kit
if you fit tyres that do not feature run-flat
characteristics, e.g. winter tyres. A TIREFIT
kit can be obtained from a Mercedes-Benz
Service Centre.
X Vehicles with AIRMATIC: make sure that
"normal" level is selected (Y page 197).
X Stop the vehicle as far away as possible
from traffic on solid, non-slippery and level
ground.
X Switch on the hazard warning lamps.
X Firmly depress the parking brake.
X Bring the fron twheels into the straight-
ahead position.
X Vehicles with manual transmission:
engage first or reverse gear.
X Vehicles with automatic transmission:
move the selector lever/DIRECT SELECT
lever to P.
27 AMG vehicles only. 340
Flat tyreBreakdown assistance
Page 348 of 409
X
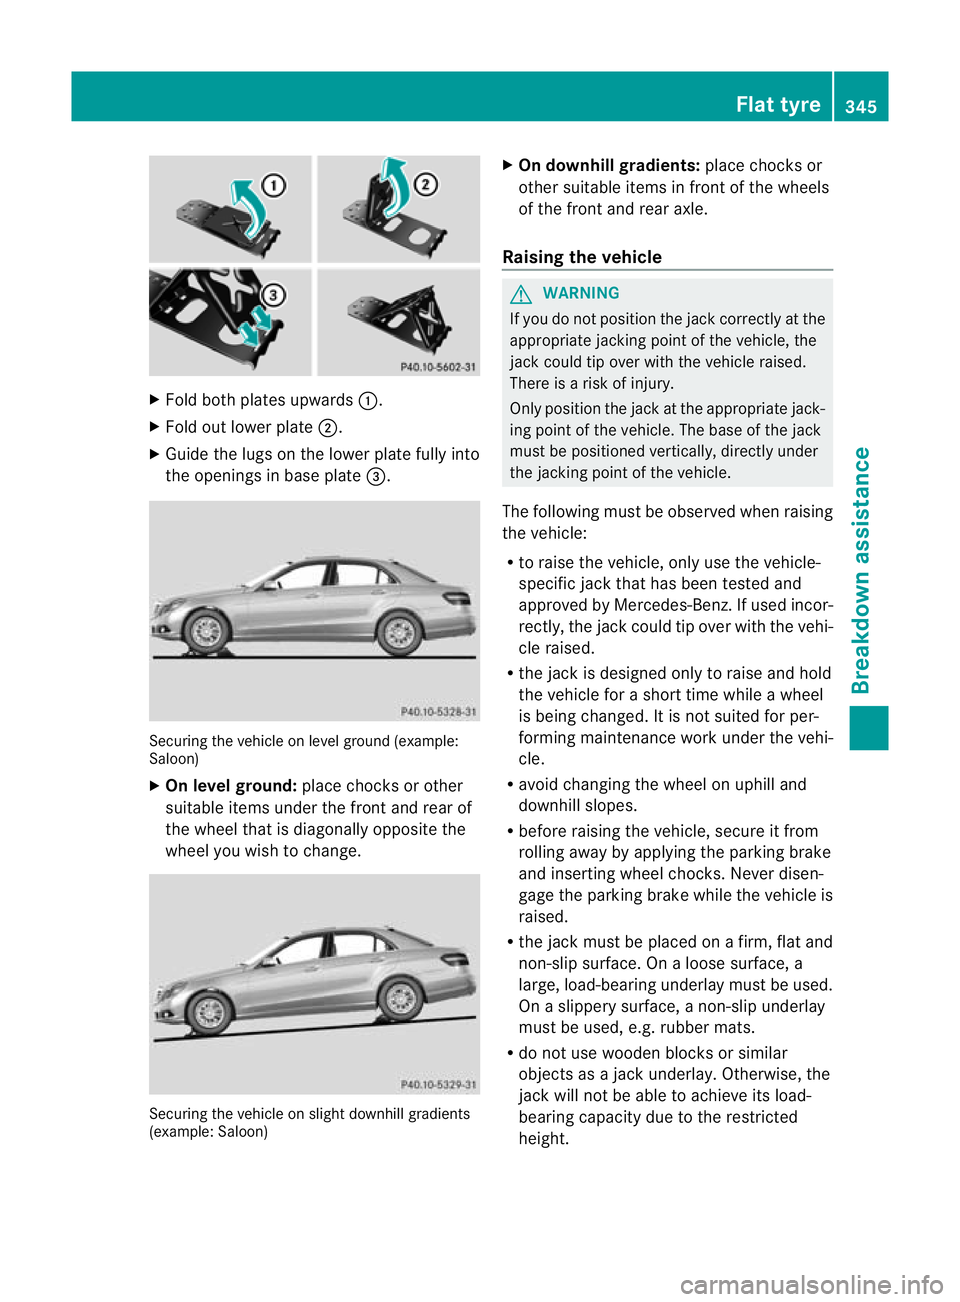
Fold both plates upwards :.
X Fold ou tlower plate ;.
X Guide the lugs on the lower plate fully into
the openings in base plate =.Securing the vehicle on level ground (example:
Saloon)
X
On level ground: place chocks or other
suitable items under the front and rear of
the wheel that is diagonally opposite the
wheel you wish to change. Securing the vehicle on slight downhill gradients
(example: Saloon) X
On downhill gradients: place chocks or
other suitable items in front of the wheels
of the front and rear axle.
Raising the vehicle G
WARNING
If you do not position the jack correctly at the
appropriate jacking point of the vehicle, the
jack could tip over with the vehicle raised.
There is a risk of injury.
Only position the jack at the appropriate jack-
ing point of the vehicle. The base of the jack
must be positioned vertically, directly under
the jacking point of the vehicle.
The following must be observed when raising
the vehicle:
R to raise the vehicle, only use the vehicle-
specific jack that has been tested and
approved by Mercedes-Benz. If used incor-
rectly, the jack could tip over with the vehi-
cle raised.
R the jack is designed only to raise and hold
the vehicle for a short time while a wheel
is being changed. It is not suited for per-
forming maintenance work under the vehi-
cle.
R avoid changing the wheel on uphill and
downhill slopes.
R before raising the vehicle, secure it from
rolling away by applying the parking brake
and inserting wheel chocks. Never disen-
gage the parking brake while the vehicle is
raised.
R the jack must be placed on a firm, flat and
non-slip surface. On a loose surface, a
large, load-bearing underlay must be used.
On a slippery surface, a non-slip underlay
must be used, e.g. rubber mats.
R do not use wooden blocks or similar
objects as a jack underlay. Otherwise, the
jack will not be able to achieve its load-
bearing capacity due to the restricted
height. Flat tyre
345Breakdown assistance Z
Page 354 of 409
environmentally responsible
recycling system.
Dispose of batteries in an
environmentally responsible
manner. Take discharged
batteries to a qualified spe-
cialist workshop or to a col-
lection point for used batter-
ies.
G
WARNING
For safety reasons, Mercedes-Benz recom-
mends that you only use batteries which have
been tested and approved for your vehicle by
Mercedes-Benz .These batteries provide
increased impact protection to prevent vehi-
cle occupants from suffering acid burns
should the battery be damaged in the event
of an accident.
To prevent acid burns, observe the following
safety notes when handling batteries:
R do not lean over the battery.
R do not place any metal objects on a battery.
Otherwise, you could cause a short circuit
and the battery's gas mixture could ignite.
R make sure that you do not create an elec-
trostatic charge, e.g. by wearing synthetic
clothing or as a result of friction on fabrics.
Therefore, you should not pull or slide the
battery over carpets or other synthetic
materials.
R never touch the battery first. To discharge
a possible electrostatic charge, step out of
the vehicle first and touch the bodywork.
R do not wipe the battery using a cloth. The
battery may explode as a result of electro-
static charge or due to flying sparks.
! Switch off the engine and remove the key
before disconnecting the terminal clamps
from the battery. On vehicles with KEY-
LESS-GO, make sure that the ignition is
switched off. Check that all the indicator
lamps in the instrumentc luster are off.You
may otherwise destroy electronic compo-
nents, such as the alternator. i
When you park the vehicle, remove the
key if you do not require any electrical con-
sumers. The vehicle will then use very little
energy, thus conserving battery power.
Mercedes-Benz recommends that you do not
carry out work on batteries yourself, e.g.
removing or charging. Have this work per-
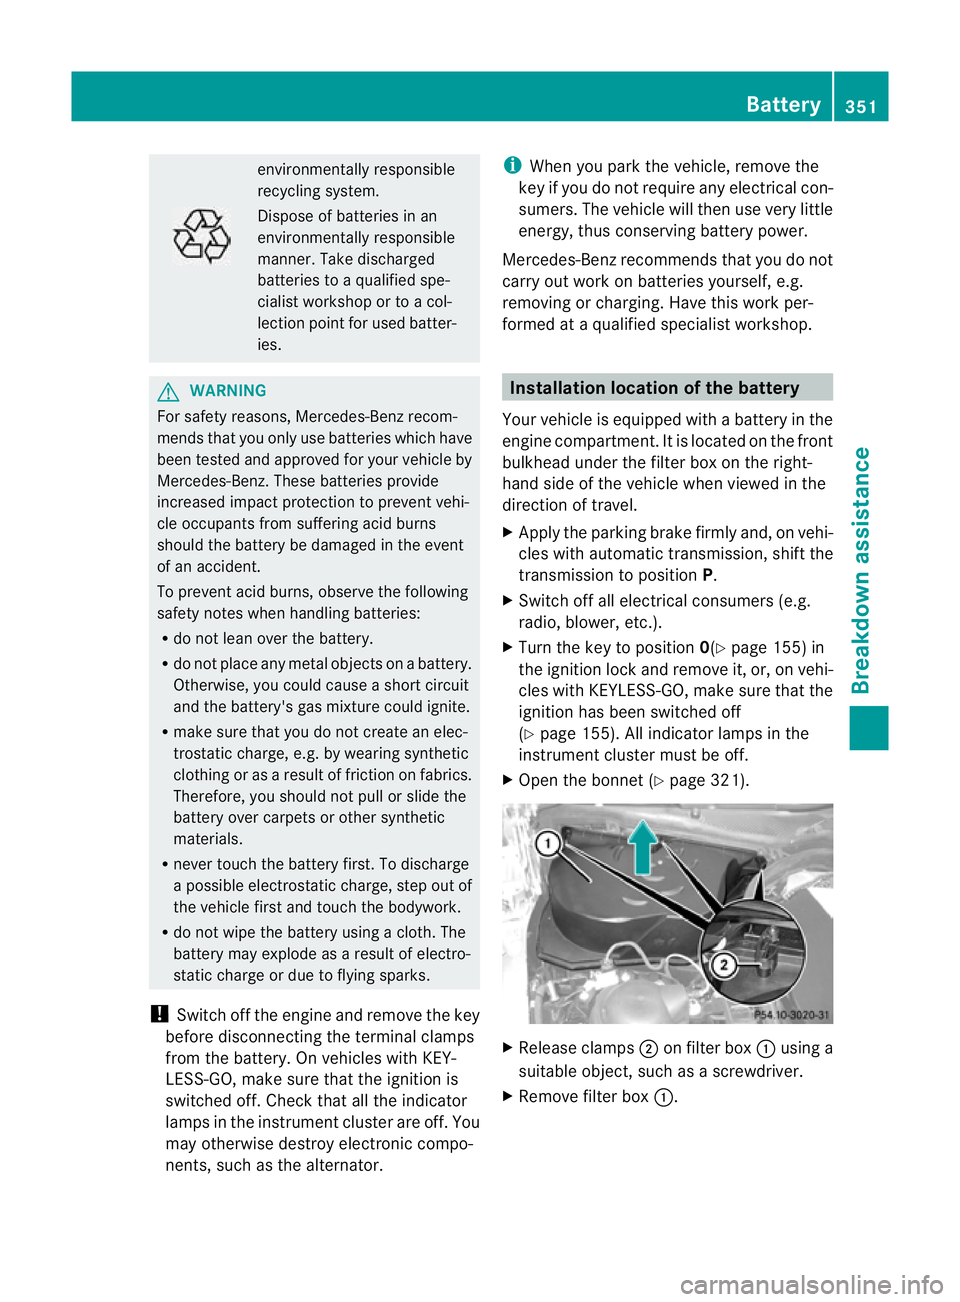
formed at a qualified specialist workshop. Installation location of the battery
Your vehicle is equipped with a battery in the
engine compartment.Iti s located on the front
bulkhead under the filter box on the right-
hand side of the vehicle when viewed in the
direction of travel.
X Apply the parking brake firmly and, on vehi-
cles with automatic transmission, shift the
transmission to position P.
X Switch off all electrical consumers (e.g.
radio, blower, etc.).
X Turn the key to position 0(Ypage 155) in
the ignition lock and remove it, or, on vehi-
cles with KEYLESS-GO, make sure that the
ignition has been switched off
(Y page 155). All indicator lamps in the
instrument cluster must be off.
X Open the bonnet (Y page 321). X
Release clamps ;on filter box :using a
suitable object, such as a screwdriver.
X Remove filter box :. Battery
351Breakdown assistance Z
Page 357 of 409
Jump-starting
G
WARNING
There is a risk of acid burns when jump-starting a vehicle due to the gases which escape from
the battery. Do not lean over the battery while the engine is being jump-started. G
WARNING
Gases escaping from the battery during jump-starting may cause minor explosions. Avoid cre-
ating sparks. Keep naked flames away from the battery, and do not smoke.
Comply with safety precautions when handling batteries. You will find these under "Battery (vehi-
cle)" in the index. G
WARNING
Non-combusted fuel can collect in the exhaust system and ignite. There is a risk of fire. Avoid
repeated and lengthy starting attempts.
! Avoid repeated and lengthy starting attempts. Otherwise, the catalytic converter could be
damaged by the non-combusted fuel.
Do not use a rapid charging device to start the vehicle. If your vehicle's battery is discharged,
the engine can be jump-started from another vehicle or from a second battery using jump
leads. Observe the following points:
R the battery is not accessible in all vehicles. if the other vehicle's battery is not accessible,
jump-start the vehicle using a second battery or ajump-starting device.
R you may only jump-start the vehicle when the engine and catalyti cconverter are cold.
R do not start the engine if the battery is frozen. let the battery thaw first.
R jump-starting may only be performed from batteries with a nominal voltage of 12 V.
R only use jump leads that have a sufficient cross-section and insulated terminal clamps.
R If the battery is fully discharged, leave the battery that is being used to jump-start connected
for a few minutes before attempting to start.T his charges the empty battery a little.
R Make sure that the two vehicles do not touch.
Make sure that:
R the jump leads are not damaged.
R bare parts of the terminal clamp do not come into contact with other metal parts while the
jump leads are connected to the battery.
R the jump leads cannot come into contact with parts such as the V-belt pulley or the fan.
These parts move when the engine is started and while it is running.
X Apply the parking brake firmly.
X Manual transmission: engage neutral.
X Automatic transmission: move the selector lever toP.
X Switch off all electrical consumers (e.g. radio, blower, etc.).
X Open the bonnet (Y page 321).354
Jump-startingBreakdown assistance
Page 360 of 409
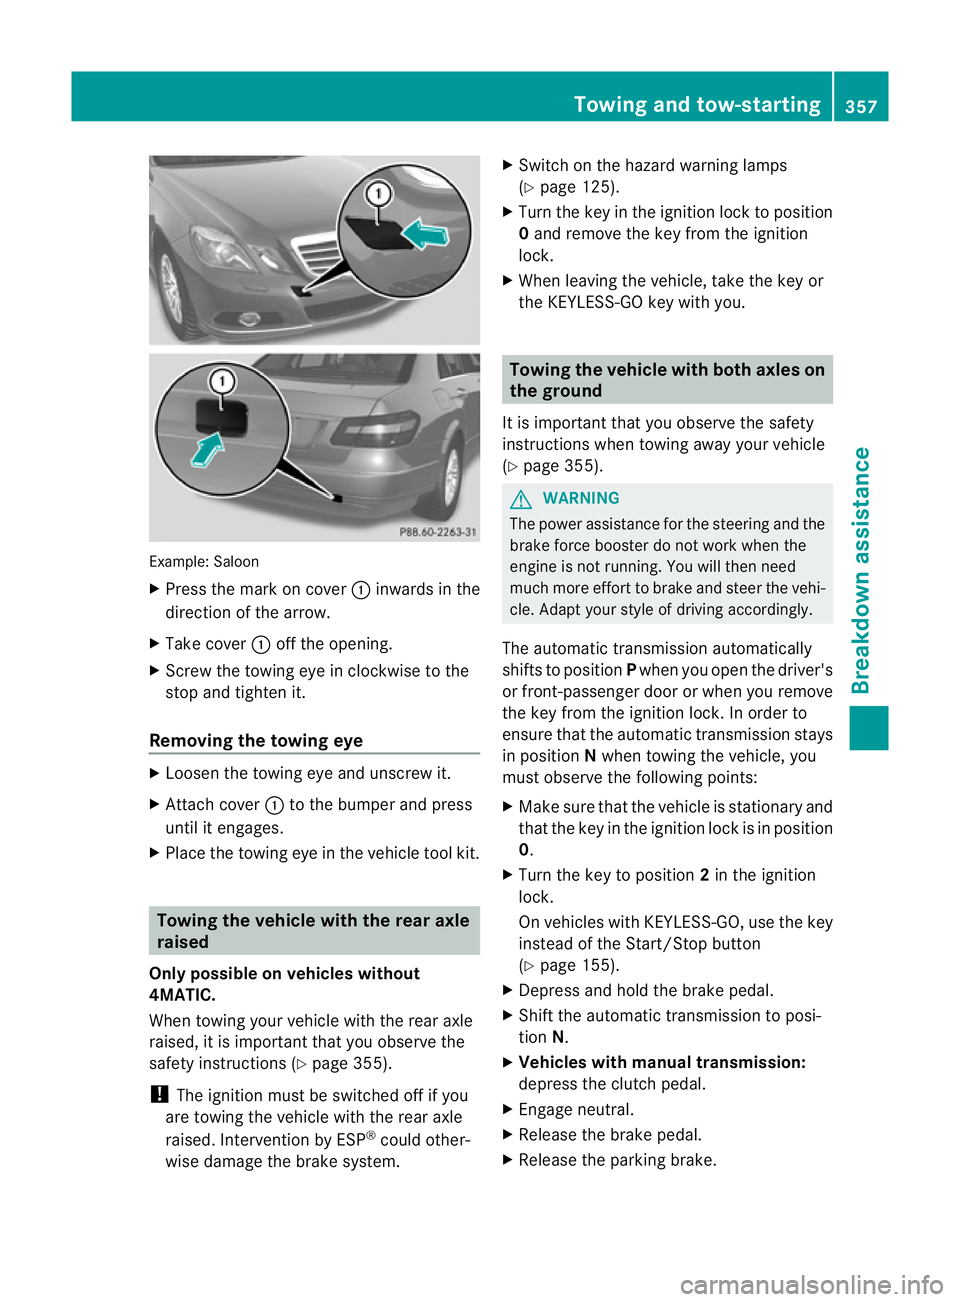
Example: Saloon
X
Press the mark on cover :inwards in the
direction of the arrow.
X Take cover :off the opening.
X Screw the towing eye in clockwise to the
stop and tighten it.
Removing the towing eye X
Loosen the towing eye and unscrew it.
X Attach cover :to the bumpe rand press
until it engages.
X Place the towing eye in the vehicle tool kit. Towing the vehicle with the rear axle
raised
Only possible on vehicles without
4MATIC.
Whe ntowing your vehicle with the rear axle
raised, it is important that you observe the
safety instructions (Y page 355).
! The ignition must be switched off if you
are towing the vehicle with the rear axle
raised. Intervention by ESP ®
could other-
wise damage the brake system. X
Switch on the hazard warning lamps
(Y page 125).
X Turn the key in the ignition lock to position
0and remove the key from the ignition
lock.
X When leaving the vehicle, take the key or
the KEYLESS-GO key with you. Towing the vehicle with both axles on
the ground
It is important that you observe the safety
instructions when towing away your vehicle
(Y page 355). G
WARNING
The power assistance for the steering and the
brake force booster do not work when the
engine is not running. You will then need
much more effort to brake and steer the vehi-
cle. Adapt your style of driving accordingly.
The automatic transmission automatically
shifts to position Pwhen you open the driver's
or front-passenger door or when you remove
the key from the ignition lock. In order to
ensure that the automatic transmission stays
in position Nwhen towing the vehicle, you
must observe the following points:
X Make sure that the vehicle is stationary and
that the key in the ignition lock is in position
0.
X Turn the key to position 2in the ignition
lock.
On vehicles with KEYLESS-GO, use the key
instead of the Start/Stop button
(Y page 155).
X Depress and hold the brake pedal.
X Shift the automatic transmission to posi-
tion N.
X Vehicles with manual transmission:
depress the clutch pedal.
X Engage neutral.
X Release the brake pedal.
X Release the parking brake. Towing and tow-starting
357Breakdown assistance Z
Page 361 of 409
X
Switch on the hazard warning lamps
(Y page 125).
X Leave the key in position 2in the ignition
lock.
i Whe ntowing with the hazard warning
lamps switched on, use the combination
switch as usual to signal achange of direc-
tion. In this case, only the turn signals for
the desired direction flash. When the com-
bination switch is reset, the hazard warning
lamps start flashing again. Transporting the vehicle
The towing eyes or trailer tow hitch can be
used to pull the vehicle onto a trailer or trans-
porter if you wish to transport it.
X Vehicles with manual transmission:
shift to neutral.
X Vehicles with automatic transmission:
turn the key to position 2in the ignition
lock.
X Shift the automatic transmission to posi-
tion N.
As soon as the vehicle is loaded:
X Prevent the vehicle from rolling away by
applying the parking brake.
X Vehicles with manual transmission:
shift to first gear or reverse gear.
X Vehicles with automatic transmission:
shift the automatic transmission to posi-
tion P.
X Turn the key in the ignition lock to position
0and remove the key from the ignition
lock.
X Secure the vehicle.
! Only lash the vehicle down by the wheels
or wheel rims, not by parts of the vehicle
such as axle or steering components. Oth-
erwise, the vehicle could be damaged. Notes for 4MATIC vehicles
! Vehicles with 4MATIC must not be towed
with the front or rear axle raised; otherwise,
the transmission may be damaged.
If the vehicle has transmission damage or
damage to the front or rear axle, have it trans-
ported on a transporter or trailer.
In the event of damage to the electrical
system
If the battery is defective, the automatic
transmission will be locked in position P. To
shift the automatic transmission to position
N, you must provide power to the vehicle's
electrical system in the same way as when
jump-starting (Y page 354).
Have the vehicle transported on a transporter
or trailer. Tow-starting (emergency engine
starting)
When tow-starting, it is important that you
observe the safety instructions (Y page 355)
and the legal requirements in each respective
country.
! Vehicles with automatic transmission
must not be tow-started. The transmission
may otherwise be damaged.
You can find information on "Jump-starting"
at (Y page 354).
Before tow-starting the following conditions
must be fulfilled:
R the battery is connected.
R the engine has cooled down.
R the catalytic converters have cooled down.
X Switch on the hazard warning lamps
(Y page 125).
X Fit the towing eye (Y page 356).
X Secure the rigid towing bar or the towing
rope.
X Depress and hold the brake pedal.
X Turn the key to position 2in the ignition
lock. 358
Towing and tow-startingBreakdown assistance