2011 MERCEDES-BENZ E-Class COUPE wheel bolt torque
[x] Cancel search: wheel bolt torquePage 19 of 344

Individual settings (on-board
computer) ...................................... 208
Loading .......................................... 314
Lowering ........................................ 292
Maintenance .................................... 19
Parking up ..................................... 166
Raising ........................................... 290
Reporting problems .........................21
Towing away .................................. 298
Tow-starting ................................... 298
Transporting .................................. 299
Vehicle data
see Technical data
Vehicle identification number
see VIN
Vehicle identification plate .............. 333
Vehicle tool kit .................................. 287
Video (DVD) ........................................ 205
Video DVD (on-board computer) ...... 205
VIN ...................................................... 333
W
Warning and indicator lamps ABS ................................................ 243
Brakes ........................................... 240
Check Engine ................................. 245
Coolant .......................................... 246
ESP ®
.............................................. 243
ESP ®
OFF ....................................... 244
Fuel tank ........................................ 245
Overview .......................................... 27
PASSENGER AIRBAG OFF
indicator lamp (only Canada) ...........47
PASSENGER AIRBAG OFF
indicator lamp (only USA) ................42
Reserve fuel ................................... 245
Seat belt ........................................ 241
SRS ................................................ 244
Tire pressure monitor ....................247
Warranty ............................................ 332
Wheel bolt tightening torque ........... 292
Wheel chock ...................................... 289
Wheels Changing/replacing .......................320
Changing a wheel .......................... 289
Checking ........................................ 305
Cleaning ......................................... 279
Guidelines to be observed .............305
Mounting a wheel .......................... 292
Removing a wheel ..........................291
Tightening torque ........................... 292
Wheel size/tire size .......................327
Wind deflector
see AIRCAP
Wind deflector (cleaning
instructions) ...................................... 280
Window curtain air bag Display message ............................ 216
Operation ......................................... 41
Windows
see Side windows
Windows (cleaning instructions) ..... 281
Wind screen ......................................... 96
Wind screen (cleaning
instructions) ...................................... 280
Windshield Defrosting ...................................... 142
Windshield washer fluid (display
message) ............................................ 238
Windshield washer system Adding washer fluid .......................275
Notes ............................................. 339
Windshield wipers
Important safety notes ..................129
Replacing the wiper blades ............130
Switching on/off ........................... 129
Troubleshooting ............................. 130
Winter operation ............................... 171
Winter tires M+S tires ....................................... 170
Wiper blades
Cleaning ......................................... 281Index17BA 207 USA, CA Edition B 2011; 1; 3, en-USd2sboikeVersion: 3.0.3.62010-05-20T10:38:09+02:00 - Seite 17
Page 294 of 344

XScrew alignment bolt : into the thread
instead of the wheel bolt.XUnscrew the remaining wheel bolts fully.
! Do not place wheel bolts in sand or on a
dirty surface. The bolt and wheel hub
threads could otherwise be damaged when
you screw them in.
XRemove the wheel.
Mounting a new wheel
GWarning!
Always replace wheel bolts that are damaged
or rusted.
Never apply oil or grease to wheel bolts.
Damaged wheel hub threads should be
repaired immediately. Do not continue to
drive under these circumstances! Contact an
authorized Mercedes-Benz Center or call
Roadside Assistance.
Incorrect wheel bolts or improperly tightened
wheel bolts can cause the wheel to come off.
This could cause an accident. Make sure to
use the correct wheel bolts.
GWarning
Only use genuine Mercedes-Benz wheel bolts.
Other wheel bolts may come loose.
Do not tighten the wheel bolts when the
vehicle is raised. Otherwise, the vehicle could
fall off the jack.
GWarning
Make sure to use the original length wheel
bolts when remounting the original wheel
after it has been repaired.
XClean the wheel and wheel hub contact
surfaces.
! To prevent damage to the paintwork, hold
the wheel securely against the wheel hub
while screwing in the first wheel bolt.
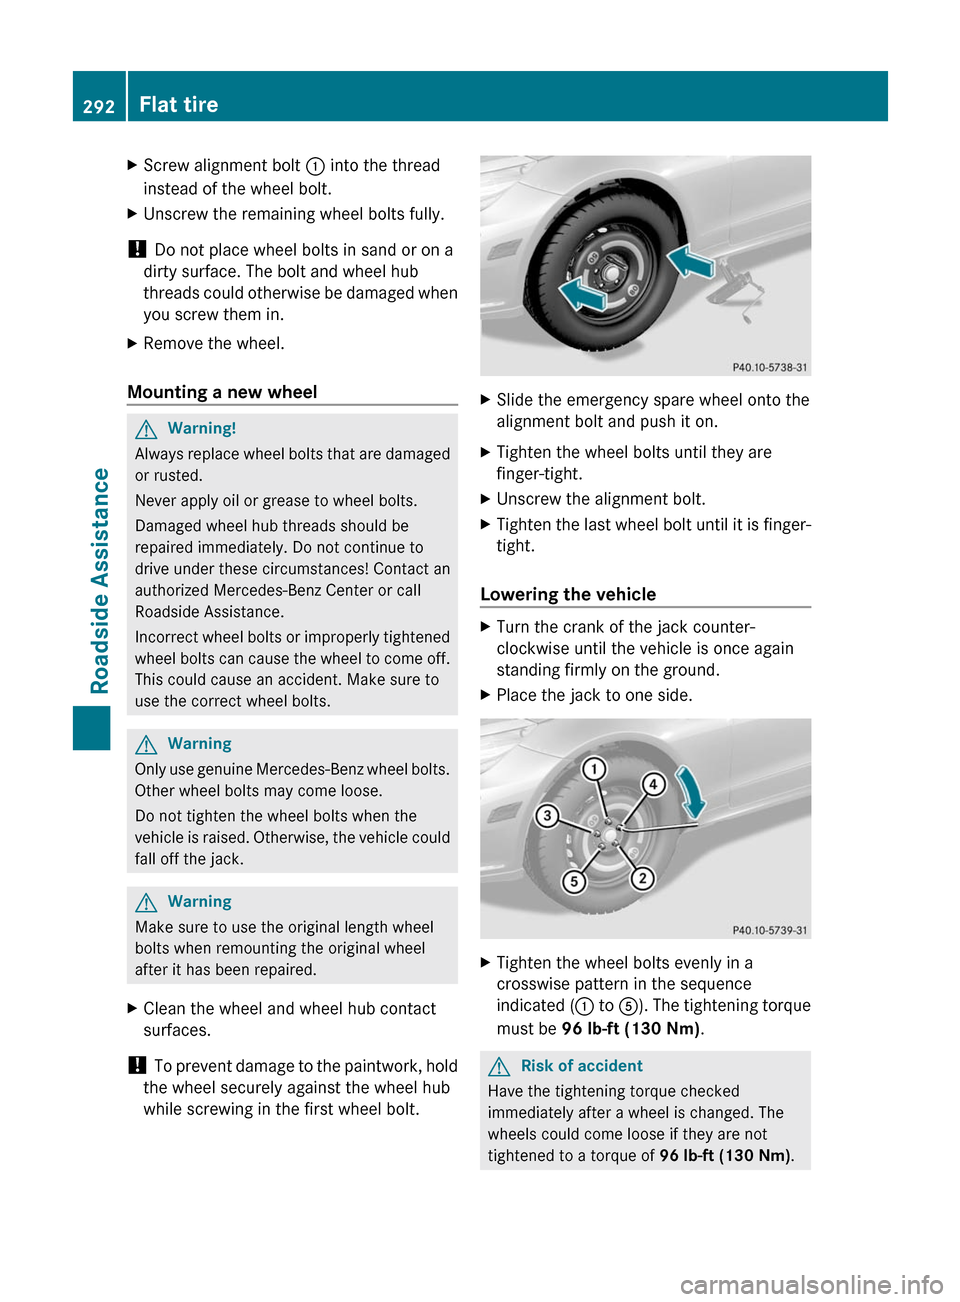
XSlide the emergency spare wheel onto the
alignment bolt and push it on.XTighten the wheel bolts until they are
finger-tight.XUnscrew the alignment bolt.XTighten the last wheel bolt until it is finger-
tight.
Lowering the vehicle
XTurn the crank of the jack counter-
clockwise until the vehicle is once again
standing firmly on the ground.XPlace the jack to one side.XTighten the wheel bolts evenly in a
crosswise pattern in the sequence
indicated ( : to A). The tightening torque
must be 96 lb-ft (130 Nm) .GRisk of accident
Have the tightening torque checked
immediately after a wheel is changed. The
wheels could come loose if they are not
tightened to a torque of 96 lb-ft (130 Nm).
292Flat tireRoadside Assistance
BA 207 USA, CA Edition B 2011; 1; 3, en-USd2sboikeVersion: 3.0.3.62010-05-20T10:38:09+02:00 - Seite 292
Page 322 of 344

car tires must meet under Federal Motor
Vehicle Safety Standard No. 109. Grades B
and A represent higher levels of performance
on the laboratory test wheel than the
minimum required by law.
Interchanging the wheels
GWarning
Rotate front and rear wheels only if the tires
are of the same dimension.
If your vehicle is equipped with mixed-size
tires (different tire dimensions front vs. rear),
tire rotation is not possible.
GWarning!
Have the tightening torque checked after
changing a wheel. Wheels could become
loose if not tightened with a torque of
96 lb-ft (130 Nm).
Only use genuine Mercedes-Benz wheel bolts
specified for your vehicle's rims.
The wear patterns on the front and rear tires
differ, depending on the operating conditions.
Rotate the wheels before a clear wear pattern
has formed on the tires. Front tires typically
wear more on the shoulders and the rear tires
in the center.
If your vehicle's tire configuration allows, you
can rotate the wheels according to the
intervals in the tire manufacturer's warranty
book in your vehicle documents. If no
warranty book is available, the tires should be
rotated every 3000 to 6000 miles
(5000 to 10000 km), or earlier if tire wear
requires. Do not change the direction of
wheel rotation.
Clean the contact surfaces of the wheel and
the brake disc thoroughly every time a wheel
is rotated. Check the tire pressures.
Information on changing a wheel and
mounting the spare wheel ( Y page 289).
Tire labeling
Overview of tire labeling
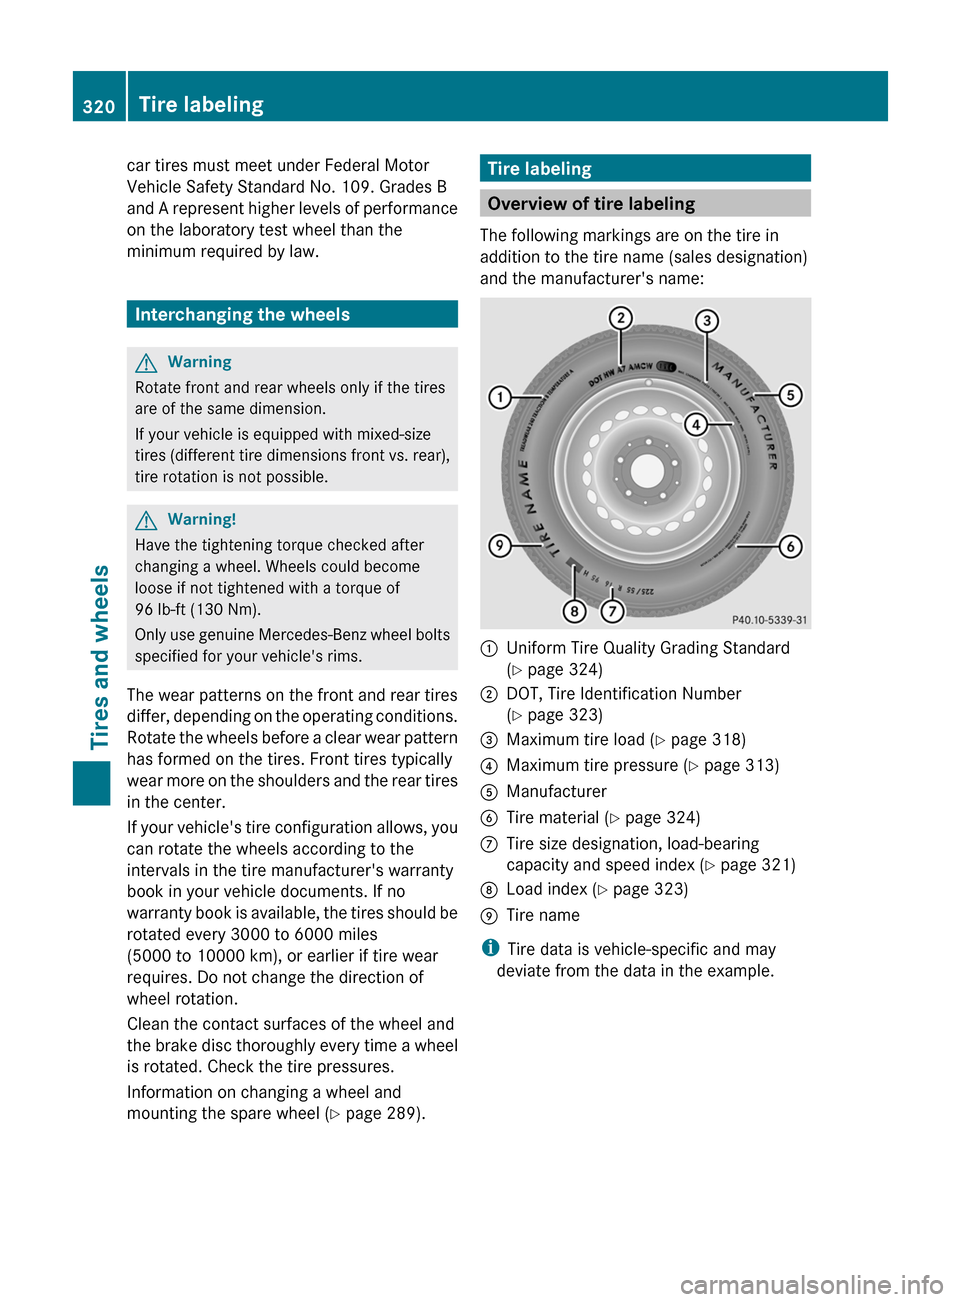
The following markings are on the tire in
addition to the tire name (sales designation)
and the manufacturer's name:
:Uniform Tire Quality Grading Standard
( Y page 324);DOT, Tire Identification Number
( Y page 323)=Maximum tire load ( Y page 318)?Maximum tire pressure ( Y page 313)AManufacturerBTire material ( Y page 324)CTire size designation, load-bearing
capacity and speed index ( Y page 321)DLoad index ( Y page 323)ETire name
i
Tire data is vehicle-specific and may
deviate from the data in the example.
320Tire labelingTires and wheels
BA 207 USA, CA Edition B 2011; 1; 3, en-USd2sboikeVersion: 3.0.3.62010-05-20T10:38:09+02:00 - Seite 320