2011 MERCEDES-BENZ E-Class COUPE belt
[x] Cancel search: beltPage 99 of 344
AIRCAP
General notes
With AIRCAP, four people can travel
comfortably with the soft top down. AIRCAP
reduces the draft for the driver and
passengers in both the front and the rear
compartment in a vehicle with the soft top
down. You can open or close AIRCAP either
when the vehicle is stationary or when driving
up to a speed of 160 km/h.
AIRCAP has the following components:
Ra wind deflector between the windshield
and the soft top
Ran AIRCAP wind screen between the two
head restraints on the rear bench seat
GRisk of injury
When extending and retracting AIRCAP, make
sure that no one can become trapped. If there
is a risk of entrapment, press the button again
to retract AIRCAP again.
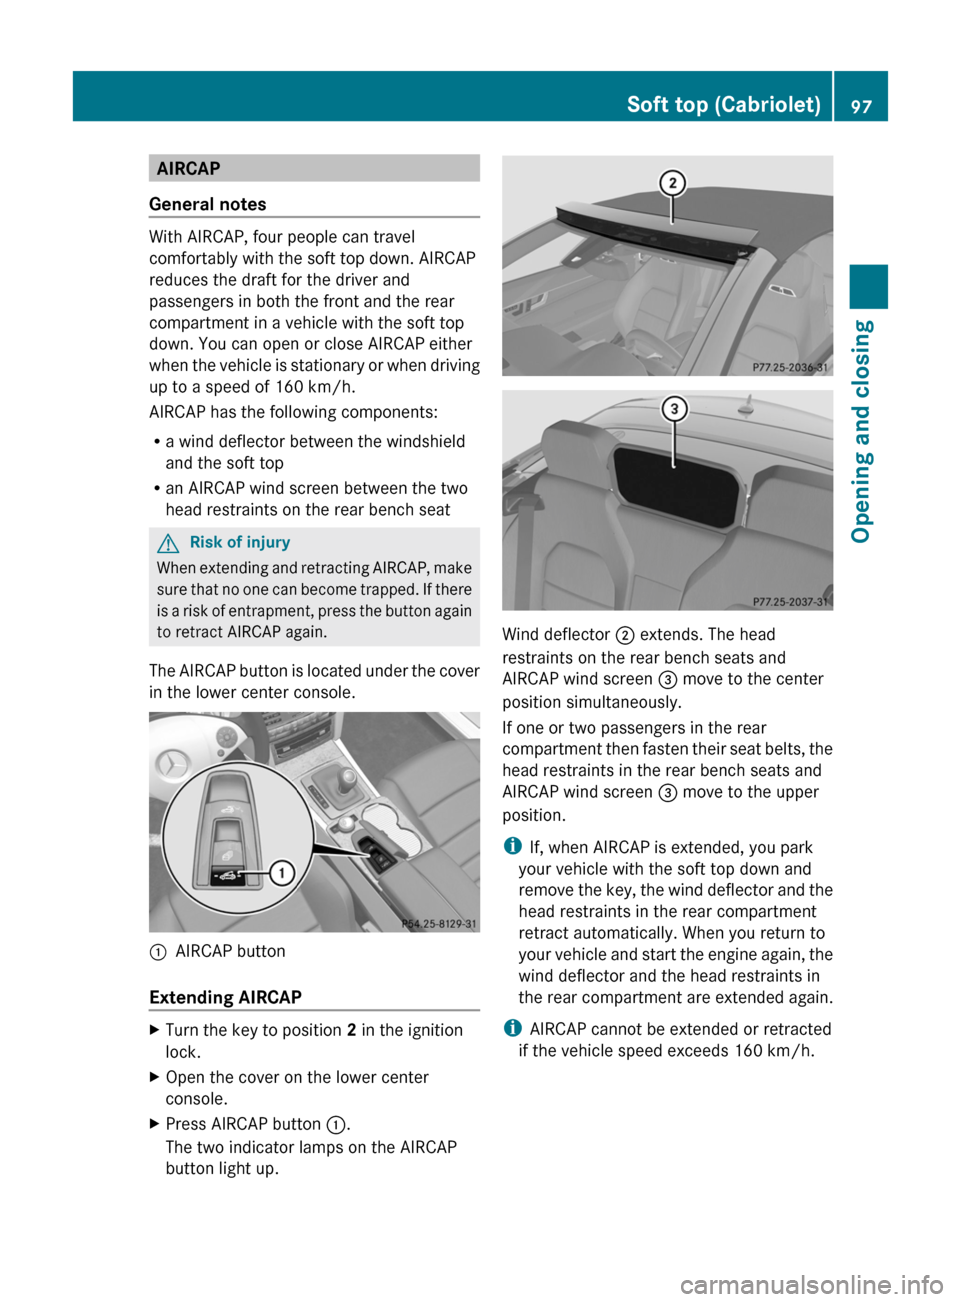
The AIRCAP button is located under the cover
in the lower center console.
:AIRCAP button
Extending AIRCAP
XTurn the key to position 2 in the ignition
lock.
XOpen the cover on the lower center
console.
XPress AIRCAP button :.
The two indicator lamps on the AIRCAP
button light up.
Wind deflector ; extends. The head
restraints on the rear bench seats and
AIRCAP wind screen = move to the center
position simultaneously.
If one or two passengers in the rear
compartment then fasten their seat belts, the
head restraints in the rear bench seats and
AIRCAP wind screen = move to the upper
position.
iIf, when AIRCAP is extended, you park
your vehicle with the soft top down and
remove the key, the wind deflector and the
head restraints in the rear compartment
retract automatically. When you return to
your vehicle and start the engine again, the
wind deflector and the head restraints in
the rear compartment are extended again.
iAIRCAP cannot be extended or retracted
if the vehicle speed exceeds 160 km/h.
Soft top (Cabriolet)97Opening and closingBA 207 USA, CA Edition B 2011; 1; 3, en-USd2sboikeVersion: 3.0.3.62010-05-20T10:38:09+02:00 - Seite 97Z
Page 100 of 344
Retracting AIRCAPXTurn the key to position 2 in the ignition
lock.XOpen the cover on the lower center
console.XPress AIRCAP button :.
The two indicator lamps on the AIRCAP
button go out. Wind deflector ; retracts.
The head restraints on the rear bench seats
and AIRCAP wind screen = move to the
lowest position simultaneously.
i If there are passengers wearing seat belts
in the rear compartment, the head
restraints on the rear bench seats and the
AIRCAP wind screen remain in the upper
position.
Retracting the head restraints on the
rear bench seats from the driver's seat
To improve the rear view, you can retract the
head restraints on the rear bench seats
individually ( Y page 109). The wind deflector
remains in its current position.
Installing and removing the AIRCAP
wind screen
Preparation
You will need a 4 mm Allen key to install/
remove the AIRCAP wind screen.
Before installing or removing the AIRCAP
wind screen:
XTurn the key to position 2 in the ignition
lock.XOpen the folding roof fully ( Y page 90).XExtend the head restraints in the rear
compartment fully ( Y page 109).Removing
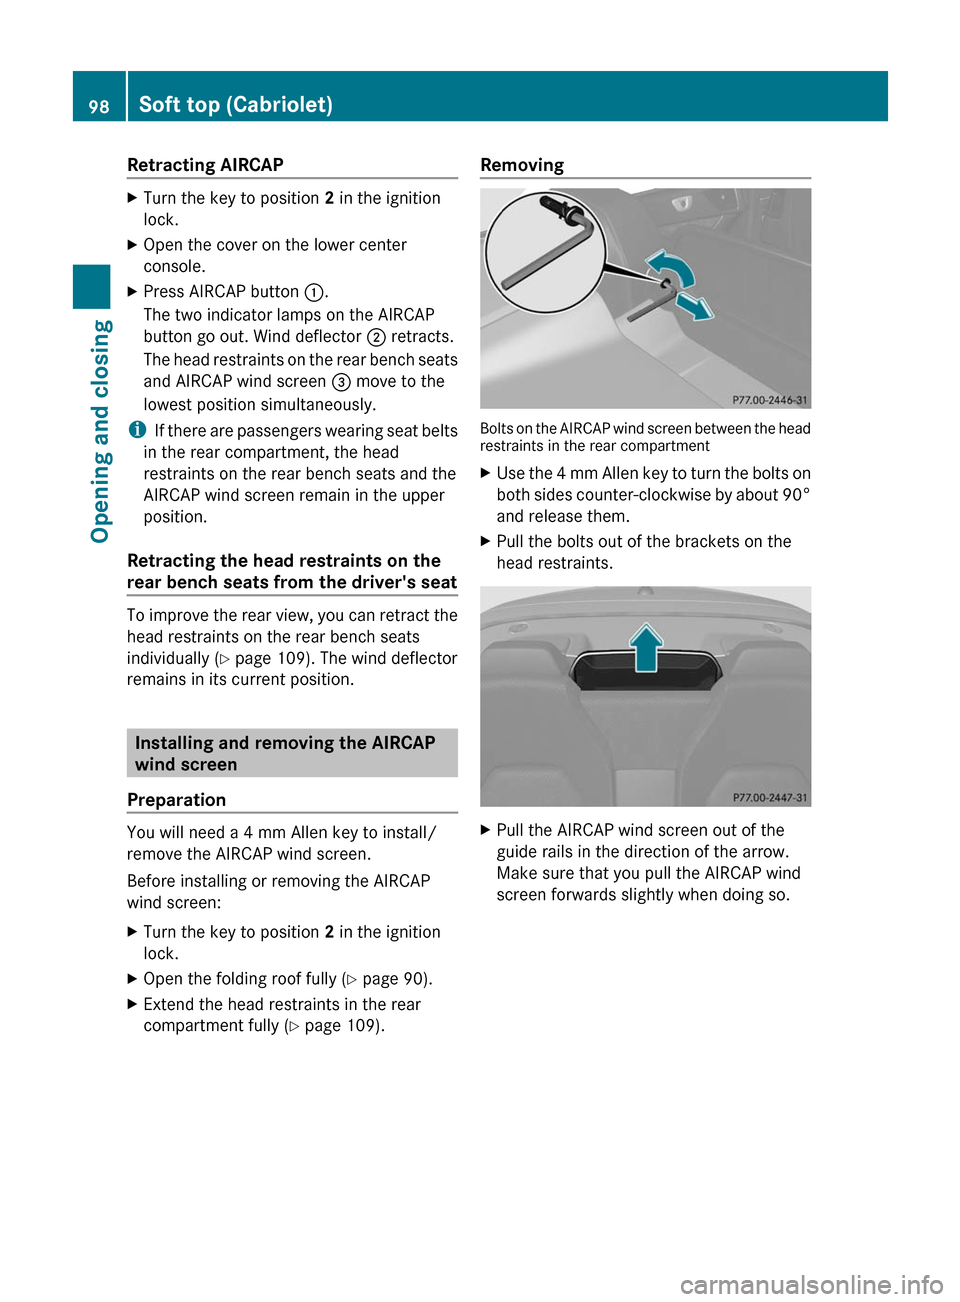
Bolts on the AIRCAP wind screen between the head
restraints in the rear compartment
XUse the 4 mm Allen key to turn the bolts on
both sides counter-clockwise by about 90°
and release them.XPull the bolts out of the brackets on the
head restraints.XPull the AIRCAP wind screen out of the
guide rails in the direction of the arrow.
Make sure that you pull the AIRCAP wind
screen forwards slightly when doing so.98Soft top (Cabriolet)Opening and closing
BA 207 USA, CA Edition B 2011; 1; 3, en-USd2sboikeVersion: 3.0.3.62010-05-20T10:38:09+02:00 - Seite 98
Page 103 of 344

Sliding sunroof3
Important safety notes
GWarning!
When leaving the vehicle, always remove the
SmartKey from the starter switch. Always
take the SmartKey with you and lock the
vehicle. Do not leave children unattended in
the vehicle, even if they are secured in a child
restraint system, or with access to an
unlocked vehicle. A child's unsupervised
access to a vehicle could result in an accident
and/or serious personal injury. The children
could
R injure themselves on parts of the vehicle
R be seriously or fatally injured through
excessive exposure to extreme heat or cold
R injure themselves or cause an accident with
vehicle equipment that can be operated
even if the SmartKey is removed from the
starter switch or removed from the vehicle,
such as seat adjustment, steering wheel
adjustment, or the memory function
If children open a door, they could injure other
persons or get out of the vehicle and injure
themselves or be injured by following traffic.
Do not expose the child restraint system to
direct sunlight. The child restraint system's
metal parts, for example, could become very
hot, and the child could be burned by these
parts.
GWarning!
Do not carry heavy or hard objects in the
passenger compartment or trunk unless they
are firmly secured in place.
Unsecured or improperly positioned cargo
increases a child's risk of injury in the event
of
R strong braking maneuvers
R sudden changes of direction
R an accident
GWarning!
When opening or closing the tilt/sliding panel,
make sure there is no danger of anyone being
harmed by the opening/closing procedure.
The tilt/sliding panel is equipped with the
automatic operation and anti-entrapment
features. If the movement of the tilt/sliding
panel is blocked during the closing procedure,
the tilt/sliding panel will stop and open
slightly.
The tilt/sliding panel operates differently
when the roof panel switch is pressed and
held. See the relevant section in this chapter
for details.
The opening/closing procedure of the tilt/
sliding panel can be immediately halted by
releasing the roof panel switch or, if the roof
panel switch was moved past the resistance
point and released, by moving the roof panel
switch in any direction.
GWarning!
The panorama roof with tilt/sliding panel is
made out of glass. In the event of an accident,
the glass may shatter. This may result in an
opening in the roof.
In a vehicle rollover, occupants not wearing
their seat belts or not wearing them properly
may be thrown out of the opening. Such an
opening also presents a potential for injury for
occupants wearing their seat belts properly as
entire body parts or portions of them may
protrude from the passenger compartment.
! Only open the sliding sunroof if it is free
of snow and ice. Otherwise, malfunctions
may occur.
Do not allow anything to protrude from the
sliding sunroof. Otherwise, the seals could
be damaged.
! Do not forget that the weather can
change abruptly. Make certain that the
sliding sunroof is closed when you leave the
vehicle. The vehicle electronics can be
3 Coupe onlySliding sunroof101Opening and closingBA 207 USA, CA Edition B 2011; 1; 3, en-USd2sboikeVersion: 3.0.3.62010-05-20T10:38:09+02:00 - Seite 101Z
Page 108 of 344

Vehicle equipment
i This manual describes all the standard
and optional equipment of your vehicle
which was available at the time of
purchase. Country-specific differences are
possible. Bear in mind that your vehicle
may not feature all functions described
here. This also refers to safety-related
systems and functions.
Correct driver's seat position
Observe the important safety notes on
( Y page 107).
XCheck whether you have adjusted seat =
properly.
Electrical seat adjustment ( Y page 108)
When adjusting the seat, make sure:
R you are as far away from the driver's air
bag as possible.
R you are sitting in a normal upright
position.
R you can fasten the seat belt properly.
R you have moved the backrest to an
almost vertical position.R you have set the seat cushion angle so
that your thighs are gently supported.
R you can depress the pedals properly.XCheck whether the head restraint is
adjusted properly ( Y page 108).
When doing so, make sure that you have
adjusted the head restraint so that the back
of your head is supported at eye level by
the center of the head restraint.
Observe the important safety notes on
( Y page 113).
XCheck whether steering wheel : is
adjusted properly.
Adjusting the steering wheel electrically
( Y page 113)
When adjusting the steering wheel, make
sure:
R you can hold the steering wheel with your
arms slightly bent.
R you can move your legs freely.
R you can see all the displays in the
instrument cluster clearly.
Observe the important safety notes on
( Y page 53).
XCheck whether you have fastened seat
belt ; properly ( Y page 54).
The seat belt should:
R fit snugly across your body
R be routed across the middle of your
shoulder
R be routed in your pelvic area across the
hip jointsXBefore starting off, adjust the rear-view
mirror and the exterior mirrors
( Y page 114) in such a way that you have
a good view of road and traffic conditions.XVehicles with memory function: save the
seat, steering wheel and exterior mirror
settings ( Y page 116).106Correct driver's seat positionSeats, steering wheel and mirrors
BA 207 USA, CA Edition B 2011; 1; 3, en-USd2sboikeVersion: 3.0.3.62010-05-20T10:38:09+02:00 - Seite 106
Page 109 of 344

Seats
Important safety notes
GWarning
In order to avoid possible loss of vehicle
control, all seat, head restraint, steering
wheel and rear view mirror adjustments, as
well as fastening of seat belts, must be done
before setting the vehicle in motion.
GWarning
Do not adjust the driver's seat while driving.
Adjusting the seat while driving could cause
the driver to lose control of the vehicle.
Never travel in a moving vehicle with the seat
backrest in an excessively reclined position as
this can be dangerous. You could slide under
the seat belt in a collision. If you slide under
it, the seat belt would apply force at the
abdomen or neck. This could cause serious or
fatal injuries. The seat backrest and seat belts
provide the best restraint when the wearer is
in a position that is as upright as possible and
seat belts are properly positioned on the
body.
GWarning
Your seat belt must be adjusted so that you
can correctly fasten your seat belt.
Observe the following points:
R adjust the seat backrest until your arms are
slightly angled when holding the steering
wheel.
R adjust the seat to a comfortable seating
position that still allows you to reach the
accelerator/brake pedal safely. The
position should be as far back as possible
with the driver still able to operate the
controls properly.
R adjust the head restraint so that it is as
close to the head as possible and the center
of the head restraint supports the back of
the head at eye level.
R never place hands under the seat or near
any moving parts while a seat is being
adjusted.
Failure to do so could result in an accident
and/or serious personal injury.GWarning
The electrically adjustable seats can be
operated at any time. Therefore, do not leave
children unattended in the vehicle, or with
access to an unlocked vehicle. A child's
unsupervised access to a vehicle could result
in an accident and/or serious personal injury.
GWarning!
According to accident statistics, children are
safer when properly restrained in the rear
seating positions than in the front seating
position. Thus, we strongly recommend that
children be placed in the rear seats whenever
possible. Regardless of seating position,
children 12 years old and under must be
seated and properly secured in an
appropriately sized infant restraint, toddler
restraint, or booster seat recommended for
the size and weight of the child. For additional
information, see "Children in the vehicle".
A child's risk of serious or fatal injuries is
significantly increased if the child restraints
are not properly secured in the vehicle and/
or the child is not properly secured in the child
restraint.
GWarning
For your protection, drive only with properly
positioned head restraints.
Adjust the head restraint so that it is as close
to the head as possible and the center of the
head restraint supports the back of the head
at eye level. This will reduce the potential for
injury to the head and neck in the event of an
accident or similar situation.
Seats107Seats, steering wheel and mirrorsBA 207 USA, CA Edition B 2011; 1; 3, en-USd2sboikeVersion: 3.0.3.62010-05-20T10:38:09+02:00 - Seite 107Z
Page 111 of 344
Rear seat head restraints
Lowering and extending the rear seat
head restraints from the front (Cabriolet)
GWarning!
For safety reasons, always drive with the rear
head restraints in the raised position when
the rear seats are occupied.
Keep the area around head restraints clear of
articles (e.g. clothing) to not obstruct the
folding operation of the head restraints.
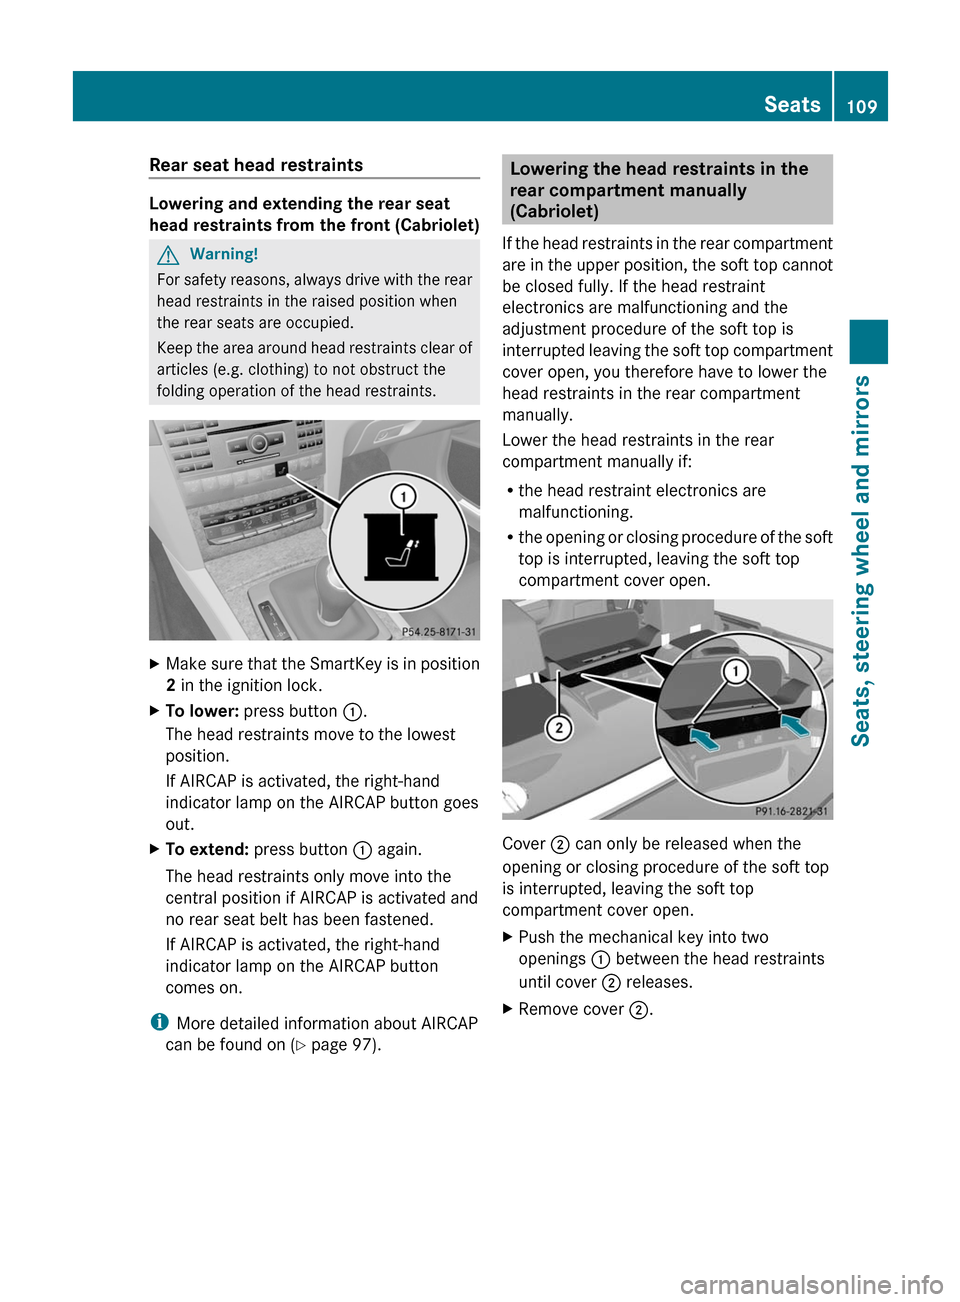
XMake sure that the SmartKey is in position
2 in the ignition lock.
XTo lower: press button :.
The head restraints move to the lowest
position.
If AIRCAP is activated, the right-hand
indicator lamp on the AIRCAP button goes
out.
XTo extend: press button : again.
The head restraints only move into the
central position if AIRCAP is activated and
no rear seat belt has been fastened.
If AIRCAP is activated, the right-hand
indicator lamp on the AIRCAP button
comes on.
iMore detailed information about AIRCAP
can be found on (Y page 97).
Lowering the head restraints in the
rear compartment manually
(Cabriolet)
If the head restraints in the rear compartment
are in the upper position, the soft top cannot
be closed fully. If the head restraint
electronics are malfunctioning and the
adjustment procedure of the soft top is
interrupted leaving the soft top compartment
cover open, you therefore have to lower the
head restraints in the rear compartment
manually.
Lower the head restraints in the rear
compartment manually if:
Rthe head restraint electronics are
malfunctioning.
Rthe opening or closing procedure of the soft
top is interrupted, leaving the soft top
compartment cover open.
Cover ; can only be released when the
opening or closing procedure of the soft top
is interrupted, leaving the soft top
compartment cover open.
XPush the mechanical key into two
openings : between the head restraints
until cover ; releases.
XRemove cover ;.Seats109Seats, steering wheel and mirrorsBA 207 USA, CA Edition B 2011; 1; 3, en-USd2sboikeVersion: 3.0.3.62010-05-20T10:38:09+02:00 - Seite 109Z
Page 112 of 344
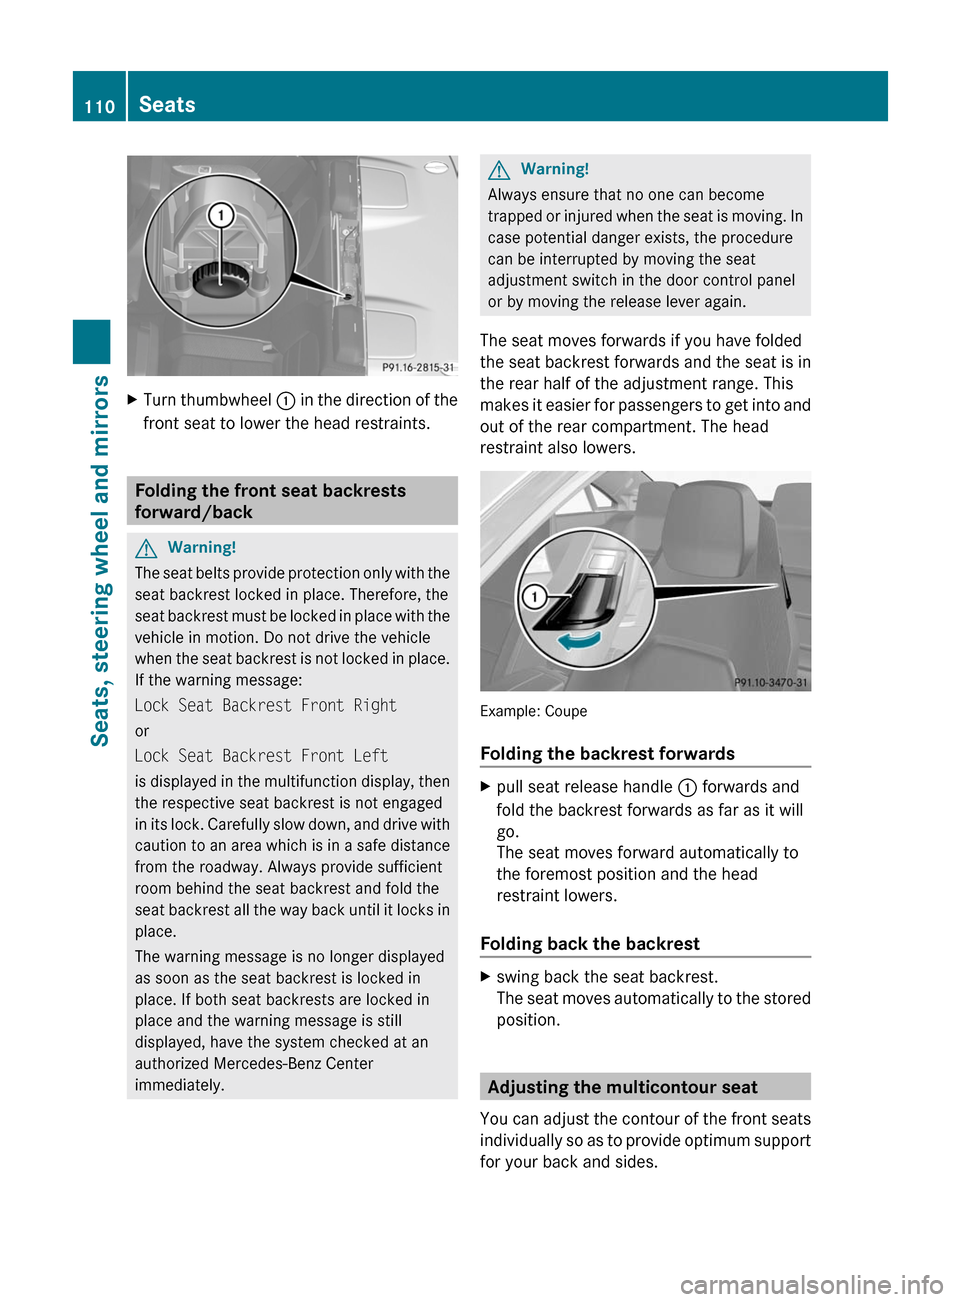
XTurn thumbwheel : in the direction of the
front seat to lower the head restraints.
Folding the front seat backrests
forward/back
GWarning!
The seat belts provide protection only with the
seat backrest locked in place. Therefore, the
seat backrest must be locked in place with the
vehicle in motion. Do not drive the vehicle
when the seat backrest is not locked in place.
If the warning message:
Lock Seat Backrest Front Right
or
Lock Seat Backrest Front Left
is displayed in the multifunction display, then
the respective seat backrest is not engaged
in its lock. Carefully slow down, and drive with
caution to an area which is in a safe distance
from the roadway. Always provide sufficient
room behind the seat backrest and fold the
seat backrest all the way back until it locks in
place.
The warning message is no longer displayed
as soon as the seat backrest is locked in
place. If both seat backrests are locked in
place and the warning message is still
displayed, have the system checked at an
authorized Mercedes-Benz Center
immediately.
GWarning!
Always ensure that no one can become
trapped or injured when the seat is moving. In
case potential danger exists, the procedure
can be interrupted by moving the seat
adjustment switch in the door control panel
or by moving the release lever again.
The seat moves forwards if you have folded
the seat backrest forwards and the seat is in
the rear half of the adjustment range. This
makes it easier for passengers to get into and
out of the rear compartment. The head
restraint also lowers.
Example: Coupe
Folding the backrest forwards
Xpull seat release handle : forwards and
fold the backrest forwards as far as it will
go.
The seat moves forward automatically to
the foremost position and the head
restraint lowers.
Folding back the backrest
Xswing back the seat backrest.
The seat moves automatically to the stored
position.
Adjusting the multicontour seat
You can adjust the contour of the front seats
individually so as to provide optimum support
for your back and sides.
110SeatsSeats, steering wheel and mirrors
BA 207 USA, CA Edition B 2011; 1; 3, en-USd2sboikeVersion: 3.0.3.62010-05-20T10:38:09+02:00 - Seite 110
Page 178 of 344
distance, which creates a danger of a
collision.
Immediately brake the vehicle to increase
your distance to the preceding vehicle. The
warning sound is intended as a final caution
in which you should intercede with your own
braking inputs to avoid a potentially
dangerous situation. Do not wait for the
operation of the warning signal to intercede
with your own braking. This will result in
potentially dangerous emergency braking
which will not always result in an impact being
avoided.
Tailgating increases the risk of an accident.GWarning
DISTRONIC PLUS brakes your vehicle with a
maximum deceleration of 13 ft/s(4 m/s 2
).
This corresponds to approximately 40% of
your vehicle's maximum possible braking
power.
You must apply the brakes yourself to avoid a
collision. DISTRONIC PLUS brakes the vehicle
to restore the set distance to the vehicle in
front or to restore the set speed.
GWarning!
If you do not receive visual or acoustic
warning signals during a critical traffic
situation, DISTRONIC PLUS has either not
recognized the collision risk, has been
deactivated or is malfunctioning.
Remember, whether or not DISTRONIC PLUS
is operating, it is ultimately always the drivers
responsibility to apply the brakes in order to
control the vehicle and avoid a collision.
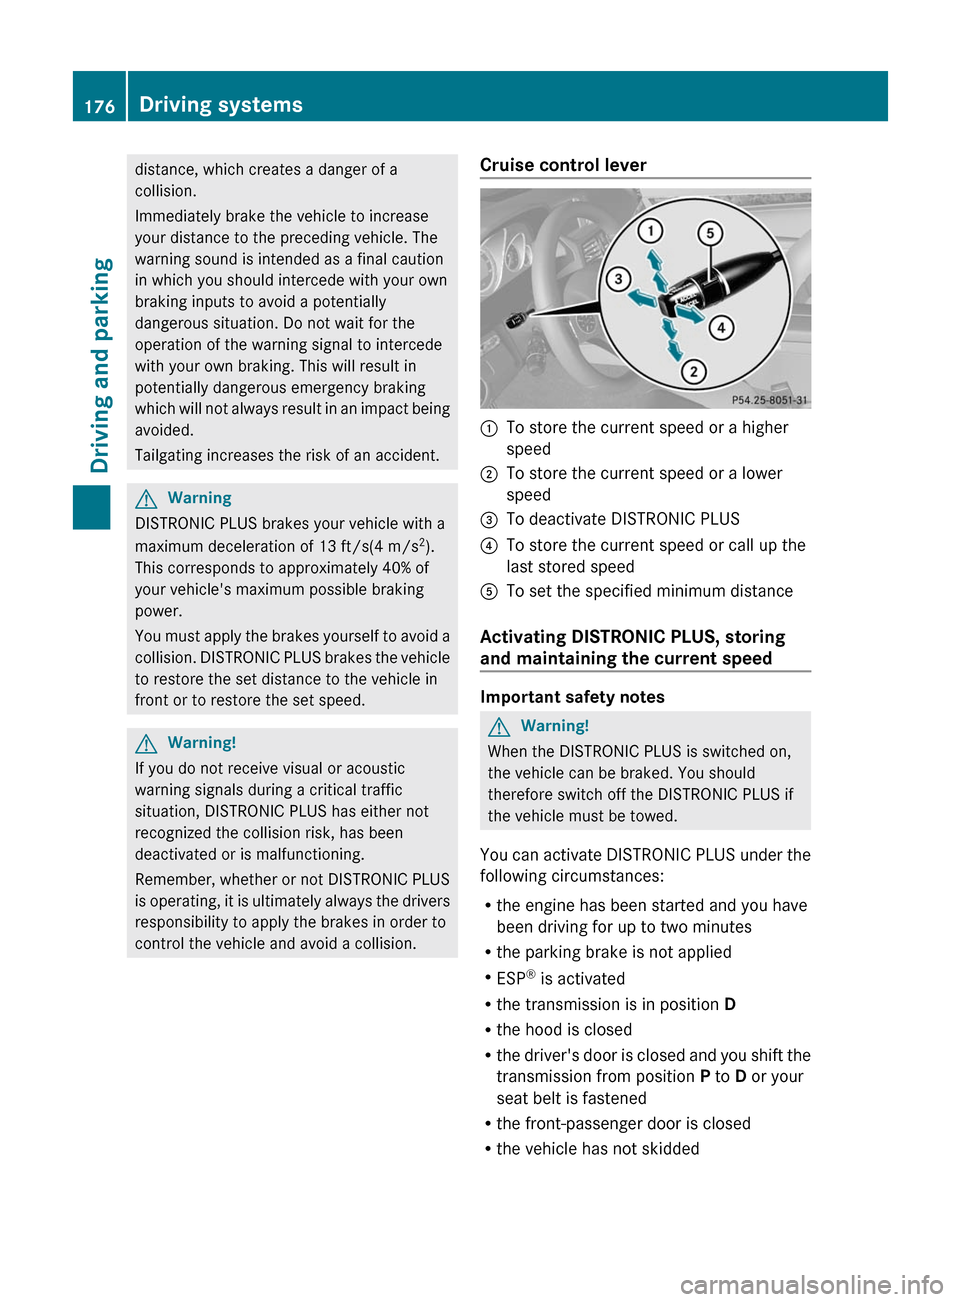
Cruise control lever:To store the current speed or a higher
speed;To store the current speed or a lower
speed=To deactivate DISTRONIC PLUS?To store the current speed or call up the
last stored speedATo set the specified minimum distance
Activating DISTRONIC PLUS, storing
and maintaining the current speed
Important safety notes
GWarning!
When the DISTRONIC PLUS is switched on,
the vehicle can be braked. You should
therefore switch off the DISTRONIC PLUS if
the vehicle must be towed.
You can activate DISTRONIC PLUS under the
following circumstances:
R the engine has been started and you have
been driving for up to two minutes
R the parking brake is not applied
R ESP ®
is activated
R the transmission is in position D
R the hood is closed
R the driver's door is closed and you shift the
transmission from position P to D or your
seat belt is fastened
R the front-passenger door is closed
R the vehicle has not skidded
176Driving systemsDriving and parking
BA 207 USA, CA Edition B 2011; 1; 3, en-USd2sboikeVersion: 3.0.3.62010-05-20T10:38:09+02:00 - Seite 176