2011 MERCEDES-BENZ E-Class COUPE turn signal
[x] Cancel search: turn signalPage 180 of 344

Changing lanes
If you wish to change to the passing lane (in
left-hand-drive vehicles, the passing lane is
the left-hand lane), DISTRONIC PLUS
supports you if:
R you are driving above 40 mph (60 km/h)
R DISTRONIC PLUS is maintaining the
distance to a vehicle in front
R you switch on the appropriate turn signals
R DISTRONIC PLUS does not detect a danger
of collision
If these conditions are met, your vehicle is
accelerated. Acceleration will be interrupted
if changing lanes takes too long or if the
distance between your vehicle and the
vehicle in front becomes too small.GWarning
DISTRONIC PLUS and Active Blind Spot Assist
are only aids designed to assist driving.
They do not relieve you of the responsibility
of paying attention. The driver remains fully
responsible for the vehicle's distance from
other vehicles, the vehicle's speed and for
braking in good time. Always pay attention to
traffic conditions and your surroundings.
Otherwise, you may fail to recognize dangers
in time, cause an accident and injure yourself
and others.
Stopping
GWarning
Never get out of the vehicle when DISTRONIC
PLUS is activated.
DISTRONIC PLUS must also never be
operated, activated or deactivated by a
passenger or from outside the vehicle.
DISTRONIC PLUS does not replace the
parking brake and must not be used for
parking.
The DISTRONIC PLUS braking effect is
canceled and the vehicle can start moving if:
R DISTRONIC PLUS is deactivated using the
cruise control lever.
R you accelerate.
R
there is a malfunction in the system or an
interruption in the power supply, e.g.
battery failure.
R the electrical system in the engine
compartment, the battery or the fuses are
tampered with.
R the battery is disconnected.
If you wish to leave the vehicle or park it,
deactivate DISTRONIC PLUS and secure the
vehicle against rolling away.
If DISTRONIC PLUS detects that the vehicle
in front is stopping, it brakes your vehicle until
it is stationary.
Once your vehicle is stationary, it remains
stationary and you do not need to depress the
brake.
i Depending on the specified minimum
distance, your vehicle will come to a
standstill at a sufficient distance behind the
vehicle in front. The specified minimum
distance is set using the control on the
cruise control lever.
You will see a warning message in the
multifunction display if DISTRONIC PLUS is
activated and:
R the driver's door is open and the driver's
seat belt is unfastened.
R the engine is switched off.
R the hood is opened.
Shift to 'P'XMove the selector lever to P to prevent the
vehicle from rolling away.
DISTRONIC PLUS is deactivated. The
warning message in the multifunction
display disappears.
The horn will also sound at regular intervals if
DISTRONIC PLUS is activated and you:
R switch the engine off, open the driver's
door and take off your seat belt
R open the hood
The sounding of the horn alerts you to the fact
that the vehicle has been parked while
DISTRONIC PLUS is still activated. The sound
178Driving systemsDriving and parking
BA 207 USA, CA Edition B 2011; 1; 3, en-USd2sboikeVersion: 3.0.3.62010-05-20T10:38:09+02:00 - Seite 178
Page 193 of 344

parking spaces on the front-passenger side
as standard. Parking spaces on the driver's
side are displayed as soon as the turn signal
on the driver's side is activated. To park on
the driver's side, you must leave the driver's
side turn signal switched on until you have
engaged reverse gear.
Parking Guidance will only detect parking
spaces:
R that are parallel to the direction of travel
R that are at least 5 ft (1.5 m) wide
R that are at least 4.3 ft (1.3 m) longer than
your vehicle.
A parking space is displayed while you are
driving past it, and until you are
approximately 50 ft (15 m) away from it.
ParkingGWarning!
The Parking Guidance is only an aid and may
not detect all obstacles. The Parking
Guidance does not relieve you of the
responsibility to pay attention. You are always
responsible for safety and must continue to
pay attention to your immediate surroundings
when parking and maneuvering. Otherwise,
you could endanger yourself and others.
XStop the vehicle when the parking space
symbol shows the desired parking space in
the instrument cluster.XShift the transmission to position R.
The multifunction display shows the
Check Vehicle Surroundings Press
'OK' to Confirm message.XPress a on the multifunction steering
wheel to confirm.
The multifunction display switches to
Parking Guidance.
Depending on your distance from the
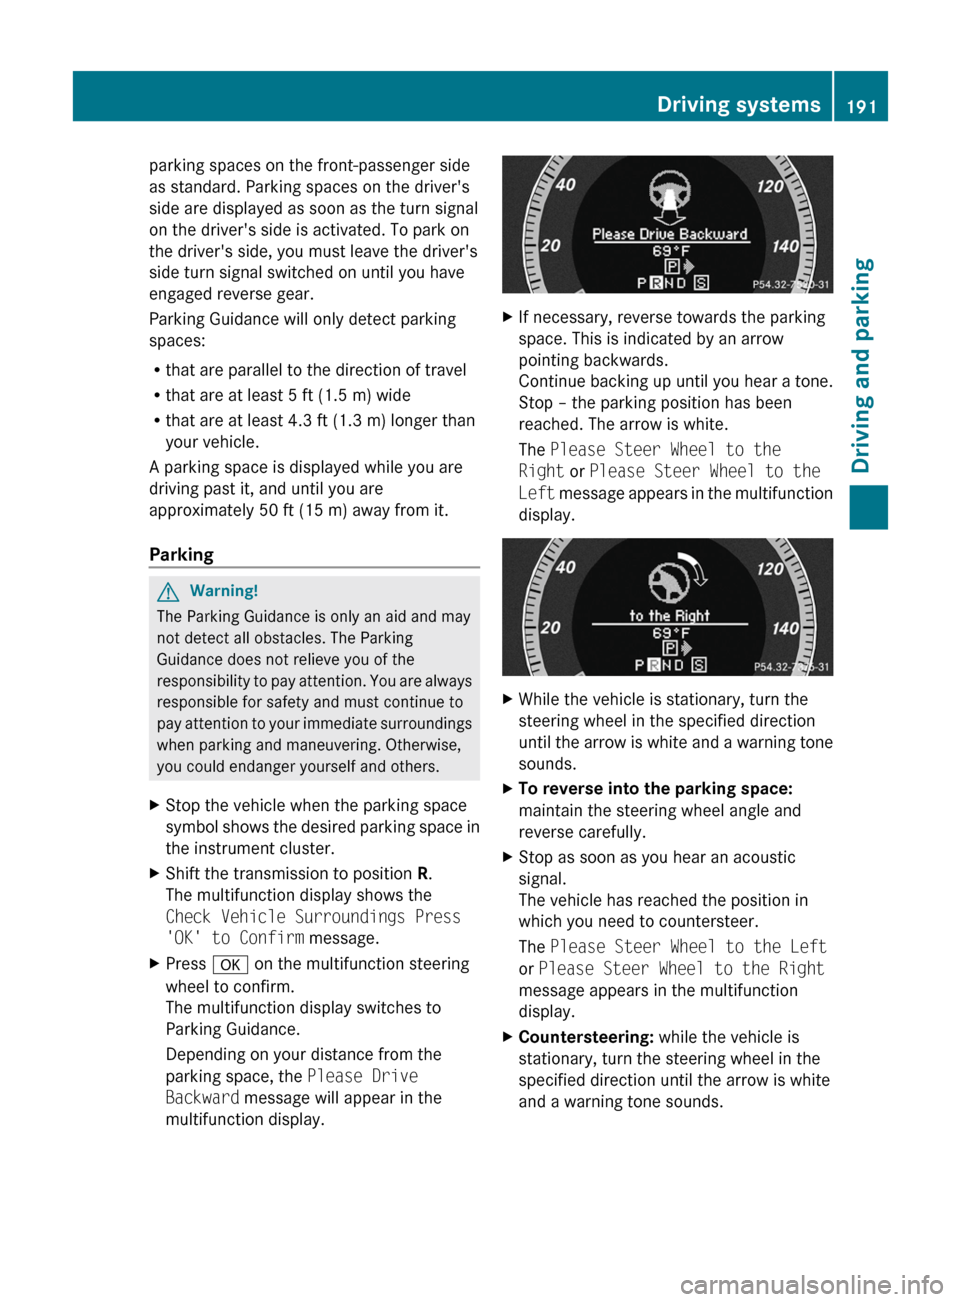
parking space, the Please Drive
Backward message will appear in the
multifunction display.XIf necessary, reverse towards the parking
space. This is indicated by an arrow
pointing backwards.
Continue backing up until you hear a tone.
Stop – the parking position has been
reached. The arrow is white.
The Please Steer Wheel to the
Right or Please Steer Wheel to the
Left message appears in the multifunction
display.XWhile the vehicle is stationary, turn the
steering wheel in the specified direction
until the arrow is white and a warning tone
sounds.XTo reverse into the parking space:
maintain the steering wheel angle and
reverse carefully.XStop as soon as you hear an acoustic
signal.
The vehicle has reached the position in
which you need to countersteer.
The Please Steer Wheel to the Left
or Please Steer Wheel to the Right
message appears in the multifunction
display.XCountersteering: while the vehicle is
stationary, turn the steering wheel in the
specified direction until the arrow is white
and a warning tone sounds.Driving systems191Driving and parkingBA 207 USA, CA Edition B 2011; 1; 3, en-USd2sboikeVersion: 3.0.3.62010-05-20T10:38:09+02:00 - Seite 191Z
Page 197 of 344

attention to a vehicle detected in the
monitored area. If you switch on the
corresponding turn signal before changing
lane, you will also receive visual and audible
collision warnings. For this purpose, Blind
Spot Assist uses sensors in the rear bumper.GWarning
Blind Spot Assist is only an aid designed to
assist driving. It may fail to detect some
vehicles and is no substitute for attentive
driving.
Blind Spot Assist cannot detect road and
traffic conditions. It may fail to detect narrow
vehicles, such as motorcycles or bicycles, or
may only detect them too late.
Monitoring may be affected by dirty sensors,
strong spray or poor visibility caused by snow,
rain or mist, for example. In this case, vehicles
are detected late or not at all.
Always pay attention to traffic conditions and
your surroundings. Otherwise, you may fail to
recognize dangers in time, cause an accident
and injure yourself and others.
i USA only:
This device has been approved by the FCC
as a “Vehicular Radar System”. The radar
sensor is intended for use in an automotive
radar system only. Removal, tampering, or
altering of the device will void any
warranties, and is not permitted by the
FCC. Do not tamper with, alter, or use in
any non-approved way.
Any unauthorized modification to this
device could void the user’s authority to
operate the equipment.
For Blind Spot Assist to assist you when
driving, the radar sensor system must be
switched on ( Y page 211) and operational.
Monitoring range of the sensors
Blind Spot Assist monitors the area up to 10 ft
(3 m) behind your vehicle and directly next to
your vehicle as shown in the diagram.
Side view, Coupe (example)
GWarning
Blind Spot Assist monitors certain areas in the
immediate vicinity of your vehicle. Vehicles
that approach and drive past at high speeds
are not detected. There is no display and no
warning.
If the lanes are very wide, it may not be
possible to monitor the complete width of the
neighboring lane. For this reason, vehicles in
the next lane may not be detected, especially
if they are driving in a staggered formation.
This may be the case if vehicles are driving at
that edge of their lane which is furthest away
from your vehicle.
Always pay attention to traffic conditions and
your surroundings. Otherwise, you may fail to
recognize dangers in time, cause an accident
and injure yourself and others.
If the lanes are narrow, the system may be
unable to distinguish the neighboring lane
from the one beyond it. For this reason, the
system may indicate vehicles in the farther
lane, especially if the vehicles are driving in a
staggered formation in different lanes. In
particular, this may be the case if the vehicles
are driving at that edge of their lane which is
nearest your vehicle.
Driving systems195Driving and parkingBA 207 USA, CA Edition B 2011; 1; 3, en-USd2sboikeVersion: 3.0.3.62010-05-20T10:38:09+02:00 - Seite 195Z
Page 198 of 344

Due to the nature of the system:
R warnings may be issued unnecessarily
when driving close to crash barriers or
similar solid lane borders.
R warnings may be interrupted when driving
alongside particularly long vehicles for a
prolonged time.
The two sensors for Blind Spot Assist are
integrated into the sides of the rear bumper.
Make sure that the bumper is free of dirt, ice
or slush around the sensors. For example, the
radar sensors must not be covered by bicycle
racks or overhanging loads. In the event of a
severe impact or damage to the bumpers,
have the function of the radar sensors
checked at a qualified specialist workshop,
e.g. an authorized Mercedes-Benz Center.
Blind Spot Assist may otherwise not work
properly.
Indicator and warning display:Yellow indicator lamp/red warning lamp
If Blind Spot Assist is switched on, indicator
lamp : in the exterior mirrors lights up in
yellow up to a speed of 20 mph (30 km/h). At
speeds above 20 mph (30 km/h), the
indicator lamp goes out and Blind Spot Assist
is operational.
If a vehicle is detected within the monitoring
range of Blind Spot Assist at speeds above
20 mph (30 km/h), warning lamp : on the
corresponding side lights up in red. This
warning is always emitted when a vehicle
enters the blind spot monitoring range from
behind or from the side. When you overtake
a vehicle, the warning only occurs if the
difference in speed is less than 7 mph
(12 km/h).
The yellow indicator lamp goes out if reverse
gear is engaged. In this event, Blind Spot
Assist is no longer active.
The brightness of the indicator/warning
lamps is adjusted automatically according to
the ambient light.GWarning
Blind Spot Assist is not active at speeds under
approximately 20 mph (30 km/h). The
indicator lamps in the exterior mirrors are
yellow. Vehicles in the monitoring range are
then not indicated.
Always pay attention to traffic conditions and
your surroundings. Otherwise, you may fail to
recognize dangers in time, cause an accident
and injure yourself and others.
Collision warning
If a vehicle is detected in the monitoring range
of Blind Spot Assist and you switch on the turn
signal, a double warning tone sounds. Red
warning lamp : flashes. If the turn signal
remains on, detected vehicles are indicated
by the flashing of red warning lamp :. There
are no further warning tones.
Switching on Blind Spot Assist
XMake sure that the radar sensor system
( Y page 211) and Blind Spot Assist
( Y page 208) are activated in the on-board
computer.XTurn the SmartKey to position 2 in the
ignition lock.
Warning lamps : light up in red in the
exterior mirrors for approximately 1.5
seconds and then turn yellow.196Driving systemsDriving and parking
BA 207 USA, CA Edition B 2011; 1; 3, en-USd2sboikeVersion: 3.0.3.62010-05-20T10:38:09+02:00 - Seite 196
Page 212 of 344

If you activate the Locator Lighting:
function, the following light up:
R the parking lamps
R the tail lamps
R the fog lamps 18
R the low-beam headlamps 19
R the license plate lamp
R the side marker lampsXPress the = or ; button on the
steering wheel to select the Settings
menu.XPress the : or 9 button to select the
Lights submenu.XPress the a button to confirm.XPress the : or 9 button to select the
Locator Lighting: function.
You will see the selected setting: Enabled
or Disabled .XPress the a button to save the setting.
To deactivate the delayed shut-off
temporarily:
XBefore leaving the vehicle, turn the
SmartKey to position 0 in the ignition lock.XTurn the SmartKey to position 2 in the
ignition lock and back to position 0.
The delayed shut-off is deactivated.
The delayed shut-off is reactivated the next
time you start the engine.
Activating/deactivating the interior
lighting delayed switch-off
When you activate the Interior Lighting
Delay: function and remove the SmartKey
from the ignition lock, the interior lighting
remains on for 10 seconds.
XPress the = or ; button on the
steering wheel to select the Settings
menu.XPress the : or 9 button to select the
Lights submenu.XPress the a button to confirm.XPress the : or 9 button to select the
Interior Lighting Delay: function.
You will see the selected setting: Enabled
or Disabled .XPress the a button to save the setting.
Vehicle
Activating/deactivating the automatic
locking feature
If you select the Automatic Door Lock:
function, the vehicle is centrally locked above
a speed of around 9 mph (15 km/h).
i Further information on the automatic
locking feature ( Y page 81).
XPress the = or ; button on the
steering wheel to select the Settings
menu.XPress the : or 9 button to select the
Vehicle submenu.XPress the a button to confirm.XPress the : or 9 button to select the
Automatic Door Lock: function.
You will see the selected setting: Enabled
or Disabled .XPress the a button to save the setting.
Activating/deactivating the acoustic
locking confirmation
If you switch on the Acoustic Lock
Feedback: function, an acoustic signal
sounds when you lock or unlock the vehicle.
When unlocking, the signal sounds once.
When locking, it sounds three times.
XPress the = or ; button on the
steering wheel to select the Settings
menu.XPress the : or 9 button to select the
Vehicle submenu.XPress the a button to confirm.18
Only for vehicles with front fog lamps.
19 Only for vehicles without front fog lamps.210Menus and submenusOn-board computer and displays
BA 207 USA, CA Edition B 2011; 1; 3, en-USd2sboikeVersion: 3.0.3.62010-05-20T10:38:09+02:00 - Seite 210
Page 225 of 344

Display messagesPossible causes/consequences and M Solutionsb
Check Left
Cornering Light
or
Check Right
Cornering LightThe left or right-hand cornering light is faulty. XCheck whether you are permitted to change the bulb yourself
( Y page 126).
or
XVisit a qualified specialist workshop.b
Check Left Low Beam
or
Check Right Low
BeamThe left or right-hand low-beam headlamp is faulty. XCheck whether you are permitted to change the bulb yourself
( Y page 126).
or
XVisit a qualified specialist workshop.b
Check Rear Left
Turn Signal
or
Check Rear Right
Turn SignalThe rear left-hand or rear right-hand turn signal is faulty.XCheck whether you are permitted to change the bulb yourself
( Y page 126).
or
XVisit a qualified specialist workshop.b
Check Front Left
Turn Signal
or
Check Front Right
Turn SignalThe front left-hand or front right-hand turn signal is faulty.XCheck whether you are permitted to change the bulb yourself
( Y page 126).
or
XVisit a qualified specialist workshop.b
Check Left Mirror
Turn Signal
or
Check Right Mirror
Turn SignalThe turn signal in the left-hand and/or right-hand exterior mirror
is faulty.XCheck whether you are permitted to change the bulb yourself
( Y page 126).
or
XVisit a qualified specialist workshop.b
Check Center Brake
LampThe high-mounted brake lamp is faulty.XCheck whether you are permitted to change the bulb yourself
( Y page 126).
or
XVisit a qualified specialist workshop.Display messages223On-board computer and displaysBA 207 USA, CA Edition B 2011; 1; 3, en-USd2sboikeVersion: 3.0.3.62010-05-20T10:38:09+02:00 - Seite 223Z
Page 268 of 344

of the garage door. People could otherwise be
injured by the movement of the door.
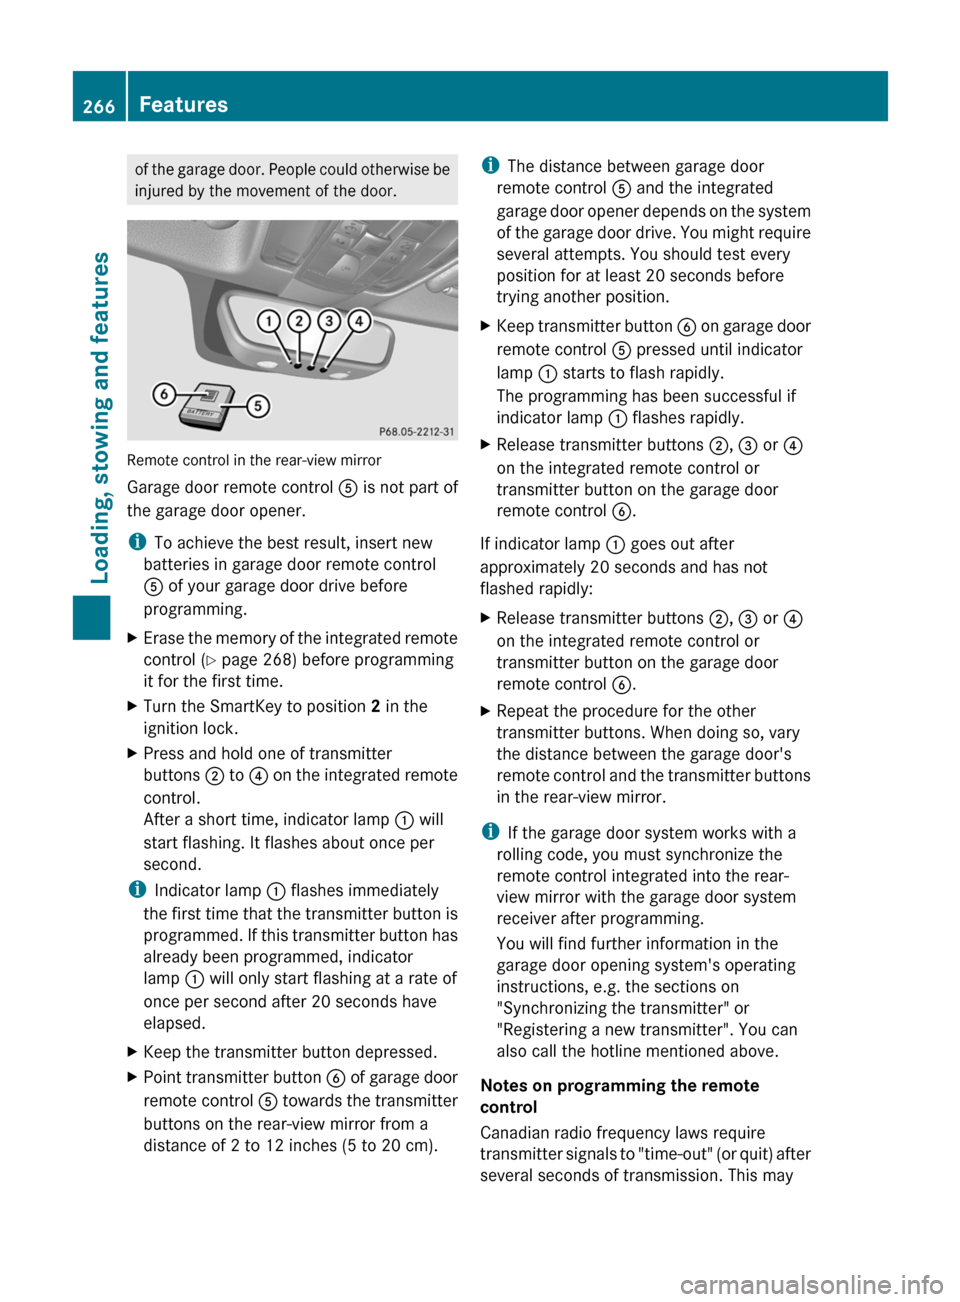
Remote control in the rear-view mirror
Garage door remote control A is not part of
the garage door opener.
i To achieve the best result, insert new
batteries in garage door remote control
A of your garage door drive before
programming.
XErase the memory of the integrated remote
control ( Y page 268) before programming
it for the first time.XTurn the SmartKey to position 2 in the
ignition lock.XPress and hold one of transmitter
buttons ; to ? on the integrated remote
control.
After a short time, indicator lamp : will
start flashing. It flashes about once per
second.
i Indicator lamp : flashes immediately
the first time that the transmitter button is
programmed. If this transmitter button has
already been programmed, indicator
lamp : will only start flashing at a rate of
once per second after 20 seconds have
elapsed.
XKeep the transmitter button depressed.XPoint transmitter button B of garage door
remote control A towards the transmitter
buttons on the rear-view mirror from a
distance of 2 to 12 inches (5 to 20 cm).i The distance between garage door
remote control A and the integrated
garage door opener depends on the system
of the garage door drive. You might require
several attempts. You should test every
position for at least 20 seconds before
trying another position.XKeep transmitter button B on garage door
remote control A pressed until indicator
lamp : starts to flash rapidly.
The programming has been successful if
indicator lamp : flashes rapidly.XRelease transmitter buttons ;, = or ?
on the integrated remote control or
transmitter button on the garage door
remote control B.
If indicator lamp : goes out after
approximately 20 seconds and has not
flashed rapidly:
XRelease transmitter buttons ;, = or ?
on the integrated remote control or
transmitter button on the garage door
remote control B.XRepeat the procedure for the other
transmitter buttons. When doing so, vary
the distance between the garage door's
remote control and the transmitter buttons
in the rear-view mirror.
i If the garage door system works with a
rolling code, you must synchronize the
remote control integrated into the rear-
view mirror with the garage door system
receiver after programming.
You will find further information in the
garage door opening system's operating
instructions, e.g. the sections on
"Synchronizing the transmitter" or
"Registering a new transmitter". You can
also call the hotline mentioned above.
Notes on programming the remote
control
Canadian radio frequency laws require
transmitter signals to "time-out" (or quit) after
several seconds of transmission. This may
266FeaturesLoading, stowing and features
BA 207 USA, CA Edition B 2011; 1; 3, en-USd2sboikeVersion: 3.0.3.62010-05-20T10:38:09+02:00 - Seite 266
Page 269 of 344

not be long enough for the integrated signal
transmitter to pick up the signal during
programming. Similar to this Canadian law,
some U.S. gate operators are designed to
"time-out" in the same manner.
If you live in Canada or have difficulties
programming the garage door opener
(regardless of where you live) when using the
programming steps (see above), proceed as
follows:XPress transmitter button ( ;, = or ?) and
hold it down during the following steps until
the setup has been completed
successfully.XAt the same time, press transmitter button
B of the garage door remote control for
two seconds, then release it for two
seconds, then press it again for two
seconds.XRepeat this sequence on transmitter
button B of the garage door remote
control until the frequency signal has been
learned.XIf the setup procedure is successful,
indicator lamp : flashes once slowly and
goes out after a few seconds.XContinue with the other programming
steps (see above).
Problems when programming
If you have problems when programming the
integrated remote control, please note the
following:
R check the transmitter frequency of garage
door remote control A (which can usually
be found on the rear of the remote control).
The integrated remote control is
compatible with equipment that operates
in the frequency range 280 to 390 MHz.
R replace the batteries in garage door remote
control A. This increases the likelihood of
garage door remote control A sending a
strong and precise signal to the integrated
remote control on the rear-view mirror.
R When aiming the garage door remote
control at the transmitter buttons on the
rear-view mirror, hold garage door remote
control A at differing distances and angles
from the transmitter button that you are
programming. Try different angles from a
distance of 2 to 12 inches (5 to 30 cm) or
the same angle from differing distances.
R If there is another garage door remote
control for the same device, perform the
programming steps again using the remote
control. Before performing these steps,
make sure that new batteries have been
installed in the garage door remote control.
R Align the antenna cable of the garage door
opener unit. This can improve signal
reception/transmission.
Opening or closing the garage door
Once programmed, the integrated remote
control will assume the function of the garage
door system's remote control. Please also
read the operating instructions for the garage
door system.
XTurn the SmartKey to position 2 in the
ignition lock.XPress transmitter button ;, = or ? in the
overhead control panel that you have
programmed to operate the garage door.
Garage door system with fixed code:
indicator lamp : lights up continuously.
Garage door system with rolling code:
indicator lamp : flashes briefly and then
lights up for approximately two seconds.
This is repeated for up to 20 seconds.
i The transmitter will transmit a signal for
as long as the transmitter button is being
pressed. The transmission will be halted
after a maximum of 20 seconds and
indicator lamp : will flash. Press the
transmitter button again, if necessary.
Features267Loading, stowing and featuresBA 207 USA, CA Edition B 2011; 1; 3, en-USd2sboikeVersion: 3.0.3.62010-05-20T10:38:09+02:00 - Seite 267Z