2011 MERCEDES-BENZ E-CLASS CABRIOLET light
[x] Cancel search: lightPage 78 of 353
X
Press the &or% button.
The key batter yisworking properly if bat-
tery check lamp :lights up briefly.
If batter ycheck lamp :does not light up
briefly during the test,t he key batteryisdis-
charged.
X Changing the batter y(Ypage 75)
i If the key batter yischecked within the
signal reception range of the vehicle, press-
ing the &or% button locks or
unlock sthe vehicle.
Changing the battery You require
aCR20253Vc ell battery.
X Take the emergenc ykey element out of the
key (Y page 74). X
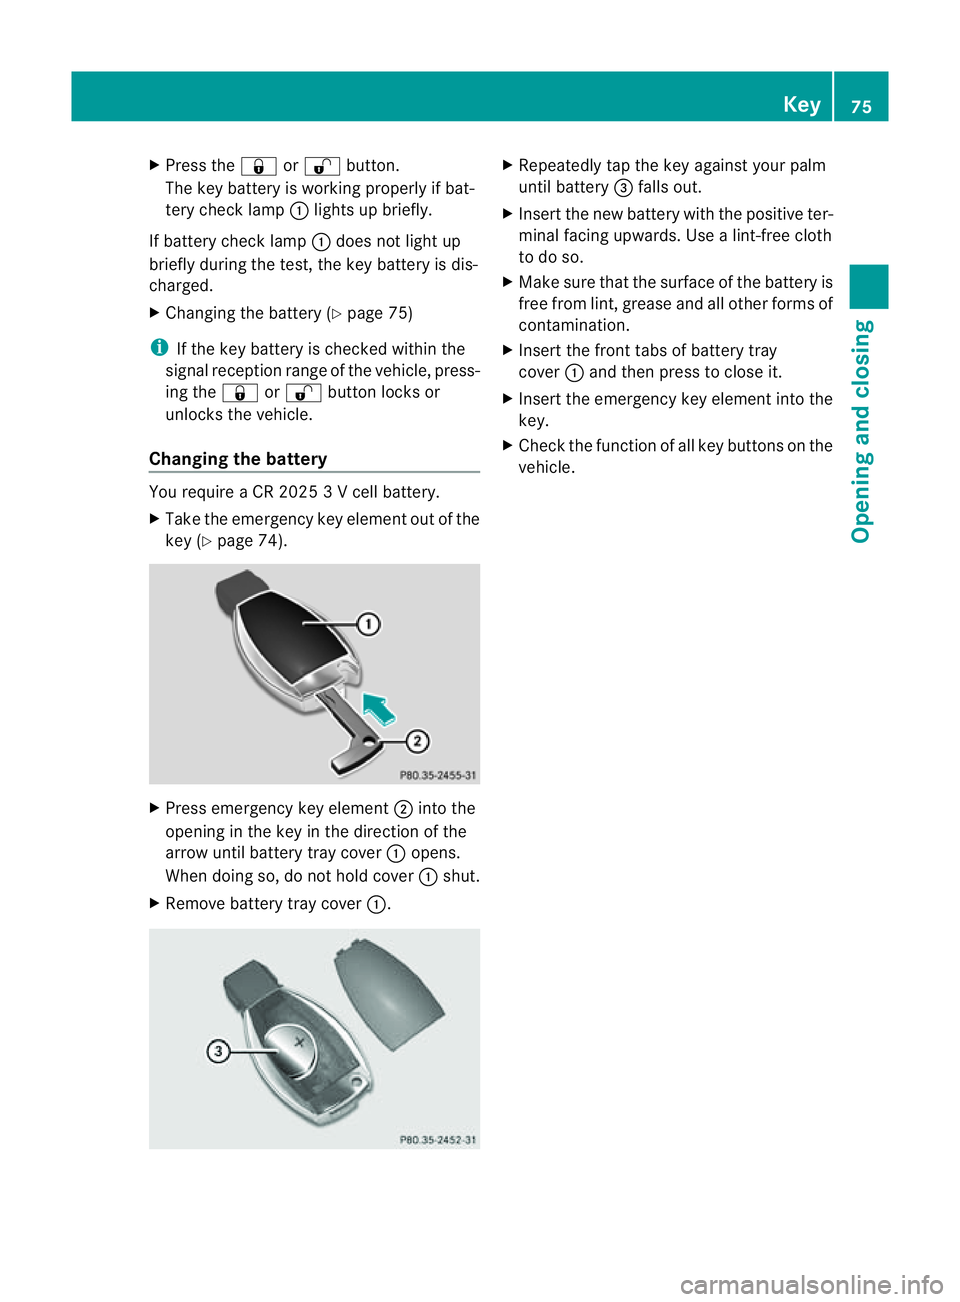
Press emergenc ykey element ;into the
opening in the key in the direction of the
arrow until batter ytray cover :opens.
When doing so, do not hold cover :shut.
X Remove batter ytray cover :. X
Repeatedly tap the key against your palm
until battery =falls out.
X Inser tthe new battery with the positive ter-
minal facing upwards. Use alint-free cloth
to do so.
X Make sure that the surface of the battery is
free from lint, grease and all other forms of
contamination.
X Insert the front tabs of battery tray
cover :and then press to close it.
X Insert the emergency key element into the
key.
X Check the function of all key buttons on the
vehicle. Key
75Opening and closing Z
Page 80 of 353

Problem Possible causes/consequences and
M Solutions
The key cannot be
turned in the ignition
lock. The key has been in position
0for aconsiderable time.
X Remove the key and reinsert it into the ignition lock.
X Check the starter battery and charge it if necessary
(Y page 305).
X Start the engine. The on-board voltage is too low.
X
Switch off non-essential consumers, e.g. seat heating or interior
lighting, and try to turn the key again.
If this does not work:
X Check the starter battery and charge it if necessary
(Y page 305).
or
X Jump-start the vehicle (Y page 309).
or
X Consult aqualified specialist workshop. Doors
Important safety notes
G
WARNING
Only for the United Kingdom: if the vehicle
has been locked with the key, the double lock
function is activated as standard. It is then not
possible to open the doors from inside the
vehicle.
Therefore, do not leave any people behind in
the vehicle, particularly children, elderly peo-
ple or people in need of special assistance if
the vehicle has been locked with the key. As
ar esult, they may not be able to free them-
selves in the event of an emergency. As a
result, they could be seriously or even fatally
injured by prolonged exposure to extremely
high or low temperatures, for example. In this
case, rescuing people from outside the vehi-
cle is difficult.
Deactivat ethe interior motion sensor before
you lock the vehicle with the key. The doors
can then be opened from the inside after the vehicle has been locked from the outside with
the key.
G
WARNING
If children are left unsupervised in the vehicle,
they could:
R open adoor from inside the vehicle at any
time, even if it has been locked
R start the vehicle using akey which has been
left in the vehicle
R release the parking brake
They could thereby endanger themselves and
others. Never leave children unsupervised in
the vehicle. Always take the key with you
when leaving the vehicle, even if you are only
leaving it for ashort time. Unlocking and opening the doors
from the inside
For all countries except the United King-
dom: you can open adoor from inside the
vehicle even if it has been locked. Doors
77Opening and closing Z
Page 81 of 353

Only for the United Kingdom:
if the vehicle
has been locked with the key, the double lock
function is activated as standard. It is then
not possible to open the doors from inside the
vehicle. Deactivate the interior motion sensor
(Y page 69) before you lock the vehicle with
the key. The doors can then be opened from
the inside after the vehicle has been locked
from the outside with the key. X
Pull door handle ;.
If the door is locked, lockin gknob :pops
up. The door is unlocked and can be
opened.
i When adoor is opened, the side window
on that side opens slightly. When the door
is closed, the side window closes again.
! The side windows will not open/close if
the batter yisdischarged or if the side win-
dows have iced up. It will then not be pos-
sible to close the door. Do not attempt to
forc ethe door to close. You could other-
wise damage the door or the side window. Centrally locking and unlocking the
vehicle from the inside
You can centrally lock or unlock the vehicle
from the inside.
The central locking/unlocking button does
not lock or unlock the fuel filler flap.
i You cannot unlock the vehicle centrally
from the inside if the vehicle has been
locked with the key or KEYLESS-GO. X
To unlock: press button :.
X To lock: press button ;. Automatic locking feature
The vehicle is locked automatically when the
ignition is switched on and the wheels are
turning.
You could therefore be locked out when:
R the vehicle is being pushed.
R the vehicle is being towed.
R the vehicle is being tested on adynamom-
eter. X
To deactivate: press and hold button :
for about five seconds until atones ounds.
X To activate: press and hold button ;for
about five seconds until atones ounds.
You can also switch the automatic locking
function on and off using the on-board com-
puter (Y page 228). 78
DoorsOpening and closing
Page 88 of 353
If the side window opens again slightly:
X Immediately pullt he corresponding switch
on the door control panel until the side win-
dow is completel yclosed (Y page 82).
X Hold the switch for an additional second.
X If the corresponding side window remains
closed after the button has been released,
the side window has been reset correctly.
If this is not the case, repeatt he steps
above again. Problems with the side windows
Problem: aside window cannot be closed
because it is blocked by objects, e.g.
leaves in th ewindow guide.
X Remove the objects.
X Close the side window.
Problem :aside window cannot be closed
and you cannot see th ecause. G
WARNING
Closing the side windows with increased force
or without the anti-entrapmen tfeature could
lead to serious or even fatal injury. Make sure
that nobody can becom etrapped when clos-
ing the side windows.
If as ide window is obstructed during closing
and reopen sagain slightly:
X Immediately afte rthe window blocks, pull
the corresponding switch again until the
side window has closed.
The side window is closed with increased
force.
If as ide window is obstructed again during
closing and reopens again slightly:
X Immediately after the window blocks, pull
the corresponding switch again until the
side window has closed.
The side window is closed without the anti-
entrapment feature. Soft top (Cabriolet)
Important safety notes
You can open or close the soft top:
R when the vehicle is stationary or
R when driving up to aspeed of 40 km/h.
If there is astrongh ead wind, it may not be
possible to close the soft top fully.Int his
case, reduce speed or stop in order to close
the soft top fully.
For safety reasons, Mercedes-Ben zrecom-
mends that you only open or close the soft
top when the vehicle is stationary. G
WARNING
Only drive with the soft top fully open or
closed.
If the soft top does not open or close fully, the
soft-top hydraulics are depressurised and the
soft top is lowered:
R after about seven minutes if the ignition is
switched on
R immediately if the ignition is switched off
Aw arning tone sounds shortly beforehand.
The Top being opened message appear
sin
th em ultifunction display.
Loc kthe soft top again before driving on. Oth-
erwise, the unlocked soft top could open dur-
ing the journey and cause you to lose control
of your vehicle. You or other persons could be
injured as aresult.
! Never sit on the soft-top compartment
cover and do not store any heavy objects
on it. You will otherwise damage the soft
top and soft-top compartmentc over of the
vehicle.
! When opening and closing the soft top,
make sure that:
R there is sufficient clearance above it, as
the soft top swings upwards
R the boot separator is closed.
R the boot is only loaded to below the boot
separator. Soft top (Cabriolet)
85Opening and closing Z
Page 96 of 353
stationary or when driving up to
aspeed of
160 km/h.
AIRCAP has the following components:
R aw ind deflector between the windscreen
and the soft top
R an AIRCAP draught stop between the two
head restraints on the rear bench seat G
WARNING
When extending and retractingA IRCAP, make
sure that no one can become trapped. If there
is ar isk of entrapment,p ress the button again
to retract AIRCAP again.
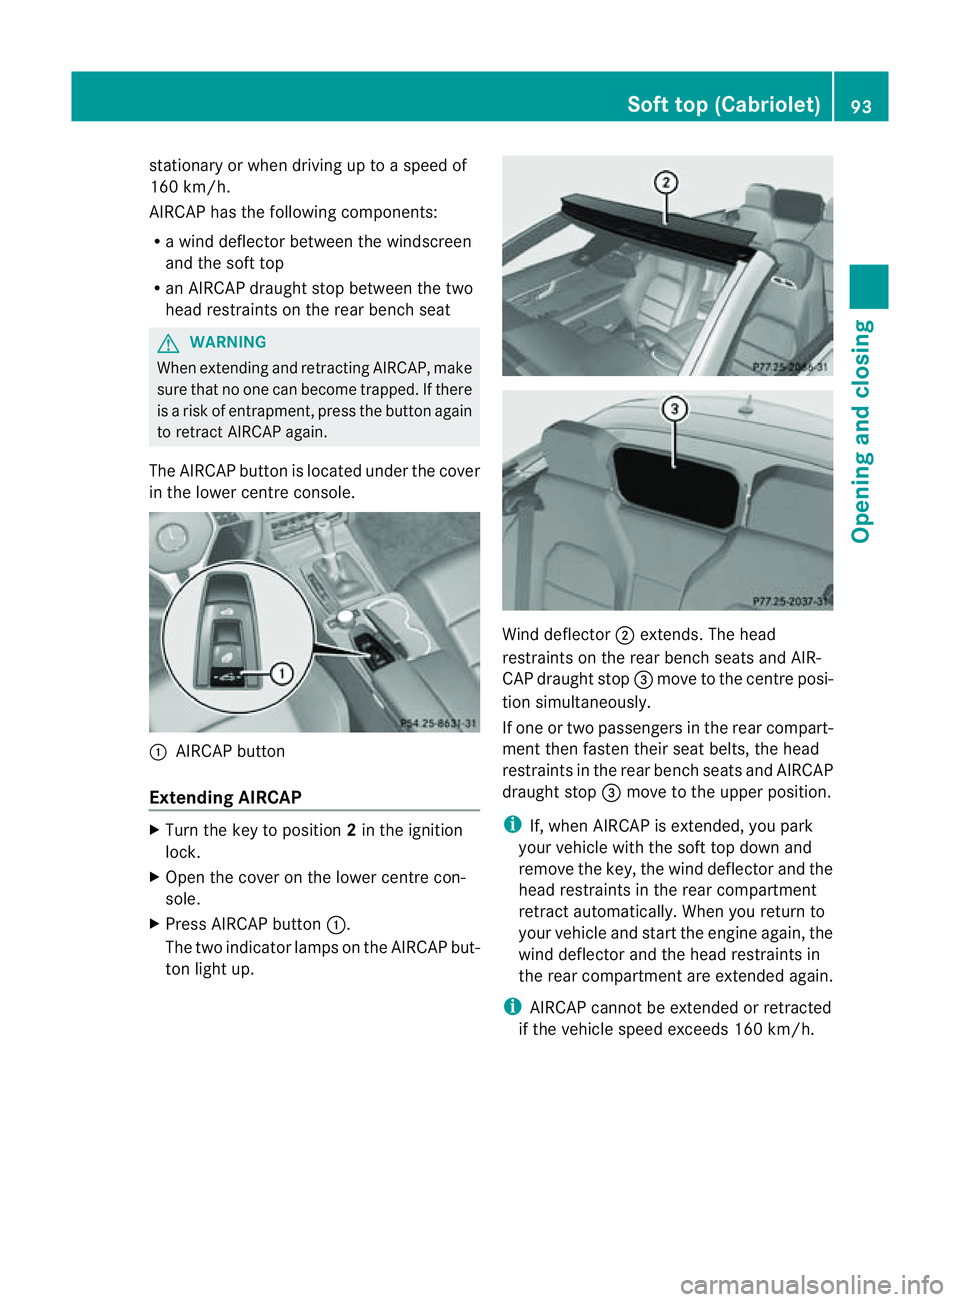
The AIRCAP button is located under the cover
in the lower centre console. :
AIRCAP button
Extending AIRCAP X
Turn the key to position 2in the ignition
lock.
X Open the cover on the lower centre con-
sole.
X Press AIRCAP button :.
The two indicator lamps on the AIRCAP but-
ton light up. Wind deflector
;extends. The head
restraints on the rear bench seats and AIR-
CAP draught stop =move to the centre posi-
tion simultaneously.
If one or two passengers in the rear compart-
ment then fasten their seat belts, the head
restraints in the rear bench seats and AIRCAP
draught stop =move to the upper position.
i If, when AIRCAP is extended, you park
your vehicle with the soft top down and
remove the key, the wind deflector and the
head restraints in the rear compartment
retract automatically. When you return to
your vehicle and start the engine again, the
wind deflector and the head restraints in
the rear compartment are extended again.
i AIRCAP cannot be extended or retracted
if the vehicle speed exceeds 160 km/h. Soft top (Cabriolet)
93Opening and closing Z
Page 97 of 353
Retracting AIRCAP
X
Turn the key to position 2in the ignition
lock.
X Ope nthe cove ronthe lowe rcentre con-
sole.
X Press AIRCAP button :.
The two indicator lamps on the AIRCAP but-
ton go out. Wind deflector ;retracts. The
hea drestraints on the rea rbenchs eats and
AIRCAP draught stop =move to the low-
est position simultaneously.
i If ther eare passengers wearing seat belts
in the rear compartment ,the head
restraint sonthe rear bench seats and the
AIRCAP draught stop remain in the upper
position.
Retracting the head restraint sonthe
rear bench seats from the driver's seat To improve the rear view, you can retract the
head restraint
sonthe rear bench seats indi-
vidually (Y page 103). The wind deflector
remains in its curren tposition. Fitting/removing the AIRCAP draught
stop
Preparation You will need
a4mmhex-socket wrench to
fit/remove the AIRCAP draught stop.
Before fitting or removing the AIRCAP draught
stop:
X Turn the key to position 2in the ignition
lock.
X Open the folding roof full y(Ypage 86).
X Exten dthe head restraint sinthe rear com-
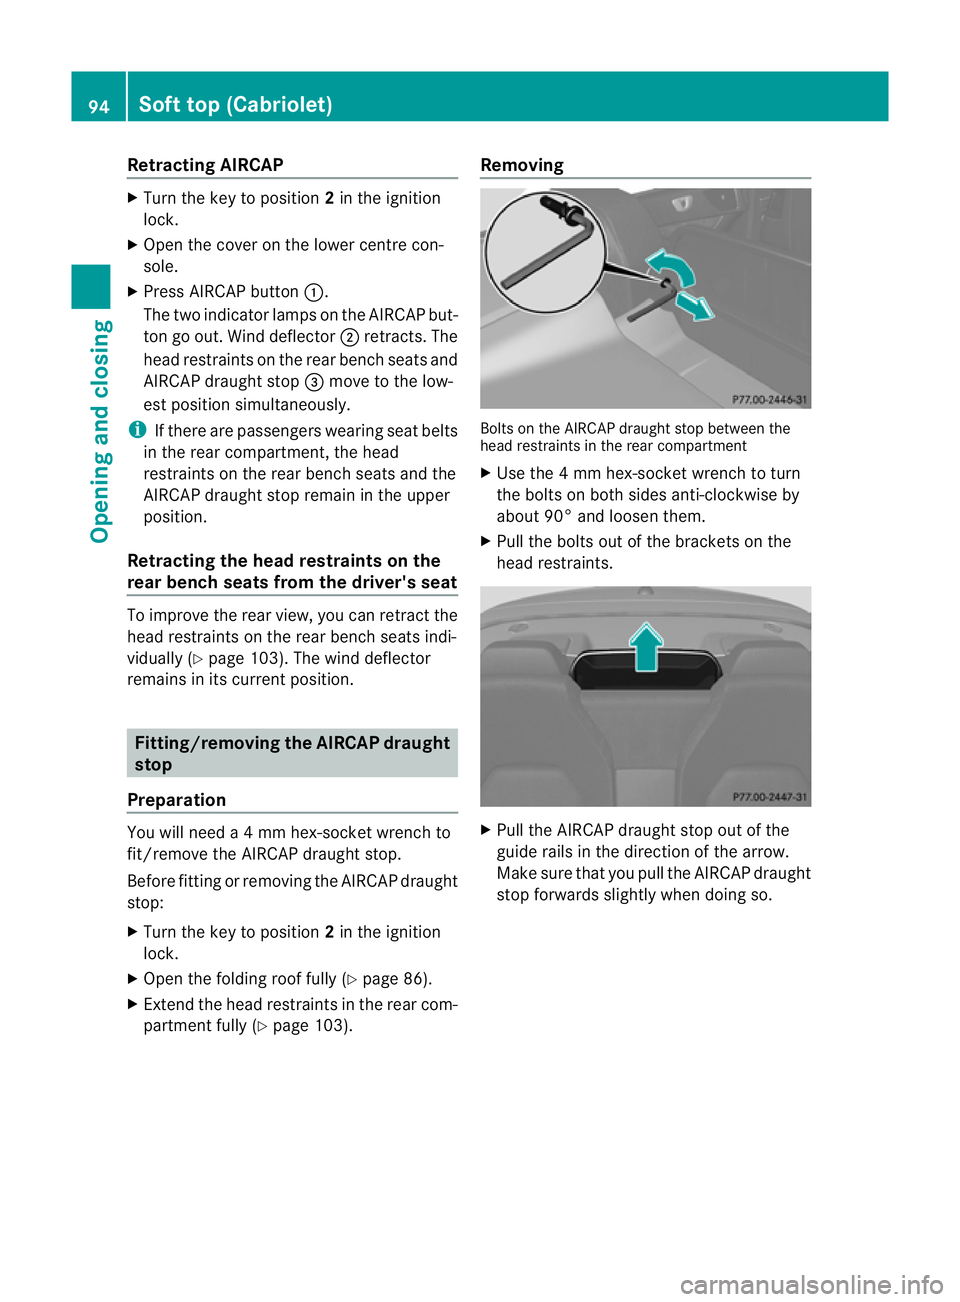
partment fully (Y page 103). Removing Bolt
sont he AIRCAP draught stop between the
head restraint sinthe rear compartment
X Use the 4mmhex-socket wrenc htoturn
the bolts on both sides anti-clockwise by
about 90° and loosen them.
X Pull the bolts out of the brackets on the
head restraints. X
Pull the AIRCAP draught stop out of the
guide rails in the direction of the arrow.
Make sure that you pull the AIRCAP draught
stop forwards slightly when doing so. 94
Soft top (Cabriolet)Opening and closing
Page 100 of 353

G
WARNING
The glass in the panorama sunroof could
brea kinana ccident. If yo uare not wearing a
sea tbelt, there is arisk that you could be
thrown through the opening in the event of the
vehicle overturning .Therefore, always wear a
seat belt to reduce the risk of injuries.
! Only open the panorama sliding sunroof
if it is free of snow and ice. Otherwise, mal-
functions may occur.
Do not allow anything to protrude from the
sliding sunroof. Otherwise, the seals could
be damaged.
i Resonance noises can occur in addition
to the usuala irflow noises when the sliding
sunroof is open. They are caused by minor
pressure fluctuations in the vehicle interior.
Change the position of the sliding sunroof
or open aside window slightly to reduce or
eliminate these noises. Operating the panoramas
liding sun-
roof
Opening and closing Overhead control panel
:
To raise
; Opening
= To close/lower
X Turn the key to position 1or 2in the ignition
lock.
X Push or pull the 3switch in the corre-
sponding direction. i
If you press the 3switch beyond the
point of resistance, an automatic opening/
closing process is started in the corre-
sponding direction. You can stop automatic
operation by pressing again.
Rain closing feature When the key is in position
0in the ignition
lock or is removed, the panorama sliding sun-
roof closes automatically:
R if it starts to rain
R at extreme outside temperatures
R after six hours
R if there is amalfunction in the power supply
The panorama sliding sunroof remains raised
at the rear in order to allow ventilation of the
vehicle interior.
i If the panorama sliding sunroof is obstruc-
ted when being closed by the rain closing
feature, it opens again slightly. The rain
closing feature is then deactivated.
The panorama sliding sunroof does not close
if:
R it is raised at the rear.
R it is blocked.
R no rain is falling on the area of the wind-
screen being monitored by the rain sensor
(e.g. because the vehicle is under abridge
or in acarport). Operating the roller sunblind for the
panoramas
liding sunroof
General notes The roller sunblin
dshields the vehicle interior
from sunlight. The roller sunblin dcan only be
opened and close dwhen the panorama slid-
ing sunroof is closed. G
WARNING
Make sure that nobody can becom etrapped
as you open or close the roller sunblind. Sliding sunroof
97Opening and closing Z
Page 101 of 353
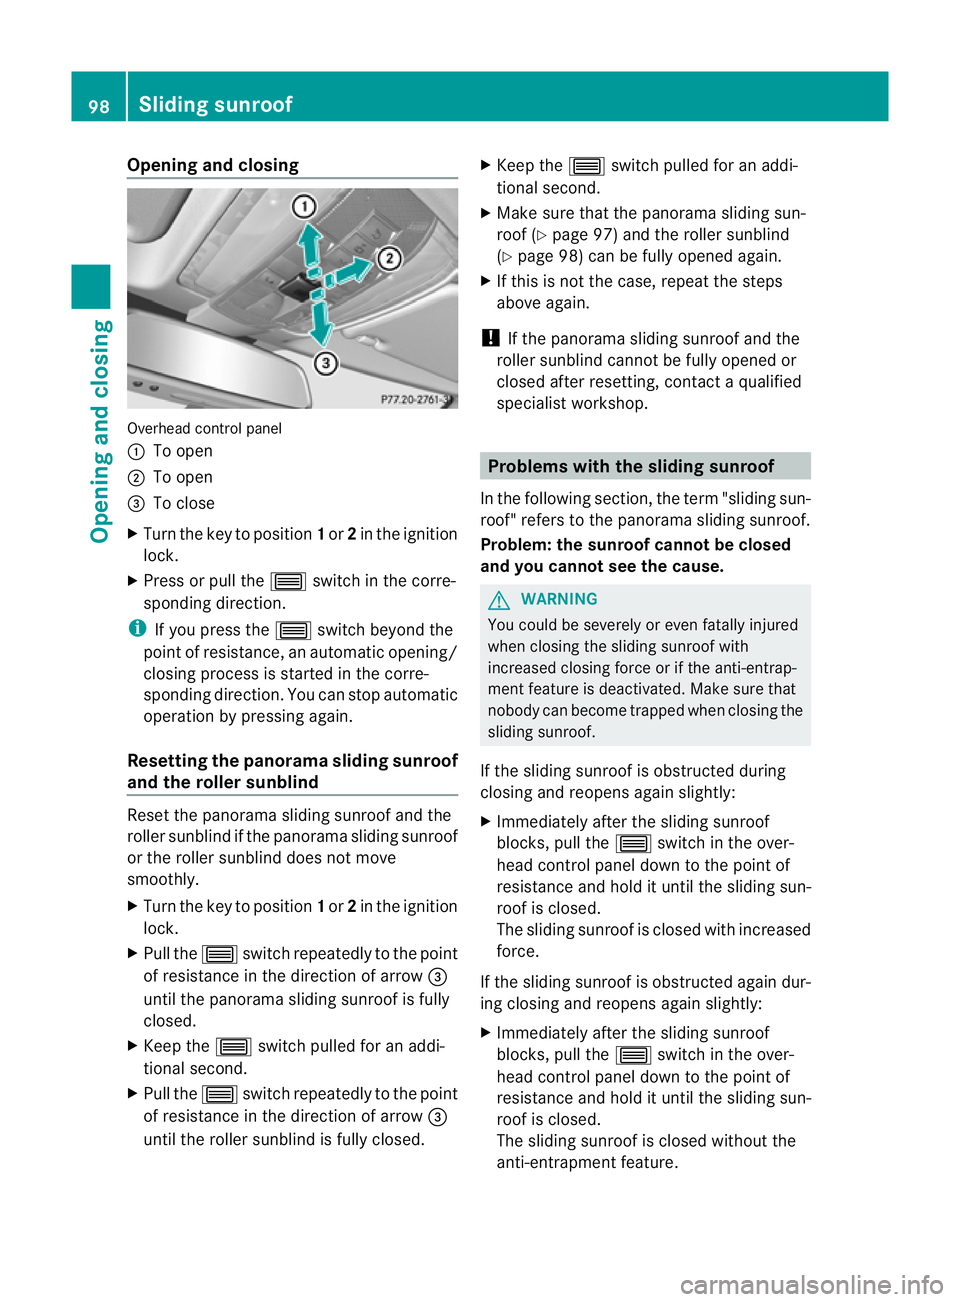
Opening and closing
Overhead control panel
:
To open
; To open
= To close
X Turn the key to position 1or 2in the ignition
lock.
X Press or pull the 3switch in the corre-
spondin gdirection.
i If you press the 3switch beyond the
point of resistance, an automatic opening/
closing process is started in the corre-
spondin gdirection. You can stop automatic
operation by pressing again.
Resetting the panorama sliding sunroof
and the roller sunblind Reset the panorama sliding sunroof and the
roller sunblind if the panorama sliding sunroof
or the roller sunblind does not move
smoothly.
X Turn the key to position 1or 2in the ignition
lock.
X Pull the 3switch repeatedly to the point
of resistance in the direction of arrow =
until the panorama sliding sunroof is fully
closed.
X Keep the 3switch pulled for an addi-
tional second.
X Pull the 3switch repeatedly to the point
of resistance in the direction of arrow =
until the roller sunblind is fully closed. X
Keep the 3switch pulled for an addi-
tional second.
X Make sure that the panorama sliding sun-
roof (Y page 97) and the roller sunblind
(Y page 98) can be fully opened again.
X If this is not the case, repeat the steps
above again.
! If the panorama sliding sunroof and the
roller sunblind cannot be fully opened or
closed after resetting, contact aqualified
specialist workshop. Problems with the sliding sunroof
In the following section, the term "sliding sun-
roof" refers to the panorama sliding sunroof.
Problem: the sunroof cannot be closed
and you cannot see the cause. G
WARNING
You could be severely or even fatally injured
when closing the sliding sunroof with
increased closing forc eorifthe anti-entrap-
ment feature is deactivated. Make sure that
nobody can become trapped when closing the
sliding sunroof.
If the sliding sunroof is obstructed during
closing and reopens again slightly:
X Immediately after the sliding sunroof
blocks ,pull the 3switch in the over-
head control panel down to the point of
resistance and hold it until the sliding sun-
roof is closed.
The sliding sunroof is closed with increased
force.
If the sliding sunroof is obstructed again dur-
ing closing and reopens again slightly:
X Immediately after the sliding sunroof
blocks ,pull the 3switch in the over-
head control panel down to the point of
resistance and hold it until the sliding sun-
roof is closed.
The sliding sunroof is closed without the
anti-entrapment feature. 98
Sliding sunroofOpening and closing